Thingiverse
ANYCUBIC Photon Zero to Wash and Cure Station Adapter by akjmphoto
by Thingiverse
Last crawled date: 4 years, 11 months ago
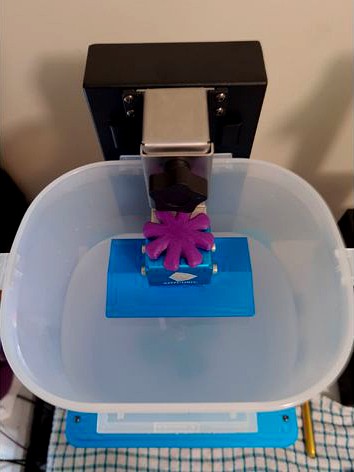
ANYCUBIC Wash and Cure Station Adapter for mounting the buildplate
from the ANYCUBIC PHOTON ZERO for Washing models/plate
Engineered By: Anthony Musgrove
Tested By: Anthony Musgrove
Contact: anthony@hunter3dprinting.com.au
CAD: Creo Parametric 3.0
Creation Date: 28/12/2020
Additional Hardware Needed:
1x M6x16mm BOLT (Bunnings, a few dollars)
1x M6 NUT (Comes with pack of bolts from Bunnings)
(Bunnings Link: https://www.bunnings.com.au/pinnacle-m6-x-16mm-stainless-steel-hex-bolt-and-nut-10-pack_p2320001)
1x M6 FLAT WASHER (12mm OD)
(Bunnings Link: https://www.bunnings.com.au/pinnacle-m6-stainless-steel-flat-washer-12-pack_p0130533)
Print Settings (all_bracket_parts.stl):
* Layer Height: 0.2
* Wall Count: 3
* Infill: 15%, Lines
* Material Tested: PLA+ (Purple, 3DFillies)
* Printed Temp: 210 degrees C
* Support Material: Enable supports build-plate only - support may be used for washer recess (against buildplate) and possibly a little bit on the rounded edges.
* Print Time: 34 minutes (approx) on CTC Replicator Dual
Print Settings (bolt_wheel.stl):
* Layer Height: 0.2
* Wall Count: 3
* Infill: 30%, Gyroid
* Material Tested: PLA+ (Purple, 3DFillies)
* Printed Temp: 210 degrees C
* Support Material: Enable supports, build plate only, it will be used for the NUT recess.
* Print Time: 34 minutes (approx) on CTC Replicator Dual
Files:
all_bracket_parts.stl ALL bracket parts, oriented in their designated print orientation - don't change orientation!
bolt_wheel.stl The wheel/knob to tighten and loosen the bolt. Oriented in print position - print as it is, with supports.
Assembly:
* Print all_bracket_parts.stl (all three parts, top, bottom and middle)
* Print bolt_wheel.stl with the separate print settings above.
* Ensure no elephant foot on any of the holes - clean up with a deburring tool to ensure correct fitment.
* Superglue inside the NUT hole, spray the NUT with Accelerator, and install NUT in place, let
it fuse well.
* Superglue the washer recess on the MIDDLE part, then spray the WASHER with Accelerator, and install
WASHER in place, let it fuse well.
* Prepare the top piece for installation - the centre slot piece should have superglue placed on
top of it, and then the middle piece slides down onto it, with the washer side UP - the WASHER side MUST
go TOWARDS the NUT on the BOTTOM piece.
* Slide the middle piece down the spine, letting the spine go through the spine hole, all the way down
until the middle piece is firm up against the alignment slider
* Once fused, place enough super glue over the washer, and the plastic piece, ready for the surface with the NUT to
also slide down the spine - press this firmly together and spray with accelerator.
* Superglue inside the bolt-wheel (knob) bolt fitment area. Spray the top of the bolt with accelerator and install
the head of the bolt into the bolt-wheel (knob) bolt fitment area. let it fuse well.