Thingiverse

Anycubic Mega X - Tensioner for x axis by dfsl
by Thingiverse
Last crawled date: 3 years ago
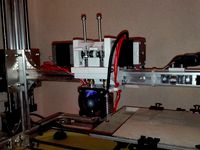
This remix makes the belt tensioner now suitable for the Anycubic Mega X, not only for the i3 Mega (S). Thanks to kulfuerst for his pre-work, he deserves the credits.
First of all you will need to drill two 8 mm holes into the right sided steel casing next to the extruder. Dismount the extruder (cap with 3 screws, then 2 screws at the steel casing).The part "hole template" can be used for getting the correct positions. A center punch and predrilling makes things easier.
After drilling, the metal frame can be dismantled screw by screw (16 pcs.). Don't forget to dismount the Z-axis endstops (4 screws). Now you can loosen the M4 screw of the belt pulley. Remove screw and sleeve, these won't be needed anymore (keep it nearby as backup). Try to keep the belt on the pulley.
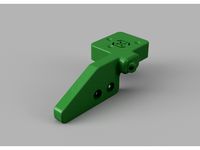
Grab the dismounted extruder and place it on it's origin. Clip the mounting corner (part 2) into the drilled holes, the extruder should now be held. Secure both the mounting corner and extruder with the screws.
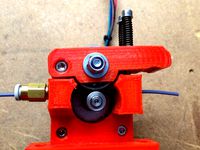
Now the tricky part begins. Prepare part 1 with one M5x40 screw and move it into the steel casing from below. Guide the screw through the upper hole and secure it with a nut. Take the next screw and repeat for the lower hole. After you succeeded, try to get the pulley into part 1. You can use some long tool e. g. screw driver or allen key. Gently press it against the aluminum profile so it fits inside. Now secure it with the M4x12 screw.
Put the M6 nut into the hand wheel, put both into part 3 and screw in M6 bolt. Pre-thighten the belt with the outer nuts and slide part 3 over the M5 screws. Make sure that both screws are at same length before you finish the assembly with the self securing nuts.
I hope you enjoy my work.
Additional needed parts:
1x drill diameter 8 mm (and some smaller drills for predrilling)
1x Screw ISO 4762 - M4 x 12 (cylinder head)
2x Screw ISO 4017 - M5 x 40 (hexagon head)
2x nut M5
2x nut M5 self securing
1x Screw ISO 4017 - M6 x 20 (hexagon head)
1x nut M6
In further updates I will add screws and nuts to the assembly and pictures.
First of all you will need to drill two 8 mm holes into the right sided steel casing next to the extruder. Dismount the extruder (cap with 3 screws, then 2 screws at the steel casing).The part "hole template" can be used for getting the correct positions. A center punch and predrilling makes things easier.
After drilling, the metal frame can be dismantled screw by screw (16 pcs.). Don't forget to dismount the Z-axis endstops (4 screws). Now you can loosen the M4 screw of the belt pulley. Remove screw and sleeve, these won't be needed anymore (keep it nearby as backup). Try to keep the belt on the pulley.
Grab the dismounted extruder and place it on it's origin. Clip the mounting corner (part 2) into the drilled holes, the extruder should now be held. Secure both the mounting corner and extruder with the screws.
Now the tricky part begins. Prepare part 1 with one M5x40 screw and move it into the steel casing from below. Guide the screw through the upper hole and secure it with a nut. Take the next screw and repeat for the lower hole. After you succeeded, try to get the pulley into part 1. You can use some long tool e. g. screw driver or allen key. Gently press it against the aluminum profile so it fits inside. Now secure it with the M4x12 screw.
Put the M6 nut into the hand wheel, put both into part 3 and screw in M6 bolt. Pre-thighten the belt with the outer nuts and slide part 3 over the M5 screws. Make sure that both screws are at same length before you finish the assembly with the self securing nuts.
I hope you enjoy my work.
Additional needed parts:
1x drill diameter 8 mm (and some smaller drills for predrilling)
1x Screw ISO 4762 - M4 x 12 (cylinder head)
2x Screw ISO 4017 - M5 x 40 (hexagon head)
2x nut M5
2x nut M5 self securing
1x Screw ISO 4017 - M6 x 20 (hexagon head)
1x nut M6
In further updates I will add screws and nuts to the assembly and pictures.
Similar models
thingiverse
free
Dual Extruder by Psycho1981
...ng:
4x allen screw m5
4x square nut m5
4x washer m5
electronic:
-ramps 1.4 board
-atx power supply
-firmware "marlin"
thingiverse
free
Mini Kossel 1.75mm extruder by wallie
...et head cap screw
2x spring
1x m5 pneumatic straight threaded-to-tube adapter, push in 4 mm 4mm male
tools
m5 manual screw tap
thingiverse
free

Height Gauge, Height Marker by Lt_AldoRaine
...with a ø5mm hss-spiral drill (for a tighter fit) and a m6 thread had to be cut manually at the top of the tip. to fix the pencil.
thingiverse
free

NEMA17 Universal Belted 2:1 Reduction Drive by mildw4ve
...rews
2x m3x25 socket hex screws
4x m3x25 or longer socket hex screws for mounting the top plate and anything that might be on it.
thingiverse
free
Artillery Genius - SWX1 filament sensor holder
...5mm
2x flat head screw m3 x 8mm
3x nut m3
2x t-nut m3
1x ptfe tubing
2x pc4 m6
pc4 m6https://www.amazon.de/gp/product/b07n6h43fw
thingiverse
free

Anycubic I3 Mega X V-belt ajusting screw by Filixx
...the screw wont screwable so take a m5 nut and and screw the screw 2 times off and on the thread! or print the screw with 95% size
thingiverse
free

Spoolholder Anycubic i3 Mega by 3D_Wonder
...ga.
inspired by the design of the i3 mega s.
fits for spools up to 90 mm width.
screws:
[2x] m3x12
[1x] m5 x 30 (20 is also okay)
thingiverse
free

i3 Y Axis Belt tensioner by Pmturiel
...axis belt. it fits on prusa i3 steel or similar you need: 2x m5 screw 2x m5 bolt 2x...
grabcad
free

Cam, Ratchet and Pawl
...;
- 1x dome nut din1587 m6;
- 1x sleeve (ericsson) nut m6;
- 1x washer din 125 12;
- 2x washer din 125 6;
- 1x washer din 9021 6.
thingiverse
free

Mini Drill Press for Foredom Flex Shaft H.30 Handpiece by ethanschultzart
...0mm
1x m6 threaded rod 75mm
3x m6 nut
2x m6 washer
2x 10mm tension springs, or rubber bands
1x mdf 1/2" x 4" x 5"
Anycubic
thingiverse
free

anycubic filament holder
...anycubic filament holder
thingiverse
anycubic filament holder
thingiverse
free

Cableholder Anycubic Mega
...cableholder anycubic mega
thingiverse
cableholder anycubic mega
thingiverse
free

AnyCubic Toolholder by WildManPrinting
...anycubic toolholder by wildmanprinting
thingiverse
anycubic i3 mega toolholder that clips on the side of the spool a-frame.
thingiverse
free

AnyCubic Funnel by phana007
...anycubic funnel by phana007
thingiverse
funnel for anycubic resin and also a reducer for a normal soda bottle.
thingiverse
free

Anycubic Kossel PID calibration
...ir mount:
kossel raspberry camera ir mount
extruder pid calibration.
simple extruder temperature calibration of your 3d printer.
thingiverse
free

anycubic mega i3
...anycubic mega i3
thingiverse
anycubic i3 mega/mega s led 30mm 10-14v 6500k
thingiverse
free

Handle for anycubic by cruiser7
...handle for anycubic by cruiser7
thingiverse
its easier to handle the cover of the anycubic mono x and wash&care
thingiverse
free

anycubic predator Printbed by Lihyon
...anycubic predator printbed by lihyon
thingiverse
anycubic predator printbed
thingiverse
free

Anycubic Predator Triggers by marcelcountry
...anycubic predator triggers by marcelcountry
thingiverse
anycubic predator triggers
thingiverse
free

support anycubic cable by sarpdental
...support anycubic cable by sarpdental
thingiverse
support anycubic cable
Mega
3ddd
$1
BoConcept / Mega
...boconcept / mega
3ddd
boconcept
boconcept mega
3ddd
free

Angelo - Mega shoin
... mega shoin , shoin
angelo - mega shoin - 3dmax 2008
3ddd
$1
Комод MEGA
...вана по фото с учетом реальных размеров.
стек не сколапсен, есть возможность регулировки уровня сглаживания.
текстуры в архиве.
3ddd
$1
Hulsta / Mega-design
...hulsta / mega-design
3ddd
hulsta
hulsta mega-design
design_connected
$18
Tolomeo Mega
...
photo-realistic 3d models of the tolomeo mega floor lamps from artemide for 3d architectural and interior design presentations.
turbosquid
$119

Mega Soldier
... free 3d model mega soldier for download as obj, c4d, and fbx on turbosquid: 3d models for games, architecture, videos. (1148568)
turbosquid
$100
Mega Yacht
... free 3d model mega yacht for download as obj, fbx, and blend on turbosquid: 3d models for games, architecture, videos. (1368903)
3ddd
$1

Massproductions Mega
... massproductions , mega
ширина: 180 см
глубина: 90 см
высота: 79 см
3d_export
$4
mega metro station
...mega metro station
3dexport
mega metro station. ready to game. thanks all downloaders!!
3ddd
$1
BAS Mega
...bas mega
3ddd
bas , ванна
ванна
Tensioner
3d_export
$5

adjustable tension lock
...adjustable tension lock
3dexport
adjustable tension lock
turbosquid
$5

tension ring
...oyalty free 3d model tension ring for download as fbx and stl on turbosquid: 3d models for games, architecture, videos. (1553452)
turbosquid
$3

Tension Chair
...free 3d model tension chair for download as obj, c4d, and fbx on turbosquid: 3d models for games, architecture, videos. (1251503)
3d_export
$5
transformador de tension
...transformador de tension
3dexport
transformador de tension entrada 460vac salida 220vac marca audax
turbosquid
$20
Motorbike Chain Tensioner
...y free 3d model motorbike chain tensioner for download as stl on turbosquid: 3d models for games, architecture, videos. (1428322)
turbosquid
$25

TENSION-WOOD-CHAIR
... available on turbo squid, the world's leading provider of digital 3d models for visualization, films, television, and games.
turbosquid
$25

tension-bentwood-chair
... available on turbo squid, the world's leading provider of digital 3d models for visualization, films, television, and games.
turbosquid
$19

Tension engagement ring
...n engagement ring for download as obj, fbx, 3dm, dwg, and stl on turbosquid: 3d models for games, architecture, videos. (1491631)
3d_export
$10

Ruby Tension set Ring 3D Model
...ruby tension set ring 3d model
3dexport
tension set ruby ring in 18k
ruby tension set ring 3d model rehansheikh 25254 3dexport
turbosquid
$20
Superficial Tension Exp. Image.max
... available on turbo squid, the world's leading provider of digital 3d models for visualization, films, television, and games.
Axis
3ddd
$1

Мария Axis
...
3ddd
кухня , классическая , axis
модель кухни.
3d_export
$22

Axis robot 6-axis robotic arm
...ing parts drawings, standard parts purchased parts list, can be produced directly according to the drawings, welcome to download!
3ddd
free

Versatile Axis
...ddd
nexus , плитка
http://bvtileandstone.com/ceramic-porcelain/versatile-axis/
3d_export
$19

robot 2 axis
...robot 2 axis
3dexport
robot 2 axis
turbosquid
$40

Axis R5F
... available on turbo squid, the world's leading provider of digital 3d models for visualization, films, television, and games.
turbosquid
$40

Axis S5F
... available on turbo squid, the world's leading provider of digital 3d models for visualization, films, television, and games.
turbosquid
$30

Axis Athlon
... available on turbo squid, the world's leading provider of digital 3d models for visualization, films, television, and games.
turbosquid
$10

Linear Axis
... available on turbo squid, the world's leading provider of digital 3d models for visualization, films, television, and games.
3d_export
$15

drawing axis
...drawing axis
3dexport
simple rendering of the scene file
3ddd
$1

versatile axis ARC
...versatile axis arc
3ddd
versatile , плитка
versatile axis arc red dot design award