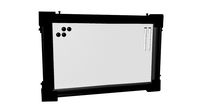
Thingiverse
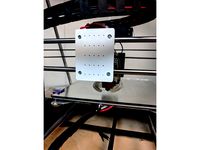
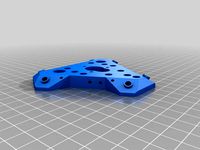
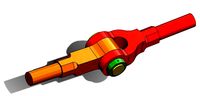
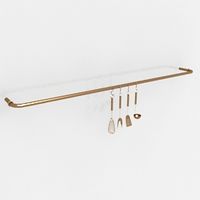
Anycubic Magnetic Ball Joint Carriages and Effector Accessory Mount by grandysims
by Thingiverse
Last crawled date: 3 years ago
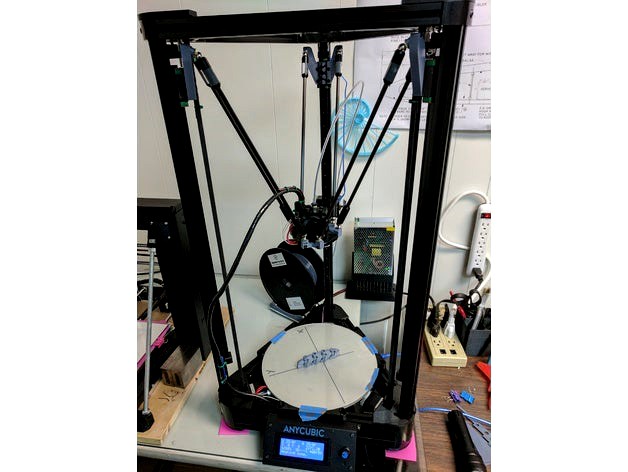
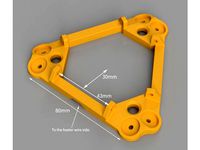
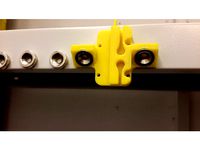
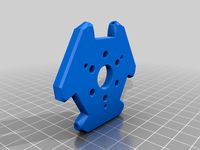
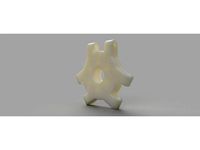
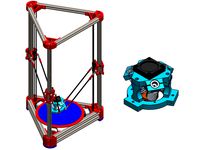
This Modification is for the Anycubic Linear Plus! It may work with the Linear and the Pulley.
It allows you to change to the 288mm Haydn's Magnetic Arms from Blue Eagle Labs.
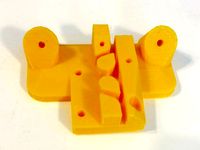
This is set up to use your existing effector by printing 3 accessory ball mounts and you will need to print 3 new carriages.
Due to the longer arms 288mm vs 267mm for the original arms and the need to place the effector balls in the same XY location as the existing Traxis Ball locations I lost 20mm of Z height after I moved my End Stops to the highest point I could and switching to shorter end stop adjustment bolts.
On the positive side I have no vibration issues and my level is better than ever before!
I can only assume, based on the build instructions this would work for the Linear and the Pulley versions but I do not have those so I cannot test their function.
I have included a step file for anyone who wants to modify this in their cam system to better fit their machine.
EDIT 08JAN2018: I added a new version of the carriage that eliminates the Ball Angle to simplify the printing and assembly. This also adds a few more millimeters of travel. The down side is that the Haydens Arms get very close to the shank of the ball and although they should clear if you are concerned then print the original. Please be aware that I have not printed this modification yet as I am waiting until I do my next round of upgrades.
It allows you to change to the 288mm Haydn's Magnetic Arms from Blue Eagle Labs.
This is set up to use your existing effector by printing 3 accessory ball mounts and you will need to print 3 new carriages.
Due to the longer arms 288mm vs 267mm for the original arms and the need to place the effector balls in the same XY location as the existing Traxis Ball locations I lost 20mm of Z height after I moved my End Stops to the highest point I could and switching to shorter end stop adjustment bolts.
On the positive side I have no vibration issues and my level is better than ever before!
I can only assume, based on the build instructions this would work for the Linear and the Pulley versions but I do not have those so I cannot test their function.
I have included a step file for anyone who wants to modify this in their cam system to better fit their machine.
EDIT 08JAN2018: I added a new version of the carriage that eliminates the Ball Angle to simplify the printing and assembly. This also adds a few more millimeters of travel. The down side is that the Haydens Arms get very close to the shank of the ball and although they should clear if you are concerned then print the original. Please be aware that I have not printed this modification yet as I am waiting until I do my next round of upgrades.
Similar models
thingiverse
free
Anycubic Kossel Magnetic Arms Kit by spikelee
... arm alignment tool : https://www.thingiverse.com/thing:2843487
if you made one , please sign "i made one". thanks! :)
thingiverse
free

Rostock reused effector and carriage magnetic solution by kakbit
...ue gun to attach the magnets
i reused the m3 screws and nuts to mount the magnet and ball holders, that earlier mounted the rods.
thingiverse
free

Anycubic Kossel magnetic rods mount
...al, but i recommend to print some spare ones. remove that cylindrical support from the centre. i mounted magnets with super-glue.
thingiverse
free

Magnetic Joint Carriage for Kossel Mini by cffellows
...ge provides the capability of building a kossel mini with magnetic ball joints using the magnetic effector from the cerberus pup.
thingiverse
free

48mm Smart Effector QQS Carriage/Slider by PetersenLocksmithQC
...sun qqs/qqs pro to accommodate longer linear bearings (or in my case, 48mm printed bearings), and smart effector mag-ball mounts.
thingiverse
free

5015 fan mount for Spike Lee's Anycubic Kossel Magnetic Effector for E3D V6
... first and third side of effector - just like on screenshot.
adapter and mount printed with pla or petg, nozzle printed with abs.
thingiverse
free

Delta Printer Arm Carriage with Magnetic Ball Joints by robkar
...ffector i am using: http://www.thingiverse.com/thing:881793
..and the complete printer: http://www.thingiverse.com/thing:923830
thingiverse
free
Kossel Magnetic ball stud carriage by wittmason
... here as well). this is designed to work with hayden huntleys effector or the effector i remixed magnetic effector e3d compatible
thingiverse
free
Magnetic carriage Linear rail by alex_des
...giverse.com/thing:2151380
magnetic carriage for delta printer, 15x5 magnets, 23x24 linear rail mount. gt2 belt lock. endstop pin.
thingiverse
free

Zero-Backlash Magnetic Ball Joint Rod Ends by huntley
...t of delrin, which work even better. i have them for sale for $15/set of 12. also my cnc machined ball studs are $18/set of 12.
Grandysims
thingiverse
free

Twisted Tube Vase by grandysims
...twisted tube vase by grandysims
thingiverse
this is a simple vase or pedestal
thingiverse
free

Nema17 Decorative Cap by grandysims
... a 5mm shaft and you will need to drill out the slightly undersize center hole to fit your shaft. it should be a tight press fit.
thingiverse
free

Large Phone Holder for Camera Phone Stand by grandysims
...lincoln and then add this as the upper and lower holder.
this will require supports to the build plate to print the lower holder!
thingiverse
free

AnyCubic Power Supply Stand by grandysims
...ical mount and protects the open wired end by placing it inside the stand. there are 2 slots to allow the wires to exit the base.
thingiverse
free
Wanhao Di3 Universal Back Plate by grandysims
...ter.
edit 12dec2107 i added a step file so you can import it into your favorite cad program and change it or design items for it.
thingiverse
free

Remixed Wanhao Duplicator Backplate and 80mm Fan Adapter by grandysims
...ut of the enclosure but the choice is yours.
i printed my backplate with no top layers just because i liked the honeycomb infill.
thingiverse
free

Wanhao Di3 Fan Shroud for the Universal Back Plate by grandysims
...ded a step file so you can import it into your favorite cad program. note this is position matched with the universal back plate.
thingiverse
free
AnyCubic Delta Linear Plus 240mm Bed Clip Extended by grandysims
...printed this in pla for myself but you should use the material you are most comfortable with as this sits against the heated bed!
thingiverse
free

Scaleable Stacking Storage Bin by grandysims
...our application. 2 perimeters should be sufficient for the designed size and 3 provides a nice snug fit with a bit more strength.
thingiverse
free

AnyCubic Delta Vortex Fan Shroud For PLA V3 by grandysims
...than the stock shroud.
edit 12dec2017 i added a step file so you can bring this into your favorite cad program and make changes.
Effector
3d_ocean
$5

Radial Sound Effector
...e spheres will expand with your song. fully customisable, change the color, the size of the spheres or even put in different s...
3d_ocean
$12
3D Customizable Puzzle Set (16x10)
...mograph compatible (you can effect the pieces with mograph effector) - included also a non-mograph version with...
thingiverse
free
Effector by olo2000pm
...effector by olo2000pm
thingiverse
effector
thingiverse
free
CERAMBOT-Effector
...cerambot-effector
thingiverse
cerambot-effector
thingiverse
free

modulize effector by candyasdf
...ulize effector by candyasdf
thingiverse
mount things on effector with m3 screws
effector radius : 25.4mm
rod arm distance : 40mm
thingiverse
free
Delta Effector by zavier
...delta effector by zavier
thingiverse
delta effector with radial fan 50 and bltouch
thingiverse
free
D810 Effector by WhiteTiger13
...d810 effector by whitetiger13
thingiverse
this is d810 effector for d810 without autocalibration, and also cap for it.
thingiverse
free
Effector for Delta Printer
...effector for delta printer
thingiverse
effector for delta printer (3 color)
using diamond hotend
thingiverse
free
Delta effector magnetic by fpassos
...delta effector magnetic by fpassos
thingiverse
effector for e3dv6 hotend. i needed put the spheres (10mm) on the effector.
thingiverse
free
End Effector Gripper
...end effector gripper
thingiverse
end effector gripper
for a robotic arm
uses mg995 servo motor
Anycubic
thingiverse
free

anycubic filament holder
...anycubic filament holder
thingiverse
anycubic filament holder
thingiverse
free

Cableholder Anycubic Mega
...cableholder anycubic mega
thingiverse
cableholder anycubic mega
thingiverse
free

AnyCubic Toolholder by WildManPrinting
...anycubic toolholder by wildmanprinting
thingiverse
anycubic i3 mega toolholder that clips on the side of the spool a-frame.
thingiverse
free

AnyCubic Funnel by phana007
...anycubic funnel by phana007
thingiverse
funnel for anycubic resin and also a reducer for a normal soda bottle.
thingiverse
free

Anycubic Kossel PID calibration
...ir mount:
kossel raspberry camera ir mount
extruder pid calibration.
simple extruder temperature calibration of your 3d printer.
thingiverse
free

anycubic mega i3
...anycubic mega i3
thingiverse
anycubic i3 mega/mega s led 30mm 10-14v 6500k
thingiverse
free

Handle for anycubic by cruiser7
...handle for anycubic by cruiser7
thingiverse
its easier to handle the cover of the anycubic mono x and wash&care
thingiverse
free

anycubic predator Printbed by Lihyon
...anycubic predator printbed by lihyon
thingiverse
anycubic predator printbed
thingiverse
free

Anycubic Predator Triggers by marcelcountry
...anycubic predator triggers by marcelcountry
thingiverse
anycubic predator triggers
thingiverse
free

support anycubic cable by sarpdental
...support anycubic cable by sarpdental
thingiverse
support anycubic cable
Carriages
archibase_planet
free

Carriage
...arriage
archibase planet
perambulator baby carriage pram
carriage n250908 - 3d model (*.gsm+*.3ds) for interior 3d visualization.
3d_export
free

carriage
...carriage
3dexport
old fashion carriage model, more files here:
turbosquid
$140

Carriage
...urbosquid
royalty free 3d model carriage for download as max on turbosquid: 3d models for games, architecture, videos. (1482052)
turbosquid
$25

Carriage
...urbosquid
royalty free 3d model carriage for download as max on turbosquid: 3d models for games, architecture, videos. (1285944)
3d_export
free

carriage
...carriage
3dexport
game cart
3d_ocean
$15

Barrel Carriage
...ieval oak old transport wheels wine wood
this model contains a barrel and a carriage. it is a medieval type of wood oak carriage.
turbosquid
$40

Carriage
...ty free 3d model carriage for download as obj, fbx, and blend on turbosquid: 3d models for games, architecture, videos. (1290094)
turbosquid
free

Carriage
...yalty free 3d model carriage for download as ma, obj, and fbx on turbosquid: 3d models for games, architecture, videos. (1239157)
3d_export
$5

Medieval carriage
...medieval carriage
3dexport
medieval carriage in fairy style
turbosquid
$58

Carriage
...d model carriage with scene for download as max, obj, and fbx on turbosquid: 3d models for games, architecture, videos. (1276262)
Joint
turbosquid
$5

Joint
...turbosquid
royalty free 3d model joint for download as blend on turbosquid: 3d models for games, architecture, videos. (1179882)
3d_export
$5
joint handle
...joint handle
3dexport
joint handle
3d_export
$5
knuckle joint
...knuckle joint
3dexport
this is a 3d model of knuckle joint
3d_export
$5
Knuckle Joint
...knuckle joint
3dexport
industry use knuckle joint
3ddd
$1
PENTA Joint
...penta joint
3ddd
penta
http://www.lampcommerce.com/en/catalogue/brands/penta-light/joint-floor-lamp
turbosquid
$49

Joint | Project
...squid
royalty free 3d model joint | project for download as on turbosquid: 3d models for games, architecture, videos. (1297983)
turbosquid
$10

universal joint
...squid
royalty free 3d model univresal joint for download as on turbosquid: 3d models for games, architecture, videos. (1309400)
turbosquid
$15

Joint Ashtray
...squid
royalty free 3d model joint ashtray for download as ma on turbosquid: 3d models for games, architecture, videos. (1199702)
turbosquid
$5

Unrolled joint
...e 3d model unrolled joint for download as blend, obj, and stl on turbosquid: 3d models for games, architecture, videos. (1577889)
3d_export
$5
Cardan Joint 3D Model
...cardan joint 3d model
3dexport
cardan joint
cardan joint 3d model fau 71171 3dexport
Magnetic
3d_ocean
$2

Magnet
...magnet 3docean 3d 3ds max electric magnet magnetic magnetism max model polygon realistic tesla magnet created in...
turbosquid
$6
Magnet
...
turbosquid
royalty free 3d model magnet for download as obj on turbosquid: 3d models for games, architecture, videos. (1548733)
turbosquid
$6

magnet
...uid
royalty free 3d model magnet for download as 3dm and max on turbosquid: 3d models for games, architecture, videos. (1670606)
turbosquid
$1

Magnet
...y free 3d model magnet for download as 3ds, max, obj, and fbx on turbosquid: 3d models for games, architecture, videos. (1215037)
turbosquid
$7

Magnet
...agnet for download as blend, unitypackage, fbx, gltf, and obj on turbosquid: 3d models for games, architecture, videos. (1576588)
3d_export
$5

magnetic knife holder
...magnetic knife holder
3dexport
ordinary magnetic knife holder
archive3d
free

Fridge magnet 3D Model
...3d model archive3d refrigerator magnet fridge magnet magnet toy magnetic s n280712 - 3d model (*.3ds) for interior 3d...
turbosquid
$35

Magnetic butterflies
...alty free 3d model magnetic butterflies for download as blend on turbosquid: 3d models for games, architecture, videos. (1315792)
turbosquid
$2
Magnetic Board
...quid
royalty free 3d model magnetic board for download as ma on turbosquid: 3d models for games, architecture, videos. (1264141)
turbosquid
$977
Magnetic Lego
...oyalty free 3d model magnetic lego for download as ma and obj on turbosquid: 3d models for games, architecture, videos. (1142761)
Accessory
3ddd
$1
accessories
...accessories
3ddd
чаша
accessories
3ddd
$1

accessories
...accessories
3ddd
статуэтка
accessories
3ddd
$1
accessories
...accessories
3ddd
статуэтка
accessories
3ddd
$1
accessories
...accessories
3ddd
статуэтка
accessories
archibase_planet
free
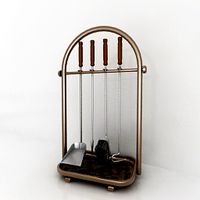
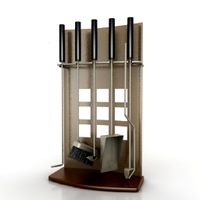
Accessories
...accessories
archibase planet
fireplace accessories
accessories - 3d model (*.gsm+*.3ds) for interior 3d visualization.
archibase_planet
free
Accessories
...accessories
archibase planet
fireplace accessories
accessories - 3d model (*.gsm+*.3ds) for interior 3d visualization.
archibase_planet
free
Accessory
...accessory
archibase planet
art accessories design creative
accessory f1137 - 3d model for interior 3d visualization.
archibase_planet
free
Accessories
...accessories
archibase planet
kitchen ware kitchen accessories
accessories - 3d model (*.gsm+*.3ds) for interior 3d visualization.
archibase_planet
free
Accessories
...accessories archibase planet poker fireplace accessory accessories 3 - 3d model (*.gsm+*.3ds) for interior 3d...
archibase_planet
free
Accessories
...essories
archibase planet
kitchen accessories pots and pans cooking battery
accessories - 3d model for interior 3d visualization.
Ball
turbosquid
$5

Ball on a Ball
...uid
royalty free 3d model ball on a ball for download as obj on turbosquid: 3d models for games, architecture, videos. (1484719)
archibase_planet
free
Ball
...ball
archibase planet
ball golf ball
ball - 3d model (*.gsm+*.3ds) for 3d visualization.
3d_export
$5

ball
...ball
3dexport
ball
archibase_planet
free

Ball
...ball
archibase planet
ball football soccer ball
ball n100714 - 3d model (*.gsm+*.3ds+*.max) for exterior 3d visualization.
3d_export
$5

ball
...ball
3dexport
soccer ball
archibase_planet
free

Ball
...ball
archibase planet
ball football
ball n100914 - 3d model (*.gsm+*.3ds+*.max) for 3d visualization.
3d_ocean
$5
Snooker Balls
... set balls snooker snooker balls white ball yellow ball
set snooker balls format include : .c4d .3ds .obj build in cinema 4d r13
3d_export
free

ball
...ball
3dexport
this is 3d model ball's
3d_ocean
$2

Soccer Ball
...soccer ball
3docean
ball red and yellow ball red ball soccer ball
a gorgeous red and yellow seamless soccer ball
3d_ocean
$5

Billard Balls
...low poly billiard balls. numbering from 1 to 15 plus the cue ball. each of the balls excluding the cue ball has a 4k texture map.
Mount
3d_export
free

mounting bracket
...mounting plate is the portion of a hinge that attaches to the wood. mounting plates can be used indoors, cabinetry and furniture.
turbosquid
$2

MOUNTING
... available on turbo squid, the world's leading provider of digital 3d models for visualization, films, television, and games.
turbosquid
free

Mounts
... available on turbo squid, the world's leading provider of digital 3d models for visualization, films, television, and games.
turbosquid
free

Mount Fuji
...fuji
turbosquid
free 3d model mount fuji for download as obj on turbosquid: 3d models for games, architecture, videos. (1579977)
3d_export
$5

Headphone mount LR
...headphone mount lr
3dexport
headphone mount l+r
turbosquid
$39

Mount rainier
...quid
royalty free 3d model mount rainier for download as fbx on turbosquid: 3d models for games, architecture, videos. (1492586)
turbosquid
$5

pipe mounting
...quid
royalty free 3d model pipe mounting for download as obj on turbosquid: 3d models for games, architecture, videos. (1293744)
turbosquid
$3

Mounting Tires
...uid
royalty free 3d model mounting tires for download as fbx on turbosquid: 3d models for games, architecture, videos. (1708511)
3d_export
$5

Magnetic GoPro Mount
...pro mount
3dexport
cool magnetic mount for gopro. allows you to mount the camera on flat metal surfaces and get exclusive shots.
turbosquid
$5

Stone Mount
...ty free 3d model stone mount for download as ma, obj, and fbx on turbosquid: 3d models for games, architecture, videos. (1370306)