Thingiverse

Anycubic i3 Mega - LED Upgrade with Switch by dasbossy
by Thingiverse
Last crawled date: 3 years ago
I liked the idea of upgrading the printer with a LED light. But as this thing is printing also all night i needed a button to switch off the light. So i combined the ring design with a switch and mounted it to the side of the printer. For those which have no idea what to do here a short summary:
https://www.youtube.com/watch?v=ffa_gQcln8Q&feature=youtu.be
You will need:
2 new M3 x 20mm screws
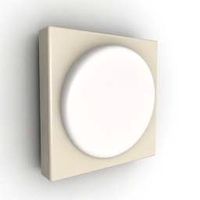
One LED ring with 80mm and 12 Volts
Switch for example ebay example
hot glue gun or something else to fix the led ring to the printed LED ring holder
thin cable 40-50cm
double-sided adhesive tape
Print the LED Ring holder and fix the LED ring to it.
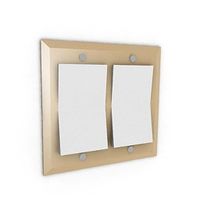
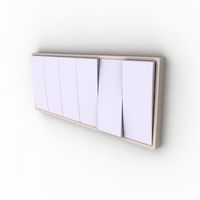
Print the switch case, if you are using the sitch above please scale it upfront (130% x and y, 160% z) and fix the switch to it
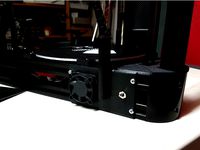
Remove the filament from the printer, the green main cable to the nozzle and remove the 4 screws i marked in the picture.
You can remove the peace with the fan now (disconnecting the cables before of course). 5. Remove the two screws from the fan and place the fix the led ring with the two new screws M3x20.
Connect the new extension cable to the fan cable and guide one to the switch. ( The fan will still work because its always connected to the power. See picture)
Hide the cables and fix everything.
Done!
The summary is very simplified but you should get the idea. In case of questions please do not hesitate to ask.
Best regards,
https://www.youtube.com/watch?v=ffa_gQcln8Q&feature=youtu.be
You will need:
2 new M3 x 20mm screws
One LED ring with 80mm and 12 Volts
Switch for example ebay example
hot glue gun or something else to fix the led ring to the printed LED ring holder
thin cable 40-50cm
double-sided adhesive tape
Print the LED Ring holder and fix the LED ring to it.
Print the switch case, if you are using the sitch above please scale it upfront (130% x and y, 160% z) and fix the switch to it
Remove the filament from the printer, the green main cable to the nozzle and remove the 4 screws i marked in the picture.
You can remove the peace with the fan now (disconnecting the cables before of course). 5. Remove the two screws from the fan and place the fix the led ring with the two new screws M3x20.
Connect the new extension cable to the fan cable and guide one to the switch. ( The fan will still work because its always connected to the power. See picture)
Hide the cables and fix everything.
Done!
The summary is very simplified but you should get the idea. In case of questions please do not hesitate to ask.
Best regards,
Similar models
thingiverse
free

Led ramp for Anychubic Mega by Mapessional
...ou can choose whether to bring the cable from the right or left side.
i printed from pla.
please leave a comment or question.
bye
thingiverse
free

LED Ring Holder NEO GRRF by Luchador
...han from the side below the motor to the front for the switch.
power i get from below the neo there are 3 standad fan connectors.
thingiverse
free

Anycubic I3 Mega LED Light with Switch by JarBinks
...
led ring 12v for the holder from ebay: https://bit.ly/2dcqoui
2 pin switch from ebay: https://bit.ly/2ocd2li
four m3x20 screws
thingiverse
free

Prima Creator P120 V4 fan adapter
... new fan to the adapter. it is a tight fit. secure with a tiny drop of superglue.
cut the fan cable and solder it to the new fan.
thingiverse
free

Switch and Connector Box by kjoussen
... and the soldering are the same.
and yes, with the print shown in the first pic, i had some serious problems with my filament ;-)
thingiverse
free
Kossel board cooling fan by samgo
...trip on the printer.
-> please note that the fan screws can not be mounted because the 2020 profile block them, any ideas :) ?
thingiverse
free

Anycubic i3 Mega Mega-S Upgrade Printhead Cable Cover and Holder Case Honeycomb Hotend Fanbox by hazweio
...the fan duct you see in the picture is this (anycubic i3 mega s - fan duct by matism09):https://www.thingiverse.com/thing:3564168
thingiverse
free

Case (for IZOKEE MP1584EN Step Down Buck Converter Module)
...se the screws from computer fans, for example from noctua nf-a6x25 if you upgrade the fan in the anycubic power device.
have fun!
thingiverse
free

Air intake arc extruder ventilator Anet A8 upgrade by mc_gaensli
...e on the object - always a good thing.
there is an extra holder to fix the cables.
you need 2 new screws m3 x 20mm
please comment
thingiverse
free

ANET A8 60mm LED Ring Holder by MalcomVinyard
...three noses/hooks a bit.
note: you have to remove the termistor to install the holder & led-ring.
** sorry for my english ;-)
Dasbossy
thingiverse
free

Logitech Unifying receiver case by dasbossy
... is the reason the case is working :)
by the way my first 3d / cad model ever.
both peaces are included in the slt file
have fun!
thingiverse
free

Anycubic i3 Mega - Raspberry Pi 3 and Camera case mounts by dasbossy
...the raspberry pi case.
the camera design i found here:https://www.thingiverse.com/thing:2722833
all files are added to the thing.
thingiverse
free

Anycubic i3 Mega - Raspberry Pi camera sidemount by dasbossy
...www.thingiverse.com/thing:2722833
the raspberry case from the picture can be found here:https://www.thingiverse.com/thing:3057389
thingiverse
free

Anycubic Mega - Pi Camera Mount by nicklargent
...glue or other materials. i borrowed the clamp from dasbossy#39;s pi mount..https://www.thingiverse.com/thing:3057389 .. and wengeol2's camera...
Anycubic
thingiverse
free

anycubic filament holder
...anycubic filament holder
thingiverse
anycubic filament holder
thingiverse
free

Cableholder Anycubic Mega
...cableholder anycubic mega
thingiverse
cableholder anycubic mega
thingiverse
free

AnyCubic Toolholder by WildManPrinting
...anycubic toolholder by wildmanprinting
thingiverse
anycubic i3 mega toolholder that clips on the side of the spool a-frame.
thingiverse
free

AnyCubic Funnel by phana007
...anycubic funnel by phana007
thingiverse
funnel for anycubic resin and also a reducer for a normal soda bottle.
thingiverse
free

Anycubic Kossel PID calibration
...ir mount:
kossel raspberry camera ir mount
extruder pid calibration.
simple extruder temperature calibration of your 3d printer.
thingiverse
free

anycubic mega i3
...anycubic mega i3
thingiverse
anycubic i3 mega/mega s led 30mm 10-14v 6500k
thingiverse
free

Handle for anycubic by cruiser7
...handle for anycubic by cruiser7
thingiverse
its easier to handle the cover of the anycubic mono x and wash&care
thingiverse
free

anycubic predator Printbed by Lihyon
...anycubic predator printbed by lihyon
thingiverse
anycubic predator printbed
thingiverse
free

Anycubic Predator Triggers by marcelcountry
...anycubic predator triggers by marcelcountry
thingiverse
anycubic predator triggers
thingiverse
free

support anycubic cable by sarpdental
...support anycubic cable by sarpdental
thingiverse
support anycubic cable
Mega
3ddd
$1
BoConcept / Mega
...boconcept / mega
3ddd
boconcept
boconcept mega
3ddd
free

Angelo - Mega shoin
... mega shoin , shoin
angelo - mega shoin - 3dmax 2008
3ddd
$1
Комод MEGA
...вана по фото с учетом реальных размеров.
стек не сколапсен, есть возможность регулировки уровня сглаживания.
текстуры в архиве.
3ddd
$1
Hulsta / Mega-design
...hulsta / mega-design
3ddd
hulsta
hulsta mega-design
design_connected
$18
Tolomeo Mega
...
photo-realistic 3d models of the tolomeo mega floor lamps from artemide for 3d architectural and interior design presentations.
turbosquid
$119

Mega Soldier
... free 3d model mega soldier for download as obj, c4d, and fbx on turbosquid: 3d models for games, architecture, videos. (1148568)
turbosquid
$100
Mega Yacht
... free 3d model mega yacht for download as obj, fbx, and blend on turbosquid: 3d models for games, architecture, videos. (1368903)
3ddd
$1
Massproductions Mega
... massproductions , mega
ширина: 180 см
глубина: 90 см
высота: 79 см
3d_export
$4
mega metro station
...mega metro station
3dexport
mega metro station. ready to game. thanks all downloaders!!
3ddd
$1
BAS Mega
...bas mega
3ddd
bas , ванна
ванна
Upgrade
turbosquid
$15

Upgraded Glock
...e 3d model upgraded glock for download as obj, fbx, and blend on turbosquid: 3d models for games, architecture, videos. (1185950)
3ddd
$1

Calligaris / UPGRADE
...calligaris / upgrade
3ddd
calligaris
c материалом
3d_export
free

cz upgrade
...cz upgrade
3dexport
https://www.buymeacoffee.com/mestrezen3d https://linktr.ee/mestrezen3
turbosquid
$80

Custer Tank upgrade
... available on turbo squid, the world's leading provider of digital 3d models for visualization, films, television, and games.
turbosquid
$39

Domestos 1 upgrade
... available on turbo squid, the world's leading provider of digital 3d models for visualization, films, television, and games.
3d_export
$10

Upgraded tea cup
...upgraded tea cup
3dexport
a cup with an unusual design and a unique shape for a more enjoyable tea experience
3d_export
$8

dixy outlander classic style upgraded poplar wood lounge chair
...utlander classic style upgraded poplar wood lounge chair
3dexport
dixy outlander classic style upgraded poplar wood lounge chair
turbosquid
free

AK-12 + Upgrades low-poly 3D model
...ow-poly 3d model for download as fbx, blend, and unitypackage on turbosquid: 3d models for games, architecture, videos. (1501145)
evermotion
$700

Upgrade from V-ray 1.5 to 3.5 for 3ds max
...here is no need to purchase a new dongle - your current dongles will be reprogrammed to carry v-ray 3. evermotion 3d models shop.
evermotion
$300

Upgrade from V-Ray 2.0 to V-ray 3.5 for 3ds Max
... interface (gui) for editing settings on one machine and one render node for rendering on one machine. evermotion 3d models shop.
I3
3d_export
$10

suv i3
...suv i3
3dexport
suv i3 2013 series
3d_ocean
$89

BMW i3 2012
...y, in real units of measurement, qualitatively and maximally close to the original. model formats: - *.max (3ds max 2008 scanl...
cg_studio
$99

BMW i3 20143d model
...
cgstudio
.3ds .c4d .fbx .lwo .max .obj - bmw i3 2014 3d model, royalty free license available, instant download after purchase.
cg_studio
$99

BMW i3 20123d model
...tudio
.3ds .c4d .fbx .lwo .max .mb .obj - bmw i3 2012 3d model, royalty free license available, instant download after purchase.
cg_studio
$99

BMW i3 20143d model
...tudio
.3ds .c4d .fbx .lwo .max .mb .obj - bmw i3 2014 3d model, royalty free license available, instant download after purchase.
humster3d
$75

3D model of BMW i3 2014
...
buy a detailed 3d model of bmw i3 2014 in various file formats. all our 3d models were created maximally close to the original.
humster3d
$40

3D model of Kitchen Set I3
...uy a detailed 3d model of kitchen set i3 in various file formats. all our 3d models were created maximally close to the original.
3d_ocean
$30

Kitchen set i3
...ensils oven plates shelves sink table ware
kitchen set i3 include 3d models: cooker, oven, sink, cupboards, table, chair, plates.
3d_ocean
$89

BMW i3 2014
...y, in real units of measurement, qualitatively and maximally close to the original. model formats: - *.max (3ds max 2008 scanl...
cg_studio
$99

BMW i3 Concept 20113d model
...i3
.3ds .c4d .fbx .lwo .max .obj - bmw i3 concept 2011 3d model, royalty free license available, instant download after purchase.
Switch
archibase_planet
free
Switch
...switch
archibase planet
switch cluster switch
light switch 1 - 3d model for interior 3d visualization.
archibase_planet
free
Switch
...switch
archibase planet
switches switch
switch 1 - 3d model (*.gsm+*.3ds) for interior 3d visualization.
archibase_planet
free
Switch
...switch
archibase planet
closer button switch cluster switch
switch - 3d model (*.3ds) for interior 3d visualization.
archibase_planet
free
Switch
...switch
archibase planet
switch closer
light switch 2 - 3d model for interior 3d visualization.
archibase_planet
free
Switch
...switch
archibase planet
closer button switch
switch n300808 - 3d model (*.gsm+*.3ds) for interior 3d visualization
archibase_planet
free
Switch
...switch
archibase planet
closer button switch
switch n141108 - 3d model (*.gsm+*.3ds) for interior 3d visualization.
archibase_planet
free

Switch
...switch
archibase planet
cluster switch closer
switch n260609 - 3d model (*.gsm+*.3ds) for interior 3d visualization.
archibase_planet
free

Switch
...switch
archibase planet
button switch closer
switch 2 - 3d model (*.gsm+*.3ds) for interior 3d visualization.
archibase_planet
free

Switch
...switch
archibase planet
button switch closer
switch n070510 - 3d model (*.gsm+*.3ds) for interior 3d visualization.
3d_export
$5

switch
...switch
3dexport
3d model of a low-poly switch
Led
3d_export
$5

led
...led
3dexport
the led is cut with all the parts.
3ddd
$1

Monacor / PARL56DMX / LED-320RGBW / LED-345RGBW / LED-300RGB
... прожектор
http://www.monacor.dk/
parl56dmx
led-320rgbw
led-345rgbw
led-300rgb
turbosquid
$10

LED
...led
turbosquid
free 3d model led for download as blend on turbosquid: 3d models for games, architecture, videos. (1691856)
3d_export
$5

led lamp
...led lamp
3dexport
led lamp, brightness animation
3ddd
free

leds-c4
...leds-c4
3ddd
leds-c4
современный торшер
3ddd
free

leds-c4
...leds-c4
3ddd
leds-c4
настольный лампа
turbosquid
$19

LED
... available on turbo squid, the world's leading provider of digital 3d models for visualization, films, television, and games.
turbosquid
$12

Led
... available on turbo squid, the world's leading provider of digital 3d models for visualization, films, television, and games.
turbosquid
free

LED
... available on turbo squid, the world's leading provider of digital 3d models for visualization, films, television, and games.
turbosquid
free

LED
... available on turbo squid, the world's leading provider of digital 3d models for visualization, films, television, and games.