Thingiverse
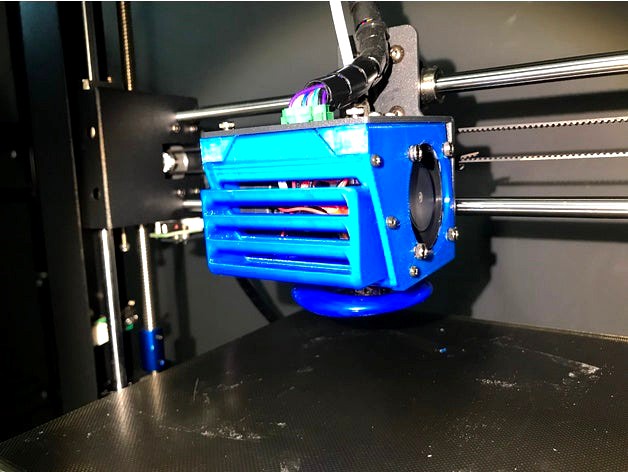
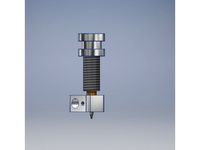
Anycubic I3 Mega Improved Hotend Fanbox (also Mega-S, Mega-X, Full Metal, BLTouch & E3DV6 versions) by Renba
by Thingiverse
Last crawled date: 3 years ago
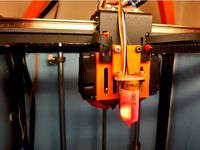
Say goodbye to warping and the noisy fans...
This mod work well with the hotend stock fan mounted on the I3 (also Mega-S,Mega-X). (E3DV5)
Only the extrusion cooling fan MUST be replaced by another model. (not necessary if you print only with ABS filament)
Update 05 June 2020 :
Files validated on Mega - X
Update 07 March 2020 :
Added Sunon Maglev extrusion Fan references
Update 15 January 2020 :
Following few requests, here are the link to the nuts and bolts used in this project
Case assembly :
Self Taping Screw
Fan BFB0512 assembly (extrusion cooling fan) or Sunon Maglev
Nuts
M4 x 25 mm NYLON
(because maybe you will have to reduce the thickness of the head inside the fanbox)
Bolts
M4 Nylon
or
M4 Alloy blue
Fan assembly (40x40mm Stock Fan or upgrade (see below))
Nuts
M2.5 x 20mm
(kit M2.5)
Bolts M2.5 inside the kit
Update 03 December 2019 :
Added an E3DV6 adapted Right side (File Right Side RB5 E3DV6)
Added BL Touch Version for ED3V5 or ED3V6 Hotend (see below)
Update 27 September 2019 : More than 10K Views and 1K downloads, It's a hit ! :)
Thanks to all, please post your makes !
Update 07 April 2019 : Correct Mismatched link to 5015 Fan (thanks to Slobodan)
Update 29 January 2019 : Added Half air duct "half buse V1.3" see below
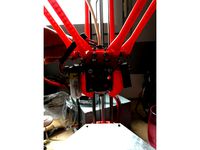
After trying a lot of fanbox for hotend for the mega i3, I was often disappointed by the characteristics, including poor head cooling for the printing of PLA, hot air escaping through the underside which causes detachments of ABS (Warping). As you can see on the utimaker S5, the bottom of the hotend is completely closed to prevent cooling of the part by the bottom side.
Lightening the fanbox allows the print head to be lighter and thus have less inertia, which allows higher print speeds, even without control of acceleration or jerk.
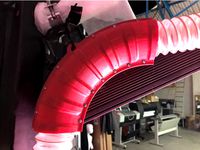
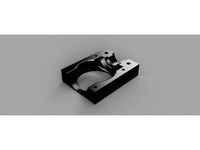
The front deflector design force the airflow to go up, by this way prevent delamination effect.
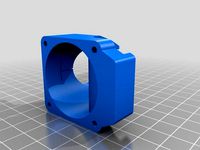
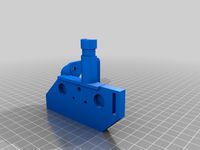
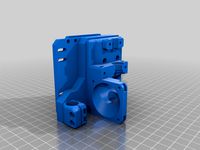
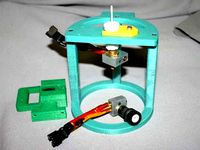
So I decided to create my own Fanbox for the I3 Mega.
After a lot of working hours under Solidworks and a dozen impressions, the result is there ..
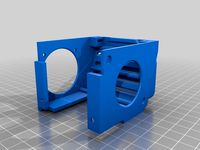
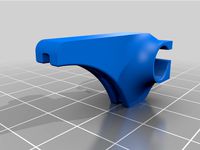
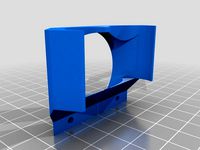
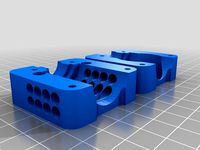
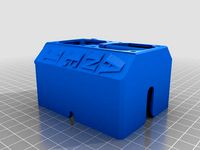
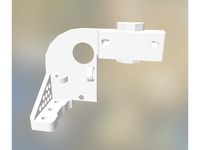
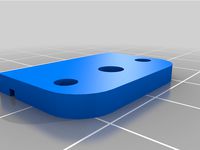
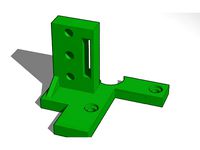
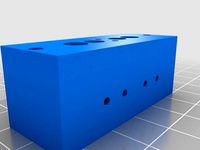
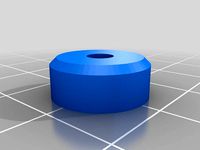
All parts are print WITHOUT SUPPORT.
Just choose the right direction for the piece to print.(see pictures)
Print in ABS because it is resistant to heat.
A finish with acetone is the most beautiful effect. (in a plastic box that seals tightly, place a sheet of aluminum foil in the bottom, wrap the inside of the box with paper towels, soak the acetone paper, place the ABS object on a stand (made for example wine bottle stoppers and toothpicks) so that the piece does not touch acetone, close the box for 10 to 30 minutes, and here ...
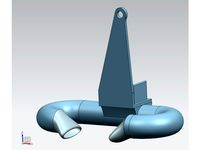
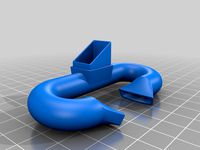
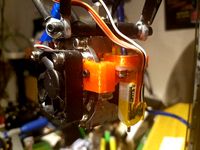
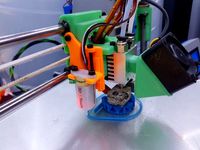
The extrusion fan duct MUST be replaced by the following one:
The Rolls Royce : Sunon MagLev (magnetic levitation bearings)Sunon Maglev
(Don't care the yellow wire, tachymeter output, here it's not connected. connect only red and black wire)
or an efficient but more noisy fan (classic brass bearings, (no ball bearings))BFB0512HH 12V 0.32A Type 5015 FAN
The extrusion fan duct is designed to provide an airflow efficient.
the internal aerodynamic shape of the fan duct was calculated, simulated and measured using a thermal camera.
The hotend original fan CAN be replaced by a very quiet fanSunon MagLev (magnetic levitation bearings)
or the Roll-Royce...Noctua NF--A4X10
..only if you want to reduce the fan noise...
This design works great with the stock fan.
The bottom of the fanbox is closed to the maximum so that cold air does not cool the tray and the object when printing abs.
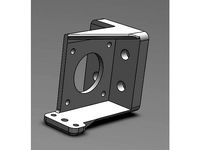
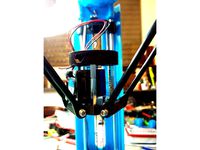
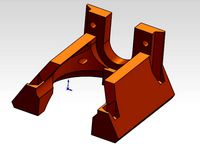
Prior to the installation, you have to check your original any.cubic hotend support is perfectly perpendicular, otherwise the new parts will not fit perfectly to the support. (see picture, mine isn't re-adjusted on this pic)
Few M4x25, M2.5x20 Nuts & Bolts, few M1 self taping screws and you will be ready to print PLA, ABS without headache
Led illumination will be added soon.
23 May 2018 : Parts "gauche.stl & "droite.stl" updated to V5, Top fixing holes has been adjusted, the two retention tips has been thinned because some guys report me the fixing screw of the little pcb with all connectors must be different in diameter on some batch of the printer.
10 January 2019 : Added "Half Buse V1.1 for the people who want to see the printing head in action or using a BLTouch like this oneBLTouch
Beware the fact the cooling maybe less efficient with this option
parts are optimized to be printed verticaly (see pictures)
E3DV6 HOTEND
The E3DV6 Hotend is a great update you must consider..
Here is the link to the part i use :E3DV6
Be care, there are many copy and dimension variation about this part.
You must use the part "Right Side RB5 E3DV6.STL" instead of "Droite V5.STL"
BL Touch Version
I design a BL Touch Version of the Fan Box.
Here is the link to the BL Touch I used (beware of false or fake version)BLTouch
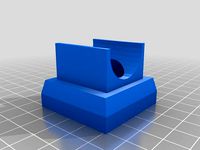
You must use the file "Grid RB6 BLT.STL" instead of "Grille V3.STL"
You have to print the BL Touch Spacer 'Support BLT.STL"
Follow the instruction on the PDF attached
Update 05 June 2020 added Buse V6 BLT ED3V6.STL
in order to allow the passage of the BLTouch pin
P.S. Please Post your makes !
I spend hours to design the object, please give me 5 min to post your make ;)
They are few things you sould consider :
the i3Mega is one of the best 3d printer for the money you spent, you should be sure !
But the manufacturer has put in the balance some features in order to provide a printer at this cost.
Updated 24 October 2018
Here are some modification i've applied to my printer
Cost : 0/5
difficulty : 1/5
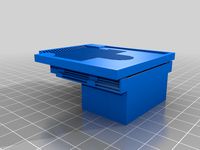
Goal : Improving the cooling of the machine
Mean : Reversing the bottom plate
As you can see the bottom plate mask a fan dedicated to the motherboard cooling
Simply rotate the bottom plate .
Cost 3/5
Difficulty : 3/5
Goal : Improving the heatbed efficiency.
Mean : Adding a efficient Mosfet controller instead of the mosfet driver included on the motherboard
A MOSFET is one of the most important upgrades you can buy. This is because the MOSFET will help prevent the motherboard from potentially overheating and taking on too much pressure. This Any.cubic i3 Mega upgrade is said to reduce fire risk, and also provide better voltage to the motors – and therefore better printing quality.
The most common use of the MOSFET with the 3D printer is to regulate the high workload that the heated bed places upon the mainboard. Although we have heard of no accidents involving the Any.cubic i3 Mega, the high current of the hotbed can lead to stress for the mainboard connectors, and increase the possibility of a fire hazard or hardware malfunction.
Adding a MOSFET is an especially important Any.cubic i3 Mega upgrade if you 3D print with ABS, as this filament generally requires high bed and extrusion temperatures. But even if you’re sticking to low-temperature 3D printing materials like PLA, it’s wise to ensure that your heated bed isn’t overpowering your motherboard
The heatbed controller included on the Motherboard has two disavantages: fisrt: it's on board , so the heat dissipated is'nt efficient, second : the internal resistor of the onbard mosfet act like a second hotbed but at the wrong place.
-> The solution is to use an external Mosfet driver, it's internal resistance is null
-> all the current provided by the power supply is conducted directly to the Hotbed, that is improving the efficience of the hotbed, an achieved a quite and perfect regulation of the temperature.
i use this one :Mosfet Board
This is the holder to print :https://www.thingiverse.com/thing:2758279
Cost 2/5
Difficulty 4/5
Goal : Improving the Thermal insulation of the hotbed
Mean : by adding a thermal isolation under the hotbed
Borried about the heating time of the hotbed and the temperature variation of this one, causing warping and adherence lost of the part on the hotbed, a simple solution is to isolate the hotbend by using simple material like on this video (they are plenty on youtube)https://youtu.be/ZAa5tzwTacY
You can also use this isolation matérial ready to use :Insulation Pad
Cost : 1/5
Difficulty : 1/5
Goal : Improve the close contact between the top cover Glass and the heater Pcb
Mean : Using simple paperclip (see picture)Paper Clip
Cost 1/5
Difficulty 1/5
Goal : Improving Extrusion precision
Mean : adding simple springs tensioner on the belt
A spring belt tensioner car achieve to minimize the mislocation defaults of the printer head, by thus improving the printing precision, at least if the belt isn't new.Belt tensioner
Cost 4/5
Difficulty 3/5
Goal : Minimize the sound generated by the running printer, with this mod, only the sound make by the fans will be audible. this is a crazy f*** improvement for lowering the sound produce during printing.
Mean : Replacing the originals motor steppe driver by 5 TMC 2208 Drivers. This kind of driver are plug and play on the sockets.
You need a correct multimeter to measure the voltage and made an adjustement on each driver. instead other models of TMCxxx , No solder iron necessary, you just have to rotate the connectors receptacles on the motherboard with a simple leatherman tool.
like on this video
Be care, some of the latest motherboard doesn't have support under the drivers boards.
the mod in this case will be very more difficult because you need to desolder the old driver and resold the new one.
This video is for motherboard with support under the drivers.
"https://youtu.be/QP8dZ8cUEBA"
the parts are here : (you need 5 pieces)TMC 2208 V3.0
The standby voltage must be set on each board at the 1.5V value (see video). The ground for the voltmeter is taken on the black cable of the power entry on the motherboard
Cost 1/5
Difficulty 1/5
Goal : catching the hot bed when it's hot , without using the adjustement screw to pull up the hotbed front of you, and the risk to made something wrong about the bed leveling...
Mean : adding this simple printed part.Handle
Cost 1/5
Difficulty 1/5
Goal : Lubrification of the axis guides, reducing noise
Mean : Using a refining base oil with lithium soap thickening, an antioxidant and anti-rust additivesLubricant
By applying these simple mods, you wil own one of the best and lowcost printing solution on the market
//////////////////////////////////////////////////////////////////////
P.S. Please Post your makes !
I spend hours to design the object, my wife left, my children do not talk to me anymore, I had to sell the house and the dog ran away ... :)
Please give me 5 min to post your make ;)
Remember to come back and post what you've printed as Make.
It's good for the designer and the community (that means you)!
/////////////////////////////////////////////////////////////////////
Happy printings !
Renba
This mod work well with the hotend stock fan mounted on the I3 (also Mega-S,Mega-X). (E3DV5)
Only the extrusion cooling fan MUST be replaced by another model. (not necessary if you print only with ABS filament)
Update 05 June 2020 :
Files validated on Mega - X
Update 07 March 2020 :
Added Sunon Maglev extrusion Fan references
Update 15 January 2020 :
Following few requests, here are the link to the nuts and bolts used in this project
Case assembly :
Self Taping Screw
Fan BFB0512 assembly (extrusion cooling fan) or Sunon Maglev
Nuts
M4 x 25 mm NYLON
(because maybe you will have to reduce the thickness of the head inside the fanbox)
Bolts
M4 Nylon
or
M4 Alloy blue
Fan assembly (40x40mm Stock Fan or upgrade (see below))
Nuts
M2.5 x 20mm
(kit M2.5)
Bolts M2.5 inside the kit
Update 03 December 2019 :
Added an E3DV6 adapted Right side (File Right Side RB5 E3DV6)
Added BL Touch Version for ED3V5 or ED3V6 Hotend (see below)
Update 27 September 2019 : More than 10K Views and 1K downloads, It's a hit ! :)
Thanks to all, please post your makes !
Update 07 April 2019 : Correct Mismatched link to 5015 Fan (thanks to Slobodan)
Update 29 January 2019 : Added Half air duct "half buse V1.3" see below
After trying a lot of fanbox for hotend for the mega i3, I was often disappointed by the characteristics, including poor head cooling for the printing of PLA, hot air escaping through the underside which causes detachments of ABS (Warping). As you can see on the utimaker S5, the bottom of the hotend is completely closed to prevent cooling of the part by the bottom side.
Lightening the fanbox allows the print head to be lighter and thus have less inertia, which allows higher print speeds, even without control of acceleration or jerk.
The front deflector design force the airflow to go up, by this way prevent delamination effect.
So I decided to create my own Fanbox for the I3 Mega.
After a lot of working hours under Solidworks and a dozen impressions, the result is there ..
All parts are print WITHOUT SUPPORT.
Just choose the right direction for the piece to print.(see pictures)
Print in ABS because it is resistant to heat.
A finish with acetone is the most beautiful effect. (in a plastic box that seals tightly, place a sheet of aluminum foil in the bottom, wrap the inside of the box with paper towels, soak the acetone paper, place the ABS object on a stand (made for example wine bottle stoppers and toothpicks) so that the piece does not touch acetone, close the box for 10 to 30 minutes, and here ...
The extrusion fan duct MUST be replaced by the following one:
The Rolls Royce : Sunon MagLev (magnetic levitation bearings)Sunon Maglev
(Don't care the yellow wire, tachymeter output, here it's not connected. connect only red and black wire)
or an efficient but more noisy fan (classic brass bearings, (no ball bearings))BFB0512HH 12V 0.32A Type 5015 FAN
The extrusion fan duct is designed to provide an airflow efficient.
the internal aerodynamic shape of the fan duct was calculated, simulated and measured using a thermal camera.
The hotend original fan CAN be replaced by a very quiet fanSunon MagLev (magnetic levitation bearings)
or the Roll-Royce...Noctua NF--A4X10
..only if you want to reduce the fan noise...
This design works great with the stock fan.
The bottom of the fanbox is closed to the maximum so that cold air does not cool the tray and the object when printing abs.
Prior to the installation, you have to check your original any.cubic hotend support is perfectly perpendicular, otherwise the new parts will not fit perfectly to the support. (see picture, mine isn't re-adjusted on this pic)
Few M4x25, M2.5x20 Nuts & Bolts, few M1 self taping screws and you will be ready to print PLA, ABS without headache
Led illumination will be added soon.
23 May 2018 : Parts "gauche.stl & "droite.stl" updated to V5, Top fixing holes has been adjusted, the two retention tips has been thinned because some guys report me the fixing screw of the little pcb with all connectors must be different in diameter on some batch of the printer.
10 January 2019 : Added "Half Buse V1.1 for the people who want to see the printing head in action or using a BLTouch like this oneBLTouch
Beware the fact the cooling maybe less efficient with this option
parts are optimized to be printed verticaly (see pictures)
E3DV6 HOTEND
The E3DV6 Hotend is a great update you must consider..
Here is the link to the part i use :E3DV6
Be care, there are many copy and dimension variation about this part.
You must use the part "Right Side RB5 E3DV6.STL" instead of "Droite V5.STL"
BL Touch Version
I design a BL Touch Version of the Fan Box.
Here is the link to the BL Touch I used (beware of false or fake version)BLTouch
You must use the file "Grid RB6 BLT.STL" instead of "Grille V3.STL"
You have to print the BL Touch Spacer 'Support BLT.STL"
Follow the instruction on the PDF attached
Update 05 June 2020 added Buse V6 BLT ED3V6.STL
in order to allow the passage of the BLTouch pin
P.S. Please Post your makes !
I spend hours to design the object, please give me 5 min to post your make ;)
They are few things you sould consider :
the i3Mega is one of the best 3d printer for the money you spent, you should be sure !
But the manufacturer has put in the balance some features in order to provide a printer at this cost.
Updated 24 October 2018
Here are some modification i've applied to my printer
Cost : 0/5
difficulty : 1/5
Goal : Improving the cooling of the machine
Mean : Reversing the bottom plate
As you can see the bottom plate mask a fan dedicated to the motherboard cooling
Simply rotate the bottom plate .
Cost 3/5
Difficulty : 3/5
Goal : Improving the heatbed efficiency.
Mean : Adding a efficient Mosfet controller instead of the mosfet driver included on the motherboard
A MOSFET is one of the most important upgrades you can buy. This is because the MOSFET will help prevent the motherboard from potentially overheating and taking on too much pressure. This Any.cubic i3 Mega upgrade is said to reduce fire risk, and also provide better voltage to the motors – and therefore better printing quality.
The most common use of the MOSFET with the 3D printer is to regulate the high workload that the heated bed places upon the mainboard. Although we have heard of no accidents involving the Any.cubic i3 Mega, the high current of the hotbed can lead to stress for the mainboard connectors, and increase the possibility of a fire hazard or hardware malfunction.
Adding a MOSFET is an especially important Any.cubic i3 Mega upgrade if you 3D print with ABS, as this filament generally requires high bed and extrusion temperatures. But even if you’re sticking to low-temperature 3D printing materials like PLA, it’s wise to ensure that your heated bed isn’t overpowering your motherboard
The heatbed controller included on the Motherboard has two disavantages: fisrt: it's on board , so the heat dissipated is'nt efficient, second : the internal resistor of the onbard mosfet act like a second hotbed but at the wrong place.
-> The solution is to use an external Mosfet driver, it's internal resistance is null
-> all the current provided by the power supply is conducted directly to the Hotbed, that is improving the efficience of the hotbed, an achieved a quite and perfect regulation of the temperature.
i use this one :Mosfet Board
This is the holder to print :https://www.thingiverse.com/thing:2758279
Cost 2/5
Difficulty 4/5
Goal : Improving the Thermal insulation of the hotbed
Mean : by adding a thermal isolation under the hotbed
Borried about the heating time of the hotbed and the temperature variation of this one, causing warping and adherence lost of the part on the hotbed, a simple solution is to isolate the hotbend by using simple material like on this video (they are plenty on youtube)https://youtu.be/ZAa5tzwTacY
You can also use this isolation matérial ready to use :Insulation Pad
Cost : 1/5
Difficulty : 1/5
Goal : Improve the close contact between the top cover Glass and the heater Pcb
Mean : Using simple paperclip (see picture)Paper Clip
Cost 1/5
Difficulty 1/5
Goal : Improving Extrusion precision
Mean : adding simple springs tensioner on the belt
A spring belt tensioner car achieve to minimize the mislocation defaults of the printer head, by thus improving the printing precision, at least if the belt isn't new.Belt tensioner
Cost 4/5
Difficulty 3/5
Goal : Minimize the sound generated by the running printer, with this mod, only the sound make by the fans will be audible. this is a crazy f*** improvement for lowering the sound produce during printing.
Mean : Replacing the originals motor steppe driver by 5 TMC 2208 Drivers. This kind of driver are plug and play on the sockets.
You need a correct multimeter to measure the voltage and made an adjustement on each driver. instead other models of TMCxxx , No solder iron necessary, you just have to rotate the connectors receptacles on the motherboard with a simple leatherman tool.
like on this video
Be care, some of the latest motherboard doesn't have support under the drivers boards.
the mod in this case will be very more difficult because you need to desolder the old driver and resold the new one.
This video is for motherboard with support under the drivers.
"https://youtu.be/QP8dZ8cUEBA"
the parts are here : (you need 5 pieces)TMC 2208 V3.0
The standby voltage must be set on each board at the 1.5V value (see video). The ground for the voltmeter is taken on the black cable of the power entry on the motherboard
Cost 1/5
Difficulty 1/5
Goal : catching the hot bed when it's hot , without using the adjustement screw to pull up the hotbed front of you, and the risk to made something wrong about the bed leveling...
Mean : adding this simple printed part.Handle
Cost 1/5
Difficulty 1/5
Goal : Lubrification of the axis guides, reducing noise
Mean : Using a refining base oil with lithium soap thickening, an antioxidant and anti-rust additivesLubricant
By applying these simple mods, you wil own one of the best and lowcost printing solution on the market
//////////////////////////////////////////////////////////////////////
P.S. Please Post your makes !
I spend hours to design the object, my wife left, my children do not talk to me anymore, I had to sell the house and the dog ran away ... :)
Please give me 5 min to post your make ;)
Remember to come back and post what you've printed as Make.
It's good for the designer and the community (that means you)!
/////////////////////////////////////////////////////////////////////
Happy printings !
Renba
Similar models
thingiverse
free

Anycubic I3 Mega-S Printhead Case Cover Honeycomb Hotend Fanbox Upgrade by hazweio
...the fan duct you see in the picture is this (anycubic i3 mega s - fan duct by matism09):https://www.thingiverse.com/thing:3564168
thingiverse
free
Anycubic i3 Mega fan duct for 5015 radial fan by D1_
...tall the fanbox around your hotend. at least with my setup...
don´t forget to choose the "support on build plate only".
thingiverse
free
i3 mega fan duct for radial fan of type 5015
...hangs. therefore i designed a improved fan duct with fits to the fan box and extrusion fan like sunon mf50151v1-a99 51x51x15 12v.
thingiverse
free

Anycubic i3 Mega Mega-S Upgrade Printhead Cable Cover and Holder Case Honeycomb Hotend Fanbox by hazweio
...the fan duct you see in the picture is this (anycubic i3 mega s - fan duct by matism09):https://www.thingiverse.com/thing:3564168
thingiverse
free

Anycubic i3 Mega - Hotend cover - noise reduction by sparky0815
...s to marcz86 to remix my cover for abs printing with part cooling fan you can find here https://www.thingiverse.com/thing:3147495
grabcad
free

Anycubic i3 mega Hotend fan box (also Mega-S, Mega-X, Full Metal, BLTouch & E3DV6 versions)
...ews - no need to buy new parts.
https://www.prusaprinters.org/de/prints/47884-anycubic-i3-mega-hotend-fan-box-also-mega-s-mega-x
thingiverse
free

Folgertech FT-5 X Carriage adapter for Prusa i3 MK2 Extruder by AeroFredcom
...ess to one or just print them on your ft5 and see what comes out.
print in abs 40% or so of infil and 2 or 3 perimeters and tops.
thingiverse
free

E3DV6 clone Distanzbuchse/mounting bushing for Anycubic I3 Mega Bowden by Blackcombify by 3D_Rapid_de
...al to the previous e3d v5!
("new-levelling" is still necessary)
don't forget the pid tuning with the new hotend:)
thingiverse
free

Anycubic i3 Mega Hotend Cover by Frs3r_43
...n (you see),
but will fit good with an modded part fan.
now i made a second version in which the hole fits the original part fan.
thingiverse
free
I3 Mega Ultrabase Hotend Fanbox by bamarayne
...e metal parts that are taken off. it definitely makes the printer run quieter. you can also use a 5015 fan for the parts cooling.
Renba
thingiverse
free

Ethernet Cable Organizer by Renba
...cable organizer by renba
thingiverse
a simple ethernet cable organizer 24 ports
i use it when i must replace a switch in a rack
thingiverse
free

Hotend Front for Anycubic Mega-S (Remix from Renba) by Uzhul
...bic mega s. there are the hotted cables in the way. so i made my own version. it fits in the other parts from the original design
thingiverse
free

3018 Rail Snap-on Durst Cover (also 1610, 2040, 2418,... series) by Renba
...o match your printer bed.
adjust with a cutter or dremel.
as a simple return, please like (if you like) and post a picture.
renba
thingiverse
free
Suspended Vacuum Hose Holder for CNC / Wood Tools by Renba
...://www.thingiverse.com/thing:4652282
as a simple return, please like and post your print!
happy printing and wood milling !
renba
thingiverse
free

Steadycam Feiyu G3 Ultra Holder for Gopro Mounting Acc. by Renba
... compatible mounting accessories.
printed with support and pla carbon
of course you have to print both sides...
happy printing !!
thingiverse
free

Mercury / Mariner Inflatable Pump Nozzle by Renba
... to have a correct fit with the valve.
you can put a small screw 16mm long and 1.5 to 2mm wide to push on the valve if necessary.
thingiverse
free

Dishwasher Soap Basket by Renba
...s best to melt them gently (see pics).
all request about improvement of this simple thing are welcome ;)
happy printing ;)
renaud
thingiverse
free

Neje Laser Unobstructed Focus Knob by Renba
.../blog/2020/7/5/affordable-laser-engraving-lightburn-setup-for-neje-master-2
as a simple return, please like and post your print !
thingiverse
free

Anycubic Photon Self VAT drainer (Dripping holder) by Renba
...n it. i highly recommend this very practical little accessory.
https://s.click.aliexpress.com/e/_d9clokq
please post your makes !
thingiverse
free
Crown Macro-Tech Main Cable Fix by Renba
...le securely in place.
i used neoprene glue to fix the piece and the cable inside the piece.
thank you for publishing your work.
Fanbox
thingiverse
free

anycubic mega s Hotend Fanbox by Hassprediger
...klebt und bei den oberen habe ich selbst schneidende schrauben verwendet
ich nutze dazu https://www.thingiverse.com/thing:2577163
thingiverse
free

Fanbox for Printrbot Air Nozzle System by moltenplastic
...ube attached that leads to a nozzle on the print head which you aim at the molten plastic from within the printer build platform.
thingiverse
free

40 mm Fanbox for RF2000 3D-Printer to replace the standard fans by a 40mm / 24 volt fan by AlbinBallad
... a 40mm / 24 volt fan by albinballad
thingiverse
fanbox replacement for the renkforce rf2000 to use one single 40mm / 24volt fan
thingiverse
free

Anycubic I3 Mega Remixed Fanbox for BLTouch by rronni
...hing:2824005
update 25.11.2018:
the fanduct bend after a while so i have moved the cut a little bit. this should solve the issue.
thingiverse
free
I3 Mega Ultrabase Hotend Fanbox by bamarayne
...e metal parts that are taken off. it definitely makes the printer run quieter. you can also use a 5015 fan for the parts cooling.
thingiverse
free
Anycubic I3 Mega-S Printhead Case Cover Honeycomb Hotend Fanbox Upgrade by hazweio
...the fan duct you see in the picture is this (anycubic i3 mega s - fan duct by matism09):https://www.thingiverse.com/thing:3564168
thingiverse
free

Anycubic I3 Mega Improved Hotend Fanbox 1 Piece Clean
...s and added corners to the bottom part for aesthetics.
to be printed with some supports (maybe tilt it to one of the fans sides).
thingiverse
free
Anycubic i3 Mega Mega-S Upgrade Printhead Cable Cover and Holder Case Honeycomb Hotend Fanbox by hazweio
...the fan duct you see in the picture is this (anycubic i3 mega s - fan duct by matism09):https://www.thingiverse.com/thing:3564168
thingiverse
free
Anycubic i3 Mega fan duct for 5015 radial fan by D1_
...plate nor they couldn´t get fixed on the hotend fanbox with a screw. so i designed my own one....
thingiverse
free
i3 mega fan duct for radial fan of type 5015
...thingiverse this fan duct can be used with renbas fanbox for me the original provided fan duct has an...
E3Dv6
thingiverse
free
Dualfan for e3dv6 by CaJI9I
...dualfan for e3dv6 by caji9i
thingiverse
this fan for dual extruder e3dv6. spacing between nozzle 24 mm
thingiverse
free
e3dv6 mount remix by mokash770
...e3dv6 mount remix by mokash770
thingiverse
e3dv6 mount with bigger holes repired
thingiverse
free
E3Dv6 Bowden Clamp by x20011
...e3dv6 bowden clamp by x20011
thingiverse
this is a e3dv6 hotend clamp with an additional 40x40mm fan mount.
thingiverse
free
E3DV6 by makermitch69
...e3dv6 by makermitch69
thingiverse
this includes a custom cover for the anet a8 with a place for 4 leds
thingiverse
free
e3dv6 gran caudal 40mm by jj25000
...e3dv6 gran caudal 40mm by jj25000
thingiverse
e3dv6 ventilador 40x40
thingiverse
free
support e3dv6 + titan + bltouch by nikos1234
...support e3dv6 + titan + bltouch by nikos1234
thingiverse
support e3dv6 + titan + bltouch
thingiverse
free
E3dV6 fan 4040 by andreascarpelli
...040 by andreascarpelli
thingiverse
this is a design to have a single fan on a e3dv6 that fit a 4cm fan for extruder and hot end
thingiverse
free

e3dv6 fan duct by Snorkis
...r this e3dv6 mount https://www.thingiverse.com/thing:2790694?fbclid=iwar19pbsfb39c7m0kvpxb-f_wh3i_uoxl43d5ghoedarbmfezc-vwr01nnia
thingiverse
free

E3Dv6 mount for Renkforce RF500 by Timon_Suhk
...e3dv6 mount for renkforce rf500 by timon_suhk
thingiverse
two piece mount for e3dv6 on renkforce rf500.
thingiverse
free
E3Dv6 for 101 Hero by electrokill
...electrokill
thingiverse
wip
heres a mount for an e3dv6 for a 101 hero
other customizations follow so here is only the first part
Bltouch
thingiverse
free
Support bltouch by TonyJ
...support bltouch by tonyj
thingiverse
support bltouch
thingiverse
free
BLTOUCH for MICRON3DP by lamerhouse
...bltouch for micron3dp by lamerhouse
thingiverse
bltouch for micron3dp
thingiverse
free
SapphirePro mount for Bltouch
...sapphirepro mount for bltouch
thingiverse
sapphirepro mount for bltouch
thingiverse
free
ender6 BLtouch by chimaer
...ender6 bltouch by chimaer
thingiverse
ender6 bltouch
this is an external bracket
thingiverse
free
BLTouch KP3s by 1devilman1
...bltouch kp3s by 1devilman1
thingiverse
bltouch mount for kingroon kp3s
thingiverse
free
Bltouch support adjustable
...bltouch support adjustable
thingiverse
adjustable support for bltouch, p3steel.
thingiverse
free
BMG NEREUS BLTOUCH
...bmg nereus bltouch
thingiverse
petg
m3 screws and nuts for the bltouch
thingiverse
free

BLTouch Bracket by tidh666
...bltouch bracket by tidh666
thingiverse
serves to attach the bltouch sensor to the extruders
thingiverse
free
bltouch mount by wars
...bltouch mount by wars
thingiverse
reinforced bracket for bltouch cooperates with high_clearance_cr10_oem_fang_mod
thingiverse
free

BLTouch Holder by Jonthan06
...bltouch holder by jonthan06
thingiverse
support bltouch pour wanhao d12
Anycubic
thingiverse
free

anycubic filament holder
...anycubic filament holder
thingiverse
anycubic filament holder
thingiverse
free

Cableholder Anycubic Mega
...cableholder anycubic mega
thingiverse
cableholder anycubic mega
thingiverse
free

AnyCubic Toolholder by WildManPrinting
...anycubic toolholder by wildmanprinting
thingiverse
anycubic i3 mega toolholder that clips on the side of the spool a-frame.
thingiverse
free

AnyCubic Funnel by phana007
...anycubic funnel by phana007
thingiverse
funnel for anycubic resin and also a reducer for a normal soda bottle.
thingiverse
free

Anycubic Kossel PID calibration
...ir mount:
kossel raspberry camera ir mount
extruder pid calibration.
simple extruder temperature calibration of your 3d printer.
thingiverse
free

anycubic mega i3
...anycubic mega i3
thingiverse
anycubic i3 mega/mega s led 30mm 10-14v 6500k
thingiverse
free

Handle for anycubic by cruiser7
...handle for anycubic by cruiser7
thingiverse
its easier to handle the cover of the anycubic mono x and wash&care
thingiverse
free

anycubic predator Printbed by Lihyon
...anycubic predator printbed by lihyon
thingiverse
anycubic predator printbed
thingiverse
free

Anycubic Predator Triggers by marcelcountry
...anycubic predator triggers by marcelcountry
thingiverse
anycubic predator triggers
thingiverse
free

support anycubic cable by sarpdental
...support anycubic cable by sarpdental
thingiverse
support anycubic cable
Hotend
thingiverse
free
hotend by fablab_lueneburg
...hotend by fablab_lueneburg
thingiverse
hotend model
thingiverse
free
Hotend for Graber
...hotend for graber
thingiverse
hotend complement pastes for graber printerhttps://youtu.be/0koxhnsuhdy
thingiverse
free
Hotend adapter by antaviana
...hotend adapter by antaviana
thingiverse
hotend adapter
thingiverse
free
hotend fan by mming1106
...hotend fan by mming1106
thingiverse
hotend fan
thingiverse
free

Hotend schema by ione
...hotend schema by ione
thingiverse
hotend project schema
thingiverse
free
Fabtotum XY Hotend holder for E3D Hotend
...s with integrated supports.
more for the project you can see here: https://kf-designs.com/2019/09/07/fabtotum-printer-conversion/
thingiverse
free
HotEnd Stand by onepointdiy
...tend, when you make your new hotend or repair your j-head or mg-plus hotend.
the hole of 16mm, please adjust using a reamer, etc.
thingiverse
free

fast magnetic hotend changer for Chimera Hotend by Draman
...chimera hotend !
and new basis (the hole from original is to small)
it is a remix form skimmy's fast magnetic hotend changer
thingiverse
free

Hotend Fan Adapter for MicroSwiss All Metal Hotend by jo_schi_man
...
thingiverse
little change for the hotend fan adapter to hold the microswiss all metal hotend (slightly longer and sharp edges).
thingiverse
free
Merlin Hotend by Alejanson
...merlin hotend by alejanson
thingiverse
this is a 1:1 drawing of the classic merlin hotend.
Mega
3ddd
$1
BoConcept / Mega
...boconcept / mega
3ddd
boconcept
boconcept mega
3ddd
free

Angelo - Mega shoin
... mega shoin , shoin
angelo - mega shoin - 3dmax 2008
3ddd
$1
Комод MEGA
...вана по фото с учетом реальных размеров.
стек не сколапсен, есть возможность регулировки уровня сглаживания.
текстуры в архиве.
3ddd
$1
Hulsta / Mega-design
...hulsta / mega-design
3ddd
hulsta
hulsta mega-design
design_connected
$18
Tolomeo Mega
...
photo-realistic 3d models of the tolomeo mega floor lamps from artemide for 3d architectural and interior design presentations.
turbosquid
$119

Mega Soldier
... free 3d model mega soldier for download as obj, c4d, and fbx on turbosquid: 3d models for games, architecture, videos. (1148568)
turbosquid
$100
Mega Yacht
... free 3d model mega yacht for download as obj, fbx, and blend on turbosquid: 3d models for games, architecture, videos. (1368903)
3ddd
$1
Massproductions Mega
... massproductions , mega
ширина: 180 см
глубина: 90 см
высота: 79 см
3d_export
$4
mega metro station
...mega metro station
3dexport
mega metro station. ready to game. thanks all downloaders!!
3ddd
$1
BAS Mega
...bas mega
3ddd
bas , ванна
ванна
I3
3d_export
$10

suv i3
...suv i3
3dexport
suv i3 2013 series
3d_ocean
$89

BMW i3 2012
...y, in real units of measurement, qualitatively and maximally close to the original. model formats: - *.max (3ds max 2008 scanl...
cg_studio
$99

BMW i3 20143d model
...
cgstudio
.3ds .c4d .fbx .lwo .max .obj - bmw i3 2014 3d model, royalty free license available, instant download after purchase.
cg_studio
$99

BMW i3 20123d model
...tudio
.3ds .c4d .fbx .lwo .max .mb .obj - bmw i3 2012 3d model, royalty free license available, instant download after purchase.
cg_studio
$99

BMW i3 20143d model
...tudio
.3ds .c4d .fbx .lwo .max .mb .obj - bmw i3 2014 3d model, royalty free license available, instant download after purchase.
humster3d
$75

3D model of BMW i3 2014
...
buy a detailed 3d model of bmw i3 2014 in various file formats. all our 3d models were created maximally close to the original.
humster3d
$40

3D model of Kitchen Set I3
...uy a detailed 3d model of kitchen set i3 in various file formats. all our 3d models were created maximally close to the original.
3d_ocean
$30

Kitchen set i3
...ensils oven plates shelves sink table ware
kitchen set i3 include 3d models: cooker, oven, sink, cupboards, table, chair, plates.
3d_ocean
$89

BMW i3 2014
...y, in real units of measurement, qualitatively and maximally close to the original. model formats: - *.max (3ds max 2008 scanl...
cg_studio
$99

BMW i3 Concept 20113d model
...i3
.3ds .c4d .fbx .lwo .max .obj - bmw i3 concept 2011 3d model, royalty free license available, instant download after purchase.
Improved
cg_studio
$49
Robot Z300 (improved version)3d model
...o
.3ds .fbx .max .obj - robot z300 (improved version) 3d model, royalty free license available, instant download after purchase.
3d_export
$39

Robot Z300 improved version 3D Model
...fantasy sci-fi robots bot humanoid droid sci fi materials character
robot z300 improved version 3d model alekrazum 55067 3dexport
3d_export
$75

CV-90 Improved
...nnon. export versions are fitted with hägglunds e-series turrets, armed with either a 30 mm mk44 or a 35 mm bushmaster autocannon
turbosquid
$55
(Important textures coming back soon after improvements)Cuboid gazebo bench area
... available on turbo squid, the world's leading provider of digital 3d models for visualization, films, television, and games.
3d_export
$15

COMPLETE AUDI 80-100 SHIFT LEVER REPAIR KIT WITH IMPROVED BUSHING
...dexport
• sleeve - 1 pc. • elastic band - 1 pc. • hinge - 1 pc. audi 100c3 audi 100 c4 audi 80 b3 (checked) audi 80 b4 (checked)
3d_export
$7

REPAIR KIT FOR GEARSHIFT LEVER AUDI 80-100 IMPROVED
...ar of the gum is excluded. - rusk - 1 pc. - elastic band - 1 pc. audi 100c3 audi 100 c4 audi 80 b3 (checked) audi 80 b4 (checked)
3d_export
$30
cup mask machine front section stereo mask manufacturing machine improved version
...ing rack cad outsourcing list. the drawings are mature drawings that have been produced.<br>drawing version solidworks 2018
3d_export
free
oven - forno
...oven - forno
3dexport
gradually i'm trying to improve my 3d.
3d_export
$75

T-55
...nally, but these improvements made the tank more efficient and lethal. the t-55 was officially adopted by the soviet army in 1958
3d_export
$5

civil registration authorities
...civil registration authorities
3dexport
city wedding square. the model can be used for projects, to improve the project, etc.
Full
3ddd
$1
Full Mobili
...ull mobili , шкаф
группа шкафов, серия мебели "классика" фабрики «full mobili»
turbosquid
$80
full man body+full facials
... available on turbo squid, the world's leading provider of digital 3d models for visualization, films, television, and games.
3ddd
$1
Full Mobili
...сика , стол
стол круглый офисный серия мебели "классика" фабрики «full mobili»
3ddd
$1

FULL MOBILI
... стол
cтол офисный серии мебели "классика" итальянской компании full mobili
design_connected
$16

Full Circle
...full circle
designconnected
atmosphere full circle computer generated 3d model.
3d_export
$5
full office
...full office
3dexport
this is full office cgi model created with maya -detailed -textured -uv mapped
design_connected
$16

Full Moon
...full moon
designconnected
roche bobois full moon computer generated 3d model. designed by ragot, cedric.
turbosquid
$100
FULL KITCHEN
...squid
royalty free 3d model full kitchen for download as skp on turbosquid: 3d models for games, architecture, videos. (1345817)
turbosquid
$15

Full Bedroomset
...id
royalty free 3d model full bedroomset for download as max on turbosquid: 3d models for games, architecture, videos. (1540649)
3d_export
$10
full human body
...full human body
3dexport
it is a full human sculpt
Metal
3d_ocean
$10

Metal Barrel
...metal barrel
3docean
barrel barrels metal metal barrel wood barrel
metal barrel
turbosquid
$14

Metals
...als
turbosquid
royalty free 3d model metals for download as on turbosquid: 3d models for games, architecture, videos. (1486252)
3d_ocean
$18
Metal Furniture
...metal furniture
3docean
design desk indoor industrial metal metal furniture restoration table
metal furniture 3d model
3d_export
$5
metal table
...metal table
3dexport
metal table.blend
3d_export
$5
Metal Shelf
...metal shelf
3dexport
metal shelf
3d_export
free

metal detector
...metal detector
3dexport
metal detector
3ddd
$1
metal lux
...metal lux
3ddd
dedalo , metal lux
люстра и бра metal lux коллекция dedalo.
3ddd
$1
bonded metal
...bonded metal
3ddd
https://www.forms-surfaces.com/bonded-metal
boded tiled metal
3ddd
$1
Metal
...metal
3ddd
1280-1024 бесшовный 8-)
3d_export
$5

cgaxis metal
...cgaxis metal
3dexport
notebook cgaxis metal
Also
turbosquid
$30

HTC Explorer black Also known as HTC Pico
... available on turbo squid, the world's leading provider of digital 3d models for visualization, films, television, and games.
3d_export
$23

Blood Cells Sickle Anemia also 3D Model
...micro virus bacterium bacteria medical science sick vein duct
blood cells sickle anemia also 3d model duchampmodels 7867 3dexport
3d_export
$5

house for the cat is also a pinned table
...n the preview:<br>- 3d max 2013 (v-ray)<br>- texture<br>- obj<br>- 3ds<br>a home for the cat, table
turbosquid
$30

Acer Allegro Smartphone Also known as Acer W4, Acer M310
... available on turbo squid, the world's leading provider of digital 3d models for visualization, films, television, and games.
turbosquid
$30

HTC Desire U Smartphone also known as HTC T327w for the Chinese market
... available on turbo squid, the world's leading provider of digital 3d models for visualization, films, television, and games.
3d_export
$18

spinosaurus miniature print also with textures two versions 3d print model
...mm width :170 you can scale the model as you see fit if you have any questions and want similar work done. contact me via message
3d_export
$8

microphone
...metal leg and a glossy metal base. there is also an led backlight on the mode switch. a scene...
3d_export
$5

ornament trim vol 03
...3d software (3dmax, maya, blender, c4d, ...). there are also 5 previews for the product. 3dmax files saved 3dmax...
3d_export
$15

Beast tentacle
...beast tentacle 3dexport rigged beast tentacle. there is also animated version in fbx and max formats. there is...
3d_export
$13

camaro concept car
...a cgi model. it can be used in game also obj file, step file and render file are attached...
Versions
3ddd
$1
Diamond version
...nd , version , ванна
visionnaire - diamond bath
turbosquid
$50
LibraryMini Version
...free 3d model librarymini version for download as max and jpg on turbosquid: 3d models for games, architecture, videos. (1617724)
design_connected
$34

Barocco Version 01
...barocco version 01
designconnected
zanotta barocco version 01 computer generated 3d model. designed by progetti, emaf.
design_connected
$27

Barocco Version 02
...barocco version 02
designconnected
zanotta barocco version 02 computer generated 3d model. designed by progetti, emaf.
turbosquid
free
![Door [2 versions]](/t/13243146.jpg)
Door [2 versions]
...rbosquid
free 3d model door [2 versions] for download as fbx on turbosquid: 3d models for games, architecture, videos. (1223985)
turbosquid
$2
seat version 0.1
...
royalty free 3d model seat version 0.1 for download as blend on turbosquid: 3d models for games, architecture, videos. (1432653)
turbosquid
$12
Chip Version 03
...lty free 3d model chip version 03 for download as c4d and fbx on turbosquid: 3d models for games, architecture, videos. (1241145)
3d_export
$10

magnolia grandiflora mature version
...magnolia grandiflora mature version
3dexport
magnolia grandiflora mature version
3d_export
$8
room assets and voxel version
...room assets and voxel version
3dexport
room assets and voxel version
turbosquid
$35

Zil Civilian version
... model zil civilian version for download as cgf, fbx, and obj on turbosquid: 3d models for games, architecture, videos. (1639420)