Thingiverse

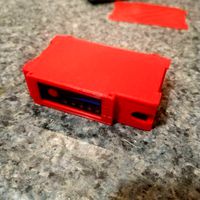
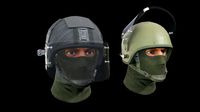
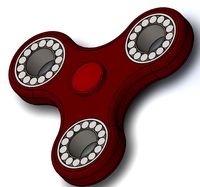
Antweight Combat Spinner Bot - Shrapnel Mk3 by Fryddog
by Thingiverse
Last crawled date: 3 years ago
Laser cutting and 3D printing required for this build!!!
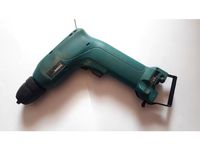
This is my Mk3 version of Shrapnel. After so many versions of my previous designs, I've organised my Mk versions by what weapon motor size I've used. Mk1 was an 1806, Mk2 an 1804 (weak!) and finally Mk3 with a 2204.
I have been using this version for 9 months now at our monthly meets and at an interstate competition and Shrapnel has been performing pretty well so far!
.
.
This version addresses most of the issues in the original Shrapnel design posted on thingiverse (https://www.thingiverse.com/thing:1692075):
Issue 1: The motor mount part of the 3D print would snap off with a hard enough hit.
Solution: An acetal top and bottom plate makes up most of the chassis now and prevents this from happening (a heavy enough hit from a strong vert spinner cracked it once however).
Issue 2: The wheels and drive motors copped a lot of hits and required frequent replacements.
Solution: Enclosed wheels protects the motors. The rear of the wheels are still exposed and vulnerable to horizontal spinner hits which damage the tread. Printed TPU wheels may solve this issue.
Issue 3: The internals were exposed on the weapon side.
Solution: A bulkhead was added to better hold the internals. Hot glue to hold things inside is no longer required!
Issue 4: Shrapnel would get stuck on his side quite easily.
Solution: Added small forks on the bottom plate assembly, this actually causes it to self right upside down but at least you're still fighting! Also created a diamond like shape on the wheel guard to prevent getting stuck on that side.
.
.
.
Assembly:
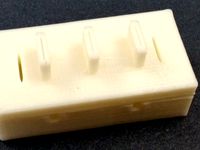
Print all of the STL files with whatever settings suit you best. Aim for the Shrapnel Base part to be approx 13 grams or less. Print 2 motor clamps.
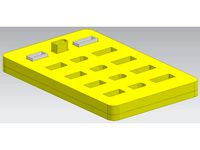
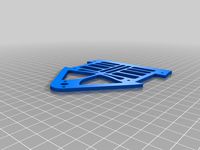
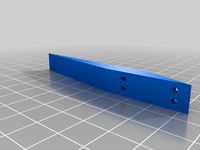
Laser cut all of the DXF files out of 3mm Acetal plastic. Nylon or HDPE would work well too but I haven't tried this. Top plate should be approx. 19 grams and the bottom approx. 14 grams.
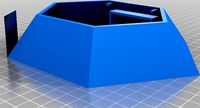
Heat and fold the top plate using a heat gun. The fold should be easy to figure out and use the photo in this listing for a guide.
Countersink all of the screw holes in the Acetal plates.
Use a file or linsher to put a 45 Degree angle where the top and bottom plates meet at the wedge tip.
Mount the motors (wheels attached) with the motor clamps, using small M2 self tapping screws. (I use spare screws from small servos).
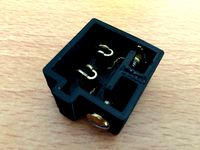
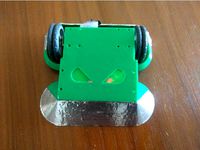
Solder the RC components and fit into chassis. Use the photo in the listing as a general guide. The BESC sits up top, above the drive motors. The battery squeezes between the drive motor connectors. The receiver sits under the right drive motor and the power switch sits under/behind the left drive motor.
Insert M3 nylon hex risers into the slots in the shrapnel base assembly and screw on the top plate. Use two steel M3x6mm screws to secure the plate to the nylon risers. Use two M3x3mm screws to tap into the base assembly to secure the rear of the top plate.
Mount the weapon motor to the chassis using two M3x3mm screws. The motor wires should run through the opening in the bulkhead of the base assembly.
Flip the bot upside down and insert an M5 flange bearing into the bottom plate hole, at the front end. Attach the weapon bar and secure the shaft nut with Loctite (do it up really tight!)
Mount the bottom plate to the bot in the same was as you did with the top plate. Two M3x6mm into the nylon risers, two M3x3mm tapped into the base assembly. When swapping a battery out during an event, I always access it by removing the bottom plate rather than the top.
For added protection, glue a 1mm piece of polycarbonate behind the rear wedge to protect the battery (not shown in photos). All it takes is a bot with a sharp point to pierce the battery!
.
.
.
Weapon:
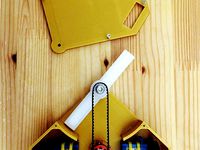
I used 3mm Grade 5 titanium, which I manufactured myself with a grinder. I drilled a 5mm hole in the center to mount it to the weapon motor. To ensure it was balanced I used a propeller balancer from Hobbyking.
Another idea could be to get a bar waterjet or plasma cut from a sheet of titanium, but this can be costly.
A simple steel bar is also suitable but keep in mind it will be heavier.
Aim for a 20 gram bar approx. for this bot.
.
.
.
Soldering:
When soldering the components, you will need to be clever in how you fit everything inside and only leave as little wire slack as possible.
As for what solders where, you can google "combat robot wiring" and find dozens of wiring diagrams to use.
So here's just a few tips for this bot:
The DF Robot motors with built in drivers come with a connector and cable. Chop off the black connector for both - this isn't needed!
The motor connector wires are as follows: Red=positive battery supply (after the switch), Black=negative battery supply, Green=signal from your receiver. You could also hard wire to the driver board to save space too.
The motor drivers don't have a BEC (5V supply for the receiver) so use the BEC from your Brushless ESC (make sure you buy one with a BEC!).
The micro receiver I use required me to solder Micro Molex connectors in, but you could also just solder the wires directly into your receiver.
Modifiy all of your wiring so that you don't have excess length - there's limited space in this bot!
.
.
.
Parts:
When selecting parts the following list isn't necessarily what you have to use. The important thing is to pick parts that are small and lightweight. The total weight for my internal parts (not including the weapon bar, screws and bearings) was approx. 76 grams. I allowed 6 grams for the screws and bearing.
(I will not post all of the web links for these parts as they can be sourced from many places and often the listings for these parts will expire. You should be able to search for the parts using the descriptions I provide.)
Receiver - Orange Micro Aircraft Receiver, 4 Channel. (Cannot find the listing for what I used)
Weapon Motor - Sunnysky X2204S
Battery - Turnigy Nano Tech 180mAh 2S https://hobbyking.com/en_us/turnigy-nano-tech-180mah-2s-25-40c-lipo-pack-5pcs.html
Drive Motor - DF Robot Motor W/Driver https://www.dfrobot.com/product-1488.html
Wheels - 32mm Pololu Wheels, Pair https://www.littlebirdelectronics.com.au/pololu-wheel-32x7mm-pair-black
Brushless ESC - Turnigy Plush 10A W/BEC https://hobbyking.com/en_us/turnigy-plush-10amp-9gram-speed-controller.html
Fixings - M3x3mm Galv, M3x6mm Galv, M2 self tapping or machine screws.
Weapon - 3mm Titanium Bar, fixed to the chassis with an M5 half nut.
Weapon Bearing - 5mm ID, 8mm OD Flange Bearing. https://www.ebay.com.au/itm/5x8x2-5mm-Flanged-2-RC-Bearings-Metal-Shields-AXIA1214-MF85-ZZ-Flange/151418085452?hash=item234138a04c:g:Dk4AAOSwWxNYrA5U
Extras - 10A Power switch and Red JST male connector https://hobbyking.com/en_us/male-jst-battery-pigtail-12cm-length-10pcs-bag.html
.
.
.
.
Feel free to ask questions on anything I might have missed in the comments!Good luck!
This is my Mk3 version of Shrapnel. After so many versions of my previous designs, I've organised my Mk versions by what weapon motor size I've used. Mk1 was an 1806, Mk2 an 1804 (weak!) and finally Mk3 with a 2204.
I have been using this version for 9 months now at our monthly meets and at an interstate competition and Shrapnel has been performing pretty well so far!
.
.
This version addresses most of the issues in the original Shrapnel design posted on thingiverse (https://www.thingiverse.com/thing:1692075):
Issue 1: The motor mount part of the 3D print would snap off with a hard enough hit.
Solution: An acetal top and bottom plate makes up most of the chassis now and prevents this from happening (a heavy enough hit from a strong vert spinner cracked it once however).
Issue 2: The wheels and drive motors copped a lot of hits and required frequent replacements.
Solution: Enclosed wheels protects the motors. The rear of the wheels are still exposed and vulnerable to horizontal spinner hits which damage the tread. Printed TPU wheels may solve this issue.
Issue 3: The internals were exposed on the weapon side.
Solution: A bulkhead was added to better hold the internals. Hot glue to hold things inside is no longer required!
Issue 4: Shrapnel would get stuck on his side quite easily.
Solution: Added small forks on the bottom plate assembly, this actually causes it to self right upside down but at least you're still fighting! Also created a diamond like shape on the wheel guard to prevent getting stuck on that side.
.
.
.
Assembly:
Print all of the STL files with whatever settings suit you best. Aim for the Shrapnel Base part to be approx 13 grams or less. Print 2 motor clamps.
Laser cut all of the DXF files out of 3mm Acetal plastic. Nylon or HDPE would work well too but I haven't tried this. Top plate should be approx. 19 grams and the bottom approx. 14 grams.
Heat and fold the top plate using a heat gun. The fold should be easy to figure out and use the photo in this listing for a guide.
Countersink all of the screw holes in the Acetal plates.
Use a file or linsher to put a 45 Degree angle where the top and bottom plates meet at the wedge tip.
Mount the motors (wheels attached) with the motor clamps, using small M2 self tapping screws. (I use spare screws from small servos).
Solder the RC components and fit into chassis. Use the photo in the listing as a general guide. The BESC sits up top, above the drive motors. The battery squeezes between the drive motor connectors. The receiver sits under the right drive motor and the power switch sits under/behind the left drive motor.
Insert M3 nylon hex risers into the slots in the shrapnel base assembly and screw on the top plate. Use two steel M3x6mm screws to secure the plate to the nylon risers. Use two M3x3mm screws to tap into the base assembly to secure the rear of the top plate.
Mount the weapon motor to the chassis using two M3x3mm screws. The motor wires should run through the opening in the bulkhead of the base assembly.
Flip the bot upside down and insert an M5 flange bearing into the bottom plate hole, at the front end. Attach the weapon bar and secure the shaft nut with Loctite (do it up really tight!)
Mount the bottom plate to the bot in the same was as you did with the top plate. Two M3x6mm into the nylon risers, two M3x3mm tapped into the base assembly. When swapping a battery out during an event, I always access it by removing the bottom plate rather than the top.
For added protection, glue a 1mm piece of polycarbonate behind the rear wedge to protect the battery (not shown in photos). All it takes is a bot with a sharp point to pierce the battery!
.
.
.
Weapon:
I used 3mm Grade 5 titanium, which I manufactured myself with a grinder. I drilled a 5mm hole in the center to mount it to the weapon motor. To ensure it was balanced I used a propeller balancer from Hobbyking.
Another idea could be to get a bar waterjet or plasma cut from a sheet of titanium, but this can be costly.
A simple steel bar is also suitable but keep in mind it will be heavier.
Aim for a 20 gram bar approx. for this bot.
.
.
.
Soldering:
When soldering the components, you will need to be clever in how you fit everything inside and only leave as little wire slack as possible.
As for what solders where, you can google "combat robot wiring" and find dozens of wiring diagrams to use.
So here's just a few tips for this bot:
The DF Robot motors with built in drivers come with a connector and cable. Chop off the black connector for both - this isn't needed!
The motor connector wires are as follows: Red=positive battery supply (after the switch), Black=negative battery supply, Green=signal from your receiver. You could also hard wire to the driver board to save space too.
The motor drivers don't have a BEC (5V supply for the receiver) so use the BEC from your Brushless ESC (make sure you buy one with a BEC!).
The micro receiver I use required me to solder Micro Molex connectors in, but you could also just solder the wires directly into your receiver.
Modifiy all of your wiring so that you don't have excess length - there's limited space in this bot!
.
.
.
Parts:
When selecting parts the following list isn't necessarily what you have to use. The important thing is to pick parts that are small and lightweight. The total weight for my internal parts (not including the weapon bar, screws and bearings) was approx. 76 grams. I allowed 6 grams for the screws and bearing.
(I will not post all of the web links for these parts as they can be sourced from many places and often the listings for these parts will expire. You should be able to search for the parts using the descriptions I provide.)
Receiver - Orange Micro Aircraft Receiver, 4 Channel. (Cannot find the listing for what I used)
Weapon Motor - Sunnysky X2204S
Battery - Turnigy Nano Tech 180mAh 2S https://hobbyking.com/en_us/turnigy-nano-tech-180mah-2s-25-40c-lipo-pack-5pcs.html
Drive Motor - DF Robot Motor W/Driver https://www.dfrobot.com/product-1488.html
Wheels - 32mm Pololu Wheels, Pair https://www.littlebirdelectronics.com.au/pololu-wheel-32x7mm-pair-black
Brushless ESC - Turnigy Plush 10A W/BEC https://hobbyking.com/en_us/turnigy-plush-10amp-9gram-speed-controller.html
Fixings - M3x3mm Galv, M3x6mm Galv, M2 self tapping or machine screws.
Weapon - 3mm Titanium Bar, fixed to the chassis with an M5 half nut.
Weapon Bearing - 5mm ID, 8mm OD Flange Bearing. https://www.ebay.com.au/itm/5x8x2-5mm-Flanged-2-RC-Bearings-Metal-Shields-AXIA1214-MF85-ZZ-Flange/151418085452?hash=item234138a04c:g:Dk4AAOSwWxNYrA5U
Extras - 10A Power switch and Red JST male connector https://hobbyking.com/en_us/male-jst-battery-pigtail-12cm-length-10pcs-bag.html
.
.
.
.
Feel free to ask questions on anything I might have missed in the comments!Good luck!
Similar models
thingiverse
free

Antweight Combat Spinner Bot - Shrapnel Mk1 by Fryddog
...uild of shrapnel:https://youtu.be/msqu1fzzkb8
and here's a video of him in action:https://www.youtube.com/watch?v=51fvmvtif0c
3dwarehouse
free

Null Pointer
...6 lbs before screws, wire, and hubs (which i can't find a weight estimate for...). #beetleweight #combat_robot #robot_battles
thingiverse
free

T12 Soldering Station for DEKO 18V battery by Rafix095
...dering station for deko 18v battery
you will need:
t12 soldering kit
2x blade wire connectors
some wire
some screws
rocker switch
thingiverse
free
Makita 7,2V to 2S LiPo conversion mod by yamaha26
...ce and the sides swelling.
if you like my conversion mod and you need parts please use my referral link to register on hk.
thanks
thingiverse
free
Kobalt 80v Battery Connector by HeavyOsmium
...ions, shock hazards, fires or worse. do not use this connector if you are unfamiliar with high voltages or lithium ion batteries.
grabcad
free

Antweight Wedge - Minibot
... from aluminum. be aware, this design requires a very thin battery.
in the configuration i use, the bot weighs around 12 ounces.
thingiverse
free
XT30 Balance Board (3S + 4S) by marcelwelter
...o glue the bottom and the top plate together, it was a tight fit. check for shorts with a multimeter before connecting a battery!
thingiverse
free
![Ryobi Soldering Station [BOTTOM PLATES] for TS100 SQ001 TS80 TS80P Pinecil by samudge](/t/9673111.jpg)
Ryobi Soldering Station [BOTTOM PLATES] for TS100 SQ001 TS80 TS80P Pinecil by samudge
...superglue for this.
without these plates, the wiring and other internals are exposed unless the station is attached to a battery.
thingiverse
free
DeWalt 18V Battery Connector by trench47
...y alongside the threaded brass tab.
i power a dc to dc buck converter reducing the 18v down to 5v used to power a raspberry pi.
thingiverse
free
Fatshark Battery Holder 18650 with Voltage Meter by bonzailyte
...ersion 1.0 will likely update some things with this , needs a little bit better screw config but even as is works perfectly well.
Fryddog
thingiverse
free

Enterprise D Stand by Fryddog
...giverse
this is a stand i knocked up for the enterprise d print by solid_alexei.
my dad, being the big trekkie his is, loved it!
thingiverse
free

Antweight Combat Wedge - Rollcage by Fryddog
...and insert into chassis.
attach the wheels and you're done!
here's a build video of rollcage:https://youtu.be/yqmmvljw1rw
thingiverse
free
Antweight Combat Spinner Bot - Shrapnel Mk1 by Fryddog
...uild of shrapnel:https://youtu.be/msqu1fzzkb8
and here's a video of him in action:https://www.youtube.com/watch?v=51fvmvtif0c
thingiverse
free

Plover (150g combat robot) by aldwin
...local fights. i've modified the n20/micro-metal gearmotor clamps from fryddog#39;s bot rollcage and similar components can be used for...
Shrapnel
turbosquid
$24
Frag gold grenade
...frag gold grenade turbosquid royalty free 3d model shrapnel gold grenade for download as obj, stl, and ige...
3d_export
$12
relay assembly machine
...or above to open it!<br>this equipment is an automatic shrapnel assembly machine in the relay industry, the equipment uses...
3d_export
free

Brdm-2
...its armor protects only from small arms bullets and shrapnel the main feature of the car is a very...
3d_ocean
$15
British Pound Sterling Coins
...heads metal payment pence penny pound queen shield shopping shrapnel silver spending sterling tails uk this file contains uk...
3d_export
$9
helmet zsh-1-2
...to protect the human head from firearms bullets and shrapnel it was adopted by the ru mvd in 2007.<br>the...
thingiverse
free

Insecticon shrapnel by Lam3gamer
...insecticon shrapnel by lam3gamer
thingiverse
thingiverse
free

Fidget Spinner - Shrapnel by BlackHawkAC
...dget spinner with a shard of shrapnel in mind. center hole is a standard 22 mm bearing, outer holes are sized to hold 4 quarters.
thingiverse
free

Redragon Shrapnel RGB Keycap replacement by xenomorphdelombre
...y xenomorphdelombre
thingiverse
replica of a redragon rgb cherry mx keycap (low profile) that i did to print on my resin printer
thingiverse
free
Shrapnel Mk3 Top and Bottom Plate Stl and Svg
...3 top and bottom plate stl and svg
thingiverse
the top and bottom plate in stl format and svg for 3d printing and laser cutting.
thingiverse
free
Antweight Combat Spinner Bot - Shrapnel Mk1 by Fryddog
...uild of shrapnel:https://youtu.be/msqu1fzzkb8
and here's a video of him in action:https://www.youtube.com/watch?v=51fvmvtif0c
Antweight
thingiverse
free

Dropsaw antweight bot body
...dropsaw antweight bot body
thingiverse
chassis for dropsaw antweight battlebot
thingiverse
free
Dropsaw antweight bot tynes
...dropsaw antweight bot tynes
thingiverse
tynes for front of drawsaw antweight battlebot
thingiverse
free

Antweight Robot - 4W Drive by ACE_ROBOTICS
...antweight robot - 4w drive by ace_robotics
thingiverse
150g antweight robot
thingiverse
free

Antweight Robot - MINI Emoji by ACE_ROBOTICS
...antweight robot - mini emoji by ace_robotics
thingiverse
150g antweight robot
thingiverse
free

Antweight Robot - ACE by ACE_ROBOTICS
...antweight robot - ace by ace_robotics
thingiverse
150g antweight robot, based on our hw robot "ace"
thingiverse
free

Kidney Stone antweight by deadpoool
...antweight by deadpoool
thingiverse
this is an antweight battle bot i made for the hell of it. feel free to mod/remix this design
thingiverse
free
Robotwars Antweight inspired by Carbide by alexmordue
...robotwars antweight inspired by carbide by alexmordue
thingiverse
robotwars antweight robot inspired by carbide
thingiverse
free

G1 antweight pusher robot hull
...g1 antweight pusher robot hull
thingiverse
simple antweight combat robot design. created to be driven by two sg90 servo motors.
thingiverse
free
Hex Bug (antweight class battle bot) by TNPI2
...ter of an rc car. the drive motors are small yellow gearboxes which run at 3.3 volts and the battery is a 4.5 volt 650ma battery.
thingiverse
free
Antweight wedge combat robot by Team_Panic
...wedge, or cover it in aluminium tape
use "slightlycrudetopeyes" file to add a section of translucent plastic to the lid
Mk3
turbosquid
$50

cention mk3
...ty free 3d model cention mk3 for download as ma, obj, and fbx on turbosquid: 3d models for games, architecture, videos. (1454148)
turbosquid
$129

MK3 Tank
... available on turbo squid, the world's leading provider of digital 3d models for visualization, films, television, and games.
turbosquid
$100

Toyota Supra MK3
... available on turbo squid, the world's leading provider of digital 3d models for visualization, films, television, and games.
turbosquid
$44

cention mk3 low poly
...d model cention mk3 low poly for download as ma, obj, and fbx on turbosquid: 3d models for games, architecture, videos. (1454666)
turbosquid
$30

Challenger I Mk3 Falcon
... available on turbo squid, the world's leading provider of digital 3d models for visualization, films, television, and games.
turbosquid
$10

American Frag hand grenade MK3
...free 3d model american frag hand grenade mk3 for download as on turbosquid: 3d models for games, architecture, videos. (1393624)
turbosquid
$20

Mk3 US Navy Combat Knife
...ty free 3d model mk3 us navy combat knife for download as fbx on turbosquid: 3d models for games, architecture, videos. (1172791)
3d_export
$29

Ford Fiesta MK3 Modified 3D Model
...7 tumerfx mtumer mehmet t?mer 1993 1995 1996 wrc special modifed modifiye
ford fiesta mk3 modified 3d model mtumer 30698 3dexport
3d_export
$99

Toyota Supra Mk3 19861993 3D Model
...ort fast coupe japan 1986 1987 1988 1989 1990 1991 1992 1993 tuning turbo
toyota supra mk3 19861993 3d model squir 62530 3dexport
turbosquid
$5

Timothy Oulton Mars Chair MK3
...on mars chair mk3 for download as 3ds, max, obj, fbx, and dae on turbosquid: 3d models for games, architecture, videos. (1209782)
Bot
turbosquid
$19

Bot
... available on turbo squid, the world's leading provider of digital 3d models for visualization, films, television, and games.
turbosquid
free

Bot
... available on turbo squid, the world's leading provider of digital 3d models for visualization, films, television, and games.
3d_export
$10

scanner bot
...scanner bot
3dexport
cool scanner bot who scans for fixing things...
3d_ocean
$9

Apc Bot
...n bot games toys
an all-purpose-constructo-bot. for cartoon purposes. the model is not rigged. please use vray adv for rendering.
3d_export
$75
Bot 3D Model
...bot 3d model
3dexport
robot bot man kiborg character
bot 3d model evgen 19504 3dexport
turbosquid
free

Eye Bot
...eye bot
turbosquid
free 3d model eye bot for download as fbx on turbosquid: 3d models for games, architecture, videos. (1514059)
turbosquid
$29

Gorill-bot
...bosquid
royalty free 3d model gorill-bot for download as fbx on turbosquid: 3d models for games, architecture, videos. (1239456)
turbosquid
$25

Lamp Bot
...bosquid
royalty free 3d model lamp bot for download as blend on turbosquid: 3d models for games, architecture, videos. (1230121)
turbosquid
$10
Spectre Bot
...osquid
royalty free 3d model spectre bot for download as fbx on turbosquid: 3d models for games, architecture, videos. (1616378)
turbosquid
$8

Ultra Bot
...urbosquid
royalty free 3d model ultra bot for download as ma on turbosquid: 3d models for games, architecture, videos. (1330752)
Spinner
turbosquid
$5

Spinner
...turbosquid
royalty free 3d model spinner for download as max on turbosquid: 3d models for games, architecture, videos. (1190412)
turbosquid
$1

Spinner
...turbosquid
royalty free 3d model spinner for download as dwg on turbosquid: 3d models for games, architecture, videos. (1173525)
3d_export
$5
spinner toy
...spinner toy
3dexport
cool spinner toy.
turbosquid
$12

Spinner
...id
royalty free 3d model spinner for download as max and obj on turbosquid: 3d models for games, architecture, videos. (1242592)
turbosquid
$20

Spinner
...lty free 3d model spinner for download as obj, fbx, and blend on turbosquid: 3d models for games, architecture, videos. (1191800)
turbosquid
$15

spinner
...yalty free 3d model spinner for download as max, obj, and fbx on turbosquid: 3d models for games, architecture, videos. (1165932)
turbosquid
$2

Spinner
...oyalty free 3d model spinner for download as ma, obj, and fbx on turbosquid: 3d models for games, architecture, videos. (1187750)
turbosquid
free

Spinner
...lty free 3d model spinner for download as obj, fbx, and blend on turbosquid: 3d models for games, architecture, videos. (1230908)
turbosquid
$29

spinner
... free 3d model spinner for download as 3ds, obj, c4d, and fbx on turbosquid: 3d models for games, architecture, videos. (1471160)
turbosquid
$4
Spinner
...y free 3d model spinner for download as ma, max, obj, and fbx on turbosquid: 3d models for games, architecture, videos. (1201076)
Combat
3d_export
$20
combat robot
...combat robot
3dexport
combat robot
3d_export
$5

Combat knife
...combat knife
3dexport
combat knife
3d_export
$5
combat knife
...combat knife
3dexport
combat knife
3d_export
$7

combat robot
...combat robot
3dexport
combat robot modeling in blender
3d_export
$5
combat knife
...combat knife
3dexport
free fantasy on the theme of a long combat knife. it is technologically thought out.
3d_export
$10

combat knife
...combat knife
3dexport
hyper realistic textured model of a combat knife. made using blender. rendered by cycles.
3d_export
$17
combat spacesuit
...combat spacesuit
3dexport
3d_export
$15

combat helmet
...combat helmet
3dexport
turbosquid
$15
Combat Knife
...rbosquid
royalty free 3d model combat knife for download as on turbosquid: 3d models for games, architecture, videos. (1425813)
turbosquid
$50
Combat Aircraft
...id
royalty free 3d model combat aircraft for download as max on turbosquid: 3d models for games, architecture, videos. (1419710)