Thingiverse

Anet A8 Z Axis CHUNK Reinforcement Top Mount & Z Motor Mount by TheWalkletts
by Thingiverse
Last crawled date: 3 years, 1 month ago
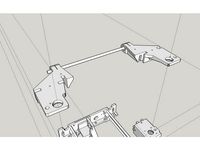
Significantly increase the stiffness of the Z axis arrangement.
Ties the leadscrew together with the bearing rod at the top with a ball bearing.
Tight fitting bearing rod points prevent the rods from being able to move.
Threaded rod between the two top mounts removes the Anet A8 cross bar flex and acts as a corner brace with the uprights.
Z Motor housings now single piece, and include a screw down point on the outer edge for fastening to a base board.
Top mounts are prepared with a 6.8mm diameter hole to allow tapping to M8 for the threaded bar tie rod. 8mm clearance through to the other side.
1: After printing, insert the bearing (should be a simple press fit)
2: Use an M8 tap to tap the tie rod hole from the washer flat side
3: Fit Z bearing rods into top blocks until all the way in. Do this on a flat wooden surface and tap the rod in until it stops moving.
4: Replace the Z motor housings. Clean out the bearing rod hole before fitting as this is also a good fit on the bearing rod.
5: Fit the top mounts with the bearing rods and guide the lower end of the bearing rod into the Z motor mount, and the top of the leadscrew into the ball bearing.
6: Use the original top mount M3 screws to fix the top mounts down.
7: Use the Z motor housing screwdown points to screw the A8 to the baseboard.
8: Re-level your bed & X Axis
9: Hopefully enjoy a reduction in Z banding!
Sounds like a lot of work, but actually only a 30 minute job once the parts are printed.
Top mounts take 1 x 608ZZ bearing each
Join the two top mounts using M8 threaded rod & nuts
Similar models
thingiverse
free

Smooth X-axis Motor mount for Anet A8 by dasquiddi
...unt (https://www.thingiverse.com/thing:1103976) to fit my anet a8. the dist. between the mounting holes and rods are now wider.
thingiverse
free
Anet A6 Z axis top plate M8 reinforced by qrisonline
...are connected by an m8 threaded rod.
this compensates for the rather flexible frame.
should fit just right. no drilling required.
thingiverse
free

Anet A8 Z-Axis top plates for 608 bearing by escwest
...anet a8 z-axis top plates for 608 bearing by escwest
thingiverse
anet a8 z-axis top plates for 608 bearing.
thingiverse
free

Geeetech Z axis bearing mount by woody_matt
...zed for the common 608 bearing (8mm id, 22mm od, 7mm thk). the model has 21mm centres between smooth rod hole and leadscrew axis.
thingiverse
free

Bianca - Nema 17 Motor mount with Z-Axis Stabilizer and Matching threaded rod bearing mount by Tabris25
...earing mount by tabris25
thingiverse
bianca - nema 17 motor mount with z-axis stabilizer and matching threaded rod bearing mount
thingiverse
free

Anet A8 Z-axis Compensator Bracket v.2 by mrfixer
...he guide rod into which a tab on the bracket fits. bracket v.2 should allow the compensator to be used with the flat top support.
thingiverse
free

NEMA17 Motor Bearing Offset by tymm
...od. it's made to fit over a coupler with screwdriver access to the set screws, and gives space for a 625 bearing at the top.
thingiverse
free

Prusa Air bearing holder by Plattekerre
...readed m8 rod of the z-axis of my prusa air. the mounting holes are 4.2 mm and the big hole is 22mm, to take a 608 ball bearing.
thingiverse
free

Anet A8 Upgrade motor and top plate on Z axis ... by Robchiks
...t - http://s.click.aliexpress.com/e/hasldbs
x shaft carriage for "titan aero" - http://s.click.aliexpress.com/e/rukpv48
thingiverse
free

Anti Z Wobble for Anet A8 by bedroman
...the rods to extend them enough to reach the holes in the frame. they're easy to install, just take off the plates on the top.

Chunk
archive3d
free

Chocolate 3D Model
...3d model archive3d chocolate milk chocolate box milk chocolate chunk baking mix box 2 - 3d model (*.gsm+*.3ds) for...
3d_ocean
$5

Chili Seamless Texture
...chili seamless texture 3docean seamless chili texture. featuring chunk of peppers, onions, meat, kidney beans and sweetcorn. perfect...
3d_ocean
$6

11 Ice Cream Flavours
...strawberry chocolate mint peach mint choc chip (with chocolate chunk) peanut butter (with peanut chunks) toffee swirl berry swirl...
cg_studio
$29

Concrete wall chunk3d model
...o
.3ds .dxf .fbx .lwo .max .obj - concrete wall chunk 3d model, royalty free license available, instant download after purchase.
archibase_planet
free

Chocolate
...chocolate archibase planet chocolate milk chocolate box milk chocolate chunk baking mix box 2 - 3d model (*.gsm+*.3ds) for...
3d_export
$27

Concrete wall chunk 3D Model
...d stone pebble iron ferroconcrete bars reinforced junk street blow chunk
concrete wall chunk 3d model duchampmodels 7923 3dexport
3d_export
$5

Bread 3D Model
...bread 3d model 3dexport bread kitchen chunk mental ray eat breakfast cooking 3d food model bread...
digiprops
$6

Red paver chunk
...d paver scratched, chipped, and broken off. for the licensing details, please see the pricing page. photoscanned in vancouver, bc
3d_export
$12

chunk chair
...br>native scene- blender<br>mesh- stl,obj,fbx.<br>texture-pbr(color,ao,height,metallic,normal,roughness).2048x2048
3d_export
$11

Bio Ethanol Fireplace - 3 Items
...used. - ready for closeup shots. - clean uv chunk - model is built to real-world scale. - system...
Reinforcement
3ddd
$1

SLV SOPRANA PD-4
...pply and equipped with a 4.9 ft long suspension.http://www.slvlighting.com/products/pendant-luminaire/soprana-pd-4.aspx
3ddd
$1

Softshell Chair with Four-Star Base
...d polyamide, cfc-free polyurethane foam, fabric or leatherhttp://www.yliving.com/vitra-softshell-chair-4-star-base.html
3ddd
$1

Подвесной светильник OISEAU
...%d0%b2%d0%b5%d1%81%d0%bd%d0%be%d0%b8-%d1%81%d0%b2%d0%b5%d1%82%d0%b8%d0%bb%d1%8c%d0%bd%d0%b8%d0%ba-oiseau-compagnie.html
3d_ocean
$3

Wooden Floor Tile 04
... wood
if you purchase this item, please don’t forget to rate it afterwards. this is hand painted, tileable wooden floor texture.
3d_ocean
$4

Wire Reinforced Glass
...ing is seamless, as you can see in the preview. the largest images are 2048×2048 pixels. also included are 1024, 512 and 256 p...
3d_ocean
$5

Metal Briefcase - Type 2
...ng professional purse reinforced safe shiny suitcase travel
metal aluminum briefcase formats included: *.obj, *.c4d, *.fbx, *.3ds
3d_ocean
$5

Metal Briefcase
...ng professional purse reinforced safe shiny suitcase travel
metal aluminum briefcase formats included: *.obj, *.c4d, *.fbx, *.3ds
3d_ocean
$6
Construction Site Reinforcement
...uctions. this is a low polygonal model, easy to animate. - poly count: 778 - formats: max /obj /fbx/3ds/dxf - high detail was ...
3ddd
$1

spHaus Apple
...ethane foam reinforced by a steel frame. available in all the fabrics and leathers in the catalogue. removable fabric upholstery.
3ddd
$1

Edito armchair by Roche Bobois
...th hr elastic straps. structure in solid fir wood reinforced with plywood and particle board.
swivel base in chrome-plated metal.
A8
3d_export
$99

Audi A8 2014 3D Model
...t
2013 2014 2015 2016 sedan saloon luxury expensive germany royal limousine audi a8 s8
audi a8 2014 3d model squir 73898 3dexport
3ddd
$1

Чайный столик
...чайный столик 3ddd журнальный чайный столик 800х600х260 изготоление этнической мебелиhttps://www.facebook.com/pages/%d0%9c%d0%b0%d1%81%d1%82%d0%b5%d1%80%d1%81%d0%ba%d0%b0%d1%8f-%d0%a8d0%b5%d1%80%d0%b2%d1%83%d0%b4/1547143605519211?pnref=story ...
3ddd
$1

Badari A8-60/2
...ari a8-60/2
3ddd
badari
бра badari a8-60/2
размеры 60x50h cm
люстра к нему имеется в соответствующем разделе сайта
170 000 polys
3d_ocean
$89

Audi A8 (D4) L 2014
...y, in real units of measurement, qualitatively and maximally close to the original. model formats: - *.max (3ds max 2008 scanl...
3d_ocean
$45

Audi A8 restyled
...our door vehicle was created in blender3d 2.62.realistic renderings were created with yafaray 0.1.2 realistic plugin.rendering...
3d_ocean
$89

Audi A8 2009
...y, in real units of measurement, qualitatively and maximally close to the original. model formats: - *.max (3ds max 2008 scanl...
3d_ocean
$89

Audi A8 (D2) 1999
...y, in real units of measurement, qualitatively and maximally close to the original. model formats: - *.max (3ds max 2008 scanl...
3d_ocean
$12

B&O BeoPlay A8 3D model
...mini-usb socket, line-in via phone (aux). - high detailed 3d models. - vray hqmaterial+texture assigned. - elegant design to a...
3d_ocean
$89

Audi S8 (D4) 2014
...audi s8 (d4) 2014 3docean 2014-2016 4-door car a8 audi audi d4 audi s8 facelift full size car...
3d_ocean
$89

Audi S8 2013
...audi s8 2013 3docean 2013-2016 4-door 4wd a8 audi audi s8 d4 full-size high-performance luxury quattro s8...
Anet
thingiverse
free

Stand Laptop by MarioW98
...which is less than 2 kg i have an anet a8...
thingiverse
free

Anet ET4 Dial Indicator Mount for Bed Levelling by peterfjorgensen
...ted to make my own model in fusion 360, as a learning experience. i think it came out pretty well, so decided to share this post.
thingiverse
free

Base filamento Anet A8 by AnibalJesus
...base filamento anet a8 by anibaljesus
thingiverse
diseñe esta base ya que la mia se rompio
thingiverse
free

Anet A6 A8 PTFE tube organizer by 3dpartmaker
...he clamp should be printed with minimal 1.6 mm wall thickness.
connect the clamp and tube clamp with two pieces 1.75 mm filament.
thingiverse
free

Anet A8 filament guide by Miguelbq
...when it comes from the top in the printer box
you can place it above or below the display, fasten it with screws or with hot glue
thingiverse
free

Anet A8 Bed leveling knob by ale624
...ake a regular nut if anyone would like.
works really well and makes adjusting the bed much nicer, especially on the first layers!
thingiverse
free

Yenkee Mouse Baterry Cover by zetor116
...design spark mechanical, sliced with prusaslicer 2.2.0, printed with anet a8, used material is prusament petg black. needs to...
thingiverse
free

Anet A8 X belt tensioner by Xshape
...net a8 x belt tensioner by xshape
thingiverse
another belt tensioner for the anet a8.
parts needeed :
1x 50 mm m5 bolt
1x m5 nut
thingiverse
free

Ikea Lack Table Stacker 10 cm (Anet A8 etc.) by Kharmeleon
...printers like mine. hope this helps people, too!
leave me a comment down below and let me know if it worked for you guys. thanks.
thingiverse
free

Anet A8 Plus bed cable holder by amirchen
...oticed that the bed cable is rubbing against the y axis switch so i have decided to design and build a cable holder to prevent it
Axis
3d_export
$99

MercedesBenz Axor Tractor Truck 2011 3D Model
...3d model 3dexport mercedes-benz axor 2644 tractor mercedes benz 3-axis 2011 2012 2013 2014 2015 2016 truck heavy duty...
3d_export
$99
Iveco Trakker Log Truck 4axis 2012 3D Model
...-axis 2011 2012 2013 2014 truck heavy duty trucks industrial
iveco trakker log truck 4axis 2012 3d model humster3d 59446 3dexport
3d_export
$99

MAN TGS Skip Loader Truck 2012 3D Model
...man tgs skip loader truck 2011 2012 2013 2014 2-axis heavy industrial trucks germany german man tgs skip loader...
3d_export
$50

Human Spine 3D Model
...human anatomy body medical cervical thoracic lumbar sacrum coccyx axis disc skeletal disk spinal column human spine 3d model...
3ddd
$1

Hulsta / Elea
...от hulsta / elea модель телефизора из сборника cg axis faces:...
3d_ocean
$7

3D Mirror
...design. this model ready to be machined using 3 axis ...
3d_export
$10

Wind Turbine 3D Model
...kinetic electrical aerofoil powered generator windmill farm hawt horizontal axis electric wind turbine 3d model download .c4d .max .obj...
3ddd
$1
Outdoor Gym Set 1
...point of each element is at zero on the axis "z". gym vol.7538 polys - 19986 verts - 20580...
cg_studio
$79

75mm Pak 97/383d model
...pak 97/383d model cgstudio 75mm anti anti-tank artillery at axis firearm german gun heavy ii military nazi pak tank...
3ddd
$1

LEGO SW Imperial Shuttle
...- all textures inside - rotation groups with true axis - 350k polys - 230x175x215 mm. - fbx +...
Z
3ddd
$1

ПОДВЕСНОЙ УНИТАЗ + БИДЕ cersanit
...[мм] 355 глубина [мм] 525 carina настенное биде артикул p-bi-carina-z ширина [мм] 355 глубина [мм] 525 link кнопка смыва,...
3ddd
$1

Игровой автомат Gaminator fv629
...gaminator fv629. polys: 14 864 x: 570mm y: 415mm z ...
3ddd
$1

Букет сирени
...букет , ваза polys: 331007 габаритные размеры: x-545mm, y-525mm, z595mm. ...
3d_ocean
$7

Glass Door Z 006
...cluded material pack — you may mix materials with no restrictions. there is some renders for example — you may download materi...
3d_ocean
$7

Glass Door Z 002
...cluded material pack — you may mix materials with no restrictions. there is some renders for example — you may download materi...
3d_ocean
$9

GLOWING AND RIGGED ALPHABET A TO Z
...ng like light and its rigged increate deformers > non linear like bend,twist, stretch and squash eight types of movemen...
3d_export
$19

Glass Door Z 007 3D Model
...gle hinge brass entry door
glass door z 007 3d model download .c4d .max .obj .fbx .ma .lwo .3ds .3dm .stl quartor 104462 3dexport
3ddd
$1

Orchid bouquet 2.0
...of model: x = 450 mm y = 460mm z = 745 mm the archive contains all the textures....
3ddd
$1
"Louix" стул и табурет_"Louix" сhair High and stool
...в центре сцены в нулевых координатах. привязка по оси "zquot; для каждого элемента находится в нулевой высоте и в...
3ddd
$1
Outdoor Gym Set 1
..."z". gym vol.7538 polys - 19986 verts - 20580 siz - 630 x 1000 x 1545 gym vol.7537 polys...
Motor
3d_export
$99

Buick Skylark convertible 1964 3D Model
...1965 1966 1967 classic 2-door coupe sport convertible general motor us american buick skylark convertible 1964 3d model humster3d...
3d_export
$89

GMC Yukon Hybrid 2013 3D Model
...2013 3d model 3dexport gmc yukon hybrid 2013 general motor avto car vehicle auto automobile cars 3d model higt...
3d_export
$89

GMC Yukon SLT 3D Model
...yukon slt 3d model 3dexport gmc yukon slt general motor avto car vehicle auto automobile cars 3d model higt...
3ddd
$1

Currey & Company Orion
...bulb type: candelabra chain length: 6 feet freight information: motor freight item wt: 13 pkg wt: 34 the model...
3d_ocean
$85

Ferrari 488 Spider 2016
...scheduled to make its official premiere during the frankfurt motor show this september. the italian company explains this is...
3d_export
$16

W Motors Lykan Hypersport logo 3D Model
...adge marque
w motors lykan hypersport logo 3d model download .c4d .max .obj .fbx .ma .lwo .3ds .3dm .stl rmodeler 104172 3dexport
3d_export
$129

Yamaha XJ6 2009 3D Model
...2011 2012 2013 2014 super sport motorcycle motorbike bike motor cycle japan yamaha xj6 2009 3d model download .c4d...
cg_studio
$50

Rat Rod3d model
...vintage retro oldschool old classic american car antique vehicle motor .dae .obj .blend - rat rod 3d model, royalty...
cg_studio
$50

Hot Rod3d model
...model cgstudio classic old car vehicle vintage abtique hotrod motor retro oldtimer oldschool american blak metal .x .dae .obj...
cg_studio
$99

Engine 023d model
...engine 023d model cgstudio v8 car engine motor vehicle cylinder power realistic part mechanical piston exhaust pipe...
Top
3d_export
$20
Oven MAX 2011 3D Model
...hob stove cooker kitchen oven interior worktop cooking panel top pan oven max 2011 3d model motionmediaworkshop 69949...
3d_export
$29
Bedside Table 3D Model
...bedside table 3d model 3dexport side table drawers top wooden storage chest bedside table 3d model archicube.3d 74311...
3ddd
$1

ferm_LIVING_baskets
...создаете себе красивый столик. в дополнение к столику идет декор.http://www.fermliving.com/webshop/shop/wire-baskets.aspx http://www.fermliving.com/webshop/shop/wire-baskets/wire-basket-top3.aspx http://www.fermliving.com/webshop/shop/all-products/winebottle-candleholder-5.aspx http://www.fermliving.com/webshop/shop/geometry-vase-1.aspx в архиве max...
3ddd
$1
ISEN tables by Belta and Frajumar
...frajumar. dimensions: d80*h37 cm, d40*h45 cm. finishings: base: textile, top wood and stainless...
3ddd
$1

Suar Wood Table Top Decoration
...suar wood table top decoration
3ddd
статуэтка , коряга
декор из дерева
3ddd
$1
Mis en Demeure
...консоль в стиле прованс. франция. console avignon small marble top ...
3d_ocean
$85

Mercedes 300SL Roaster Top
...etailed interior. the model comes in five formats: -.blend, rendered with cycles, as seen in the images; -.obj, with materials...
3d_ocean
$4

Earth
...full game latest map most new planet plygon ready top world earth 3d model is available in all major...
3d_ocean
$99

Full Land Rover Defender 90 Hard Top
...y detailed interior and chassis, with engine, gearbox, exhaust, suspension and brakes modeled. the model comes in five formats...
3d_ocean
$85

Mercedes 300SL Roaster Top
...etailed interior. the model comes in five formats: -.blend, rendered with cycles, as seen in the images; -.obj, with materials...
Mount
3ddd
$1
Vega flush mount lamp
...t lamp
3ddd
dimensions: 22.5"wx22.5"dx12"h
размеры: 58см х 58см х 31см
v-ray light included | v-ray light внутри
3ddd
$1
Currey & Company Balthazar
...quality of the glass elements. product name: balthazar ceiling mount dimensions: 21h x 18d x 18w number of lights:...
3d_ocean
$5
Rock_6
...rock_6 3docean mount mountin rock rocks stone rock_6….............1474.polygon. .1476.vertices. 4096 * 4096 texture....
3d_ocean
$19

Low Poly Hotel
...and flower pots, trees, brunches, street lights, trashcans, wall mountd air freshener, air conditioners, fire...
3d_ocean
$25

Low Poly Buildings
...storehouse/warehouse, one grocery/minimarket, flower beds and flower pots, wall mountd air freshener, air conditioners, air intake,...
3d_ocean
$5

rock_4
...rock_4 3docean low polygon mount mountin old rock rock stone rock_4…...............1419.polygon. .1421.vertices. 4096 * 4096...
3d_ocean
$5

mountain_9
...n_9…........................12560 polygon. ...12562 vertices. 4096 * 4096 texture obj , fbx , and blend format model. game ready.
3d_ocean
$25

Low Poly City Block
...and flower pots, trees, brunches, street lights, trashcans, wall mountd ...
3d_ocean
$5

Rock_3
...rock_3 3docean mount mountin rock stone rock_3…..............6048.polygon 6127.point. 4096*4096 texture. obj,fbx,blend format model....
3d_ocean
$5

Rock_2
...rock_2 3docean mount mountin rock stone rock_2…...............3196.polygon 3248.point. 4096*4096 texture. obj,fbx,blend format model....