Thingiverse

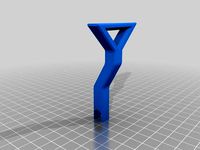
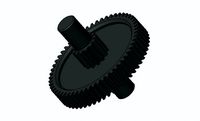
Anet A8 Z Axis Brake by Gear_Down_For_What
by Thingiverse
Last crawled date: 3 years, 1 month ago
UPDATES!
5/14/17- Was notified that the brake is a bit too strong for some printers, Created two more versions. P1 Clearance is .1 more clearance and P2 clearance has .2 more. Comment if you would like to see more clearance than that.
Results
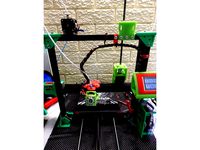
4/19/17- After the initial installation of this i aligned by X carriage perfectly horizontal by measuring with a digital caliper from the X rods to the Z axis stepper mounts.
Since then, the carriage has not changed one bit. I have not had to adjust my auto level sensor, and before this mod i had to adjust it every day.
This is the best mod i have ever done for my printer, and its super easy!
Just a tip!
After you install this, level your X carriage from the frame to the x axis rods, its very important that you level it to the rods, then make a mark on your stepper motor shaft collar and a mark on the Z-Brake with a sharpie, and you will never need to use the caliper again, and you can double check that they stay aligned by moving the Z axis up or down until the marks line up!
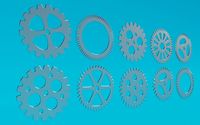
What Fer?
As soon as I printed other upgrade parts for my X axis carriage to line up the Z threaded rods I noticed that the entire carriage started to fall down when powered off, the weight of the X carriage was turning the Z axis rods very slowly overnight, and getting out of level. Anet must of intentionally
misaligned those rods to create some friction. If you have this issue too, here's a fix for you!
This will stop your Z Axis from falling down when your printer is off, but doesn't prevent your z-axis from moving, because your motors overpower it.
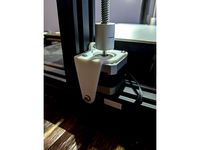
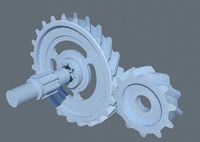
Install
if you have a squashed first layer make sure you clean that off of where it rubs on the shaft collar or else it will cause a LOT more drag than its intended to.
You might also run into an issue with too much drag, in this case the Z steppers will be unable to overcome this brake, you can either sand down the breaking surface, or adjust the potentiometer for your Z axis until your motors can overpower it, alternatively you can adjust the scaling or the included fusion 360 project to fit your printer or application.
For More Cool Projects and Upgrades, Don't forget to Follow Me on Thingiverse and Subscribe to my Youtube Channel, Gear Down For What?https://www.youtube.com/c/GearDownForWhat
5/14/17- Was notified that the brake is a bit too strong for some printers, Created two more versions. P1 Clearance is .1 more clearance and P2 clearance has .2 more. Comment if you would like to see more clearance than that.
Results
4/19/17- After the initial installation of this i aligned by X carriage perfectly horizontal by measuring with a digital caliper from the X rods to the Z axis stepper mounts.
Since then, the carriage has not changed one bit. I have not had to adjust my auto level sensor, and before this mod i had to adjust it every day.
This is the best mod i have ever done for my printer, and its super easy!
Just a tip!
After you install this, level your X carriage from the frame to the x axis rods, its very important that you level it to the rods, then make a mark on your stepper motor shaft collar and a mark on the Z-Brake with a sharpie, and you will never need to use the caliper again, and you can double check that they stay aligned by moving the Z axis up or down until the marks line up!
What Fer?
As soon as I printed other upgrade parts for my X axis carriage to line up the Z threaded rods I noticed that the entire carriage started to fall down when powered off, the weight of the X carriage was turning the Z axis rods very slowly overnight, and getting out of level. Anet must of intentionally
misaligned those rods to create some friction. If you have this issue too, here's a fix for you!
This will stop your Z Axis from falling down when your printer is off, but doesn't prevent your z-axis from moving, because your motors overpower it.
Install
if you have a squashed first layer make sure you clean that off of where it rubs on the shaft collar or else it will cause a LOT more drag than its intended to.
You might also run into an issue with too much drag, in this case the Z steppers will be unable to overcome this brake, you can either sand down the breaking surface, or adjust the potentiometer for your Z axis until your motors can overpower it, alternatively you can adjust the scaling or the included fusion 360 project to fit your printer or application.
For More Cool Projects and Upgrades, Don't forget to Follow Me on Thingiverse and Subscribe to my Youtube Channel, Gear Down For What?https://www.youtube.com/c/GearDownForWhat
Similar models
thingiverse
free
Z axis height calibration by photocromax
...tands are engaged and pressed by the rod
lift z axis 20 mm
remove the stands
done, you're ready to print or level your bed :)
thingiverse
free

Z distance blockers (for e.g. Anet A8) by 7eggert
...er a long time of having marks on the z rod connectors, i'd recommend to try that first. i rarely use these blockers anymore.
thingiverse
free

CR-10 Adjustable Z-axis Stepper + Damper Bracket (Remix) by Toothy1911
...p surface thickness (the one with 3 holes) by 2mm to raise the motor up off the aluminium frame slightly.
lh only model modified.
thingiverse
free

X Carriage Alignment Tool for Geeetech Prusa i3 by DougInAZ
...t carriage/bed leveling is all about. thanks to gzumwalt, thingiverse designer extraordinaire, for introducing me to a new word.
thingiverse
free

Laser Cutter Z Carriage by jawziii
... carriage will drop - you have to adjust laserweb to keep the z axis energised & adjust current on stepper driver accordingly
thingiverse
free
Sovol SV01 Adjustable Z Axis Stepper Mount by shagbag913
... used digital calipers to make everything as lined up as possible, then tightened everything down (including the lead screw nut).
thingiverse
free
Tevo Dual Linear Rod for "Z" Axis by iMakebyDesign
...prox 16, there are more holes than needed, but you can add / leave as needed.
1 x m3 x 35mm, idler pulley next to stepper motor .
thingiverse
free

X Axis Level Assist by Zday
...th any printer that uses 8mm x axis rods with an rod spacing of 53mm from the top of the top rod to the bottom of the bottom rod.
thingiverse
free

Z axis leveling / balancing / stopper clip for tronxy by atosys
... can sand or cut or edit the file according your machine.
long measured by 0 mm z height ( stop when nozzle touching print bed.)
thingiverse
free

Adimlab Gantry Leveling tool for 20x20 Extruded Frame by casedog21
...ld be level.
home and calibrate your bed.
recommend printing 12% or higher infill so the part that sticks out doesn't flex.
A8
turbosquid
$47

Car A8
...
turbosquid
royalty free 3d model car a8 for download as max on turbosquid: 3d models for games, architecture, videos. (1196060)
turbosquid
$50

Audi A8
...yalty free 3d model audi a8 for download as 3dm, obj, and fbx on turbosquid: 3d models for games, architecture, videos. (1580187)
turbosquid
$15

Audi A8
...lty free 3d model audi a8 for download as obj, fbx, and blend on turbosquid: 3d models for games, architecture, videos. (1387519)
turbosquid
$500

Audi A8
... available on turbo squid, the world's leading provider of digital 3d models for visualization, films, television, and games.
3d_export
$5

Audi A8 3D Model
...audi a8 3d model
3dexport
audi a8 cars car
audi a8 3d model ma 20351 3dexport
3d_export
$5

Audi A8 3D Model
...audi a8 3d model
3dexport
3d model of audi a8
audi a8 3d model badyaka 12136 3dexport
3d_ocean
$89

Audi A8 2010
...usiness car car class class f f german german luxury luxury s s s8 s8 sedan sedan vehicle vehicle
new audi a8 2010 detaled model.
turbosquid
$39

A8 2018
...a8 2018 for download as 3ds, obj, wrl, c4d, fbx, dae, and stl on turbosquid: 3d models for games, architecture, videos. (1345349)
turbosquid
free

audi a8 l
...rbosquid
royalty free 3d model audi a8 l for download as obj on turbosquid: 3d models for games, architecture, videos. (1663016)
3d_ocean
$45

Audi A8 restyled
...our door vehicle was created in blender3d 2.62.realistic renderings were created with yafaray 0.1.2 realistic plugin.rendering...
Anet
thingiverse
free

Anet by derbodesign
...anet by derbodesign
thingiverse
logo anet
thingiverse
free

Anet e10 , Anet v1.0 by jonathan_943D
...anet e10 , anet v1.0 by jonathan_943d
thingiverse
soporte de ventilador de 80mm, para controladora anet v1.0
thingiverse
free

Anet A8 Anet AM8 Y belt holder
...anet a8 anet am8 y belt holder
thingiverse
anet a8 anet am8 y belt holder
thingiverse
free

Anet A8 Probe Bracket for anet sensor by chelrix
...anet a8 probe bracket for anet sensor by chelrix
thingiverse
anet a8 probe bracket for anet official sensor and marlin firmware
thingiverse
free

Anet logo by JUST3D_PRNTNG
...anet logo by just3d_prntng
thingiverse
anet logo
thingiverse
free

Fan nozzle for Anet A8 with original Anet levelsensor by peteruhlmann
...et levelsensor by peteruhlmann
thingiverse
here is an improved fan nozzle for the anet a8 with original level sensor from anet.
thingiverse
free

Anet Et4 Box
...anet et4 box
thingiverse
tool box for anet et4
thingiverse
free

Anet Logo by Superflex_Plastic_Fantastic
...anet logo by superflex_plastic_fantastic
thingiverse
anet logo to incorporate into designs.
thingiverse
free

Box for Anet ET4
...box for anet et4
thingiverse
this is a simple box for tool of anet et4
thingiverse
free

Anet V1.0 Board Kühlung (80mm Lüfter) / Anet A8 by MadCre8
...anet v1.0 board kühlung (80mm lüfter) / anet a8 by madcre8
thingiverse
anet v1.0 board kühlung (80mm lüfter) / anet a8
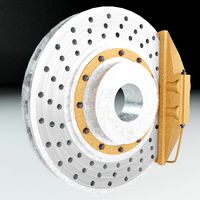
Brake
3d_export
$5
brake
...brake
3dexport
brake disk
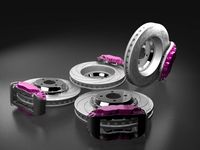
turbosquid
$2
Brake
... free 3d model brake for download as blend, fbx, obj, and stl on turbosquid: 3d models for games, architecture, videos. (1600351)
turbosquid
$19

Brakes
... available on turbo squid, the world's leading provider of digital 3d models for visualization, films, television, and games.
turbosquid
$9

brake
... available on turbo squid, the world's leading provider of digital 3d models for visualization, films, television, and games.
turbosquid
$7
Brake
... available on turbo squid, the world's leading provider of digital 3d models for visualization, films, television, and games.
turbosquid
free

brake
... available on turbo squid, the world's leading provider of digital 3d models for visualization, films, television, and games.
3d_export
$5

muzzle brake
...muzzle brake
3dexport
muzzle brake for large-caliber. not a real sample.
3d_export
$22

Brakes 3D Model
...brakes 3d model
3dexport
brakes disc support ventilated caliper brake disk wheel
brakes 3d model bayazoff 30362 3dexport
3d_export
$15
Brakes 3D Model
...brakes 3d model
3dexport
brake disk support caliper
brakes 3d model mackandco 33574 3dexport
3d_export
$10

brake-disc-brembo
...brake-disc-brembo
3dexport
brake-disc-brembo
Axis
3ddd
$1

Мария Axis
...
3ddd
кухня , классическая , axis
модель кухни.
3d_export
$22

Axis robot 6-axis robotic arm
...ing parts drawings, standard parts purchased parts list, can be produced directly according to the drawings, welcome to download!
3ddd
free

Versatile Axis
...ddd
nexus , плитка
http://bvtileandstone.com/ceramic-porcelain/versatile-axis/
3d_export
$19

robot 2 axis
...robot 2 axis
3dexport
robot 2 axis
turbosquid
$40

Axis R5F
... available on turbo squid, the world's leading provider of digital 3d models for visualization, films, television, and games.
turbosquid
$40

Axis S5F
... available on turbo squid, the world's leading provider of digital 3d models for visualization, films, television, and games.
turbosquid
$30

Axis Athlon
... available on turbo squid, the world's leading provider of digital 3d models for visualization, films, television, and games.
turbosquid
$10

Linear Axis
... available on turbo squid, the world's leading provider of digital 3d models for visualization, films, television, and games.
3d_export
$15

drawing axis
...drawing axis
3dexport
simple rendering of the scene file
3ddd
$1

versatile axis ARC
...versatile axis arc
3ddd
versatile , плитка
versatile axis arc red dot design award
Gear
3d_ocean
$4
Gears
...gears
3docean
gear gears iron
4 different size of gears
3d_export
$5
gear
...gear
3dexport
gear
3d_export
free
Gears
...gears
3dexport
gears
3d_export
$5
gear
...gear
3dexport
a simple model of gear
3d_export
$5
gear
...gear
3dexport
gear for transmission , case machine
3d_ocean
$3
Gears
...nical parts process steampunk vehicle wheel work
10 different gear models volume 01-10 files: .3ds .c4d .obj note: you need vray
3d_ocean
$1

Spur Gear
...spur gear
3docean
decoration gear
a typical spur gear
3d_ocean
$4
Gear wheels
...gear wheels
3docean
engine engineering gear gears industry machinery mechanical toothwheel wheel
pair of gear wheels : animated.
turbosquid
$9

Gear
...gear
turbosquid
royalty free 3d model gear for download as on turbosquid: 3d models for games, architecture, videos. (1712328)
turbosquid
$2

Gears
...rs
turbosquid
royalty free 3d model gears for download as ma on turbosquid: 3d models for games, architecture, videos. (1166710)
Z
3d_export
$5

nissan z
...nissan z
3dexport
nissan z
3ddd
$1

Vase Z
...vase z
3ddd
vase z
3ddd
$1

полотенцесушить Z
...полотенцесушить z
3ddd
полотенцесушитель
полотенцесушить z
design_connected
free

Z-Chair
...z-chair
designconnected
free 3d model of z-chair designed by karman, aleksei.
design_connected
$11

Z Lamp
...z lamp
designconnected
phillips z lamp computer generated 3d model. designed by kalff, louis.
3d_export
$5

Dragon balls z
...dragon balls z
3dexport
dragon ball z
turbosquid
$20

Fighter Z
...
turbosquid
royalty free 3d model fighter z for download as on turbosquid: 3d models for games, architecture, videos. (1292563)
turbosquid
$9

Pen Z
...pen z
turbosquid
free 3d model pen z for download as obj on turbosquid: 3d models for games, architecture, videos. (1686775)
turbosquid
free

z chair
...z chair
turbosquid
free 3d model z chair for download as max on turbosquid: 3d models for games, architecture, videos. (1410230)
turbosquid
$5

Letter Z
...urbosquid
royalty free 3d model letter z for download as max on turbosquid: 3d models for games, architecture, videos. (1408540)
What
3ddd
$1

Progetti What Time IN LEGNO NATURALE
...progetti what time in legno naturale
3ddd
часы
часы progetti what time in legno naturale
turbosquid
$28

Chandelier Andromeda So What
... available on turbo squid, the world's leading provider of digital 3d models for visualization, films, television, and games.
turbosquid
$19

Chair What's New Pussycat
... available on turbo squid, the world's leading provider of digital 3d models for visualization, films, television, and games.
3d_export
free

Download free You lookong for what 3D Model
...ort
words
you lookong for what 3d model download free .c4d .max .obj .fbx .ma .lwo .3ds .3dm .stl makleierik19098 103707 3dexport
3d_export
$49

air jordan 4 retro what the pbr
...x 2014 v-ray 3ds max 2018 arnold blender 2.8 cycles render cinema 4d r16 advanced render maya 2014 v-ray maya 2018 arnold fbc obj
3d_export
$135

honda e
...3dexport honda e, high detail model real world dimensions, what you see is what you...
3d_export
free

old barrel
...if you have time, download it and email me what is wrong and what needs to be fixed,...
3d_export
free

nail
...nail 3dexport a nail for what is...
3d_export
$155

Ferrari 812 Competizione
...ferrari 812 competizione, high detail model. real world dimensions, what you see is what you get, parts separated in...
3d_export
$155

Ferrari 812 Superfast
...ferrari 812 superfast, high detail model. real world dimensions, what you see is what you get, parts separated in...