Thingiverse
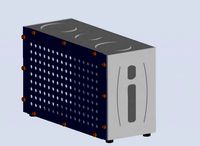
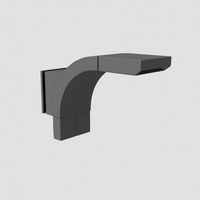
Anet A8 Upgrade Power Supply Cover w/switch mount by rk_20
by Thingiverse
Last crawled date: 3 years, 3 months ago
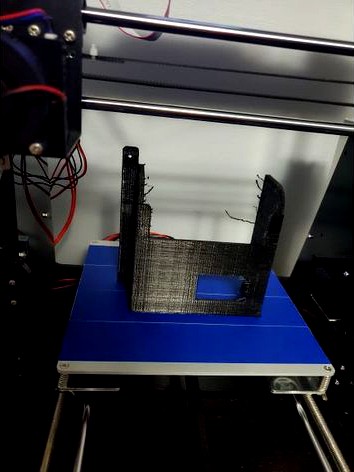
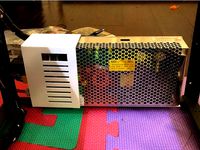
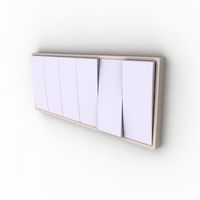
So I decided to upgrade my stock power supply because it gets a little too warm during long prints. I purchased this one on amazon and it was bigger but it had active cooling.
https://www.amazon.com/gp/product/B00D7CWSCG/ref=ppx_yo_dt_b_asin_title_o01_s00?ie=UTF8&psc=1
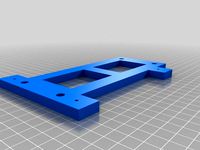
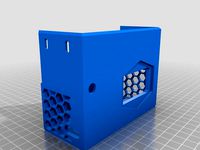
There was really no way to mount it so I decided to make a cover for it. It's made so I could used a fused switch and a detachable power cord. To mount the switch, fit it in, and drill out the two holes and mount it with two m3 screws with nuts on the back, and wire accordingly. To mount it to the frame, loosed the nut holding the y axis rail and put the cover with the supply between the frames as shown in the pictures. Tighten the nut back and drill holes in the attached left mounting bar and acrylic frame and use whatever screws you want. (One screw was enough to hold it in for me) Be sure to only use supports attached to the build plate as to not cover up the switch hole. Use 15% infill or 20%. Speed really doesn't matter but I printed mine up to 50 or 60 mm/s and I think it took about 9 hours on 15% infill.
Good luck and let me know any problems or potential upgrades! I will be modifying it over time!
If your feeling generous, a little support is always appreciated! I am a struggling college student haha.https://www.paypal.com/cgi-bin/webscr?cmd=_donations&business=9LMN4QE3Z2JX4&item_name=Just+a+little+help+is+always+appreciated%21¤cy_code=USD
https://www.amazon.com/gp/product/B00D7CWSCG/ref=ppx_yo_dt_b_asin_title_o01_s00?ie=UTF8&psc=1
There was really no way to mount it so I decided to make a cover for it. It's made so I could used a fused switch and a detachable power cord. To mount the switch, fit it in, and drill out the two holes and mount it with two m3 screws with nuts on the back, and wire accordingly. To mount it to the frame, loosed the nut holding the y axis rail and put the cover with the supply between the frames as shown in the pictures. Tighten the nut back and drill holes in the attached left mounting bar and acrylic frame and use whatever screws you want. (One screw was enough to hold it in for me) Be sure to only use supports attached to the build plate as to not cover up the switch hole. Use 15% infill or 20%. Speed really doesn't matter but I printed mine up to 50 or 60 mm/s and I think it took about 9 hours on 15% infill.
Good luck and let me know any problems or potential upgrades! I will be modifying it over time!
If your feeling generous, a little support is always appreciated! I am a struggling college student haha.https://www.paypal.com/cgi-bin/webscr?cmd=_donations&business=9LMN4QE3Z2JX4&item_name=Just+a+little+help+is+always+appreciated%21¤cy_code=USD
Similar models
thingiverse
free

Anet A8 Power Supply Mount Plate by viswakarma
...r own risk.
used this one for the power switch holder on the bottom of the power supply.https://www.thingiverse.com/thing:2410085
thingiverse
free
Anet A8 Mounting Bracket for a MeanWell NES-350-12 Power Supply by mskressin
...bracket to the power supply. then you can simply put the m3 screws through the existing holes in the frame to attach the bracket.
thingiverse
free

Anet A8 Upgraded Power Supply (12V 30A) Cover by frankwatervoort
...rflow going between the power supply and the frame and to clear the 2mm thick wall on the back of the cover.
enjoy!
frank / ab0wv
thingiverse
free
Power Supply Switch Cover by Amilious
...ays.
change log
update 12/09/2017
added unbranded versionupdate 4/20/2017
modified the mounting holes to allow some wiggle room.
thingiverse
free

360W Power Supply Cover and Mount by CPT_Spekkie
...s mounted with one screw in the top position and the middle channel and bottom channel are used to run my wires to the mainboard.
thingiverse
free

ATX Power Supply Holder and Cable Box for Prusa i3 printer by grnnja
...ply to the frame and all the excess cables were a mess, so i built this box to attach the power supply and hide the pesky cables.
thingiverse
free

Anet A6 power supply cover by andygo
...equires:
3pcs. m4x10..15 (for mounting the power supply to base plate)
2pcs. m4x6..8 (for the fixing cover onto the power supply)
thingiverse
free
Power supply cover for Flying Bear P905 by locnhinho
...r you drill the right side (the side with plug), place the power supply over it, mark the second hole, and drill the second hole.
thingiverse
free

Anet A8 Power Supply Cover by allen476
... take the cover off. downside is that you have to drill the frame.
holes on the bottom so you can use cable ties to secure wires.
thingiverse
free

Power supply cover w\LCD power meter remix by dbemowsk
...s and a higher fill density. overall though it turned out good. just need to get me an m3x45 screw for the front mounting hole.
Rk
design_connected
$11

RK.04016
...rk.04016
designconnected
reka iluminação rk.04016 computer generated 3d model.
design_connected
$11

RK.04055A
...rk.04055a
designconnected
reka iluminação rk.04055a computer generated 3d model.
design_connected
free

Qi Seat RK-344
...seat rk-344
designconnected
mcguire furniture company qi seat rk-344 poufs computer generated 3d model. designed by robert kuo.
3d_export
$5

BBS RK II 3D Model
...bbs rk ii 3d model
3dexport
bbs rkii wheel car transport
bbs rk ii 3d model skull 179 3dexport
3ddd
$1

Spexi s-rk 06
...spexi s-rk 06
3ddd
spexi
зеленая керамическая раковина с росписью.
габариты: d410мм / h140мм
3ddd
$1

Spexi s-rk 04
...spexi s-rk 04
3ddd
spexi
красная керамическая раковина с росписью.
габариты: d410мм / h140мм
3ddd
$1
Spexi s-rk-03
...spexi s-rk-03
3ddd
spexi
белая керамическая раковина с росписью.
габариты: d410мм / h140мм
3ddd
$1

Spexi s-rk 10
...spexi s-rk 10
3ddd
spexi
белая керамическая раковина с росписью.
габариты: d410мм / h140мм
3ddd
$1

Spexi s-rk 05
...spexi s-rk 05
3ddd
spexi
черная керамическая раковина с росписью.
габариты: d410мм / h140мм
3ddd
$1

Spexi s-rk 12
...spexi s-rk 12
3ddd
spexi
белая керамическая раковина с росписью.
габариты: d410мм / h140мм
A8
turbosquid
$47

Car A8
...
turbosquid
royalty free 3d model car a8 for download as max on turbosquid: 3d models for games, architecture, videos. (1196060)
turbosquid
$15

Audi A8
...lty free 3d model audi a8 for download as obj, fbx, and blend on turbosquid: 3d models for games, architecture, videos. (1387519)
turbosquid
$500

Audi A8
... available on turbo squid, the world's leading provider of digital 3d models for visualization, films, television, and games.
3d_export
$5

Audi A8 3D Model
...audi a8 3d model
3dexport
audi a8 cars car
audi a8 3d model ma 20351 3dexport
3d_export
$5

Audi A8 3D Model
...audi a8 3d model
3dexport
3d model of audi a8
audi a8 3d model badyaka 12136 3dexport
3d_ocean
$89

Audi A8 2010
...usiness car car class class f f german german luxury luxury s s s8 s8 sedan sedan vehicle vehicle
new audi a8 2010 detaled model.
turbosquid
$39

A8 2018
...a8 2018 for download as 3ds, obj, wrl, c4d, fbx, dae, and stl on turbosquid: 3d models for games, architecture, videos. (1345349)
turbosquid
free

audi a8 l
...rbosquid
royalty free 3d model audi a8 l for download as obj on turbosquid: 3d models for games, architecture, videos. (1663016)
3d_ocean
$45

Audi A8 restyled
...our door vehicle was created in blender3d 2.62.realistic renderings were created with yafaray 0.1.2 realistic plugin.rendering...
turbosquid
$79

2020 Audi A8
...ree 3d model 2020 audi a8 for download as blend, obj, and fbx on turbosquid: 3d models for games, architecture, videos. (1564786)
Anet
thingiverse
free

Anet by derbodesign
...anet by derbodesign
thingiverse
logo anet
thingiverse
free

Anet e10 , Anet v1.0 by jonathan_943D
...anet e10 , anet v1.0 by jonathan_943d
thingiverse
soporte de ventilador de 80mm, para controladora anet v1.0
thingiverse
free

Anet A8 Anet AM8 Y belt holder
...anet a8 anet am8 y belt holder
thingiverse
anet a8 anet am8 y belt holder
thingiverse
free

Anet A8 Probe Bracket for anet sensor by chelrix
...anet a8 probe bracket for anet sensor by chelrix
thingiverse
anet a8 probe bracket for anet official sensor and marlin firmware
thingiverse
free

Anet logo by JUST3D_PRNTNG
...anet logo by just3d_prntng
thingiverse
anet logo
thingiverse
free

Fan nozzle for Anet A8 with original Anet levelsensor by peteruhlmann
...et levelsensor by peteruhlmann
thingiverse
here is an improved fan nozzle for the anet a8 with original level sensor from anet.
thingiverse
free

Anet Et4 Box
...anet et4 box
thingiverse
tool box for anet et4
thingiverse
free

Anet Logo by Superflex_Plastic_Fantastic
...anet logo by superflex_plastic_fantastic
thingiverse
anet logo to incorporate into designs.
thingiverse
free

Box for Anet ET4
...box for anet et4
thingiverse
this is a simple box for tool of anet et4
thingiverse
free

Anet V1.0 Board Kühlung (80mm Lüfter) / Anet A8 by MadCre8
...anet v1.0 board kühlung (80mm lüfter) / anet a8 by madcre8
thingiverse
anet v1.0 board kühlung (80mm lüfter) / anet a8
Upgrade
turbosquid
$15

Upgraded Glock
...e 3d model upgraded glock for download as obj, fbx, and blend on turbosquid: 3d models for games, architecture, videos. (1185950)
3ddd
$1

Calligaris / UPGRADE
...calligaris / upgrade
3ddd
calligaris
c материалом
3d_export
free

cz upgrade
...cz upgrade
3dexport
https://www.buymeacoffee.com/mestrezen3d https://linktr.ee/mestrezen3
turbosquid
$80

Custer Tank upgrade
... available on turbo squid, the world's leading provider of digital 3d models for visualization, films, television, and games.
turbosquid
$39

Domestos 1 upgrade
... available on turbo squid, the world's leading provider of digital 3d models for visualization, films, television, and games.
3d_export
$10

Upgraded tea cup
...upgraded tea cup
3dexport
a cup with an unusual design and a unique shape for a more enjoyable tea experience
3d_export
$8

dixy outlander classic style upgraded poplar wood lounge chair
...utlander classic style upgraded poplar wood lounge chair
3dexport
dixy outlander classic style upgraded poplar wood lounge chair
turbosquid
free

AK-12 + Upgrades low-poly 3D model
...ow-poly 3d model for download as fbx, blend, and unitypackage on turbosquid: 3d models for games, architecture, videos. (1501145)
evermotion
$700

Upgrade from V-ray 1.5 to 3.5 for 3ds max
...here is no need to purchase a new dongle - your current dongles will be reprogrammed to carry v-ray 3. evermotion 3d models shop.
evermotion
$300

Upgrade from V-Ray 2.0 to V-ray 3.5 for 3ds Max
... interface (gui) for editing settings on one machine and one render node for rendering on one machine. evermotion 3d models shop.
Supply
3d_export
$5

black supply
...black supply
3dexport
black supply size: 57.9 x 29.2 x 34 sm
3d_export
free

office supplies
...office supplies
3dexport
turbosquid
$75

Supply Helicopter
... available on turbo squid, the world's leading provider of digital 3d models for visualization, films, television, and games.
turbosquid
$65
Supply Ship
... available on turbo squid, the world's leading provider of digital 3d models for visualization, films, television, and games.
turbosquid
$19

Power Supply
... available on turbo squid, the world's leading provider of digital 3d models for visualization, films, television, and games.
turbosquid
$5

school supplies
... available on turbo squid, the world's leading provider of digital 3d models for visualization, films, television, and games.
3d_export
$10
Supply air duct
...supply air duct
3dexport
supply air duct with two axial fans and hangers
3d_ocean
$15

Office Supplies Pack
...e dispenser eraser markers office paper pencils pens scissors stapler supplies tape tools work
pack of different office supplies.
3d_export
$18

dance supplies-workshop
...dance supplies-workshop
3dexport
dance supplies-workshop<br>3ds max 2015
3ddd
$1
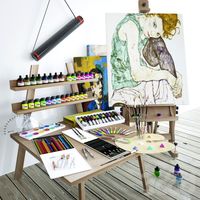
Art Supplies
...art supplies
3ddd
мольберт , краски
318 793 poly count
Switch
archibase_planet
free
Switch
...switch
archibase planet
switch cluster switch
light switch 1 - 3d model for interior 3d visualization.
archibase_planet
free
Switch
...switch
archibase planet
switches switch
switch 1 - 3d model (*.gsm+*.3ds) for interior 3d visualization.
archibase_planet
free
Switch
...switch
archibase planet
closer button switch cluster switch
switch - 3d model (*.3ds) for interior 3d visualization.
archibase_planet
free
Switch
...switch
archibase planet
switch closer
light switch 2 - 3d model for interior 3d visualization.
archibase_planet
free
Switch
...switch
archibase planet
closer button switch
switch n300808 - 3d model (*.gsm+*.3ds) for interior 3d visualization
archibase_planet
free
Switch
...switch
archibase planet
closer button switch
switch n141108 - 3d model (*.gsm+*.3ds) for interior 3d visualization.
archibase_planet
free

Switch
...switch
archibase planet
cluster switch closer
switch n260609 - 3d model (*.gsm+*.3ds) for interior 3d visualization.
archibase_planet
free

Switch
...switch
archibase planet
button switch closer
switch 2 - 3d model (*.gsm+*.3ds) for interior 3d visualization.
archibase_planet
free

Switch
...switch
archibase planet
button switch closer
switch n070510 - 3d model (*.gsm+*.3ds) for interior 3d visualization.
3d_export
$5

switch
...switch
3dexport
3d model of a low-poly switch
Cover
archibase_planet
free
Cover
...cover
archibase planet
cover place setting
cover n170807 - 3d model for interior 3d visualization.
3ddd
$1
cover
...cover
3ddd
ковер , круглый
cover decor
archibase_planet
free

Cover
...cover
archibase planet
cover place setting setting
servis-cafe1930 - 3d model for interior 3d visualization.
turbosquid
free
Coverings
...rings
turbosquid
free 3d model coverings for download as dwg on turbosquid: 3d models for games, architecture, videos. (1279391)
3d_export
$5
plug cover
...plug cover
3dexport
plug cover
turbosquid
$25
Covers
... available on turbo squid, the world's leading provider of digital 3d models for visualization, films, television, and games.
3d_export
$10
manhole cover
...manhole cover
3dexport
manhole cover gost, stl, step
turbosquid
$5

Street Gas Cover Manhole Cover
... available on turbo squid, the world's leading provider of digital 3d models for visualization, films, television, and games.
3ddd
free
Bed cover
...bed cover
3ddd
постельное белье
very useful bed cover
3d_export
$5
cpu cover
...cpu cover
3dexport
cpu cover, cpu box, sheet metal container
Power
turbosquid
$100

power
...ower
turbosquid
royalty free 3d model power for download as on turbosquid: 3d models for games, architecture, videos. (1421990)
3d_export
$5

Power
...power
3dexport
3d_export
$5

power outlets
...power outlets
3dexport
power outlets
3ddd
$1

lion power
...lion power
3ddd
лев , статуя
lion power gold sculpture
3ddd
$1

Sea Power
...
компас , море , часы
часы с компасом sea power
3ddd
free

Meridiani / Power
...power
3ddd
meridiani , круглый
стол power производитель meridiani, диаметр 120,высота 67
3d_export
$5

Power Surge
...power surge
3dexport
the power surge is a all mesh carnival ride to lower in game part count and lag
turbosquid
$8

Airport Ground Power Unit (AXA Power )
... available on turbo squid, the world's leading provider of digital 3d models for visualization, films, television, and games.
turbosquid
$50

Power Houser
...rbosquid
royalty free 3d model power houser for download as on turbosquid: 3d models for games, architecture, videos. (1333800)
3d_export
$5

power outlet
...power outlet
3dexport
power outlet<br>format file maya 2018, 3d max 2017, obj, fbx
W
3ddd
$1
chair W
...chair w
3ddd
chair w
3ddd
$1

кресло w
...кресло w
3ddd
капитоне
кресло w
3ddd
$1
KUTEK (W) W-ZW-5
...kutek (w) w-zw-5
3ddd
kutek
3d модель люстри (w) w-zw-5 фабрики kutek. в архиве: max2012, obj, fbx, mat.(два варианта металла)
3ddd
$1
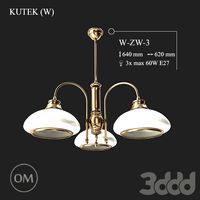
KUTEK (W) W-ZW-3
...kutek (w) w-zw-3
3ddd
kutek
3d модель люстри (w) w-zw-3 фабрики kutek. в архиве: max2012, obj, fbx, mat. (два варианта металла)
3ddd
$1
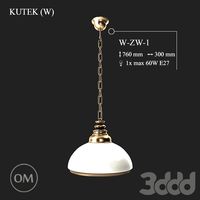
KUTEK (W) W-ZW-1
...kutek (w) w-zw-1
3ddd
kutek
3d модель люстри (w) w-zw-1 фабрики kutek. в архиве: max2012, obj, fbx, mat (два варианта металла).
3ddd
free
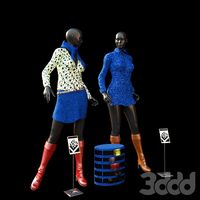
aneken W&W
...aneken w&w
3ddd
2 женских манекена, ценники и фолио. материалы и текстуры прилагаются.
design_connected
$9
KTribe W
...ktribe w
designconnected
ktribe w computer generated 3d model. designed by starck, philippe.
design_connected
$16

Troy W
...troy w
designconnected
magis troy w computer generated 3d model. designed by wanders, marcel.
turbosquid
$9
Menu - Benjamin Hubert - W W Carafe
... available on turbo squid, the world's leading provider of digital 3d models for visualization, films, television, and games.
turbosquid
$9
Menu - Benjamin Hubert - W W Carafe
... available on turbo squid, the world's leading provider of digital 3d models for visualization, films, television, and games.
20
3d_export
$15
rocks 20
...rocks 20
3dexport
rocks 3d model 20
3ddd
$1

DECOR MEDIEVO 20*20 MIX
...ллекция: bolonia
фабрика: mainzu
страна: испания
размер: 20x20 см
ссылка:http://www.mainzu.com/bolonia.php#prettyphoto
3d_export
$6
tap-20
...tap-20
3dexport
3ddd
$1

Bed 20
...bed 20
3ddd
постельное белье
bed 20. i hope you like it
software : 3dsmax + md + vray 2.4
turbosquid
$40

20 Shields
...turbosquid
royalty free 3d model 20 shields for download as on turbosquid: 3d models for games, architecture, videos. (1305068)
3d_export
$5

houseberg home 20
...houseberg home 20
3dexport
houseberg home 20
turbosquid
$10

Decor 20
...urbosquid
royalty free 3d model decor 20 for download as stl on turbosquid: 3d models for games, architecture, videos. (1677149)
turbosquid
$10

building 20
...osquid
royalty free 3d model building 20 for download as max on turbosquid: 3d models for games, architecture, videos. (1362227)
turbosquid
$2
Workout 20
...bosquid
royalty free 3d model workout 20 for download as max on turbosquid: 3d models for games, architecture, videos. (1607615)
turbosquid
$125

fd-20
...quid
royalty free 3d model fd-20 for download as max and fbx on turbosquid: 3d models for games, architecture, videos. (1218626)
Mount
3d_export
free

mounting bracket
...mounting plate is the portion of a hinge that attaches to the wood. mounting plates can be used indoors, cabinetry and furniture.
turbosquid
$2

MOUNTING
... available on turbo squid, the world's leading provider of digital 3d models for visualization, films, television, and games.
turbosquid
free

Mounts
... available on turbo squid, the world's leading provider of digital 3d models for visualization, films, television, and games.
turbosquid
free

Mount Fuji
...fuji
turbosquid
free 3d model mount fuji for download as obj on turbosquid: 3d models for games, architecture, videos. (1579977)
3d_export
$5

Headphone mount LR
...headphone mount lr
3dexport
headphone mount l+r
turbosquid
$39

Mount rainier
...quid
royalty free 3d model mount rainier for download as fbx on turbosquid: 3d models for games, architecture, videos. (1492586)
turbosquid
$5

pipe mounting
...quid
royalty free 3d model pipe mounting for download as obj on turbosquid: 3d models for games, architecture, videos. (1293744)
turbosquid
$3

Mounting Tires
...uid
royalty free 3d model mounting tires for download as fbx on turbosquid: 3d models for games, architecture, videos. (1708511)
3d_export
$5

Magnetic GoPro Mount
...pro mount
3dexport
cool magnetic mount for gopro. allows you to mount the camera on flat metal surfaces and get exclusive shots.
turbosquid
$5

Stone Mount
...ty free 3d model stone mount for download as ma, obj, and fbx on turbosquid: 3d models for games, architecture, videos. (1370306)