Thingiverse
Anet A8 J-Head compatible mount (supports E3D v5/v6 etc) UPDATED by werto165
by Thingiverse
Last crawled date: 3 years ago
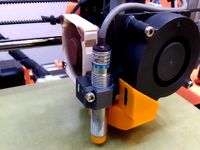
DISCLAIMER: I haven't actually attached this to my printer as I'm waiting for some fittings for the rest of the bowden setup, however there's nothing that I see that could be an issue.
I've installed it into my printer and realised that it triggers the end stop 12.5mm before it should so I would use the G28 (to home) and then M206 command to see what your current offsets are if there are any say your offset is X-40 Y-20 Z0 Then I would change it to X-24
My settings are X-14 Y-20 Z0.
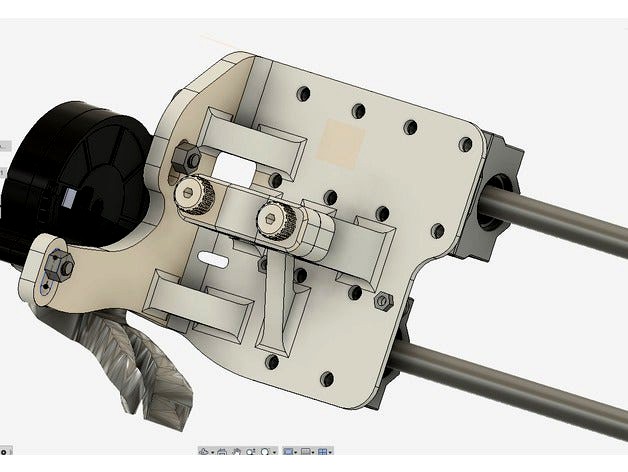
I printed my design in simplify 3d however I imagine other slicers would work too, supports will be needed for the main bracket and also the front of the clamp, the goal of this design was to make a j-head mount that was as light as possible and for it to support the popular
"Spriya" - High Efficiency Anet A8 Fan Duct" found here:
https://www.thingiverse.com/thing:2133328
I just used the method that original metal mount used for attaching the belts to the carriage which is using a screw and a nut, you can use the ones that came with the printer to achieve this.
To attach the fan I'm going to be using some left over parts that I had from the printer, namely the M3x30 screws for attaching the part cooling fan, you'll probably need to print off a spacer if you're using nyloc nuts like I am however it's not required. It's just a measure to make the nyloc nuts last a tiny bit longer.
As far as I'm aware the print head is the exact same place as the bone stock version so you won't need to make any alterations in the firmware for extruder offsets. However I may redesign this with option of having two j heads on one carriage, in that case there will need to be an offset.
If you have any questions, or possible improvements for this design leave them in the comments.
Try and follow the same supports as I've done in simplify3d however, supports are not needed for the Knurled Screw.
https://www.facebook.com/oliver.jackson.376/videos/10212030623494821/
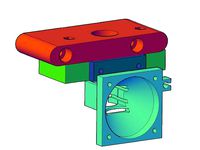
If you need a E3D V5 clone fusion file like the one I used to design your own x-carriage then you can find that here: https://www.thingiverse.com/thing:2456199
I noticed that the screw that I originally uploaded had a 3mm across flats head so I changed it and uploaded two, one that's 2.55mm that I imagine will work with most printers (2.4mm being the head size I was aiming for) and 2.45 if you're feeling adventurous.
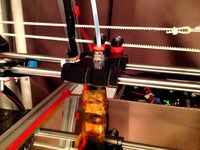
I've updated it to have a more substantial fan holder as the previous one was quite prone to wiggling, I've also accomodated for the endstop position so you no longer get prints that are offset.
I've installed it into my printer and realised that it triggers the end stop 12.5mm before it should so I would use the G28 (to home) and then M206 command to see what your current offsets are if there are any say your offset is X-40 Y-20 Z0 Then I would change it to X-24
My settings are X-14 Y-20 Z0.
I printed my design in simplify 3d however I imagine other slicers would work too, supports will be needed for the main bracket and also the front of the clamp, the goal of this design was to make a j-head mount that was as light as possible and for it to support the popular
"Spriya" - High Efficiency Anet A8 Fan Duct" found here:
https://www.thingiverse.com/thing:2133328
I just used the method that original metal mount used for attaching the belts to the carriage which is using a screw and a nut, you can use the ones that came with the printer to achieve this.
To attach the fan I'm going to be using some left over parts that I had from the printer, namely the M3x30 screws for attaching the part cooling fan, you'll probably need to print off a spacer if you're using nyloc nuts like I am however it's not required. It's just a measure to make the nyloc nuts last a tiny bit longer.
As far as I'm aware the print head is the exact same place as the bone stock version so you won't need to make any alterations in the firmware for extruder offsets. However I may redesign this with option of having two j heads on one carriage, in that case there will need to be an offset.
If you have any questions, or possible improvements for this design leave them in the comments.
Try and follow the same supports as I've done in simplify3d however, supports are not needed for the Knurled Screw.
https://www.facebook.com/oliver.jackson.376/videos/10212030623494821/
If you need a E3D V5 clone fusion file like the one I used to design your own x-carriage then you can find that here: https://www.thingiverse.com/thing:2456199
I noticed that the screw that I originally uploaded had a 3mm across flats head so I changed it and uploaded two, one that's 2.55mm that I imagine will work with most printers (2.4mm being the head size I was aiming for) and 2.45 if you're feeling adventurous.
I've updated it to have a more substantial fan holder as the previous one was quite prone to wiggling, I've also accomodated for the endstop position so you no longer get prints that are offset.
Similar models
thingiverse
free

Cable Chain Mount Bracket for TEVO Tarantula Taralu Y Carriage by ThorUs
...an m4 screw and nut. the second one uses an m3 screw and nut. the latter one has more play so i would recommend using the m4 one.
thingiverse
free

Anet A8 Carriage for J Head by lwrhack
... innovations, "groove mount plate."
was printed on 1.75mm pla at 190* @ .32 layer with 30% infill.
hope you enjoy it.!!
thingiverse
free
Sturdy X-Carriage for J-Head with Bowden by villekl
...thingiverse what you need: 4x lm8uu linear bearing (or similar 6x m3x25 or m3x30 screw (longer works too) 4x...
thingiverse
free
Anet A8 / AM8 Mount for 12mm Sensor
...sensor. i used x -22 y -36. the fan duct in the picture is mistral 2.1a-4.5 (https://www.thingiverse.com/thing:2121279) by leo_n.
thingiverse
free

Improved SN04 bracket for Anet A8 by gmarsh23
... :)
openscad source files are attached. this is the first thing i've designed in that software so it's a bit of a mess :)
thingiverse
free

80mm to 120mm Fan Adapter Offset by CaseyRedDragon
...h with the adapter with mounted.
work in progress as i haven't tested to see if the adapter would fit on 120mm and 80mm fans.
thingiverse
free

Anet A8 j head v5 carriage with 12mm sensor and 40 mm fan duct by qpidgiga
...sor, all reflects my actual configuration, if something goes wrong while assembling, please report it and i'll try to fix it!
thingiverse
free

D-Bot Titan Extruder, Bl-Touch and Cooling Fan Carriage by 1sPiRe
...needs. i'll adapt it to the fan mount, and will make a shim for the bltouch.
part of my d-bot upgrades collection.
°affiliate
thingiverse
free

Modix Big 60 dual fan adapter and Improved fan shroud
...fan the original had a big gap on the side not sealing properly so made everything a little tighter.
let me know how you like it.
thingiverse
free
J-Head mount with 40 mm fan by egrojyos
...and nuts needed.
to use with this x-carriage: https://github.com/obijuan/clone-wars/raw/master/printers/prusa3/stl/x-carriage.stl
Werto165
thingiverse
free

Oculus Logo by werto165
...oculus logo by werto165
thingiverse
logo
thingiverse
free

Vive Logo by werto165
...vive logo by werto165
thingiverse
design for the front of my pc case
thingiverse
free

Bike Decoration by werto165
...bike decoration by werto165
thingiverse
just a little bike that i made a while ago.
thingiverse
free

Turnigy i6 transmitter mount by werto165
...would recommend printing this in tpu because of the long stems that hold the antennas which would probably snap in a heavy crash.
thingiverse
free

Oculus Touch controller Mount by werto165
...ot for the hook to attach it to the main body has a 0.2mm offset this is to ensure a good fit without it being impossible insert.
thingiverse
free

CC3D Flight controller placeholder by werto165
...ight controller, that can be found here:
https://www.thingiverse.com/thing:2456194 .
i've uploaded the fusion360 files too.
thingiverse
free

lighter version Of xbox one controller holder by werto165
...giverse
printed with no supports and 0.2 mm layers with a 0.3 nozzle, probably could do 0.28+ if you've got a 0.4 mm nozzle.
thingiverse
free

PS4 Lightbar Fusion 360 editable by werto165
...make it your own! :)
if you would like to have your own designed by me, just comment what you want or send me a private message.
thingiverse
free
Custom One Pro Custom Plate by werto165
...n and it only cost me 5 pence in plastic. i've included the fusion 360 files too if you want to change it to your own design.
thingiverse
free

Maverick STRADA XB EVO Battery Post by werto165
...hole as the two holed version was prone to breaking because of the thin cross section near the secondary hole when under loading.
A8
turbosquid
$47

Car A8
...
turbosquid
royalty free 3d model car a8 for download as max on turbosquid: 3d models for games, architecture, videos. (1196060)
turbosquid
$50

Audi A8
...yalty free 3d model audi a8 for download as 3dm, obj, and fbx on turbosquid: 3d models for games, architecture, videos. (1580187)
turbosquid
$15

Audi A8
...lty free 3d model audi a8 for download as obj, fbx, and blend on turbosquid: 3d models for games, architecture, videos. (1387519)
turbosquid
$500

Audi A8
... available on turbo squid, the world's leading provider of digital 3d models for visualization, films, television, and games.
3d_export
$5

Audi A8 3D Model
...audi a8 3d model
3dexport
audi a8 cars car
audi a8 3d model ma 20351 3dexport
3d_export
$5

Audi A8 3D Model
...audi a8 3d model
3dexport
3d model of audi a8
audi a8 3d model badyaka 12136 3dexport
3d_ocean
$89

Audi A8 2010
...usiness car car class class f f german german luxury luxury s s s8 s8 sedan sedan vehicle vehicle
new audi a8 2010 detaled model.
turbosquid
$39

A8 2018
...a8 2018 for download as 3ds, obj, wrl, c4d, fbx, dae, and stl on turbosquid: 3d models for games, architecture, videos. (1345349)
turbosquid
free

audi a8 l
...rbosquid
royalty free 3d model audi a8 l for download as obj on turbosquid: 3d models for games, architecture, videos. (1663016)
3d_ocean
$45

Audi A8 restyled
...our door vehicle was created in blender3d 2.62.realistic renderings were created with yafaray 0.1.2 realistic plugin.rendering...
V5
turbosquid
$20

Door v5
...yalty free 3d model door v5 for download as max, max, and obj on turbosquid: 3d models for games, architecture, videos. (1523141)
turbosquid
$9

Silencer V5
...3d model silencer v5 for download as blend, obj, dae, and fbx on turbosquid: 3d models for games, architecture, videos. (1711483)
turbosquid
$6

surfboard V5
...e 3d model surfboard v5 for download as ma, max, obj, and fbx on turbosquid: 3d models for games, architecture, videos. (1168657)
turbosquid
$26
Apples-v5
... available on turbo squid, the world's leading provider of digital 3d models for visualization, films, television, and games.
turbosquid
$22

ChairS981-v5
... available on turbo squid, the world's leading provider of digital 3d models for visualization, films, television, and games.
3d_export
$8

Bunker Light v5
...bunker light v5
3dexport
turbosquid
$19

Fence with Ivy v5
...odel fence with ivy v5 for download as max, max, obj, and fbx on turbosquid: 3d models for games, architecture, videos. (1640139)
turbosquid
$15

Building office v5
...del building office v5 for download as max, obj, fbx, and stl on turbosquid: 3d models for games, architecture, videos. (1338336)
turbosquid
$10

Steak on the Wood V5
...l steak on the wood v5 for download as 3ds, max, obj, and fbx on turbosquid: 3d models for games, architecture, videos. (1199326)
turbosquid
$9
Car v5 concept
...model car v5 concept for download as blend, fbx, obj, and stl on turbosquid: 3d models for games, architecture, videos. (1633222)
E3D
turbosquid
$23

E3D - Google Home
... 3d model e3d - google home for download as max, obj, and c4d on turbosquid: 3d models for games, architecture, videos. (1192509)
cg_studio
free

e3d model
...e3d model
cgstudio
- e 3d model, royalty free license available, instant download after purchase.
turbosquid
$2

Syringe C4D (E3D Ready)
...lty free 3d model syringe c4d (e3d ready) for download as c4d on turbosquid: 3d models for games, architecture, videos. (1336720)
turbosquid
$12

Microphone USB E3D and C4D
...ree 3d model microphone usb e3d & c4d for download as c4d on turbosquid: 3d models for games, architecture, videos. (1568216)
turbosquid
$29

E3D - OnePlus 6 Black
...model e3d - oneplus 6 black for download as max, obj, and c4d on turbosquid: 3d models for games, architecture, videos. (1358534)
turbosquid
$29

E3D - Motorola One 2018
...del e3d - motorola one 2018 for download as max, obj, and c4d on turbosquid: 3d models for games, architecture, videos. (1358533)
turbosquid
$29

E3D - Disney MagicBands 2
...l e3d - disney magicbands 2 for download as max, obj, and c4d on turbosquid: 3d models for games, architecture, videos. (1355515)
turbosquid
$29

E3D - Samsung Z4 Smartphone
...e3d - samsung z4 smartphone for download as max, obj, and c4d on turbosquid: 3d models for games, architecture, videos. (1182179)
turbosquid
$23

E3D - Razer Phone model
...del e3d - razer phone model for download as max, obj, and c4d on turbosquid: 3d models for games, architecture, videos. (1231207)
turbosquid
$23

E3D - Alcatel Idol 5
... model e3d - alcatel idol 5 for download as max, obj, and c4d on turbosquid: 3d models for games, architecture, videos. (1212799)
V6
3d_export
$100

v6 engine
...engine
3dexport
complete v6 engine modeled on solidworks 2017 along with .stl, .sldprt and .sldasm of all th parts and assembly.
3d_export
$10

V6 engine
... the first v6 engines were designed and produced independently by marmon motor car company, deutz gasmotoren fabrik and delahaye.
3d_export
$35

v6 engine
...s a complete model of a v6 engine containing over 400 components. you can contact me for a video of all the components assembling
3d_export
$10

v6 engine
...v6 engine
3dexport
turbosquid
$25

Bed1001-v6
... available on turbo squid, the world's leading provider of digital 3d models for visualization, films, television, and games.
turbosquid
$22

Chair2-v6
... available on turbo squid, the world's leading provider of digital 3d models for visualization, films, television, and games.
turbosquid
$20

V6.mb
... available on turbo squid, the world's leading provider of digital 3d models for visualization, films, television, and games.
3d_export
$20

V6 engine
...rovided in this package is all the parts in sldprt format and assembly in sldasm format. i can also convert the format on demand.
3ddd
$1

Стол V6
...6" в стиле дизельпанк изготовлен из блока двигателя, 4х поршней и 4х шатунов.
столешница изготовлена из стекла толщиной 8мм.
cg_studio
$199

V6 VVTi3d model
...v6 vvti3d model
cgstudio
.3ds - v6 vvti 3d model, royalty free license available, instant download after purchase.
Anet
thingiverse
free

Anet by derbodesign
...anet by derbodesign
thingiverse
logo anet
thingiverse
free

Anet e10 , Anet v1.0 by jonathan_943D
...anet e10 , anet v1.0 by jonathan_943d
thingiverse
soporte de ventilador de 80mm, para controladora anet v1.0
thingiverse
free

Anet A8 Anet AM8 Y belt holder
...anet a8 anet am8 y belt holder
thingiverse
anet a8 anet am8 y belt holder
thingiverse
free

Anet A8 Probe Bracket for anet sensor by chelrix
...anet a8 probe bracket for anet sensor by chelrix
thingiverse
anet a8 probe bracket for anet official sensor and marlin firmware
thingiverse
free

Anet logo by JUST3D_PRNTNG
...anet logo by just3d_prntng
thingiverse
anet logo
thingiverse
free

Fan nozzle for Anet A8 with original Anet levelsensor by peteruhlmann
...et levelsensor by peteruhlmann
thingiverse
here is an improved fan nozzle for the anet a8 with original level sensor from anet.
thingiverse
free

Anet Et4 Box
...anet et4 box
thingiverse
tool box for anet et4
thingiverse
free

Anet Logo by Superflex_Plastic_Fantastic
...anet logo by superflex_plastic_fantastic
thingiverse
anet logo to incorporate into designs.
thingiverse
free

Box for Anet ET4
...box for anet et4
thingiverse
this is a simple box for tool of anet et4
thingiverse
free

Anet V1.0 Board Kühlung (80mm Lüfter) / Anet A8 by MadCre8
...anet v1.0 board kühlung (80mm lüfter) / anet a8 by madcre8
thingiverse
anet v1.0 board kühlung (80mm lüfter) / anet a8
J
3d_export
$17

J-7mg
...j-7mg
3dexport
j-7mg
3d_export
$5

j hook
...j hook
3dexport
j hook
3d_export
$17

J-21 jastreb
...j-21 jastreb
3dexport
j-21 jastreb
3d_export
$17

Chengdu J-10
...chengdu j-10
3dexport
chengdu j-10
turbosquid
$96

J-20
...20
turbosquid
royalty free 3d model j-20 for download as max on turbosquid: 3d models for games, architecture, videos. (1658873)
turbosquid
$68

J-10A
...a
turbosquid
royalty free 3d model j-10a for download as max on turbosquid: 3d models for games, architecture, videos. (1658854)
turbosquid
$30

J-7
...j-7
turbosquid
royalty free 3d model j-7 for download as max on turbosquid: 3d models for games, architecture, videos. (1538420)
turbosquid
$14

Fence J
...turbosquid
royalty free 3d model fence j for download as fbx on turbosquid: 3d models for games, architecture, videos. (1313345)
turbosquid
$7

J for Jug
...rbosquid
royalty free 3d model j for jug for download as max on turbosquid: 3d models for games, architecture, videos. (1688347)
turbosquid
$5

Letter J
...urbosquid
royalty free 3d model letter j for download as max on turbosquid: 3d models for games, architecture, videos. (1408483)
Compatible
turbosquid
$3

Genesis 8 Clothing 1 dForce Compatible
... available on turbo squid, the world's leading provider of digital 3d models for visualization, films, television, and games.
turbosquid
free

Genesis 8 Clothing Top 1 dForce Compatible
...nesis 8 clothing top 1 dforce compatible (2) for download as on turbosquid: 3d models for games, architecture, videos. (1217671)
turbosquid
$50
Screwdriver Latch Type CSC Torx compatible with Straumann
...sc torx compatible with straumann for download as obj and stl on turbosquid: 3d models for games, architecture, videos. (1370064)
3d_export
$9
cad compatible casual woman hand model f1p3d1v1hand
...s: stl, obj, fbx<br>models with quad-topology (1100 quads) are also included (f1p3d1v1hand_quad.obj, f1p3d1v1hand_quad.fbx)
3d_export
$38

uzaki rigify
...uzaki rigify 3dexport compatible-blender ...
3d_export
$5

cloud lowpoly 3d
...cloud lowpoly 3d 3dexport lowpoly 3d format fbx compatible with unreal and...
3d_export
$5

flower lowpoly 3d
...flower lowpoly 3d 3dexport lowpoly 3d format fbx compatible with unreal and...
3d_export
$5

rocks lowpoly 3d
...rocks lowpoly 3d 3dexport lowpoly 3d format fbx compatible with unreal and...
3d_export
$10
pots
...pots
3dexport
pots<br>modeled in blender<br>compatable with evee and cycels
3d_ocean
$95

Mr Techny
...for 3ds max 2010 and later – biped (2010 compatible and cat (2011 compatible) versions incluided. for maya 2012...
Etc
3ddd
free
Oranges, mandarins etc.
...син , мандарин , фрукты
oranges, mandarins etc.
3ddd
$1
Bowls, dishes etc.
...bowls, dishes etc.
3ddd
посуда , сервиз
bowls, dishes etc. for contemporary kitchens
turbosquid
$30

theater for( cinema, collage, etc.)
...model theater for( cinema, collage, etc.) for download as fbx on turbosquid: 3d models for games, architecture, videos. (1258736)
3d_export
$40
stage light ETC 3D Model
...am shaper lighting concert music electric studio set movie lens lamp zoom reflector
stage light etc 3d model braz 7043 3dexport
3d_ocean
$8

Realistic TV/Blu-ray/DVD etc. remote
...3docean
blu-ray dvd realistic remote technology television tv
this is a model of a television, dvd, blu-ray, etc. remote control.
3d_ocean
$12

Desk accessories (pen, eraser, etc.)
...ats included: .c4d, .obj – the model contains 58530 polygons – not rigged, scene setup / lighting from the preview, are included.
3d_export
$5

kitchen assets - pots pans etc
...fferent material as they have a separate material id for the ability to personalise or have alternate lid types e.g. foggy glass.
3d_export
$15

bentley continental 2015 with all surroundings complete with lightmaterials etc
...als etc
3dexport
in the car model, each part as a separate object, which allows you to make animation or destruction in the game
3d_export
$12
set of 73 parts bolts nuts washers nails etc
...red with eevee. the wood texture is not included. all the other materials are procedural pbr configured in the native blend file.
3ddd
free

Suitcase
...suitcase 3ddd suitcase plastic suitcase for tools etc ...
Updated
turbosquid
$5

orthographic room (updated)
...ee 3d model orthographic room (updated) for download as blend on turbosquid: 3d models for games, architecture, videos. (1375451)
turbosquid
$95

Romantic Bedroom - Updated
... available on turbo squid, the world's leading provider of digital 3d models for visualization, films, television, and games.
turbosquid
$39
Sofa. Updated release
... available on turbo squid, the world's leading provider of digital 3d models for visualization, films, television, and games.
turbosquid
$15

Procedurally updating cartoon crystal
...l procedurally updating cartoon crystal for download as blend on turbosquid: 3d models for games, architecture, videos. (1525853)
3d_export
$5

10 Surfboard s UPDATE
...10 surfboard s update
3dexport
3d_export
$10
chair updated rocking
...chair updated rocking
3dexport
armchair renewed plywood 18 mm. for cnc machines. layout in the stp archive.
turbosquid
free

Marble Table Updated
...el marble table for download as 3ds, obj, fbx, blend, and dae on turbosquid: 3d models for games, architecture, videos. (1201300)
turbosquid
$35
Mauser 1930the model is updated with the kits
... available on turbo squid, the world's leading provider of digital 3d models for visualization, films, television, and games.
turbosquid
$145

Contemporary Bedroom Collection Vol 1 - Updated
... available on turbo squid, the world's leading provider of digital 3d models for visualization, films, television, and games.
turbosquid
$16

B&B Mart Armchair MPRN (Updated)
...art armchair mprn (updated) for download as max, obj, and fbx on turbosquid: 3d models for games, architecture, videos. (1284355)
Head
3d_export
$5

head
...head
3dexport
simulated female head.
3d_ocean
$5
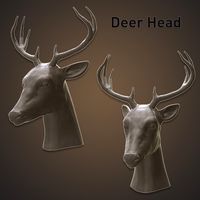
Deer Head
...deer head
3docean
deer head
simple model of deer head with neck.
cg_studio
$25
Marble Head - Head A3d model
... - head a3d model
cgstudio
.ma - marble head - head a 3d model, royalty free license available, instant download after purchase.
turbosquid
$5
Head
...ad
turbosquid
royalty free 3d model head for download as max on turbosquid: 3d models for games, architecture, videos. (1230068)
turbosquid
free

Head
...
turbosquid
royalty free 3d model head for download as blend on turbosquid: 3d models for games, architecture, videos. (1276899)
turbosquid
free

The Head
...urbosquid
royalty free 3d model the head for download as max on turbosquid: 3d models for games, architecture, videos. (1386205)
3d_export
$10

bull head
...bull head
3dexport
bull head
3d_export
$5
girl head
...girl head
3dexport
head girl
3d_export
$5
Tigger-head
...tigger-head
3dexport
tigger-head
3d_export
$5

head on a spear
...head on a spear
3dexport
head on a spear
Mount
3d_export
free

mounting bracket
...mounting plate is the portion of a hinge that attaches to the wood. mounting plates can be used indoors, cabinetry and furniture.
turbosquid
$2

MOUNTING
... available on turbo squid, the world's leading provider of digital 3d models for visualization, films, television, and games.
turbosquid
free

Mounts
... available on turbo squid, the world's leading provider of digital 3d models for visualization, films, television, and games.
turbosquid
free

Mount Fuji
...fuji
turbosquid
free 3d model mount fuji for download as obj on turbosquid: 3d models for games, architecture, videos. (1579977)
3d_export
$5

Headphone mount LR
...headphone mount lr
3dexport
headphone mount l+r
turbosquid
$39

Mount rainier
...quid
royalty free 3d model mount rainier for download as fbx on turbosquid: 3d models for games, architecture, videos. (1492586)
turbosquid
$5

pipe mounting
...quid
royalty free 3d model pipe mounting for download as obj on turbosquid: 3d models for games, architecture, videos. (1293744)
turbosquid
$3

Mounting Tires
...uid
royalty free 3d model mounting tires for download as fbx on turbosquid: 3d models for games, architecture, videos. (1708511)
3d_export
$5

Magnetic GoPro Mount
...pro mount
3dexport
cool magnetic mount for gopro. allows you to mount the camera on flat metal surfaces and get exclusive shots.
turbosquid
$5

Stone Mount
...ty free 3d model stone mount for download as ma, obj, and fbx on turbosquid: 3d models for games, architecture, videos. (1370306)
Supports
turbosquid
$5
Support
... available on turbo squid, the world's leading provider of digital 3d models for visualization, films, television, and games.
3d_export
$8
Support 3D Model
...support 3d model
3dexport
support cantilever console
support 3d model tasal 73900 3dexport
3d_export
$5
phone support
...phone support
3dexport
phone
turbosquid
$12
Support bars
...squid
royalty free 3d model support bars for download as max on turbosquid: 3d models for games, architecture, videos. (1411542)
turbosquid
$8

support weights
...id
royalty free 3d model support weights for download as max on turbosquid: 3d models for games, architecture, videos. (1411538)
turbosquid
$2
headphone support
...royalty free 3d model headphone support for download as sldpr on turbosquid: 3d models for games, architecture, videos. (1357583)
turbosquid
$2

Support for flowers
...royalty free 3d model support for flowers for download as max on turbosquid: 3d models for games, architecture, videos. (1463543)
turbosquid
$14

Flower Support
...alty free 3d model flower support for download as max and obj on turbosquid: 3d models for games, architecture, videos. (1497066)
turbosquid
$5
serum support
...yalty free 3d model serum support for download as c4d and obj on turbosquid: 3d models for games, architecture, videos. (1551267)
3d_export
$10
spyro joystick support
...spyro joystick support
3dexport
joystick support of spyro dragon