Thingiverse
Anet A8 Bowden E3D V6 Conversion Guide by GliDeThuNDeR
by Thingiverse
Last crawled date: 3 years ago
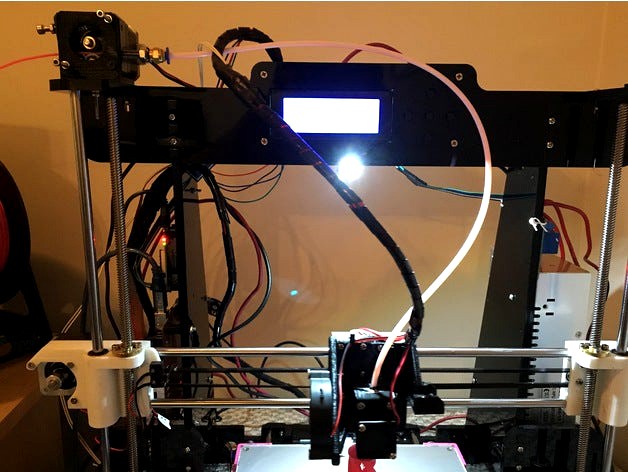
This guide will cover how to convert your Anet A8 from it's stock extruder, to an all metal Bowden E3D V6 (or clone) setup.
After seeing a large amount of Anet A8 users wanting to upgrade to an E3D V6 Bowden extruder, and a lack of information regarding the upgrade, I have decided to post a complete guide detailing how I went about the upgrade. When I did this myself, the lack of information caused me to repeatedly wait for parts, leaving my printer torn apart for nearly 3 weeks. Hopefully after reading this, you will be able to avoid doing the same.Note: I have enough spare hardware lying around, that I was able to complete this project without buying hardware. As a result I do not know what is needed or where. If someone can figure this out and provide feedback including this information I'd be happy to include it! (The .stl is irrelevant. Just included for publishing :D)
Step 1) Before you take your printer apart, you need to print a few parts:
E3D V6 Bowden carriage (I chose this one: http://www.thingiverse.com/thing:2099577)
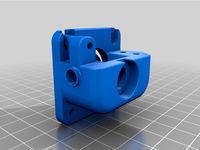
Extruder motor mount (I chose this one: http://www.thingiverse.com/thing:2146021)
(Optional) X Axis Cable Chain (http://www.thingiverse.com/thing:2105040 (fully
compatible with the carriage I chose))
Step 2) There are several parts you need to buy, here's what I bought: (all links at bottom)
30mm 12V fan
Fan Duct (could also print it, but I just bought it)
M6 bowden connector, this one gives you a spare, and a spare bowden tube
(Recommended) Spare thermistors, incase of breakage during assembly
https://www.amazon.com/gp/product/B01L2LFCWG/ref=oh_aui_detailpage_o06_s00?ie=UTF8&psc=1
https://www.amazon.com/gp/product/B01FBPQF1Q/ref=oh_aui_detailpage_o06_s00?ie=UTF8&psc=1
https://www.amazon.com/gp/product/B014G85MO0/ref=oh_aui_detailpage_o05_s00?ie=UTF8&psc=1
https://www.amazon.com/gp/product/B01F1XTRGI/ref=oh_aui_detailpage_o02_s00?ie=UTF8&psc=1
https://www.amazon.com/gp/product/B01B41K7OM/ref=oh_aui_detailpage_o00_s00?ie=UTF8&psc=1
Step 3) Disassembly (explaining this from memory, may not be perfect)
Heat extruder, remove filament, let cool
Remove squirrel cage fan
Undo hex bolts holding fan and heat sink (while not ideal, I reused these), remove fan and heat sink
Remove screw on underside of extruder, holding the motor to the carriage
Loosen the M6 bolt on the underside (you will need this later)
Disconnect the extruder motor
Slide the extruder assembly off the carriage, and out of the way
Unscrew carriage from the mounts on the guide rods, set carriage aside (you will reuse the screws
Remove heat cartridge and thermistor from heat block (you will be reusing these)
Remove nozzle throat from heat block (ideally you will be reusing this)
Move heat block and nozzle off to the side. You do not need these
Remove Z axis guide rod cover from the side in which the extruder motor will reside (save the screw)
Step 4) Assembly (The exciting part?) Be sure to cable manage when necessary!
Install new carriage using original screws.
Remove screws from E3D heat block for cartridge and thermistor
Insert cartridge into heat block, tighten corresponding screw firmly
Insert thermistor, carefully tighten screw, do not over tighten
Slide E3D into carriage
Install cap over Extruder using screws
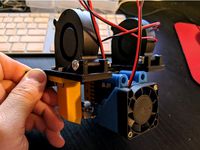
Screw 30mm fan into fan duct.
Slide fan and duct onto the E3D's heat sink.
Install squirrel cage fan, and any desired cooling nozzle
Runs screws through the carriage on either side of the extruder, to attach the X Axis belt to
Install the extruder motor mount on the top of the printer
Align all the parts of the motor as they would originally exist, and using the original screws in conjunction with nuts (along with one more appropriate screw) attach the motor to the mount. The input side of the motor should face toward the outside of the printer
Connect the Bowden connector to the stock nozzle throat using the M6 bolt from the original extruder. (This bolt and throat trick is not necessary, but makes loading filament much easier. I have not had issues with this connection, as sketchy as it may seem)
Screw the nozzle throat into the output of the extruder motor, until it is an appropriate distance from the gear and bearing.
Connect the bowden tube between the motor and extruder.
Step 5) Initial testing (technically skippable):
Be weary of the fact that the extruder is lower than before, make the necessary adjustments to prevent the nozzle from crashing
Hold in screw on extruder motor, feed the filament until it is coming out the heated extruder
Try a print! (You may need to reduce/temporarily disable retraction)
Step 6) Firmware
As noted in the thing summary for the carriage, the X positioning of the extruder is slightly different. As you probably noticed in Step 5, this leads to prints being offset from the center of the bed. You can either account for this in your starting GCODE in your slicer of choice, or you can reflash firmware. Because of it's availability, I updated to Skynet. I do not recommend fighting with Skynet unless you also have an auto-leveling sensor. I dislike my current firmware configuration strongly (if anyone can tell me where I can find the stock firmware, that would be appreciated). Long story short, you need the Arduino IDE, and once you open the files for your desired firmware, find the file called "configuration.h", and open it. use CTRL + F and find the string "X_MIN_POS", and set this value to -10. Compile the firmware, and push it to the printer over USB.Step 7) Enjoy!
Print a retraction test or two and dial your settings in, once you re-familiarize yourself with your printer, have fun increasing your print speeds!
I wish I had found a better solution as far as firmware is concerned, but I have made this as detailed as possible. Please provide feedback regarding the completeness of this, and let me know if there's anything I missed!
(Please note: I am not responsible for any damages or injuries caused while following this guide. Thanks)
After seeing a large amount of Anet A8 users wanting to upgrade to an E3D V6 Bowden extruder, and a lack of information regarding the upgrade, I have decided to post a complete guide detailing how I went about the upgrade. When I did this myself, the lack of information caused me to repeatedly wait for parts, leaving my printer torn apart for nearly 3 weeks. Hopefully after reading this, you will be able to avoid doing the same.Note: I have enough spare hardware lying around, that I was able to complete this project without buying hardware. As a result I do not know what is needed or where. If someone can figure this out and provide feedback including this information I'd be happy to include it! (The .stl is irrelevant. Just included for publishing :D)
Step 1) Before you take your printer apart, you need to print a few parts:
E3D V6 Bowden carriage (I chose this one: http://www.thingiverse.com/thing:2099577)
Extruder motor mount (I chose this one: http://www.thingiverse.com/thing:2146021)
(Optional) X Axis Cable Chain (http://www.thingiverse.com/thing:2105040 (fully
compatible with the carriage I chose))
Step 2) There are several parts you need to buy, here's what I bought: (all links at bottom)
30mm 12V fan
Fan Duct (could also print it, but I just bought it)
M6 bowden connector, this one gives you a spare, and a spare bowden tube
(Recommended) Spare thermistors, incase of breakage during assembly
https://www.amazon.com/gp/product/B01L2LFCWG/ref=oh_aui_detailpage_o06_s00?ie=UTF8&psc=1
https://www.amazon.com/gp/product/B01FBPQF1Q/ref=oh_aui_detailpage_o06_s00?ie=UTF8&psc=1
https://www.amazon.com/gp/product/B014G85MO0/ref=oh_aui_detailpage_o05_s00?ie=UTF8&psc=1
https://www.amazon.com/gp/product/B01F1XTRGI/ref=oh_aui_detailpage_o02_s00?ie=UTF8&psc=1
https://www.amazon.com/gp/product/B01B41K7OM/ref=oh_aui_detailpage_o00_s00?ie=UTF8&psc=1
Step 3) Disassembly (explaining this from memory, may not be perfect)
Heat extruder, remove filament, let cool
Remove squirrel cage fan
Undo hex bolts holding fan and heat sink (while not ideal, I reused these), remove fan and heat sink
Remove screw on underside of extruder, holding the motor to the carriage
Loosen the M6 bolt on the underside (you will need this later)
Disconnect the extruder motor
Slide the extruder assembly off the carriage, and out of the way
Unscrew carriage from the mounts on the guide rods, set carriage aside (you will reuse the screws
Remove heat cartridge and thermistor from heat block (you will be reusing these)
Remove nozzle throat from heat block (ideally you will be reusing this)
Move heat block and nozzle off to the side. You do not need these
Remove Z axis guide rod cover from the side in which the extruder motor will reside (save the screw)
Step 4) Assembly (The exciting part?) Be sure to cable manage when necessary!
Install new carriage using original screws.
Remove screws from E3D heat block for cartridge and thermistor
Insert cartridge into heat block, tighten corresponding screw firmly
Insert thermistor, carefully tighten screw, do not over tighten
Slide E3D into carriage
Install cap over Extruder using screws
Screw 30mm fan into fan duct.
Slide fan and duct onto the E3D's heat sink.
Install squirrel cage fan, and any desired cooling nozzle
Runs screws through the carriage on either side of the extruder, to attach the X Axis belt to
Install the extruder motor mount on the top of the printer
Align all the parts of the motor as they would originally exist, and using the original screws in conjunction with nuts (along with one more appropriate screw) attach the motor to the mount. The input side of the motor should face toward the outside of the printer
Connect the Bowden connector to the stock nozzle throat using the M6 bolt from the original extruder. (This bolt and throat trick is not necessary, but makes loading filament much easier. I have not had issues with this connection, as sketchy as it may seem)
Screw the nozzle throat into the output of the extruder motor, until it is an appropriate distance from the gear and bearing.
Connect the bowden tube between the motor and extruder.
Step 5) Initial testing (technically skippable):
Be weary of the fact that the extruder is lower than before, make the necessary adjustments to prevent the nozzle from crashing
Hold in screw on extruder motor, feed the filament until it is coming out the heated extruder
Try a print! (You may need to reduce/temporarily disable retraction)
Step 6) Firmware
As noted in the thing summary for the carriage, the X positioning of the extruder is slightly different. As you probably noticed in Step 5, this leads to prints being offset from the center of the bed. You can either account for this in your starting GCODE in your slicer of choice, or you can reflash firmware. Because of it's availability, I updated to Skynet. I do not recommend fighting with Skynet unless you also have an auto-leveling sensor. I dislike my current firmware configuration strongly (if anyone can tell me where I can find the stock firmware, that would be appreciated). Long story short, you need the Arduino IDE, and once you open the files for your desired firmware, find the file called "configuration.h", and open it. use CTRL + F and find the string "X_MIN_POS", and set this value to -10. Compile the firmware, and push it to the printer over USB.Step 7) Enjoy!
Print a retraction test or two and dial your settings in, once you re-familiarize yourself with your printer, have fun increasing your print speeds!
I wish I had found a better solution as far as firmware is concerned, but I have made this as detailed as possible. Please provide feedback regarding the completeness of this, and let me know if there's anything I missed!
(Please note: I am not responsible for any damages or injuries caused while following this guide. Thanks)
Similar models
thingiverse
free

Chiron Direct Drive with V6 hotend by Shoots2k
...sc=1
capricorn bowden ptfe tubinghttps://www.amazon.com/gp/product/b086ypdhmf/ref=ppx_yo_dt_b_search_asin_title?ie=utf8&psc=1
thingiverse
free

Makerfarm i3v Bowden e3d v6 carriage with auto bed leveling by zwags
...f=sr_1_2?ie=utf8&qid=1522439823&sr=8-2&keywords=bowden&dpid=41ih%252b7ps4al&prest=_sx342_ql70_&dpsrc=srch
thingiverse
free

Desk Fan by NebNorse
...lpages04?ie=utf8&psc=1
motor control: https://www.amazon.com/gp/product/b01cnl6imc/ref=od_aui_detailpages04?ie=utf8&psc=1
thingiverse
free

X-Carriage Anet Hotend by davidtanis
...?ie=utf8&psc=1
and the wheelshttps://www.amazon.com/gp/product/b07gf9vghd/ref=ppx_yo_dt_b_search_asin_title?ie=utf8&psc=1
thingiverse
free
12 Function Deep Dish Button Box by coyoteyz13
..._title_o03_s00?ie=utf8&psc=1
https://www.amazon.com/gp/product/b07vhcb1q4/ref=ppx_yo_dt_b_search_asin_title?ie=utf8&psc=1
thingiverse
free

3D Printer 150x150x150
....6v
2004 lcd
extruder accessory
teprontube
z_axis screw
(1) 30mm fan
springs 4x8x20mm
youtube channelhttps://youtu.be/jqld5ejmcyi
thingiverse
free

I3 mega fan duct extrudeur motor/heatsink by Eikichi
...e_o08_s00?ie=utf8&psc=1
fan: https://www.amazon.fr/gp/product/b009lekgge/ref=ppx_yo_dt_b_asin_title_o04_s00?ie=utf8&psc=1
thingiverse
free
Noctua Laptop Cooling Pad for 3:2 Aspect Ratio Laptops by 3Dnate
...e?ie=utf8&psc=1
rubber feet:https://www.amazon.com/gp/product/b087h5b87m/ref=ppx_yo_dt_b_asin_title_o09_s00?ie=utf8&psc=1
thingiverse
free

Turntable
...amp;psc=1
m3 screws m3x6 or m3x8https://www.amazon.com/gp/product/b07twz7x38/ref=ppx_yo_dt_b_asin_title_o03_s00?ie=utf8&psc=1
thingiverse
free
Tronxy X5S Chimera Mount v2
...ab when i get a minute, probably later tonight
thank you joar for the x carriage model: https://www.thingiverse.com/thing:2599504
Glidethunder
thingiverse
free

Foxbody Mustang 5.0 Badge by GliDeThuNDeR
... not scaled properly, and the thickness is almost certainly wrong. i have used it in several versions of phone cases i have made.
thingiverse
free

iPhone 6/6S Fox Body Case by GliDeThuNDeR
...and it fits reasonably well. note: with my printer i get some overextrusion on the inside of the case that requires some sanding.
thingiverse
free
Anet A8 Adjustable Dual E3D V6 Bowden Setup by TheIgorMC
...0mm in y and 32.04 on x. thanks to glidethunder for pointing it out in the comments. update 16/06/2018:...
Bowden
turbosquid
$199
Vintage Ben Bowden Spacelander bike
... available on turbo squid, the world's leading provider of digital 3d models for visualization, films, television, and games.
3ddd
$1

Manooi Artica
...and pendants in various sizes and forms. suspension: galvanized bowden - dia. 1,5 mm. bulb: max 60 w -...
thingiverse
free
Remix Compact Bowden extruder - m6 bowden couplers and bowden tube pass-through
...ouplers and bowden tube pass-through
thingiverse
remix compact bowden extruder - m6 bowden couplers and bowden tube pass-through
thingiverse
free

Bowden Extruder
...bowden extruder
thingiverse
i have created bowden extruder for flsun delta 3d printer.
thingiverse
free

bowden 3mm by spee_D
...bowden 3mm by spee_d
thingiverse
for bowden 3mm
thingiverse
free
Bowden Tube Cutter
...bowden tube cutter
thingiverse
bowden tube cutter
thingiverse
free
Customizable Bowden Clip
...customizable bowden clip
thingiverse
customizable bowden clip
thingiverse
free
Bowden Oiler by fcheshire
...bowden oiler by fcheshire
thingiverse
inline bowden oiler
thingiverse
free

Bowden adapter by helkaroui
...bowden adapter by helkaroui
thingiverse
this is a fixed bowden adapter
thingiverse
free

Adventure3 Bowden Clip
...adventure3 bowden clip
thingiverse
adventure3 bowden clip
A8
turbosquid
$47

Car A8
...
turbosquid
royalty free 3d model car a8 for download as max on turbosquid: 3d models for games, architecture, videos. (1196060)
turbosquid
$50

Audi A8
...yalty free 3d model audi a8 for download as 3dm, obj, and fbx on turbosquid: 3d models for games, architecture, videos. (1580187)
turbosquid
$15

Audi A8
...lty free 3d model audi a8 for download as obj, fbx, and blend on turbosquid: 3d models for games, architecture, videos. (1387519)
turbosquid
$500

Audi A8
... available on turbo squid, the world's leading provider of digital 3d models for visualization, films, television, and games.
3d_export
$5

Audi A8 3D Model
...audi a8 3d model
3dexport
audi a8 cars car
audi a8 3d model ma 20351 3dexport
3d_export
$5

Audi A8 3D Model
...audi a8 3d model
3dexport
3d model of audi a8
audi a8 3d model badyaka 12136 3dexport
3d_ocean
$89

Audi A8 2010
...usiness car car class class f f german german luxury luxury s s s8 s8 sedan sedan vehicle vehicle
new audi a8 2010 detaled model.
turbosquid
$39

A8 2018
...a8 2018 for download as 3ds, obj, wrl, c4d, fbx, dae, and stl on turbosquid: 3d models for games, architecture, videos. (1345349)
turbosquid
free

audi a8 l
...rbosquid
royalty free 3d model audi a8 l for download as obj on turbosquid: 3d models for games, architecture, videos. (1663016)
3d_ocean
$45

Audi A8 restyled
...our door vehicle was created in blender3d 2.62.realistic renderings were created with yafaray 0.1.2 realistic plugin.rendering...
E3D
turbosquid
$23

E3D - Google Home
... 3d model e3d - google home for download as max, obj, and c4d on turbosquid: 3d models for games, architecture, videos. (1192509)
cg_studio
free

e3d model
...e3d model
cgstudio
- e 3d model, royalty free license available, instant download after purchase.
turbosquid
$2

Syringe C4D (E3D Ready)
...lty free 3d model syringe c4d (e3d ready) for download as c4d on turbosquid: 3d models for games, architecture, videos. (1336720)
turbosquid
$12

Microphone USB E3D and C4D
...ree 3d model microphone usb e3d & c4d for download as c4d on turbosquid: 3d models for games, architecture, videos. (1568216)
turbosquid
$29

E3D - OnePlus 6 Black
...model e3d - oneplus 6 black for download as max, obj, and c4d on turbosquid: 3d models for games, architecture, videos. (1358534)
turbosquid
$29

E3D - Motorola One 2018
...del e3d - motorola one 2018 for download as max, obj, and c4d on turbosquid: 3d models for games, architecture, videos. (1358533)
turbosquid
$29

E3D - Disney MagicBands 2
...l e3d - disney magicbands 2 for download as max, obj, and c4d on turbosquid: 3d models for games, architecture, videos. (1355515)
turbosquid
$29

E3D - Samsung Z4 Smartphone
...e3d - samsung z4 smartphone for download as max, obj, and c4d on turbosquid: 3d models for games, architecture, videos. (1182179)
turbosquid
$23

E3D - Razer Phone model
...del e3d - razer phone model for download as max, obj, and c4d on turbosquid: 3d models for games, architecture, videos. (1231207)
turbosquid
$23

E3D - Alcatel Idol 5
... model e3d - alcatel idol 5 for download as max, obj, and c4d on turbosquid: 3d models for games, architecture, videos. (1212799)
V6
3d_export
$100

v6 engine
...engine
3dexport
complete v6 engine modeled on solidworks 2017 along with .stl, .sldprt and .sldasm of all th parts and assembly.
3d_export
$10

V6 engine
... the first v6 engines were designed and produced independently by marmon motor car company, deutz gasmotoren fabrik and delahaye.
3d_export
$35

v6 engine
...s a complete model of a v6 engine containing over 400 components. you can contact me for a video of all the components assembling
3d_export
$10

v6 engine
...v6 engine
3dexport
turbosquid
$25

Bed1001-v6
... available on turbo squid, the world's leading provider of digital 3d models for visualization, films, television, and games.
turbosquid
$22

Chair2-v6
... available on turbo squid, the world's leading provider of digital 3d models for visualization, films, television, and games.
turbosquid
$20

V6.mb
... available on turbo squid, the world's leading provider of digital 3d models for visualization, films, television, and games.
3d_export
$20

V6 engine
...rovided in this package is all the parts in sldprt format and assembly in sldasm format. i can also convert the format on demand.
3ddd
$1

Стол V6
...6" в стиле дизельпанк изготовлен из блока двигателя, 4х поршней и 4х шатунов.
столешница изготовлена из стекла толщиной 8мм.
cg_studio
$199

V6 VVTi3d model
...v6 vvti3d model
cgstudio
.3ds - v6 vvti 3d model, royalty free license available, instant download after purchase.
Anet
thingiverse
free

Anet by derbodesign
...anet by derbodesign
thingiverse
logo anet
thingiverse
free

Anet e10 , Anet v1.0 by jonathan_943D
...anet e10 , anet v1.0 by jonathan_943d
thingiverse
soporte de ventilador de 80mm, para controladora anet v1.0
thingiverse
free

Anet A8 Anet AM8 Y belt holder
...anet a8 anet am8 y belt holder
thingiverse
anet a8 anet am8 y belt holder
thingiverse
free

Anet A8 Probe Bracket for anet sensor by chelrix
...anet a8 probe bracket for anet sensor by chelrix
thingiverse
anet a8 probe bracket for anet official sensor and marlin firmware
thingiverse
free

Anet logo by JUST3D_PRNTNG
...anet logo by just3d_prntng
thingiverse
anet logo
thingiverse
free

Fan nozzle for Anet A8 with original Anet levelsensor by peteruhlmann
...et levelsensor by peteruhlmann
thingiverse
here is an improved fan nozzle for the anet a8 with original level sensor from anet.
thingiverse
free

Anet Et4 Box
...anet et4 box
thingiverse
tool box for anet et4
thingiverse
free

Anet Logo by Superflex_Plastic_Fantastic
...anet logo by superflex_plastic_fantastic
thingiverse
anet logo to incorporate into designs.
thingiverse
free

Box for Anet ET4
...box for anet et4
thingiverse
this is a simple box for tool of anet et4
thingiverse
free

Anet V1.0 Board Kühlung (80mm Lüfter) / Anet A8 by MadCre8
...anet v1.0 board kühlung (80mm lüfter) / anet a8 by madcre8
thingiverse
anet v1.0 board kühlung (80mm lüfter) / anet a8
Conversion
3ddd
$1

Conversation Seat
...шетка
the conversation seat made in englandhttp://www.squintlimited.com/products/the_conversation_seat/gold
+ max 2011
3d_export
$10

Converse 3D Model
...converse 3d model
3dexport
converse shoe pc unix mac
converse 3d model electropainter17075 38067 3dexport
turbosquid
$100

converse-shoe
...quid
royalty free 3d model converse-shoe for download as c4d on turbosquid: 3d models for games, architecture, videos. (1398427)
turbosquid
$10

Conversation Furniture
... available on turbo squid, the world's leading provider of digital 3d models for visualization, films, television, and games.
turbosquid
$7

Converse Allstars
... available on turbo squid, the world's leading provider of digital 3d models for visualization, films, television, and games.
design_connected
$16

Conversation Club Chair
...conversation club chair
designconnected
donghia conversation club chair chairs computer generated 3d model. designed by n/a.
design_connected
$27

Hemicycle Conversation Chair
...rsation chair
designconnected
ligne roset hemicycle conversation chair computer generated 3d model. designed by nigro, philippe.
3d_export
$24

Converse keds 3D Model
...converse keds 3d model
3dexport
converse all star ked shoe clothes sports
converse keds 3d model vermi1ion 26201 3dexport
3ddd
$1

Converse All-Star Shoes
...converse all-star shoes
3ddd
кеды , обувь
converse all-star shoes
design_connected
$18

CONVERSE Jack Purcell Sneakers
...converse jack purcell sneakers
designconnected
converse jack purcell sneakers computer generated 3d model.
Guide
turbosquid
$15
Guide drawer
...squid
royalty free 3d model guide drawer for download as dwg on turbosquid: 3d models for games, architecture, videos. (1261387)
turbosquid
$1
Road Guide
... available on turbo squid, the world's leading provider of digital 3d models for visualization, films, television, and games.
archive3d
free
Guide-board 3D Model
...ion sign guide sign
guide-board n170112 - 3d model (*.gsm+*.3ds) for exterior 3d visualization.
turbosquid
$2
soap cutter guide
...
royalty free 3d model soap cutter guide for download as stl on turbosquid: 3d models for games, architecture, videos. (1694030)
turbosquid
$15
Blind Guiding tiles
...free 3d model blind guiding tiles for download as 3dm and dae on turbosquid: 3d models for games, architecture, videos. (1156598)
turbosquid
$69

Japanese Tour Guide
...d model japanese tour guide for download as max, fbx, and obj on turbosquid: 3d models for games, architecture, videos. (1614288)
turbosquid
$10
CNC Linear Guide
... available on turbo squid, the world's leading provider of digital 3d models for visualization, films, television, and games.
turbosquid
$1

Tank Model Guide
... available on turbo squid, the world's leading provider of digital 3d models for visualization, films, television, and games.
turbosquid
$1
Road Guide 2
... available on turbo squid, the world's leading provider of digital 3d models for visualization, films, television, and games.
3d_ocean
$9

Guide Books 3
...sformed separately and each have unique texture map on front and back cover. to make your work easier this model comes in thre...