Thingiverse
Anet A8 $4 Bed Leveling by VegasGuy
by Thingiverse
Last crawled date: 3 years, 1 month ago
DO NOT LEAVE THE GAUGE ON YOUR PRINTER WHILE PRINTING! YOU WILL DAMAGE YOUR PRINTER.
This gauge mount makes it fast and easy for you to level your X-axis gantry with your entire printer bed, corner-to-corner to within +/- 0.01mm of accuracy or better. Your 1st layer will be the most uniform it's ever been regardless of whether you have auto-leveling or not.
It is also a great diagnosis tool for bed leveling problems. It allows you to readily see precisely how your bed leveling efforts are affecting your bed. It's much, much faster than printing a calibration grid in order to find low and high spots. In other words, you can see your adjustments "LIVE" as you make them.
There are a few different versions of these tire tread depth gauges so make sure you buy the same one. This is the one I bought for $4:
https://www.ebay.com/itm/Black-Truck-Tool-Gauge-Tire-Caliper-Tread-Depth-Accurate-Car-Digital-LCD-Display/202805838951?hash=item2f382b8467%3Ag%3A-rwAAOSwijRdr6tT&LH_ItemCondition=3&LH_BIN=1
Here is the same gauge on Amazon with much faster delivery:
https://www.amazon.com/Audew-Digital-Tread-Depth-Gauge/dp/B078TCYPR7/ref=sr_1_10?ie=UTF8&qid=1532044794&sr=8-10&keywords=tire+tread+depth+gauge
Mounting the gauge:
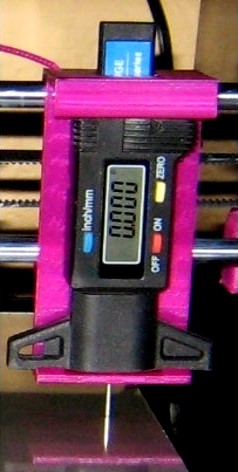
Before putting the gauge in the mount the tension spring needs to be removed. Image #4 shows the back of the gauge with the label removed in order to expose four Philips head screws. Image #5 shows the probe tension spring. Remove this spring and reassemble the gauge. Make sure the probe's blue side is on the same side as the LCD screen.
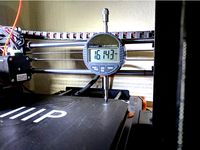
The benefit of removing the spring is the probe only weighs about 9 grams which minimizes bed deflection and provides ultimate measuring accuracy and repeatability. By comparison, my machinist's dial indicator exerts ~90 grams of force on the bed.
Attach the gauge to the mount by pushing it into place until the mounting tabs give a satisfying snap. No screws or other retainers are required. Check the top and bottom holes to make sure the probe is not binding. The probe needs to drop under its own weight to function properly.
UPDATE 09/06/2018: Auto leveling is helpful. I have it. But an auto bed leveler can only square the X-axis gantry to the bed. It cannot square the bed with the frame. A bed that is not square with the frame prints parallelograms in the Z-axis vertical plane (like the Leaning Tower of Pizza), not rectangles with 90 degree corners.
For that reason, I have created a probe extension and coupler that allows you to perfectly square your bed with your frame. This should be done first. Complete instructions to square your bed with your frame are located at https://www.thingiverse.com/thing:3087459.
The coupler and extension STL files are now included when you download this thing. Be sure to see print requirements for the coupler and extension in the link above.
X-axis Belt Alignment (optional):
In my case the tire gauge mount would not hang freely when butted up next to the extruder. Anet provides two M3 x 18mm screws to mount the X-axis belt to the extruder assembly. Because they are too short, they cause the belt to be misaligned with X-axis rods. This makes the belt push the gauge mount away from the rods making it impossible for the mount to hang freely when slid against the extruder.
I could still move the extruder to the far left or right side while the extruder was in the middle of the bed to take a measurement and use it that way, but I have a perfectionist streak in me so that would not do. I wanted to be able to measure every square centimeter of the bed.
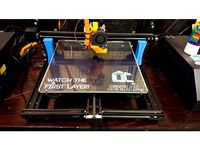
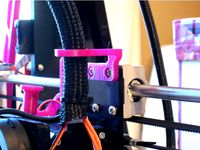
Before using the gauge I replaced the extruder's M3 x 18mm belt screws with longer 25mm ones so the belt was properly aligned with the pulleys and rods. Now the belt does not touch the gauge mount anywhere along the X-axis gantry. These 25mm screws are what Anet should have provided in the 1st place for proper pulley, rods and belt alignment. See image #2.
Using the gauge the easy way. Updated 08/23/2018:
Put the extruder in the Home position. Turn printer off and center the extruder in middle of the bed. Leave it there. Image #1.
Attach the gauge so the probe is reading the left edge of the bed. Zero the gauge.
Move the gauge to the right side of the bed and take a reading.
Example for a negative reading: Right side reading is -0.20. Divide -0.20 by 2 = -0.10. Multiply -0.10 by -1 (negative one) = +0.10. (A negative number times a negative number is a positive number.) Adjust the right Z-motor until it reads +0.10.
Example for a positive reading: Right side reading is +0.20. Divide +0.20 by 2 = +0.10. Multiply +0.10 by -1 (negative one) = -0.10. (A positive number times a negative number is a negative number.) Adjust the right Z-motor until it reads -0.10.
Now let's check if we are level. Zero the gauge while it is still mounted on the right side.
Move the gauge back to the left side of the bed and take a reading. You should now be within +/- 0.01mm of level. If not, repeat one more time. If you repeat these steps a second time you can usually achieve 0.00mm to 0.01mm of leveling.
This gauge is very sensitive. If your arms are resting on your desk it will affect your accuracy.
From this point on you only need to adjust the right Z-motor to get your X-axis level.
The gauge has both inches and mm modes. Either mode works well. Chose the mode that is easiest for you.
You will find these steps are much faster and easier to do than they sound.
-VegasGuy
This gauge mount makes it fast and easy for you to level your X-axis gantry with your entire printer bed, corner-to-corner to within +/- 0.01mm of accuracy or better. Your 1st layer will be the most uniform it's ever been regardless of whether you have auto-leveling or not.
It is also a great diagnosis tool for bed leveling problems. It allows you to readily see precisely how your bed leveling efforts are affecting your bed. It's much, much faster than printing a calibration grid in order to find low and high spots. In other words, you can see your adjustments "LIVE" as you make them.
There are a few different versions of these tire tread depth gauges so make sure you buy the same one. This is the one I bought for $4:
https://www.ebay.com/itm/Black-Truck-Tool-Gauge-Tire-Caliper-Tread-Depth-Accurate-Car-Digital-LCD-Display/202805838951?hash=item2f382b8467%3Ag%3A-rwAAOSwijRdr6tT&LH_ItemCondition=3&LH_BIN=1
Here is the same gauge on Amazon with much faster delivery:
https://www.amazon.com/Audew-Digital-Tread-Depth-Gauge/dp/B078TCYPR7/ref=sr_1_10?ie=UTF8&qid=1532044794&sr=8-10&keywords=tire+tread+depth+gauge
Mounting the gauge:
Before putting the gauge in the mount the tension spring needs to be removed. Image #4 shows the back of the gauge with the label removed in order to expose four Philips head screws. Image #5 shows the probe tension spring. Remove this spring and reassemble the gauge. Make sure the probe's blue side is on the same side as the LCD screen.
The benefit of removing the spring is the probe only weighs about 9 grams which minimizes bed deflection and provides ultimate measuring accuracy and repeatability. By comparison, my machinist's dial indicator exerts ~90 grams of force on the bed.
Attach the gauge to the mount by pushing it into place until the mounting tabs give a satisfying snap. No screws or other retainers are required. Check the top and bottom holes to make sure the probe is not binding. The probe needs to drop under its own weight to function properly.
UPDATE 09/06/2018: Auto leveling is helpful. I have it. But an auto bed leveler can only square the X-axis gantry to the bed. It cannot square the bed with the frame. A bed that is not square with the frame prints parallelograms in the Z-axis vertical plane (like the Leaning Tower of Pizza), not rectangles with 90 degree corners.
For that reason, I have created a probe extension and coupler that allows you to perfectly square your bed with your frame. This should be done first. Complete instructions to square your bed with your frame are located at https://www.thingiverse.com/thing:3087459.
The coupler and extension STL files are now included when you download this thing. Be sure to see print requirements for the coupler and extension in the link above.
X-axis Belt Alignment (optional):
In my case the tire gauge mount would not hang freely when butted up next to the extruder. Anet provides two M3 x 18mm screws to mount the X-axis belt to the extruder assembly. Because they are too short, they cause the belt to be misaligned with X-axis rods. This makes the belt push the gauge mount away from the rods making it impossible for the mount to hang freely when slid against the extruder.
I could still move the extruder to the far left or right side while the extruder was in the middle of the bed to take a measurement and use it that way, but I have a perfectionist streak in me so that would not do. I wanted to be able to measure every square centimeter of the bed.
Before using the gauge I replaced the extruder's M3 x 18mm belt screws with longer 25mm ones so the belt was properly aligned with the pulleys and rods. Now the belt does not touch the gauge mount anywhere along the X-axis gantry. These 25mm screws are what Anet should have provided in the 1st place for proper pulley, rods and belt alignment. See image #2.
Using the gauge the easy way. Updated 08/23/2018:
Put the extruder in the Home position. Turn printer off and center the extruder in middle of the bed. Leave it there. Image #1.
Attach the gauge so the probe is reading the left edge of the bed. Zero the gauge.
Move the gauge to the right side of the bed and take a reading.
Example for a negative reading: Right side reading is -0.20. Divide -0.20 by 2 = -0.10. Multiply -0.10 by -1 (negative one) = +0.10. (A negative number times a negative number is a positive number.) Adjust the right Z-motor until it reads +0.10.
Example for a positive reading: Right side reading is +0.20. Divide +0.20 by 2 = +0.10. Multiply +0.10 by -1 (negative one) = -0.10. (A positive number times a negative number is a negative number.) Adjust the right Z-motor until it reads -0.10.
Now let's check if we are level. Zero the gauge while it is still mounted on the right side.
Move the gauge back to the left side of the bed and take a reading. You should now be within +/- 0.01mm of level. If not, repeat one more time. If you repeat these steps a second time you can usually achieve 0.00mm to 0.01mm of leveling.
This gauge is very sensitive. If your arms are resting on your desk it will affect your accuracy.
From this point on you only need to adjust the right Z-motor to get your X-axis level.
The gauge has both inches and mm modes. Either mode works well. Chose the mode that is easiest for you.
You will find these steps are much faster and easier to do than they sound.
-VegasGuy
Similar models
thingiverse
free

Anet A8 $4 Bed Leveling Accessory by VegasGuy
...bed. the coupler must be printed in tpu or similar flexible material in order to achieve the correct amount...
thingiverse
free

X-axis belt height leveler for CR10S Pro by 3Dprinty
...nd makes the belt leveled.
you need to print two pieces (one for each mounting point).
further, a slightly longer belt is needed.
thingiverse
free

HICHIC/HICTOP X axis mount for Prusa i3 MK2S extruder + pinda probe by spit2k1
...d hotend and pinda probe to be used.
includes central cable mount (turn part backwards!) and cable tie points on right hand side.
thingiverse
free

Tread Depth Gauge Holder for Sapphire Pro/Plus and Creality by wjohnsaunders
...hat adjustment is gradually removed over successive layers, so any leveling error will be reflected in the geometry of your part.
thingiverse
free

Anet A6 Bowden Extruder Mount by debuggerX
...t
version 1
attention z-axis: -0.01mm
version 2
better screw holes
no z-axis adjustment
have fun with this bowden extruder mount!
thingiverse
free

QU-BD 2Up Extruder Belt Clamp by Skeeter314
...e clamp onto the belt and then use a m3 by 8mm long cap head screw (or equivalent) and thread into the hole of the printed clamp.
thingiverse
free

CR-10S LCD Tire Gauge Mount For Bed Leveling by netox
...r the 4mm spring.
the gauge that is working with this mount you can find very cheap here:digital lcd tyre tire tread depth gauge
thingiverse
free
CR-10 Gantry Levelling Blocks by CreateCafe3D
...on the blocks. then use the control box to move the z axis up, which will engage the steppers and keep it in the proper position!
thingiverse
free
Bed auto level servo mount + z-probe by hawkan
...bed auto level servo mount + z-probe by hawkan
thingiverse
bed auto level servo mount and z-probe for wades extruder.
thingiverse
free
Bed Leveling Bracket by kbrint
...%2f0.00005%27%27+digital+probe+indicator+dial+test+gauge+range+0-25.4mm%2f1%27%27+dial+test+indicators+electronic+indicator+gauge
Vegasguy
thingiverse
free

Carson Name Placard by VegasGuy
... for the best quality. i printed the one in the pic above at 60mm/sec and the quality was not as good as i usually get.
-vegasguy
thingiverse
free

Harbor Freight LED Magnifying Glass Holder by VegasGuy
...19.4mm in diameter. the holder has a 20mm hole so it will also work for magnifying glasses with handles less than 20mm.
-vegasguy
thingiverse
free

Thumbwheel Spacers by VegasGuy
...lp you perfectly square and level your print bed to your printer's frame: https://www.thingiverse.com/thing:3087459
-vegasguy
thingiverse
free

Finger Rest for Nail Painting by VegasGuy
...- non-commercial - no derivatives license.
contact me if you would like to arrange a royalty license to sell this item.
-vegasguy
thingiverse
free

RV Key Ring by VegasGuy
... was printed in glow-in-the-dark yellow pla.
-vegasguycheck out my designs page to see other useful things i have made for my rv.
thingiverse
free
Anet A8 Extruder Strain Relief by VegasGuy
..." techflex flexo f6 split sleeving. i highly recommend it. it looks a lot more professional than the spiral stuff.
-vegasguy
thingiverse
free

Puffs Brand Tissue Holder Box by VegasGuy
...l thickness is only 0.8 mm to reduce print time and filament cost. it needs about 38.5 meters for both the box and lid.
-vegasguy
thingiverse
free

Assassin's Creed Logo Drink Coaster by VegasGuy
...t on it.
this coaster is 101mm in diameter x 5.3mm thick. you may want to scale it in your slicer to a size you prefer.
-vegasguy
thingiverse
free

Binder Clip Grips - 20, 25, 30 & 50 mm by VegasGuy
...e been ultimately satisfied with how well they work. no more crawling on the floor looking for the flying binder clips.
-vegasguy
thingiverse
free

Pop Top Can Opener - Final by VegasGuy
...s able to open the ring pull-tabs on food cans of all shapes and sizes check out my universal ring pull-tab can opener.
-vegasguy
A8
turbosquid
$47

Car A8
...
turbosquid
royalty free 3d model car a8 for download as max on turbosquid: 3d models for games, architecture, videos. (1196060)
turbosquid
$50

Audi A8
...yalty free 3d model audi a8 for download as 3dm, obj, and fbx on turbosquid: 3d models for games, architecture, videos. (1580187)
turbosquid
$15

Audi A8
...lty free 3d model audi a8 for download as obj, fbx, and blend on turbosquid: 3d models for games, architecture, videos. (1387519)
turbosquid
$500

Audi A8
... available on turbo squid, the world's leading provider of digital 3d models for visualization, films, television, and games.
3d_export
$5

Audi A8 3D Model
...audi a8 3d model
3dexport
audi a8 cars car
audi a8 3d model ma 20351 3dexport
3d_export
$5

Audi A8 3D Model
...audi a8 3d model
3dexport
3d model of audi a8
audi a8 3d model badyaka 12136 3dexport
3d_ocean
$89

Audi A8 2010
...usiness car car class class f f german german luxury luxury s s s8 s8 sedan sedan vehicle vehicle
new audi a8 2010 detaled model.
turbosquid
$39

A8 2018
...a8 2018 for download as 3ds, obj, wrl, c4d, fbx, dae, and stl on turbosquid: 3d models for games, architecture, videos. (1345349)
turbosquid
free

audi a8 l
...rbosquid
royalty free 3d model audi a8 l for download as obj on turbosquid: 3d models for games, architecture, videos. (1663016)
3d_ocean
$45

Audi A8 restyled
...our door vehicle was created in blender3d 2.62.realistic renderings were created with yafaray 0.1.2 realistic plugin.rendering...
Anet
thingiverse
free

Anet by derbodesign
...anet by derbodesign
thingiverse
logo anet
thingiverse
free

Anet e10 , Anet v1.0 by jonathan_943D
...anet e10 , anet v1.0 by jonathan_943d
thingiverse
soporte de ventilador de 80mm, para controladora anet v1.0
thingiverse
free

Anet A8 Anet AM8 Y belt holder
...anet a8 anet am8 y belt holder
thingiverse
anet a8 anet am8 y belt holder
thingiverse
free

Anet A8 Probe Bracket for anet sensor by chelrix
...anet a8 probe bracket for anet sensor by chelrix
thingiverse
anet a8 probe bracket for anet official sensor and marlin firmware
thingiverse
free

Anet logo by JUST3D_PRNTNG
...anet logo by just3d_prntng
thingiverse
anet logo
thingiverse
free

Fan nozzle for Anet A8 with original Anet levelsensor by peteruhlmann
...et levelsensor by peteruhlmann
thingiverse
here is an improved fan nozzle for the anet a8 with original level sensor from anet.
thingiverse
free

Anet Et4 Box
...anet et4 box
thingiverse
tool box for anet et4
thingiverse
free

Anet Logo by Superflex_Plastic_Fantastic
...anet logo by superflex_plastic_fantastic
thingiverse
anet logo to incorporate into designs.
thingiverse
free

Box for Anet ET4
...box for anet et4
thingiverse
this is a simple box for tool of anet et4
thingiverse
free

Anet V1.0 Board Kühlung (80mm Lüfter) / Anet A8 by MadCre8
...anet v1.0 board kühlung (80mm lüfter) / anet a8 by madcre8
thingiverse
anet v1.0 board kühlung (80mm lüfter) / anet a8
Leveling
design_connected
$11

Levels
...levels
designconnected
one nordic levels computer generated 3d model. designed by form us with love.
design_connected
$7

Level
...level
designconnected
zanotta level shelves and storage computer generated 3d model. designed by arik levy.
turbosquid
$29
level
...ty free 3d model level for download as 3ds, obj, c4d, and fbx on turbosquid: 3d models for games, architecture, videos. (1272856)
turbosquid
$1
level
... available on turbo squid, the world's leading provider of digital 3d models for visualization, films, television, and games.
3d_export
$5

Mario level
...mario level
3dexport
mario level low quality for fun videos
3ddd
$1

LEVELS OF DISCOVERY
...етская мебель "levels of discovery". rab10003 princess mini rocker
кресло-качалка (мини) "принцесса навсегда"
3d_export
$19

level design
...level design
3dexport
you can use this design (level design) in your own game.
turbosquid
$60

Desert level
...squid
royalty free 3d model desert level for download as fbx on turbosquid: 3d models for games, architecture, videos. (1208131)
turbosquid
$15
Transit Level
...quid
royalty free 3d model transit level for download as max on turbosquid: 3d models for games, architecture, videos. (1158112)
turbosquid
$14

Districts Level
...id
royalty free 3d model districts level for download as max on turbosquid: 3d models for games, architecture, videos. (1408410)
Bed
3ddd
$1

bed
...bed
3ddd
bed , постельное белье
bed
3ddd
$1

bed
...bed
3ddd
bed , постельное белье
bed
3ddd
$1

bed
...bed
3ddd
bed , постельное белье
bed
3ddd
$1

bed
...bed
3ddd
bed , постельное белье
bed
3ddd
$1

bed
...bed
3ddd
bed , постельное белье
bed
3ddd
$1

bed
...bed
3ddd
bed , постельное белье
bed
3ddd
free

bed
...bed
3ddd
bed , постельное белье
bed
3ddd
free

bed
...bed
3ddd
bed , постельное белье
bed
3ddd
$1

Bed
...bed
3ddd
bed , постельное белье , постель
bed
3d_export
$7

bed adairs bed
...rs bed
3dexport
bed adairs bed in modern style. if you want a smoother surface, please turn on turbosmooth in the modifier list.
4
turbosquid
$9

Office Chair 4-4
... available on turbo squid, the world's leading provider of digital 3d models for visualization, films, television, and games.
3d_export
$5

doors- 4
...doors- 4
3dexport
doors 4
3d_export
$5

hinge 4
...hinge 4
3dexport
hinge 4
3ddd
$1

Штора №4
...штора №4
3ddd
штора №4
3d_export
free

playstation 4
...playstation 4
3dexport
playstation 4
turbosquid
$1

re 4-4 electric locomotive
... free 3d model re 4 4 electric locomotive for download as obj on turbosquid: 3d models for games, architecture, videos. (1707845)
3ddd
$1

nexus 4
...nexus 4
3ddd
lg , телефон
nexus 4
3ddd
$1

4 Poufs
...4 poufs
3ddd
пуф
4 soft poufs
turbosquid
$12

Calligraphic Digit 4 Number 4
...hic digit 4 number 4 for download as max, obj, fbx, and blend on turbosquid: 3d models for games, architecture, videos. (1389332)
3ddd
$1

Dauphin 4+
...dauphin 4+
3ddd
кресло
dauphin 4+ конференц кресло