Thingiverse
ANET A6 / A8 ULTIMATE Upgrade Guide
by Thingiverse
Last crawled date: 4 years, 1 month ago
If You enjoyed this guide and You want to say "Thank You" please consider supporting me by sending a tip on thingiverse or my PayPal here.
Over 2 years ago I have got my first 3D Printer - Anet A6. I was upgrading it and when it became almost perfect I have sold it because I got Anycubic I3 Mega for testing. Then I was upgrading I3 mega and I have made upgrade guide. There is a lot of knowledge which may help You get the best 3D printing results. You will find it here:
http://bit.ly/2OVbu5Z
After this 2 years of upgrading and testing a lot of 3D printers I have decided to make also Anet upgrade guide for You guys!
I'm basing on Anet A6 but because Anet A8 is very similar You can also read this guide - Most of the upgrades should work also for A8.
I - Free must-have upgrades - 3D printed:
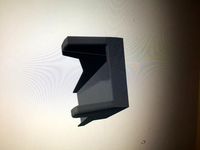
Fan duct
One of the most important upgrades - It has huge positive impact on the model finish.
http://bit.ly/2g3w7xG
Belt distance
Originally the belt is not running in parallel which is not good. This part will fix this issue.
http://bit.ly/2g4OAK4
Y - Belt tensioner
Another really important upgrade. It will allow You to easily tension the belt which will improve accuracy of Your 3D printer. You can download it here:
http://bit.ly/2g3oibd
Bed Level Thumbwheel Upgrade
Manual bed leveling the Anet A6 andA8 is a bit awkward and can be made much easier. ATTENTION: To do this mod, you will need to drill out the M3 thread in the Y carriage aluminum frame. This can not be reversed, but You really will not even think about it when You will see how easy bed leveling is now. Also in the thing below You will find spacers which are setting spring in the center which also helps.
http://bit.ly/2yAAAST
Anet A6 X Axis with belt tension
Original Anet A6 X Axis parts are complicated, they have a lot of screws, and they are heavy. It is also not making them robust. To make it simple and reliable You should print new X Axis parts. It's not an easy upgrade because You will probably need to enlarge holes for 8 mm rods. But if You know how to drill in plastic it shouldn't be a problem and this upgrade is really rewarding. You get X Axis belt tensioner, more reliable, simple and prettier parts. You will find it here:
http://bit.ly/2yAmIYS
While I was making this guide I have also found a newer one. It has fix for Z wobble and other features. I didn't test this part but it may be worth checking out. You can find it here:
http://bit.ly/39TcAtH
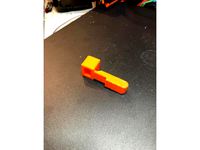
M4 Nut Knob - Previous part didn't have a knob to adjust belt tension, so I have designed this one:
http://bit.ly/2z57Li0
Adjustable Z Endstop
When You are using custom X Axis parts You need to change position of the Z Endstop because now it will not trigger. This mod will change endstop position and it will allow You to easily adjust Z trigger height.
http://bit.ly/2yAAbzP
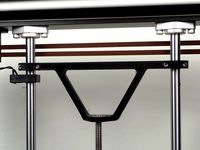
Frame brace - Front
Anet A6 frame is made from acrylic which is not stiff enough. It can easily bend, especially while doing fast movements by the printer. This part will make front of Your printer more rigid and it will allow You to fix Your printer to the ground.
http://bit.ly/2yClwUO
Frame brace - back
Same as above - another part for making Anet more rigid.
http://bit.ly/2yAneWO
Z Rod stabilizer
This part fixes the rods, so the printer is more stable. (Especially rods) It can be used with bearings, but it's not recommended. (Bearings will cause huge Wobble effect)
http://bit.ly/2yIFMn3
II - Free additional upgrades - 3D printed:
Quick Change Universal Spool Holder
With this part changing the spool is a breeze as it is essentially a giant nut and bolt with cone-like faces, and the nut threads on very quickly due to the coarse thread pitch. Once the hub is mounted on the spool simply slide in a piece of 5/16" or 8mm rod. I was testing a lot of this type Spool holders and this one worked the best.
http://bit.ly/2yAlltb
Top Spool holder
It will allow You to put Your spool above the printer. Maybe it's not the best idea but it worked great for me. It is great especially if You don't have too much space on Your desk.
http://bit.ly/2g4jUZo
Filament Guide
It will help to guide Your filament. It's especially important if You have Your spool above the printer.
http://bit.ly/2yBAGKg
Extruder button
Pushing extruder leaver with original screw is a bit painful for Your finger. This mod will make this problem go away.
http://bit.ly/2g4jeDk
Flexible Filament Guide
This mod will make loading filament easier and should help while printing with flex filaments.
http://bit.ly/2yCL4RC
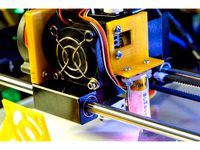
Extruder Heatsink Fan Spacer
In the Anet A6 kit the 40mm fan is bolted against the cooling rib to keep the filament assembly drive together. This is done without no support for the fan.
Area51 made this spacer/standoff design to give proper support for the 40mm cooling fan and make the assembly more rigid. To make assembly easier the two spacers is interconnected with a bridge with correct spacing, just insert it into the cooling rib as shown on the photos. It will also make Your extruder leaver move easier.
http://bit.ly/2yABI9l
Dust Cap for Z-Rod
This parts will help You protect Z screw from dust. Also it looks cool ;)
http://bit.ly/2g4t08N
Reset button and buzzer cover
This parts will make Your printer look better. Also the buzzer cover will make it a bit quieter.
http://bit.ly/2g4fMJc
Portal fan cover
It's lighter than original one. Also it's awesome mod for portal fans.
http://bit.ly/2g39mKf
Screen cover
This is a cover for the LCD board on the Anet A6. It makes it look much neater and it is more protected than with the single piece of acrylic which comes with the kit.
http://bit.ly/2yAm3ql
Longer top spool holder
After installing screen cover, original parts from Top Spool holder were not long enough, so I have made my own which is a bit longer.
http://bit.ly/2iuBtpE
III - Paid must-have upgrades
PSU CoverSafety First!
Anet A6 kit has dangerous main power terminals exposed without cover, fuse or on/off switch. This simple power supply cover will make your 3D printer more safe to operate.
http://bit.ly/2yAm2CN
You will need to buy this socket to install this mod:
http://bit.ly/2zJEl68
Mosfet
External mosfet is more efficient than this build in Anet A6's motherboard. It will give You more stable voltage on PSU, especially if You are using PID for heated bed which I do recommend for You.
http://bit.ly/2gZkxnQ
To instal Mosfet You will also need to print this part:
http://bit.ly/2yBgsQG
Male to micro SD card Flexible Card Extension
After installing mosfet above the motherboard putting SD Card in became a bit tricky. With this part You can easily move Your sd slot wherever you want.
http://bit.ly/2yG8XW6
Heated bed insulation
Most of the heat is just escaping under Your heated bed, so heating is not efficient. You can easily improve it by insulating Your bed. On my Anet A6 I have used cotton insulation, but now I was using different type of insulation on my 3D printers. In my opinion it works the same and it is easier to install.
Just clean the surface under Your bed with isopropyl alcohol and put there Your insulation. You should PID tune Your heated bed after this modification.
You will find 220 x 220 mm Insulation here:
http://bit.ly/2HFVXIs
Printing surface
When I was upgrading this 3D printer BuildTak was the best 3d printing surface for me. At the moment I'm using only pure glass. Also Ultrabase types surfaces are great but are easy to break and a bit expensive. Choose for Yourself, but I do recommend pure glass. It's cheap and easy to use if You will learn how to use it right ;)
New hotend and carriage
Hotend and extruder on Anet A6 are really old school at the moment. Extruder is slow and has low resolution. You have a lot of options to choose. Here I will give an example of one option which will make Your 3D printer use bowden extruder. You will need to print for example this carriage:
http://bit.ly/2w6t6bj
In most cases, regardless if You chose bowden or direct extruder You will need a new hotend. The best clones I know are from Triangle lab. They are really high quality and are almost same as E3D's. Of course if You have more money You should consider buying original parts, so You can support original creators. If You have smaller budget You should get this one:
http://bit.ly/2TYpq4v
You should also get better extruder. If You have money - Buy Hemera. I'm using it on one of my printers and it's just the best extruder You can get at the moment. But if You want to make it cheap buy BMG clone:
http://bit.ly/2xDSVzB
After installing these mods You will be free of jams, printing quality will improve, there will be less stringing, and You will have better results while printing on small layer heights.
IV - Paid additional upgrades
BLTouch
This one doesn't need to be introduced. If You like automatic bed probing You should buy BLTouch:
http://bit.ly/2UcNkb7
SSR & AC heated bed
That's one of the most rewarding upgrades which You can make to Your 3d printer. SSR is a Solid State Relay which will allow You to use AC heater for Your heated bed. On my 3D printers with 220 x 220 bed I'm using 500W Keenovo heater. On my second 300 x 300 mm printer I'm using even 750W! That's crazy power but it will allow You to easily reach high bed temperatures in a relly short time when we compare it to DC bed. Especially on ANET A6 which has poor 12V PSU. It will make Your heating faster, You will be able to reach higher temperatures and You will make voltage on stepper motors and motherboard more stable which will give You more stable layer height etc.
For this mod You will need:
Keenovo heater 220V:
http://bit.ly/2UdHlmi
I couldn't find one for 110V, so if in Your country is 110V You will need to find it by Your self.
SSR kit (You need AC type):
http://bit.ly/2S6crxx
Clean the surface under the heated bed with isopropyl alcohol and glue AC heater there. Using red silicone secure edges of the heater. When it's done You should insulate the bed the same as in point: III - 4 You can see this process for larger heated bed in the photos section.
You will find connection schematic in SSR kit link. As You can see connection is as easy as installing mosfet. Be careful because we are dealing with AC voltage which may be dangerous for You if You will not follow the safety rules.
Btw. You will not need mosfet while using SSR and AC bed so think about it before installing mosfet for DC bed.
Modern motherboard
ANET A6 is using old 8 bit motherboard with noisy steppers. You can easily change Your motherboard to 32 bit one with removable steppers which will give Your 3D printer a new life. Here You will find example of a fantastic motherboard with open source system and a lot of possibilities. You can buy it with TMC2209 which I do recommend for You.
http://bit.ly/2IVkpTS
Silent fans
Cheap Chinese 3D printers are using Cheap Chinese fans. These are really loud and if they are not they will be after some time. I suggest You to upgrade them for noctua ones or other silent fans.
Silent steppers - TMC2209
If You have installed silent fans You will realize that the most annoying sound that CNC machines are making - stepper sound is now in the foreground. Solution for getting rid of this is really simple - You need to swap Your cheap A4988 drivers for better ones. I'm using TMC2209 which I bought here:
http://bit.ly/TMC-2209
They are easy to install. You just need to throw out old ones and put new ones in their place. Then You just need to invert your stepper motor spin direction by connecting stepper connectors upside down or by inverting it in firmware. Except that they will make Your printer deadly silent, they will improve print quality (A4988 has 1/16 microstepping, TMC2208 has 1/256) also You are able to make your 3D printer smart with them. If You are more into electronics and marlin configuration You can easily connect these drivers to Your motherboard by SPI. It will allow You to set driver current from the terminal or Marlin menu, change stealthchop settings and much more.
You can watch install process, and sound comparison on my video about it here:
https://www.youtube.com/watch?v=efpZR1sLH6o
It's in Polish language, but it should be easy to follow even if You don't understand a word.
24V PSU
On 24V psu Your stepper motors are just working better than on 12V. They can achieve higher speeds and accelerations without loosing steps.
I do recommend this one:
http://bit.ly/2ScxuOL
It's a really reliable and powerful PSU for 3D printer with DC bed.ATTENTION! Remember that when You are upgrading from 12V to 24V You will have to upgrade Your hotend heater to 24V and Your DC bed to 24V. You don't have to upgrade bed heater if You are using SSR. After this type of changes You will have to PID tune your heaters.
V. Other upgrades
Marlin firmware - must-have
Everybody in 3D printing hobby knows marlin firmware. If somebody doesn't he will eventually know it. Stock 3D printer firmwares are often basing on Marlin, but the problem is that these are outdated. They are often not properly configured, and they can be dangerous as sometimes security system are disabled. You can install it on stock motherboard and You really should do it. You will find all important information about it here:
http://bit.ly/38ZiRma
Making Z rods stable
On Anet A6 Z rods are not securely fixed in place. They can wobble around which will definitely make accuracy of this printer worse. At the bottom side You will need to drill two holes, one of each side. Then You should use a screw to thread in acrylic. Now You can use small set screws to hold rods in place. You can see this process in my upgrade video here:
http://bit.ly/2Latt5V
To hold rods in place at the top I have designed a part which I have mentioned earlier in point I - 9.
Lubricate bearings
Mine bearings in ANET A6 from the beginning were almost dry. You should definitely apply some white lithium grease on the balls inside the bearing to make them run smoothly and without problems.
Upgrade bearings
If even after lubrication Your bearings they are not working as they should, they have a lot of free play etc. You should upgrade them. Buy some high quality bearings for example Misumi, or if Your budget is smaller use these:
http://bit.ly/2whUClU
You will need LM8UU bearings
Synchronize Z motors
Do You know this problem? You just leveled Your bed perfectly and printed something. You come back next day and again right side of the bed is higher than left side! This problem exists because right Z motor does not have endstop and it's desynchronizing with left motor. Now You have 2 options:First one: Use two endstops, one for each Z motor. You will need better motherboard and some skills in configuring marlin to set this up.Second One: You can connect Your Z motors with belt. Check out this mod for example:
http://bit.ly/2QqKZIK
THE END
I hope that You found this guide useful and Your ANET A6 or A8 have become a lot better 3D printer. Have a good day and don't forget to leave a comment if it helped You!
You can watch my review of Anet A6 here:
https://www.youtube.com/watch?v=zxlTGkgWEfU
And my video about upgrading it here:
https://www.youtube.com/watch?v=KauVa8hqxtw
Over 2 years ago I have got my first 3D Printer - Anet A6. I was upgrading it and when it became almost perfect I have sold it because I got Anycubic I3 Mega for testing. Then I was upgrading I3 mega and I have made upgrade guide. There is a lot of knowledge which may help You get the best 3D printing results. You will find it here:
http://bit.ly/2OVbu5Z
After this 2 years of upgrading and testing a lot of 3D printers I have decided to make also Anet upgrade guide for You guys!
I'm basing on Anet A6 but because Anet A8 is very similar You can also read this guide - Most of the upgrades should work also for A8.
I - Free must-have upgrades - 3D printed:
Fan duct
One of the most important upgrades - It has huge positive impact on the model finish.
http://bit.ly/2g3w7xG
Belt distance
Originally the belt is not running in parallel which is not good. This part will fix this issue.
http://bit.ly/2g4OAK4
Y - Belt tensioner
Another really important upgrade. It will allow You to easily tension the belt which will improve accuracy of Your 3D printer. You can download it here:
http://bit.ly/2g3oibd
Bed Level Thumbwheel Upgrade
Manual bed leveling the Anet A6 andA8 is a bit awkward and can be made much easier. ATTENTION: To do this mod, you will need to drill out the M3 thread in the Y carriage aluminum frame. This can not be reversed, but You really will not even think about it when You will see how easy bed leveling is now. Also in the thing below You will find spacers which are setting spring in the center which also helps.
http://bit.ly/2yAAAST
Anet A6 X Axis with belt tension
Original Anet A6 X Axis parts are complicated, they have a lot of screws, and they are heavy. It is also not making them robust. To make it simple and reliable You should print new X Axis parts. It's not an easy upgrade because You will probably need to enlarge holes for 8 mm rods. But if You know how to drill in plastic it shouldn't be a problem and this upgrade is really rewarding. You get X Axis belt tensioner, more reliable, simple and prettier parts. You will find it here:
http://bit.ly/2yAmIYS
While I was making this guide I have also found a newer one. It has fix for Z wobble and other features. I didn't test this part but it may be worth checking out. You can find it here:
http://bit.ly/39TcAtH
M4 Nut Knob - Previous part didn't have a knob to adjust belt tension, so I have designed this one:
http://bit.ly/2z57Li0
Adjustable Z Endstop
When You are using custom X Axis parts You need to change position of the Z Endstop because now it will not trigger. This mod will change endstop position and it will allow You to easily adjust Z trigger height.
http://bit.ly/2yAAbzP
Frame brace - Front
Anet A6 frame is made from acrylic which is not stiff enough. It can easily bend, especially while doing fast movements by the printer. This part will make front of Your printer more rigid and it will allow You to fix Your printer to the ground.
http://bit.ly/2yClwUO
Frame brace - back
Same as above - another part for making Anet more rigid.
http://bit.ly/2yAneWO
Z Rod stabilizer
This part fixes the rods, so the printer is more stable. (Especially rods) It can be used with bearings, but it's not recommended. (Bearings will cause huge Wobble effect)
http://bit.ly/2yIFMn3
II - Free additional upgrades - 3D printed:
Quick Change Universal Spool Holder
With this part changing the spool is a breeze as it is essentially a giant nut and bolt with cone-like faces, and the nut threads on very quickly due to the coarse thread pitch. Once the hub is mounted on the spool simply slide in a piece of 5/16" or 8mm rod. I was testing a lot of this type Spool holders and this one worked the best.
http://bit.ly/2yAlltb
Top Spool holder
It will allow You to put Your spool above the printer. Maybe it's not the best idea but it worked great for me. It is great especially if You don't have too much space on Your desk.
http://bit.ly/2g4jUZo
Filament Guide
It will help to guide Your filament. It's especially important if You have Your spool above the printer.
http://bit.ly/2yBAGKg
Extruder button
Pushing extruder leaver with original screw is a bit painful for Your finger. This mod will make this problem go away.
http://bit.ly/2g4jeDk
Flexible Filament Guide
This mod will make loading filament easier and should help while printing with flex filaments.
http://bit.ly/2yCL4RC
Extruder Heatsink Fan Spacer
In the Anet A6 kit the 40mm fan is bolted against the cooling rib to keep the filament assembly drive together. This is done without no support for the fan.
Area51 made this spacer/standoff design to give proper support for the 40mm cooling fan and make the assembly more rigid. To make assembly easier the two spacers is interconnected with a bridge with correct spacing, just insert it into the cooling rib as shown on the photos. It will also make Your extruder leaver move easier.
http://bit.ly/2yABI9l
Dust Cap for Z-Rod
This parts will help You protect Z screw from dust. Also it looks cool ;)
http://bit.ly/2g4t08N
Reset button and buzzer cover
This parts will make Your printer look better. Also the buzzer cover will make it a bit quieter.
http://bit.ly/2g4fMJc
Portal fan cover
It's lighter than original one. Also it's awesome mod for portal fans.
http://bit.ly/2g39mKf
Screen cover
This is a cover for the LCD board on the Anet A6. It makes it look much neater and it is more protected than with the single piece of acrylic which comes with the kit.
http://bit.ly/2yAm3ql
Longer top spool holder
After installing screen cover, original parts from Top Spool holder were not long enough, so I have made my own which is a bit longer.
http://bit.ly/2iuBtpE
III - Paid must-have upgrades
PSU CoverSafety First!
Anet A6 kit has dangerous main power terminals exposed without cover, fuse or on/off switch. This simple power supply cover will make your 3D printer more safe to operate.
http://bit.ly/2yAm2CN
You will need to buy this socket to install this mod:
http://bit.ly/2zJEl68
Mosfet
External mosfet is more efficient than this build in Anet A6's motherboard. It will give You more stable voltage on PSU, especially if You are using PID for heated bed which I do recommend for You.
http://bit.ly/2gZkxnQ
To instal Mosfet You will also need to print this part:
http://bit.ly/2yBgsQG
Male to micro SD card Flexible Card Extension
After installing mosfet above the motherboard putting SD Card in became a bit tricky. With this part You can easily move Your sd slot wherever you want.
http://bit.ly/2yG8XW6
Heated bed insulation
Most of the heat is just escaping under Your heated bed, so heating is not efficient. You can easily improve it by insulating Your bed. On my Anet A6 I have used cotton insulation, but now I was using different type of insulation on my 3D printers. In my opinion it works the same and it is easier to install.
Just clean the surface under Your bed with isopropyl alcohol and put there Your insulation. You should PID tune Your heated bed after this modification.
You will find 220 x 220 mm Insulation here:
http://bit.ly/2HFVXIs
Printing surface
When I was upgrading this 3D printer BuildTak was the best 3d printing surface for me. At the moment I'm using only pure glass. Also Ultrabase types surfaces are great but are easy to break and a bit expensive. Choose for Yourself, but I do recommend pure glass. It's cheap and easy to use if You will learn how to use it right ;)
New hotend and carriage
Hotend and extruder on Anet A6 are really old school at the moment. Extruder is slow and has low resolution. You have a lot of options to choose. Here I will give an example of one option which will make Your 3D printer use bowden extruder. You will need to print for example this carriage:
http://bit.ly/2w6t6bj
In most cases, regardless if You chose bowden or direct extruder You will need a new hotend. The best clones I know are from Triangle lab. They are really high quality and are almost same as E3D's. Of course if You have more money You should consider buying original parts, so You can support original creators. If You have smaller budget You should get this one:
http://bit.ly/2TYpq4v
You should also get better extruder. If You have money - Buy Hemera. I'm using it on one of my printers and it's just the best extruder You can get at the moment. But if You want to make it cheap buy BMG clone:
http://bit.ly/2xDSVzB
After installing these mods You will be free of jams, printing quality will improve, there will be less stringing, and You will have better results while printing on small layer heights.
IV - Paid additional upgrades
BLTouch
This one doesn't need to be introduced. If You like automatic bed probing You should buy BLTouch:
http://bit.ly/2UcNkb7
SSR & AC heated bed
That's one of the most rewarding upgrades which You can make to Your 3d printer. SSR is a Solid State Relay which will allow You to use AC heater for Your heated bed. On my 3D printers with 220 x 220 bed I'm using 500W Keenovo heater. On my second 300 x 300 mm printer I'm using even 750W! That's crazy power but it will allow You to easily reach high bed temperatures in a relly short time when we compare it to DC bed. Especially on ANET A6 which has poor 12V PSU. It will make Your heating faster, You will be able to reach higher temperatures and You will make voltage on stepper motors and motherboard more stable which will give You more stable layer height etc.
For this mod You will need:
Keenovo heater 220V:
http://bit.ly/2UdHlmi
I couldn't find one for 110V, so if in Your country is 110V You will need to find it by Your self.
SSR kit (You need AC type):
http://bit.ly/2S6crxx
Clean the surface under the heated bed with isopropyl alcohol and glue AC heater there. Using red silicone secure edges of the heater. When it's done You should insulate the bed the same as in point: III - 4 You can see this process for larger heated bed in the photos section.
You will find connection schematic in SSR kit link. As You can see connection is as easy as installing mosfet. Be careful because we are dealing with AC voltage which may be dangerous for You if You will not follow the safety rules.
Btw. You will not need mosfet while using SSR and AC bed so think about it before installing mosfet for DC bed.
Modern motherboard
ANET A6 is using old 8 bit motherboard with noisy steppers. You can easily change Your motherboard to 32 bit one with removable steppers which will give Your 3D printer a new life. Here You will find example of a fantastic motherboard with open source system and a lot of possibilities. You can buy it with TMC2209 which I do recommend for You.
http://bit.ly/2IVkpTS
Silent fans
Cheap Chinese 3D printers are using Cheap Chinese fans. These are really loud and if they are not they will be after some time. I suggest You to upgrade them for noctua ones or other silent fans.
Silent steppers - TMC2209
If You have installed silent fans You will realize that the most annoying sound that CNC machines are making - stepper sound is now in the foreground. Solution for getting rid of this is really simple - You need to swap Your cheap A4988 drivers for better ones. I'm using TMC2209 which I bought here:
http://bit.ly/TMC-2209
They are easy to install. You just need to throw out old ones and put new ones in their place. Then You just need to invert your stepper motor spin direction by connecting stepper connectors upside down or by inverting it in firmware. Except that they will make Your printer deadly silent, they will improve print quality (A4988 has 1/16 microstepping, TMC2208 has 1/256) also You are able to make your 3D printer smart with them. If You are more into electronics and marlin configuration You can easily connect these drivers to Your motherboard by SPI. It will allow You to set driver current from the terminal or Marlin menu, change stealthchop settings and much more.
You can watch install process, and sound comparison on my video about it here:
https://www.youtube.com/watch?v=efpZR1sLH6o
It's in Polish language, but it should be easy to follow even if You don't understand a word.
24V PSU
On 24V psu Your stepper motors are just working better than on 12V. They can achieve higher speeds and accelerations without loosing steps.
I do recommend this one:
http://bit.ly/2ScxuOL
It's a really reliable and powerful PSU for 3D printer with DC bed.ATTENTION! Remember that when You are upgrading from 12V to 24V You will have to upgrade Your hotend heater to 24V and Your DC bed to 24V. You don't have to upgrade bed heater if You are using SSR. After this type of changes You will have to PID tune your heaters.
V. Other upgrades
Marlin firmware - must-have
Everybody in 3D printing hobby knows marlin firmware. If somebody doesn't he will eventually know it. Stock 3D printer firmwares are often basing on Marlin, but the problem is that these are outdated. They are often not properly configured, and they can be dangerous as sometimes security system are disabled. You can install it on stock motherboard and You really should do it. You will find all important information about it here:
http://bit.ly/38ZiRma
Making Z rods stable
On Anet A6 Z rods are not securely fixed in place. They can wobble around which will definitely make accuracy of this printer worse. At the bottom side You will need to drill two holes, one of each side. Then You should use a screw to thread in acrylic. Now You can use small set screws to hold rods in place. You can see this process in my upgrade video here:
http://bit.ly/2Latt5V
To hold rods in place at the top I have designed a part which I have mentioned earlier in point I - 9.
Lubricate bearings
Mine bearings in ANET A6 from the beginning were almost dry. You should definitely apply some white lithium grease on the balls inside the bearing to make them run smoothly and without problems.
Upgrade bearings
If even after lubrication Your bearings they are not working as they should, they have a lot of free play etc. You should upgrade them. Buy some high quality bearings for example Misumi, or if Your budget is smaller use these:
http://bit.ly/2whUClU
You will need LM8UU bearings
Synchronize Z motors
Do You know this problem? You just leveled Your bed perfectly and printed something. You come back next day and again right side of the bed is higher than left side! This problem exists because right Z motor does not have endstop and it's desynchronizing with left motor. Now You have 2 options:First one: Use two endstops, one for each Z motor. You will need better motherboard and some skills in configuring marlin to set this up.Second One: You can connect Your Z motors with belt. Check out this mod for example:
http://bit.ly/2QqKZIK
THE END
I hope that You found this guide useful and Your ANET A6 or A8 have become a lot better 3D printer. Have a good day and don't forget to leave a comment if it helped You!
You can watch my review of Anet A6 here:
https://www.youtube.com/watch?v=zxlTGkgWEfU
And my video about upgrading it here:
https://www.youtube.com/watch?v=KauVa8hqxtw
Similar models
thingiverse
free

Z-Axis endstop level with glass by NickRimmer
... will use some glass on your hot bed, you will need correct level of z-axis endstop. so that, one of solutions wich can help you.
thingiverse
free

Anet A6 Adjustable Z Endstop by FHauser
...ndstop. this is particularly useful if you want to print on a glass, mirror or any other surface other than on the provided tape.
thingiverse
free

Anet A6 Z axis bottom bracket by RichieK
...e z axis motors of an anet a6.
this is what you first need to prevent z wobble.
you need to have a bottom plate for your printer!
thingiverse
free
Anet E12; quick lock for the SIQUK MK8 Extruder upgrade by twhite0101
... for two mosfets anet e12: cable strain relief for heated bed (improved) anet e12: y belt tensioner anet e12: x belt tensioner
thingiverse
free

Anet A6 Z-Endstop adjustable by _Brokkr_
...r structure, it´s instaled in a existing screw, and only need install the original switch for endstop in this adjustable bracket.
thingiverse
free

Anet A6 Z endstop adjustable by josezgz
... original switch for endstop in this adjustable bracket.
this is a remix from this design http://www.thingiverse.com/thing:454635
thingiverse
free
Installing the BLtouch on Anet A6 by wenzej
... should step you through installing the bltouch on the a6 and setting up auto level. it also goes over the install of the mounts.
thingiverse
free
Sapphire Pro / S - Z-Wobble FIX - Anti Z Wobble
...simultaneously transmit torque to the nut. so it's doing similar job like the oldham coupler but it's more compact....
thingiverse
free

Anet A6/A8 upgrade: Y-Belt tensioner by Photograaf16
...nd you want to support my work that i am making, you can donate me if you want with paypal: https://www.paypal.me/jordanhogetoorn
thingiverse
free

Tevo Tornado Heat Bed Cable Stain Reliever by Bit_Drafted
...installing this part.
this part is not guaranteed to solve any issues with you printer. it will not make your printer fire proof.
A6
3ddd
free

audi a6
...audi a6
3ddd
audi a6
audi a6
3ddd
$1

AUDI A6
...audi a6
3ddd
audi
audi a6, — семейство легковых автомобилей бизнес-класса, выпускающихся под маркой audi
3ddd
$1
Slipper Bath A6
...slipper bath a6
3ddd
toto
slipper bath a6
3ddd
$1
Slipper Bath A6
...slipper bath a6
3ddd
toto , ванна
slipper bath a6
3d_export
$40

Audi A6 3D Model
...audi a6 3d model
3dexport
audi a6
audi a6 3d model kaxa3d 8037 3dexport
3d_export
$79

Audi A6 3D Model
...audi a6 3d model
3dexport
audi auto a6
audi a6 3d model growl 3313 3dexport
3d_export
$40

Audi a6 3D Model
...audi a6 3d model
3dexport
car audi a6
audi a6 3d model bararhakopre20 91055 3dexport
turbosquid
$99

Audi A6
... available on turbo squid, the world's leading provider of digital 3d models for visualization, films, television, and games.
turbosquid
$99

Audi A6
... available on turbo squid, the world's leading provider of digital 3d models for visualization, films, television, and games.
turbosquid
$90

Audi A6
... available on turbo squid, the world's leading provider of digital 3d models for visualization, films, television, and games.
Ultimate
turbosquid
$3
Ultimate Grave
...model ultimate grave for download as blend, obj, stl, and fbx on turbosquid: 3d models for games, architecture, videos. (1636144)
turbosquid
$79

ULTIMATE GIRAFFE
... available on turbo squid, the world's leading provider of digital 3d models for visualization, films, television, and games.
turbosquid
$5
The Ultimate Bowl
... available on turbo squid, the world's leading provider of digital 3d models for visualization, films, television, and games.
turbosquid
$1

Ultimate Revolver
... available on turbo squid, the world's leading provider of digital 3d models for visualization, films, television, and games.
3ddd
$1

Kimera Ultimate DVD System
...kimera ultimate dvd system
3ddd
dvd
schneider kimera ultimate dvd system
cg_studio
$49

The Ultimate Lioness3d model
... model
cgstudio
.max .obj .fbx - the ultimate lioness 3d model, royalty free license available, instant download after purchase.
turbosquid
$5
Ultimate Brick Castle
...yalty free 3d model ultimate brick castle for download as fbx on turbosquid: 3d models for games, architecture, videos. (1335247)
turbosquid
$31

Zombie Ultimate pack
... available on turbo squid, the world's leading provider of digital 3d models for visualization, films, television, and games.
turbosquid
$8

Barrels Ultimate Pack
...ls ultimate pack for download as ma, max, obj, fbx, and blend on turbosquid: 3d models for games, architecture, videos. (1353281)
turbosquid
$25

Ultimate "F" Bomb
... available on turbo squid, the world's leading provider of digital 3d models for visualization, films, television, and games.
A8
turbosquid
$47

Car A8
...
turbosquid
royalty free 3d model car a8 for download as max on turbosquid: 3d models for games, architecture, videos. (1196060)
turbosquid
$50

Audi A8
...yalty free 3d model audi a8 for download as 3dm, obj, and fbx on turbosquid: 3d models for games, architecture, videos. (1580187)
turbosquid
$15

Audi A8
...lty free 3d model audi a8 for download as obj, fbx, and blend on turbosquid: 3d models for games, architecture, videos. (1387519)
turbosquid
$500

Audi A8
... available on turbo squid, the world's leading provider of digital 3d models for visualization, films, television, and games.
3d_export
$5

Audi A8 3D Model
...audi a8 3d model
3dexport
audi a8 cars car
audi a8 3d model ma 20351 3dexport
3d_export
$5

Audi A8 3D Model
...audi a8 3d model
3dexport
3d model of audi a8
audi a8 3d model badyaka 12136 3dexport
3d_ocean
$89

Audi A8 2010
...usiness car car class class f f german german luxury luxury s s s8 s8 sedan sedan vehicle vehicle
new audi a8 2010 detaled model.
turbosquid
$39

A8 2018
...a8 2018 for download as 3ds, obj, wrl, c4d, fbx, dae, and stl on turbosquid: 3d models for games, architecture, videos. (1345349)
turbosquid
free

audi a8 l
...rbosquid
royalty free 3d model audi a8 l for download as obj on turbosquid: 3d models for games, architecture, videos. (1663016)
3d_ocean
$45

Audi A8 restyled
...our door vehicle was created in blender3d 2.62.realistic renderings were created with yafaray 0.1.2 realistic plugin.rendering...
Anet
thingiverse
free

Anet by derbodesign
...anet by derbodesign
thingiverse
logo anet
thingiverse
free

Anet e10 , Anet v1.0 by jonathan_943D
...anet e10 , anet v1.0 by jonathan_943d
thingiverse
soporte de ventilador de 80mm, para controladora anet v1.0
thingiverse
free

Anet A8 Anet AM8 Y belt holder
...anet a8 anet am8 y belt holder
thingiverse
anet a8 anet am8 y belt holder
thingiverse
free

Anet A8 Probe Bracket for anet sensor by chelrix
...anet a8 probe bracket for anet sensor by chelrix
thingiverse
anet a8 probe bracket for anet official sensor and marlin firmware
thingiverse
free

Anet logo by JUST3D_PRNTNG
...anet logo by just3d_prntng
thingiverse
anet logo
thingiverse
free

Fan nozzle for Anet A8 with original Anet levelsensor by peteruhlmann
...et levelsensor by peteruhlmann
thingiverse
here is an improved fan nozzle for the anet a8 with original level sensor from anet.
thingiverse
free

Anet Et4 Box
...anet et4 box
thingiverse
tool box for anet et4
thingiverse
free

Anet Logo by Superflex_Plastic_Fantastic
...anet logo by superflex_plastic_fantastic
thingiverse
anet logo to incorporate into designs.
thingiverse
free

Box for Anet ET4
...box for anet et4
thingiverse
this is a simple box for tool of anet et4
thingiverse
free

Anet V1.0 Board Kühlung (80mm Lüfter) / Anet A8 by MadCre8
...anet v1.0 board kühlung (80mm lüfter) / anet a8 by madcre8
thingiverse
anet v1.0 board kühlung (80mm lüfter) / anet a8
Upgrade
turbosquid
$15

Upgraded Glock
...e 3d model upgraded glock for download as obj, fbx, and blend on turbosquid: 3d models for games, architecture, videos. (1185950)
3ddd
$1

Calligaris / UPGRADE
...calligaris / upgrade
3ddd
calligaris
c материалом
3d_export
free

cz upgrade
...cz upgrade
3dexport
https://www.buymeacoffee.com/mestrezen3d https://linktr.ee/mestrezen3
turbosquid
$80

Custer Tank upgrade
... available on turbo squid, the world's leading provider of digital 3d models for visualization, films, television, and games.
turbosquid
$39

Domestos 1 upgrade
... available on turbo squid, the world's leading provider of digital 3d models for visualization, films, television, and games.
3d_export
$10

Upgraded tea cup
...upgraded tea cup
3dexport
a cup with an unusual design and a unique shape for a more enjoyable tea experience
3d_export
$8

dixy outlander classic style upgraded poplar wood lounge chair
...utlander classic style upgraded poplar wood lounge chair
3dexport
dixy outlander classic style upgraded poplar wood lounge chair
turbosquid
free

AK-12 + Upgrades low-poly 3D model
...ow-poly 3d model for download as fbx, blend, and unitypackage on turbosquid: 3d models for games, architecture, videos. (1501145)
evermotion
$700

Upgrade from V-ray 1.5 to 3.5 for 3ds max
...here is no need to purchase a new dongle - your current dongles will be reprogrammed to carry v-ray 3. evermotion 3d models shop.
evermotion
$300

Upgrade from V-Ray 2.0 to V-ray 3.5 for 3ds Max
... interface (gui) for editing settings on one machine and one render node for rendering on one machine. evermotion 3d models shop.
Guide
turbosquid
$15
Guide drawer
...squid
royalty free 3d model guide drawer for download as dwg on turbosquid: 3d models for games, architecture, videos. (1261387)
turbosquid
$1
Road Guide
... available on turbo squid, the world's leading provider of digital 3d models for visualization, films, television, and games.
archive3d
free
Guide-board 3D Model
...ion sign guide sign
guide-board n170112 - 3d model (*.gsm+*.3ds) for exterior 3d visualization.
turbosquid
$2
soap cutter guide
...
royalty free 3d model soap cutter guide for download as stl on turbosquid: 3d models for games, architecture, videos. (1694030)
turbosquid
$15
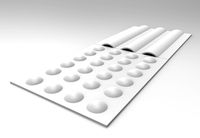
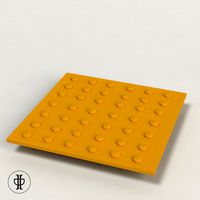
Blind Guiding tiles
...free 3d model blind guiding tiles for download as 3dm and dae on turbosquid: 3d models for games, architecture, videos. (1156598)
turbosquid
$69

Japanese Tour Guide
...d model japanese tour guide for download as max, fbx, and obj on turbosquid: 3d models for games, architecture, videos. (1614288)
turbosquid
$10
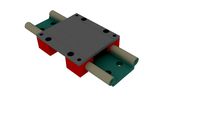
CNC Linear Guide
... available on turbo squid, the world's leading provider of digital 3d models for visualization, films, television, and games.
turbosquid
$1

Tank Model Guide
... available on turbo squid, the world's leading provider of digital 3d models for visualization, films, television, and games.
turbosquid
$1
Road Guide 2
... available on turbo squid, the world's leading provider of digital 3d models for visualization, films, television, and games.
3d_ocean
$9

Guide Books 3
...sformed separately and each have unique texture map on front and back cover. to make your work easier this model comes in thre...