Thingiverse

Analog USB Handbrake for Playseat Challenge by Omdoyas
by Thingiverse
Last crawled date: 3 years, 2 months ago
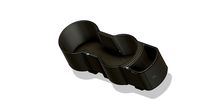
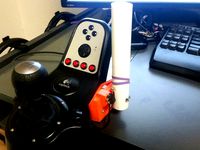
I designed this handbrake specifically for the Playseat Challenge to be mounted next to the steering wheel on the bent tube.
I saw this video on YouTube: https://www.youtube.com/watch?v=QWc6EbQdUjE&t=182s
Then I thought that i could design all the mechanical parts myself and do the soldering and setting up the arduino just like in the video.
I use the Logitech G27 Racing Wheen and this Handbrake is compatible with this Shifter Mount: https://www.thingiverse.com/thing:3569302
I included an assembled .stl file of the whole handbrake for previewing.
Parts you´ll need:
2x 608 Ball Bearing
1x 10K Wh148 Linear Potentiometer
3x M3x4mm screws
11x M4 Nuts
11x M4x16mm Allen Bolts
1x M8 Nut
1x M8x70mm Bolt
1x Arduino Pro Micro / leonardo
1x 35-45mm long spring with a max outer diameter of 15mm. Wire diameter can be 0.8 - 1.6mm. Thicker wire means stronger pull force.
How to assemble:
push the two bearings into the lever`s bottom part.
put the M8 Nut into the cutout in the main body. make sure the nut is all the way in.
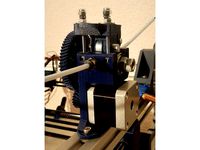
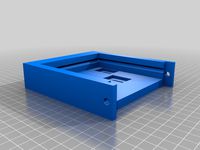
mount the potentiometer on the MainBodyCover. Make sure that it sits flush and doesnt wiggle. The pins should face down.
push the SmallGear onto the potentiometer.
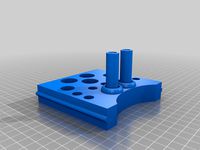
choose one of the 3 LeverStop parts (I chose LeverStop15Degree) and push it into the MainBody. Secure it with the LeverStopSpline from the bottom side.
slide the Lever into position and put in the spring into the cutouts in the lever and LeverStop part. (The SpringSpacer is optional. It helps to keep springs with outer diameter thats less than 15mm centered.)
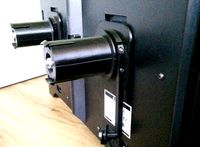
push the M8x70mm Bolt through the MainBodyCover first, then through the two bearings in the Lever and then into the MainBody and screw it snuggly into the M8 Nut.
make sure that the potentiomerer has full range of motion and doesnt hit its limit when you pull the lever.
secure the MainBodyCover with 5 M4 Nuts and Bolts. The M4 nuts have to be pressed in first.
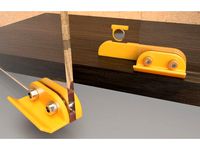
Mount the MainBody assembly together with the Clamp part to the Playseat using 6 M4 Nuts and Bolts.
screw in HandleMountScrew into the Lever.
push the Handle onto the HandleMountScrew and secure it with the HandleLockSpline.
follow the tutorial in the youtube video on how to solder the potentiometer to the arduino and hook it up to your computer.
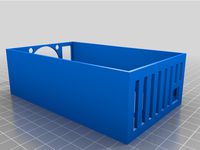
Put the arduino into the ArduinoLeonardoCase1 & 2 to protect it.
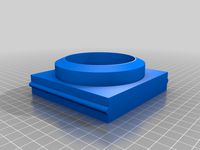
cover the potentiometer with the PotentiometerCover using 3 short M3 screws.
(optional) 16. Use superglue to secure the arduino to the MainBodyCover as shown in one of the pictures
This Handbrake is pretty simple as it only took me 4 days from start to finish. (designing, printing, assembling) There are quite a few things that could be optimized a bit more.
I saw this video on YouTube: https://www.youtube.com/watch?v=QWc6EbQdUjE&t=182s
Then I thought that i could design all the mechanical parts myself and do the soldering and setting up the arduino just like in the video.
I use the Logitech G27 Racing Wheen and this Handbrake is compatible with this Shifter Mount: https://www.thingiverse.com/thing:3569302
I included an assembled .stl file of the whole handbrake for previewing.
Parts you´ll need:
2x 608 Ball Bearing
1x 10K Wh148 Linear Potentiometer
3x M3x4mm screws
11x M4 Nuts
11x M4x16mm Allen Bolts
1x M8 Nut
1x M8x70mm Bolt
1x Arduino Pro Micro / leonardo
1x 35-45mm long spring with a max outer diameter of 15mm. Wire diameter can be 0.8 - 1.6mm. Thicker wire means stronger pull force.
How to assemble:
push the two bearings into the lever`s bottom part.
put the M8 Nut into the cutout in the main body. make sure the nut is all the way in.
mount the potentiometer on the MainBodyCover. Make sure that it sits flush and doesnt wiggle. The pins should face down.
push the SmallGear onto the potentiometer.
choose one of the 3 LeverStop parts (I chose LeverStop15Degree) and push it into the MainBody. Secure it with the LeverStopSpline from the bottom side.
slide the Lever into position and put in the spring into the cutouts in the lever and LeverStop part. (The SpringSpacer is optional. It helps to keep springs with outer diameter thats less than 15mm centered.)
push the M8x70mm Bolt through the MainBodyCover first, then through the two bearings in the Lever and then into the MainBody and screw it snuggly into the M8 Nut.
make sure that the potentiomerer has full range of motion and doesnt hit its limit when you pull the lever.
secure the MainBodyCover with 5 M4 Nuts and Bolts. The M4 nuts have to be pressed in first.
Mount the MainBody assembly together with the Clamp part to the Playseat using 6 M4 Nuts and Bolts.
screw in HandleMountScrew into the Lever.
push the Handle onto the HandleMountScrew and secure it with the HandleLockSpline.
follow the tutorial in the youtube video on how to solder the potentiometer to the arduino and hook it up to your computer.
Put the arduino into the ArduinoLeonardoCase1 & 2 to protect it.
cover the potentiometer with the PotentiometerCover using 3 short M3 screws.
(optional) 16. Use superglue to secure the arduino to the MainBodyCover as shown in one of the pictures
This Handbrake is pretty simple as it only took me 4 days from start to finish. (designing, printing, assembling) There are quite a few things that could be optimized a bit more.
Similar models
thingiverse
free
Improved Filament Mount + Guide for Flashforge Creator Pro by Zwom
...om ruthex)
1x socket screw m4 x <16mm
for installation of filament guide to filament mount
2x nut m3
2x socket screw m3 x 8mm
thingiverse
free

Handbrake sensor by jsheradin
...enter of rotation at all points in an intersecting plane
mount slider to lever with zip ties
connect via usb and map it in a game
thingiverse
free

Motorized barndoor tracker for astrophotography by elenhinan
...r
1x a4988 (or other stepper driver)
1x arduino nano
1x 1/4 inch 20 tpi screw for mounting camera
m3 screws for the laser pointer
thingiverse
free

Super simple analogue sim handbrake
...rew
1x m8x50 bolt + m8 locknut
2x 688zz bearing
4x m4x20 internal allen bolt
lever i did from mdf 12mm, and glued big gear to it.
thingiverse
free

Rotating table (DIY) by utTech
...ot of space under cover)
1x 12v power supply
////
1x condensator 0,33uf
1x condensator 0,1uf
1x condensator 100uf
1x 10k resistor
thingiverse
free
Cyborg Geared Extruder for 3030 Extrusion by brainchecker
...3 nuts and washers
only part3 needs to be printed with supports.
printed in petg with an high amount of infill for good strength.
thingiverse
free

Shelf Mounted Spool Holder
...
1x m12 hexagonal nut
2x m8 bolt
2x m8 hexagonal nut
1x m4 screw
1x m4 nyloc nut
6x m4 torx wood screws
1x 25x600mm aluminum tube
thingiverse
free

Simple and sturdy camera gimbal by peterkrull
...an 8mm rod.
parts needed to assemble:
6x 608zz bearings
10x m4 20mm bolts
2x m4 10mm bolts
1x m8 30mm bolt
1x m8 nut
1x m8 washer
thingiverse
free

Wall-mount spool holder with quick release fastener by loco
...unk screws 4mm diameter
3x m8 nuts
1x m8 threaded rod
2x 608 ball bearing
1x m3x20 screw
1x m3 nut (nyloc nut or loctite)
thingiverse
free

Dual 608 bearing Y idler for Prusa i3 with 10mm threaded rod by Tech2C
...-slightly reduced the bearing rim.
you will need:
1x m8x30mm cap screw
1x m8 nut
2x 608 bearings
2x m4x20mm cap screws
2x m4 nuts
Omdoyas
thingiverse
free

Flower Pot Insert by Omdoyas
...flower pot insert by omdoyas
thingiverse
i made a flower pot insert for my mom... and now for all of you too :d
thingiverse
free

ADKS Fan Duct Remix to fit Noctua Fans (With screws) by Omdoyas
...the fans to fit noctua 40mm fans, as they have sharper corners.
i also added mounting holes for securing the fans with m3 screws.
thingiverse
free
Filament spool holder Remix by Omdoyas
...._with_lettering" version that say "spool-holda" and "spool-hold-inator" on the sides :)
hope you enjoy!
thingiverse
free
Magnetic door handle and stopper for 3d printer enclosure by Omdoyas
...mm magnets
4x m3x12mm (for 4mm thick door panels, so adjust for your door thickness)
4x m3 nut
2 wood screws for the door stopper
thingiverse
free

Logitech G27 Shift Knob With Eunos Roadster Emblem by Omdoyas
...his one.
for mounting just use the original screw.
hope you enjoy! :)
if you have any sugestions, pls leave them in the comments.
thingiverse
free
Temperature controller box for 3d printer enclosure by Omdoyas
...,0-40v
1x arduino nano
1x ds18b20 temperature probe
1x noctua nf-a4x20 flx
1x noctua nf-a8 flx
m3 screws to mount the electronics
thingiverse
free

Filament spool holder (2 models) - remixed - no supports needed by Design8Studio
...faster print based on an excellent suggestion from username "omdoyasquot; who also offered a remix of their own. the...
Playseat
3ddd
$1

Игровое кресло Playseat Alcantara + Logitech G27
... автосимулятор
игровое кресло playseat alcantara + logitech g27 моделилось по референсам. сайт производителя www.playseat.com
thingiverse
free

Playseat Shifter Holder
...playseat shifter holder
thingiverse
playseat shifter holder
thingiverse
free

PlaySeat Thrustmaster Cupholder by Tchibo99
...playseat thrustmaster cupholder by tchibo99
thingiverse
cupholder for playseat gearholder
thingiverse
free

Playseat Modular - Cradle Insert by NukeSnow
...3942617
this file is the base insert for the playseat modular system, from this you can build whatever you need for your playseat
thingiverse
free
Playseat Modular - Drink Holder
...www.thingiverse.com/thing:3942617 to start
a basic drinks holder for the playseat modular, no support is needed just print as is
thingiverse
free

Playseat cable bracket by altruego
...playseat cable bracket by altruego
thingiverse
this bracket was made to clamp cables from a logitech g27 wheel to a playseat.
thingiverse
free
Playseat Modular - Cradle
...lish anything that they also use it for
get the playseat modular - g29 gear shifter - https://www.thingiverse.com/thing:3942662
thingiverse
free
Playseat Modular - G29 Gear Shift
... modular, this is for the logitech g29 gear shifter. the mounting plate and the bolts will need support from the build plate only
thingiverse
free

Playseat Challenge Bass Shaker Holder by charlie_sheen
...e_sheen
thingiverse
hi, this is a bass shaker mount for the playseat challenge seat.
thanks for donating
paypal.me/charliethingy
thingiverse
free

Logitech G29 shifter adapter for Playseat by Emeduza
...eat by emeduza
thingiverse
i have designed an adapter for the logitech g29 gear shifter to fit the shifter mount on a playseat.
Handbrake
3d_export
$12
E30 Cup Holder v2
...removable box.<br>the installation location is located next to the handbrake<br>printed abs layer...
3d_export
$10
e30 cup holder
...box. the installation location is located next to the handbrake the diameter of the cup is 68 mm. the...
3d_export
$19
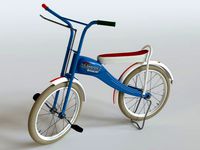
Bambino bicycle
...i owned and used one myself in 1965-1966. the handbrake was dangerous; rolling down the hill and using the...
3d_export
$70

lancer evolution 9
...wheel 2 4 sliders for opening each door 3 handbrake down slider 4 sun shades 5 bardachek 6 dashboard...
3d_export
$129

ursus c-355 tractor
...front tank front tires front wheels gauges gear sticks handbrake head lights hydrolic hitch system pedals rear axle rear...
thingiverse
free

Honda Jazz handbrake button
...honda jazz handbrake button
thingiverse
i had a request for a new handbrake button for a honda jazz.
thingiverse
free

Handbrake Simracing by Javi91ac
...handbrake simracing by javi91ac
thingiverse
work in progress
thingiverse
free
Mitsubishi Colt handbrake button by Raptirius
...mitsubishi colt handbrake button by raptirius
thingiverse
mitsubishi colt z34 handbrake button.
thingiverse
free
G27/G25 Handbrake Mount by Roedkill
...g27/g25 handbrake mount by roedkill
thingiverse
simple handbrake mount for the g27/g25 shifter
thingiverse
free
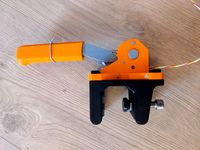
Table Mount For Handbrake
...or an m12 spacer on the bottom side of the print.
this was printed in pla with 3-4 walls while laying on the side with 20% infill
Analog
turbosquid
$1
Analog scape
... free 3d model analog scape for download as 3ds, max, and fbx on turbosquid: 3d models for games, architecture, videos. (1315807)
turbosquid
$25

Analog Durometer
... available on turbo squid, the world's leading provider of digital 3d models for visualization, films, television, and games.
turbosquid
$3

playstation analog
... available on turbo squid, the world's leading provider of digital 3d models for visualization, films, television, and games.
design_connected
$7

Analog Wall Clock
...analog wall clock
designconnected
hay analog wall clock computer generated 3d model. designed by schneck, shane.
turbosquid
free

Vossen rim analog
... 3d model vossen rim analog for download as max, obj, and fbx on turbosquid: 3d models for games, architecture, videos. (1706126)
turbosquid
$7

Old analog multimeter
...analog multimeter for download as 3ds, max, obj, fbx, and dae on turbosquid: 3d models for games, architecture, videos. (1365964)
3d_export
$10

Analog Synthesizer 3D Model
... model
3dexport
keyboard moog synth retro vintage electronic techno music
analog synthesizer 3d model nillervision 59956 3dexport
cg_studio
$29
Analog Chess Timer3d model
...del
cgstudio
.obj .lwo .max .3ds - analog chess timer 3d model, royalty free license available, instant download after purchase.
turbosquid
$10

Dining Table Analog Set
...ritz hansen analog set for download as max, max, fbx, and obj on turbosquid: 3d models for games, architecture, videos. (1596537)
turbosquid
$24

Analog Cassette Audio Tape
...ssette audio tape for download as 3ds, max, obj, fbx, and stl on turbosquid: 3d models for games, architecture, videos. (1495255)
Challenge
turbosquid
$120

Challenger 2 and challenger 2 TES
...e 3d model challenger 2 and challenger 2 tes for download as on turbosquid: 3d models for games, architecture, videos. (1430319)
3d_export
$59

dodge challenger srt8
...dodge challenger srt8
3dexport
dodge challenger srt8
3d_export
$20

dodge challenger 1970
...dodge challenger 1970
3dexport
dodge challenger 1970
3d_export
$15
Dodge Challenger Hellcat
...dodge challenger hellcat
3dexport
dodge challenger hellcat
turbosquid
$80

challenger-2
...rbosquid
royalty free 3d model challenger-2 for download as on turbosquid: 3d models for games, architecture, videos. (1498848)
3d_export
$5

dodge challenger car
...dodge challenger car
3dexport
3d model dodge challenger!
turbosquid
$99

Dodge Challenger
...
royalty free 3d model dodge challenger for download as blend on turbosquid: 3d models for games, architecture, videos. (1489358)
turbosquid
$49

Dodge Challenger
...
royalty free 3d model dodge challenger for download as blend on turbosquid: 3d models for games, architecture, videos. (1698375)
turbosquid
$10

dodge challenger
...
royalty free 3d model dodge challenger for download as blend on turbosquid: 3d models for games, architecture, videos. (1405948)
3d_export
free

dodge challenger srt8
...dodge challenger srt8
3dexport
dodge challenger srt8 free model
Usb
3d_ocean
$3
USB Thumbdrive
...usb thumbdrive
3docean
thumbdrive usb usb drive usb stick
this is a swivel type usb thumb drive.
3d_ocean
$5

Usb Stick
...usb stick
3docean
flash stick usb usb memory usb stick
usb stick created using 3ds max 2015 and rendered on mental ray.
3ddd
$1
USB cable
... кабель , провод
высокополигональные модели кабелей usb.
3d_ocean
$5

USB Stick
...usb stick
3docean
32gb computer memory plug plugin protection usb usb stick
an usb stick with built-in plug protection
3d_ocean
$6

USB Stick
...tick
3docean
32 gb flash ram gigabyte memory metal nand plug ram stick usb usb 3 usb stick
usb stick with texture and normal map.
turbosquid
$5

USBS
...bs
turbosquid
royalty free 3d model usbs for download as max on turbosquid: 3d models for games, architecture, videos. (1466594)
3d_export
$5
usb flash
...usb flash
3dexport
usb flash
3d_export
free
usb flash
...usb flash
3dexport
usb flash
3d_export
free

usb flash
...usb flash
3dexport
usb flash driver
3ddd
$1

usb
...usb
3ddd
флешка
флешка