Thingiverse
AM8 Electronics Case with Dual mosfet by CPT_Spekkie
by Thingiverse
Last crawled date: 3 years, 1 month ago
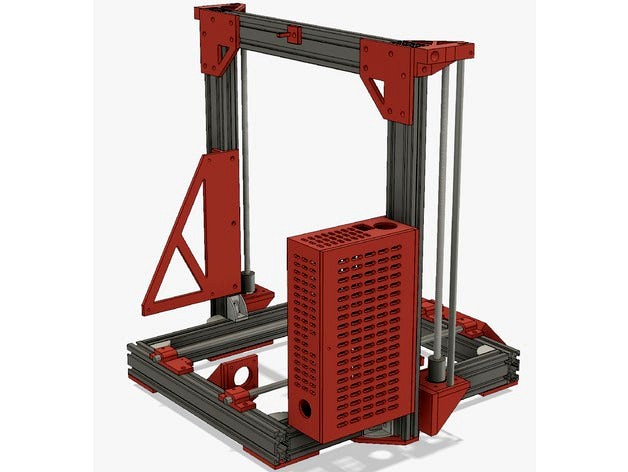
Electronics case for the AM8 frame
For my AM8 frame build i was looking for a nice case to house the electronics. As the AM8 frame is pretty new and i didn't like the old versions that were created for the original Anet frame i started work to create my very own design.
This case has 2 versions, one for the standard Anet board and one that has the screw positions for a Arduino Mega 2560 with RAMPS board. The lid is for both versions the same.
The USB port of the Anet board is accessible through a cutout in the top part of the frame.
I modelled the ventilation holes as slots to complement the design of the Meanwell power supply cover that was created for the AM8 frame. Although i will create a cover for my own power supply, i liked the slotted design more than an hexagon cutout.
Notice: The screenshots of the case do not show the position on the frame correctly. Because the Z stands of the AM8 frame are not in the correct place in the picture. The case will sit flush between the Z upright beams and the back frame profile. So any cables running through the back frame profile will exit under the case and can be routed directly into the case.
For the lid to lock in place, you can place an M3 nut into the little cutout in the case. Then use a screw or a thumbscrew to secure the lid in place. If your screw is to long it will simply pass out of the back of the nut holder, it has a back hole for this.
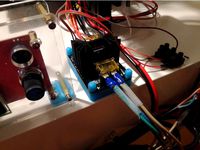
Also to screw the mosfet and board in place you can place the bolt through the hole in the case from the outside, then place the component and thread a nut inside the case on the bolt. This way if the bolt is to long it will not stick out the back of the case. You should be able to reuse the M3 screws of the original Anet frame for this.
Update: May 19th 2017
Made a slightly different version of the lid. This one prints a few hours faster and needs less material. The slots are 2mm thick and the frame of the lid is still 5mm. It now has 4 alignment strips to be sure it fits nice with the case.
Only thing is, this now needs to be printed upside down and needs support for the clips on the right side with which the lid clips into the case.
So both versions are included now.
Second Update: May 19th 2017
As per request of PapaJohn88 i lowered the Ramps position down by about 10mm, to make space for the LCD ribbon cable.
Update: May 20th 2017
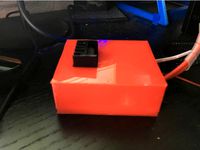
My print completed, so finally am able to show you pictures of the case in real live! Also found out that some tolerances were just a bit to tight. Like the nut holder for the lid lock. Yes the nut did fit (mine is in) but i am not able to get it back out. So i updated the files and made a little more space thickness wise for the nut to sit in the holder.
Also i made the taps of the lid a tad less thick, this is to compensate for the hole slots in the case in which the taps sit. If you have a little sageness in the bridging of that part, is now should just fit without adjustment.
Lid is printed and came out perfect. Support from the taps were easily removed and it fits nicely. The 1.1 and 2.1 versions will fit even better at the taps side. (i may need to file a little bit on my print for it so stay better in position.)
Overall i'm super happy with the results, a nice finish, sturdy case and lid and finishes the overall look of the printer.
As promissed i have included the Fusion 360 design files. the AM8 ANET file for the Anet board case and the AM8 RAMPS file for you guessed it, the RAMPS case. These files include the whole AM8 frame. But beware, there are modifications to the power supply mount, so if you need the original of that, use the file of Pheneeny.
Update: May 22th 2017
PapaJohn88 found out that the RAMPS screw positions were compromised when changing the design the last time, and therefore mounting the board would fail.
And indeed the bottom screw positions where off by about 2mm's which is unacceptable. So i fixed that and replaced the files here.
Update August 13th 2017
Finally i got around to update some of the suggested updates to the case.
The RAMPS version is updated with the suggestions of PapaJohn88. The board is moved to the right 9mm and has longer standoffs. Also the slots behind the second mosfet have been centered now. This allows you to route the USB cable from the Arduino between both mosfets.
For the Anet board there is now a additional version for instead of the 2 smaller mosfets, to use one big mosfet. This per request of TwinToe, but made sense that more people would use this setup. This is the mosfet with the big heatsink as seen on Amazon.
Update August 26th 2017
Now there are two remixes available for lid's with a fan attached. Personally i like TwinToe's design and this one would have been almost the same as i had planned myself.
If 80x80mm is not big enough for you, then there is Vaniac's design, that one attaches a 120x120 mm fan to the lid. Also a very good design, but not completely in the same style as the case, but function over form is what matters here.
So i would like to thank both TwinToe and Vaniac for sharing these remixed lids with the community.
PS, You want to install a Raspberry Pi on the AM8 frame in a nice case? Check out the remix from Pokelia! Its a Rpi case in the same style as this electronics case.
Update June 10th 2018
Check out this remix by Jsschlat, Its a complete overhaul of my case with many improvements i should have thought of at the beginning. Consider using this remix instead of the original if you haven't printed it yet. https://www.thingiverse.com/thing:2954741
For my AM8 frame build i was looking for a nice case to house the electronics. As the AM8 frame is pretty new and i didn't like the old versions that were created for the original Anet frame i started work to create my very own design.
This case has 2 versions, one for the standard Anet board and one that has the screw positions for a Arduino Mega 2560 with RAMPS board. The lid is for both versions the same.
The USB port of the Anet board is accessible through a cutout in the top part of the frame.
I modelled the ventilation holes as slots to complement the design of the Meanwell power supply cover that was created for the AM8 frame. Although i will create a cover for my own power supply, i liked the slotted design more than an hexagon cutout.
Notice: The screenshots of the case do not show the position on the frame correctly. Because the Z stands of the AM8 frame are not in the correct place in the picture. The case will sit flush between the Z upright beams and the back frame profile. So any cables running through the back frame profile will exit under the case and can be routed directly into the case.
For the lid to lock in place, you can place an M3 nut into the little cutout in the case. Then use a screw or a thumbscrew to secure the lid in place. If your screw is to long it will simply pass out of the back of the nut holder, it has a back hole for this.
Also to screw the mosfet and board in place you can place the bolt through the hole in the case from the outside, then place the component and thread a nut inside the case on the bolt. This way if the bolt is to long it will not stick out the back of the case. You should be able to reuse the M3 screws of the original Anet frame for this.
Update: May 19th 2017
Made a slightly different version of the lid. This one prints a few hours faster and needs less material. The slots are 2mm thick and the frame of the lid is still 5mm. It now has 4 alignment strips to be sure it fits nice with the case.
Only thing is, this now needs to be printed upside down and needs support for the clips on the right side with which the lid clips into the case.
So both versions are included now.
Second Update: May 19th 2017
As per request of PapaJohn88 i lowered the Ramps position down by about 10mm, to make space for the LCD ribbon cable.
Update: May 20th 2017
My print completed, so finally am able to show you pictures of the case in real live! Also found out that some tolerances were just a bit to tight. Like the nut holder for the lid lock. Yes the nut did fit (mine is in) but i am not able to get it back out. So i updated the files and made a little more space thickness wise for the nut to sit in the holder.
Also i made the taps of the lid a tad less thick, this is to compensate for the hole slots in the case in which the taps sit. If you have a little sageness in the bridging of that part, is now should just fit without adjustment.
Lid is printed and came out perfect. Support from the taps were easily removed and it fits nicely. The 1.1 and 2.1 versions will fit even better at the taps side. (i may need to file a little bit on my print for it so stay better in position.)
Overall i'm super happy with the results, a nice finish, sturdy case and lid and finishes the overall look of the printer.
As promissed i have included the Fusion 360 design files. the AM8 ANET file for the Anet board case and the AM8 RAMPS file for you guessed it, the RAMPS case. These files include the whole AM8 frame. But beware, there are modifications to the power supply mount, so if you need the original of that, use the file of Pheneeny.
Update: May 22th 2017
PapaJohn88 found out that the RAMPS screw positions were compromised when changing the design the last time, and therefore mounting the board would fail.
And indeed the bottom screw positions where off by about 2mm's which is unacceptable. So i fixed that and replaced the files here.
Update August 13th 2017
Finally i got around to update some of the suggested updates to the case.
The RAMPS version is updated with the suggestions of PapaJohn88. The board is moved to the right 9mm and has longer standoffs. Also the slots behind the second mosfet have been centered now. This allows you to route the USB cable from the Arduino between both mosfets.
For the Anet board there is now a additional version for instead of the 2 smaller mosfets, to use one big mosfet. This per request of TwinToe, but made sense that more people would use this setup. This is the mosfet with the big heatsink as seen on Amazon.
Update August 26th 2017
Now there are two remixes available for lid's with a fan attached. Personally i like TwinToe's design and this one would have been almost the same as i had planned myself.
If 80x80mm is not big enough for you, then there is Vaniac's design, that one attaches a 120x120 mm fan to the lid. Also a very good design, but not completely in the same style as the case, but function over form is what matters here.
So i would like to thank both TwinToe and Vaniac for sharing these remixed lids with the community.
PS, You want to install a Raspberry Pi on the AM8 frame in a nice case? Check out the remix from Pokelia! Its a Rpi case in the same style as this electronics case.
Update June 10th 2018
Check out this remix by Jsschlat, Its a complete overhaul of my case with many improvements i should have thought of at the beginning. Consider using this remix instead of the original if you haven't printed it yet. https://www.thingiverse.com/thing:2954741
Similar models
thingiverse
free

AM8 Electronics Case Lid Remix 120mm Fan Remix by docrenatoms
...s case lid remix 120mm fan" to mantains the style of the cpt_spekkie's "am8 electronics case with dual mosfet"
thingiverse
free

Anet A8 Electronics Case by Lindkj
...nut. i used this fan and mounted it with m3 bolt and nut.
i ordered this kit of bolts, nuts and washers to have around as spares.
thingiverse
free

AM8 MKS Mosfet holder M4 / M5 Screws by KayDeeGermany
... version for m5 screws as in the default am8 build guide. but i build a version with nut 5 and m4 screws so i uploaded it as well
thingiverse
free

AM8 Board Holders Anet/Ramps/Gen1.4 by GrkMangas
...on the ramps holder. holes should line up better. also lowered the studs so that you can use 18mm screws instead of 20.
thank you
thingiverse
free

Anet A8 Plus mosfet box by stefanobatt
...
you can attach to the v-slot frame by t-nut.
you will need
4 x 2,9 x 8 mm screw-plast or parker screw
2 x m5 t-nut screw washer
thingiverse
free

External Enclosure for A8 Mainboard and 2x mosfet board by MattKi
...es you can access all of the screw holes for securing your boards!
mirrored relevant changes to the generic project box template.
thingiverse
free

ANET A8 RAMPS+ DUAL MOSFET ELECTRONICS CASE by Daltoncnc
...gress so please let me know how it turns out for you
designed to work with x1 80x25mm fan and x2 40x20mm fan
i hope you enjoy :)
thingiverse
free

Anet AM8 controlboard backplate with MOSFET by CrazyD82
...rolboard mount.
also has support for 1 mosfet board.
includes the spacers. use the default m3 nuts and screws as on the stock a8
thingiverse
free

AM8 RAMPS Y axis endtop mount and target by PapaJohn88
...h
2 x m5 x 10mm screws
2 x m5 square nuts
printer:
anet a8
rafts:
no
supports:
no
resolution:
0.2 (i printed at .12)
infill:
20%
thingiverse
free

Ramp 1.4 + Mosfet Mod by Sndgjaytr
...
i uploaded a few photo for reference. im in the process of rebuilding my anet a8 so sorry about the messy background. =)
enjoy!
Spekkie


Cpt
3d_export
$5

CPT Keyboard 3D Model
...cpt keyboard 3d model
3dexport
nerd low polygon ds iphone app character
cpt keyboard 3d model vizzi 36956 3dexport
3dfindit
free

CPT-1
...cpt-1
3dfind.it
catalog: te connectivity
3dfindit
free

CPT-6
...cpt-6
3dfind.it
catalog: te connectivity
thingiverse
free

Toaster Knob for Cusinart CPT-340WC by arjeousski
...toaster knob for cusinart cpt-340wc by arjeousski
thingiverse
toaster knob for cusinart cpt-340wc
thingiverse
free
1/6 1/5 Carson Attack CRT CPT Differential by Daniel9
...1/6 1/5 carson attack crt cpt differential by daniel9
thingiverse
habe das differential eines carson cpt nachgezeichnet
thingiverse
free
Parasol Adapter 55 to 25mm by Cpt-Cook-Saar
...fit 25mm size parasol tubes to 55mm parasol bases.
example printed with 20% infill, pla, works fine. no support should be needed.
thingiverse
free

Kurvinox - alien spiece from polish cartoon for adults 'Kapitan Bomba' (Cpt. Bomba)) by patryk0493
...the outlines have been printed with a different filament.
white and pink nail polish was used to fill in the remaining fragments.
thingiverse
free

Raspberry 7" Display Frame by robingii
...and holds the pcb at the rear display = 7d-cpttv-50pin pcb =...
thingiverse
free
Robotic arm "Cpt. Hook" by thorgal
... hot days. see the picture gallery and you will learn why :d. good time to print version 1.3 and test the last set of arm models.
thingiverse
free

Raspberry 7" Display Frame v2 by robingii
...display frame is backward compatible with v1 display = 7d-cpttv-50pin pcb =...
Am8
evermotion
$12
armchair 055 am8
...f armchair with all textures, shaders and materials. it is ready to use, just put it into your scene.. evermotion 3d models shop.
evermotion
$12

armchair 051 am8
...f armchair with all textures, shaders and materials. it is ready to use, just put it into your scene.. evermotion 3d models shop.
evermotion
$10
chair 012 am8
...l of chair with all textures, shaders and materials. it is ready to use, just put it into your scene.. evermotion 3d models shop.
evermotion
$10
chair 011 am8
...l of chair with all textures, shaders and materials. it is ready to use, just put it into your scene.. evermotion 3d models shop.
evermotion
$10
chair 017 am8
...l of chair with all textures, shaders and materials. it is ready to use, just put it into your scene.. evermotion 3d models shop.
evermotion
$10
desk 079 am8
...el of desk with all textures, shaders and materials. it is ready to use, just put it into your scene.. evermotion 3d models shop.
evermotion
$10

chair 027 am8
...l of chair with all textures, shaders and materials. it is ready to use, just put it into your scene.. evermotion 3d models shop.
evermotion
$10

chair 015 am8
...l of chair with all textures, shaders and materials. it is ready to use, just put it into your scene.. evermotion 3d models shop.
evermotion
$10

chair 037 am8
...l of chair with all textures, shaders and materials. it is ready to use, just put it into your scene.. evermotion 3d models shop.
evermotion
$10

chair 013 am8
...l of chair with all textures, shaders and materials. it is ready to use, just put it into your scene.. evermotion 3d models shop.
Mosfet
3d_export
$5

IC SMD Package TO263
...used for different types of semiconductors, such as transistor, mosfet voltage regulators and etcetra. a surface mount device for...
thingiverse
free
Support Mosfet
...support mosfet
thingiverse
support mosfet
remplissage 20%
thingiverse
free

i3 MOSFET Holder / i3 MOSFET Halter by JMDesigns
...i3 mosfet holder / i3 mosfet halter by jmdesigns
thingiverse
i3 mosfet holder / i3 mosfet halter
thingiverse
free
MOSFET Holder / MOSFET Halter 20x20 Extrusion by JMDesigns
...mosfet holder / mosfet halter 20x20 extrusion by jmdesigns
thingiverse
mosfet holder / mosfet halter 20x20 extrusion
thingiverse
free

TO-220 MOSFET Holder
...to-220 mosfet holder
thingiverse
this will hold 3x to-220 mosfets. the mosfets will snap into place.
free3d
free

MOSFET
...mosfet
free3d
metal oxide semiconductor field effect transistor
thingiverse
free
Double Mosfet Holder for Lerdge Mosfet Board by LorDXEO
... board by lordxeo
thingiverse
dual mosfet holder for lergde mosfet modules.
holes for m3 screws, you can also use brass inserts.
thingiverse
free
MOSFET Case by Nbbwarhammer
...mosfet case by nbbwarhammer
thingiverse
a case for mosfet.
thingiverse
free
MOSFET Support
...
2 3mm screws
design
i have uploaded the freecad design that i made, so you can remix it and mod it.
i hope it is useful for you!
thingiverse
free
mosfet holders by paulsonia
...mosfet holders by paulsonia
thingiverse
two mosfet holders
Dual
turbosquid
free

Dual Pistols
...ls
turbosquid
free 3d model dual pistols for download as fbx on turbosquid: 3d models for games, architecture, videos. (1320360)
turbosquid
$2

Dual Axe
...urbosquid
royalty free 3d model dual axe for download as fbx on turbosquid: 3d models for games, architecture, videos. (1332372)
turbosquid
$10

Dual Lesaths
... available on turbo squid, the world's leading provider of digital 3d models for visualization, films, television, and games.
3ddd
$1

плитка Dual Bianco (Испания)
...й плитки venis dual (испания). технические качества: устойчивость к стирания, отличная геометрия, отсутствие проблем при укладке.
turbosquid
$35

Dual Mesh Fonts
...ree 3d model dual mesh fonts for download as ma, obj, and fbx on turbosquid: 3d models for games, architecture, videos. (1352989)
turbosquid
$29

Dual Flask with Bungs
...del dual flask with bungs for download as obj, fbx, and blend on turbosquid: 3d models for games, architecture, videos. (1210512)
turbosquid
$19

Dual Socket Plug
...3d model dual socket plug for download as obj, fbx, and blend on turbosquid: 3d models for games, architecture, videos. (1303912)
turbosquid
$13

Dual Adjustable Pulley
... available on turbo squid, the world's leading provider of digital 3d models for visualization, films, television, and games.
turbosquid
$10

Amoi N809 Dual
... available on turbo squid, the world's leading provider of digital 3d models for visualization, films, television, and games.
turbosquid
$5

Dual Turret Tank
... available on turbo squid, the world's leading provider of digital 3d models for visualization, films, television, and games.
Electronics
turbosquid
$1

electron
...urbosquid
royalty free 3d model electron for download as max on turbosquid: 3d models for games, architecture, videos. (1157488)
turbosquid
$50

electronic
...
royalty free 3d model electronic for download as max and obj on turbosquid: 3d models for games, architecture, videos. (1289427)
turbosquid
$40

Electron
... available on turbo squid, the world's leading provider of digital 3d models for visualization, films, television, and games.
3d_ocean
$8
Electronic game
...electronic game
3docean
electronic games nu pogody wait a minute well
electronic game “well, wait a minute”, “nu pogody”
3ddd
$1
Brilux Electronic
...brilux electronic
3ddd
подвес. brilux electronic. польша. материалы настроены.
3d_export
free

electronic shop
...lectronic shop with high quality interior and exterior. it has tvs smartphone play station printer and many more electronic item.
3ddd
$1

Термостаты OJ Electronics
...ермостаты oj electronics
3ddd
oj electronics , термостат
термостаты фирмы oj electronics
3d_export
$8

electron 714
...electron 714
3dexport
game ready model for export to unreal engine soviet tv electron 714 pbr 4k
3ddd
$1

Термостат OJ Electronics
... oj electronics
3ddd
oj electronics , термостат
термостат occ2-1991 фирмы oj electronics
turbosquid
$60
Electronics Stuff
...
royalty free 3d model electronics stuff for download as max on turbosquid: 3d models for games, architecture, videos. (1624680)
Case
3d_export
$1

case
...case
3dexport
case
archibase_planet
free

Case
...case
archibase planet
showcase show-case glass case
glass-case + cakes - 3d model for interior 3d visualization.
archibase_planet
free

Case
...case
archibase planet
showcase show-case glass case
glass-case for chips - 3d model for interior 3d visualization.
archibase_planet
free

Case
...case
archibase planet
case shelving drawer
case - 3d model for interior 3d visualization.
archibase_planet
free

Case
...case
archibase planet
case rack locker
case - 3d model for interior 3d visualization.
archibase_planet
free

Case
...case
archibase planet
case drawer kitchen furniture
case - 3d model for interior 3d visualization.
archibase_planet
free

Case
...case
archibase planet
case cupboard shelving
glass case - 3d model for interior 3d visualization.
archibase_planet
free

Case
...case
archibase planet
case handbag suitcase
case - 3d model (*.gsm+*.3ds) for interior 3d visualization.
archibase_planet
free

Case
...case
archibase planet
case suitcase
case 5 - 3d model (*.gsm+*.3ds) for interior 3d visualization.
archibase_planet
free

Case
...case
archibase planet
locker case dresser
case - 3d model (*.gsm+*.3ds) for interior 3d visualization.