Thingiverse

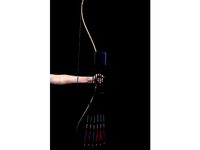
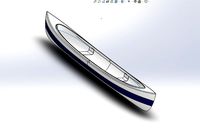
Altenative superstructure to HobbyKing Swamp Dawg Air Boat by Phil86B
by Thingiverse
Last crawled date: 3 years, 3 months ago
Alternative cabin for the Swamp Dawg Air Boat from Hobbyking.
The one provided is a bit small - it's very hard to put all the electronic parts + the battery inside. So I've designed this cabin (inspired from the Copper Responder) - scale ~1/32.
With that version:
all the electronic components can be put inside the cabin and not under the floor.
quite a large battery can be used now: a 105x37x28mm block can fit in. Size of my current battery is 105(+)x35x19mm (1)+ wires.
the 2 long screws used to close the original compartment are reused here. You will also need 2 M2x10mm screws + their corresponding nuts.
Features:
The 2 M2x10mm extra needed screws are used to fix the body of the cabin to the air boat (reusing the original holes).
The 2 M2 nuts are used with the 2 original long screws in order to set/remove the roof (see the assembly pictures). A piece (cabin_cover_nut) has been designed to avoid the nut to fall - this cover piece is glued to block the nut completely.
I've added "__color" at the end of the name of some pieces to identify the "recommended" color to use when printing them but of course, fell free to use the color you want/have.
Sometimes there are 2 versions of the same piece - just pick the one the most suitable for you.
All the STL files should be already well oriented,
With some exceptions, I printed all my pieces here with a 0.2mm resolution, using PLA.
I used superglue (cyanoacrylate glue) to glue everything.
Here is the list of the pieces, with the number of copy to be printed + some extra notes:
Plateform board:
o board.stl: board to use the original servomotor
or
o board_blank.stl: if for some reason the previous one doesn't fit you, I've also provided this blank one. 100% infill might be judicious here (?)
Main body (once):
o V1: the boby is in 2 parts - cabinV1_lowerPart.stl + cabinV1_upperPart.stl - and will have to be glued together (note that there will be a little joint comparing to the V2). Support needed when printing the lower part.
o V2: cabinV2_full.stl: full cabin in a single part. Support needed here.
cabin_cover_nut.stl (twice): to be glued inside the cabin, to block the nuts
door (once): you can simulate joints by setting the first layer (only) in black
door_handle__black.stl (once): just to simulate the handle of the door
ladder__black.stl (once) : to be glued on the cabin based on the corresponding opening in the roof (so glue it once the roof is printed and in place)
Window frames:
frame_back__black.stl (twice): for the 2 back windows
frame_front__black.stl (thrice): for the 3 front windows. there is a way to set them (the lower part is "full")
frame_port__black.stl (once): for the port window
frame_port_door__black.stl (once): for the door window
frame_starbord__black.stl (twice): for the 2 starboard windows
Roof (I glued every parts set on top of the roof by the inside)
o V1: roofV1.stl (once): simple and classic roof version
o V2: roofV2.stl (once) + roofV2_pin.stl (once) + roofV2_plug.stl (once): V1 version with a hole, if you ever want to pass some wires (for a camera or something else). When this option is not used, I've designed a plug + a pin to hide the hole
roof_side_rails_back__black.stl (twice): back side rails of the roof
roof_side_rails_front__black.stl (twice): front side rails of the roof
antenna_holder_legblack.stl (twice) + antenna_holder_bodyblack.stl (once): introduce the 2 leg parts in the roof first without gluing them, then set and glue the body to the legs and finally glue the legs to the roof.
Searchlights:
o V1: if you want to simulate the panels via the printed files:
searchlight_big_V1__black.stl (once): body of the main searchlight
searchlight_big_V1_panel__white.stl (once): to be printed in white - 0,10 resolution here
searchlight_tiny_V1__black.stl (twice): body of the tiny searchlights - support needed here
searchlight_tiny_V1_panel__white.stl (twice): to be printed in white - 0,10 resolution here
o V2: if you want to simulate the panels using paint or stickers:
searchlight_big_V2__black.stl (once): body of the main searchlight
searchlight_tiny_V2__black.stl (twice): body of the tiny searchlights
For the antenna, I used what my printer (prusa i3) do every time: a 2 layer "wall" all arround the piece so basically I get everytime a 2 layers wire - I simply cut an glued a straight part of that.
Similar models
thingiverse
free

Attitude Indicator for Flight Simulator by alvaroalea
...flight simulator via opencockpits servo board, a arduino or similar system. you need several m3 allen screws, about 6...
thingiverse
free

Phone car holder by HomeLab
...with the "case" name are one part, they must be glued together. see photos for more details. for glue i use super glue.
thingiverse
free

Z striker adapter for Printrbot+ V1 bridge for V2 bed/base by wd5gnr
...and use #6 hardware to secure one side and use a #6 bolt as the "poker" with two jam nuts or a lock nut as the striker.
thingiverse
free

Miniature headphones by ttreis
... it to hide the seam. glue knob on the outside of the speaker parts (i printed mine in a different colour as a highlight).
cheers
thingiverse
free

Wargame: 20mm barn by don_eldarro
... cutted version in rar archive. also, the roof itself needs redesign, so it's possible, that i wiil upload version 2 someday.
thingiverse
free

Wren House by Arnieb
...t 15%. i glued the roof to the body using super glue. there is a couple of small holes in the roof section for hanging the house.
thingiverse
free
Bow // Limps Quiver V2 by Helisinus
...ith foam.
note: for a german speaking people, the "unten.stl" was wrong named. this is the upper part of the quiver :-)
thingiverse
free

Push Block by CliffGlanz
... 1
center leg=1
leg=2
handle=1
oval washer=4
thumbscrew=2
push heal = optional
print settings:
2 walls
2 top
2 bottom
20 % infill
thingiverse
free

Dream Catcher by chriswberlin
...he parts.
for the decoration i used thin jewelry wire, natural stone beads, mosaic glue and feathers.
have fun doing handicrafts.
thingiverse
free

DnD Water Well by Trynn
... file labeled "water well". this file contains the well fully built and how it should look when its all glued together.
Phil86B
thingiverse
free
Basic Succulent Plant by Phil86B
...by phil86b
thingiverse
basic succulent plant
diameter: ~9cm
height: 5cm
made in wooden pla + coats of varnish for wood (colored)
thingiverse
free

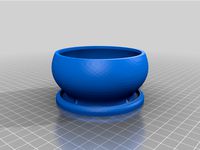
Succulent Planter by Phil86B
...diameter: 12cm
height: 6cm
made in pla + coats of varnish.
for the wooden version, i used wood pla and varnish for wood (colored)
thingiverse
free

Fridge magnet "Cat's Paw" by Phil86B
... is designed for a 10mm diameter / 2mm height magnet.
i scratch a face of the magnet before gluing it (using epoxy glue).
enjoy !
thingiverse
free

Fridge magnet "Cat's Paw" V2 by Phil86B
... change the color at 6.0mm and 6.6mm height.
i use to scratch the face of the magnet before gluing it (using epoxy glue).
enjoy !
Dawg
thingiverse
free

Burger Dawg by ThinkerSpace
...burger dawg by thinkerspace
thingiverse
a hotdog in a burger... who would do such a thing...
thingiverse
free

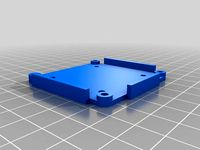
Turnigy D2826 Motor Mount for Swamp Dawg by Astrafreak
...turnigy d2826 motor mount for swamp dawg by astrafreak
thingiverse
mounting plate to use the d2826 on your swamp dawg air boat
thingiverse
free

Life is Strange Hawt Dawg Man - Balloon holder by YellowScope
...ou can have your own as well, the model is there, just add some paint, add your own 9' balloon and you'll be on your way.
thingiverse
free
RC Swamp Dawg Servo Mount by frogfish_42
....
v2: battery goes flat on the open side of the compartment. weight distribution might not be ideal, but cg is as low as it can.
thingiverse
free

RC Trailer Swamp Dawg
...chsel set and amewi 02038
use foam rubber band 10 x 2 mm on top of the trailer (difficult nto see in manual)
manual is in the pdf
thingiverse
free

HobbyKing Swamp Dawg Air Boat Tuning under the large battery by Larkin_Michael
...ttp://www.hobbyking.com/hobbyking/store/__17899__hobbyking_swamp_dawg_air_boat_arr_.html
tuning under the large battery and fpv
thingiverse
free
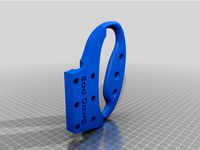
BAD DAWG - Rope Leash Handle For Stubborn Dogs by John546
...lso meant t countersink or counterbore the handle holes to fit a nut flush, should be doable with a drill bit after printing too.
renderosity
$17

i13 Dirty Dawg BAR
...duf, pz2)<br />
<br />
both daz studio and poser tested and supported<br />
both pc and mac supported</p>
thingiverse
free

University of Georgia Keychain by nic1
...thingiverse keychain of the university of georgia logo. go dawg. ...
thingiverse
free

UGA Power G
...g printed in 3 pieces for gluing together. go dawg! ...
Superstructure
design_connected
$16

Superstructure
...superstructure
designconnected
david design superstructure computer generated 3d model. designed by dahlström, björn.
3d_export
$70
sd kfz 234-4
...has a 7.5 cm pak 40 l/46 in open-topped superstructure replacing the turret. 89 built between december 1944 and...
3d_export
$110

stug iii ausf g
...iii tank, replacing the turret with an armored, fixed superstructure mounting a more powerful. initially intended as a mobile...
3d_export
$70
sdkfz 234-3
...234-3, has a 7.5 cm k51 l/24 in open-topped superstructure replacing the turret. 88 built between june and december...
3d_export
$20
helix walkway 90m
...consits of two staircases, two elevators and metal spiral-type superstructure (3 x spirals (5 turns) rotated by 120 degrees)....
3d_export
$15
cetus wall freezer showcase
...standard lighting both in the base and in the superstructure sliding covers in the base, in order to grant...
3d_export
$120

akagi iiww carrier
...into a single enlarged flight deck and an island superstructure the second japanese aircraft carrier to enter service, and...
3d_export
$105
roks seoul ffg-821 daegu class frigate
...incheon-class. however, as a part of system modifications, the superstructure has been significantly changed. the hangar and a hellicopter...
3d_sky
free

Combat \ Desk with superstructure
...ain). full extension ball bearing slides (italy). . sitehttp://www.kombatt.ru/ polygons much. model without decoration.
3d_sky
free
Combat \ Desk with superstructure
...ed glass in the door is 4 mm thick (czech republic) sitehttp://www.kombatt.ru/ polygons much. model without decoration.
Altenative
thingiverse
free
Ersatzgriff Badwischer Fensterwischer Abzieher by Runkel
...ersatzgriff badwischer fensterwischer abzieher by runkel
thingiverse
ersatzgriff für alten fensterwischer/abzieher
thingiverse
free

Gartenzaunhalterung by svend29
...rtenzaunhalterung by svend29
thingiverse
gartenzaunhalterung.
die alten metallhalterungen sind im stützbalken ausgebrochen/lose.
thingiverse
free

Greifer für Kfz-Torpedosicherungen by Greebo2
...greifer für kfz-torpedosicherungen by greebo2
thingiverse
greifer für die alten torpedosicherungen bei oldtimern.
thingiverse
free

DF-02 Front suspension mount by Kani123
...df-02 front suspension mount by kani123
thingiverse
dämpferbrücke für den alten df-02
thingiverse
free

schalter by skillakt
...y skillakt
thingiverse
schalter funktioniert wie ein kühlschranklicht
habe den schalter aus einer alten kaffe maschine ausgebaut
thingiverse
free

Commodore SX64 Modulschachtklappe by oobdoo
...ommodore sx64 modulschachtklappe by oobdoo
thingiverse
neue klappen für einen commodore sx64, wann man die alten verbummelt hat.
thingiverse
free
CTC Idler
...iverse
nachdem ich keinen passenden idler gefunden habe, habe ich den alten in fusion nachgebaut. funktioniert bei mir tadellos.
thingiverse
free

Tischbeinbefestigung by badenzer
...ngiverse
tischbeinbefestigung, da bei der alten die gewindestange gebrochen ist.
drucken kann ich leider erst ab nächster woche.
thingiverse
free

AAA Batarie box by Joermungan
...ox by joermungan
thingiverse
ich habe einen verschluss eingefügt der den alten starren ersetzt und somit das brechen verhindert.
thingiverse
free

Hamilton Beach Mixer Clutch / Kupplung by haitonno
...ung by haitonno
thingiverse
clutch for an old hamilton beach mixer, printed in abs
kupplung für einen alten hamilton beach mixer
Swamp
3d_export
free

swamp
...swamp
3dexport
swamp
3d_export
$5

The Russia Swamp
...the russia swamp
3dexport
the russian swamp is a real hell. this is clearly shown in this model
turbosquid
$10

Swamp Monster
...quid
royalty free 3d model swamp monster for download as ztl on turbosquid: 3d models for games, architecture, videos. (1193942)
turbosquid
$3

swamp wolf
...squid
royalty free 3d model swamp wolf for download as blend on turbosquid: 3d models for games, architecture, videos. (1639879)
turbosquid
$1

Hovel swamp
...royalty free 3d model hovel swamp for download as fbx and obj on turbosquid: 3d models for games, architecture, videos. (1532373)
turbosquid
$499

Murky Swamp
... available on turbo squid, the world's leading provider of digital 3d models for visualization, films, television, and games.
turbosquid
$2
swamp plant
... available on turbo squid, the world's leading provider of digital 3d models for visualization, films, television, and games.
turbosquid
$2

swamp plant
... available on turbo squid, the world's leading provider of digital 3d models for visualization, films, television, and games.
3d_export
$5
swamp monster
...swamp monster
3dexport
low polygonal game-ready model monster
3d_export
$10

swamp fairy house
...swamp fairy house
3dexport
Hobbyking
thingiverse
free

hobbyking paramotor esc by creative70
...hobbyking paramotor esc by creative70
thingiverse
supporto esc per paramotore hobbyking
thingiverse
free

Enclosure for HobbyKing voltage monitor by TheCure
.../www.hobbyking.com/hobbyking/store/__41177__led_rx_voltage_indicator_for_lipoly_life_battery_us_warehouse_.html?strsearch=voltage
thingiverse
free

Rear leg, hobbyking trifecta by Amdek
...rear leg, hobbyking trifecta by amdek
thingiverse
longer rear leg for hobbyking trifecta
free3d
free

Hobbyking Bixler | Sky Surfer
...e hobbyking variant of the skysurfer airframe, textured and smoothed. the model has a video of its creation available on youtube:
thingiverse
free

Hobbyking ECO SIX stand by azure93
...hobbyking eco six stand by azure93
thingiverse
hobbyking eco six 20 degree stand
thingiverse
free

Hobbyking X930 Battery Mount by mausolfb
...ount by mausolfb
thingiverse
this is a replacement part for the hobbyking x930 octocopter where the battery rests on the mounts.
thingiverse
free

9G Servo from HobbyKing by buffington
...9g servo from hobbyking by buffington
thingiverse
a customizable 9g servo based on hobbyking's hk15178 servo.
thingiverse
free

Turnigy Trackstar Logo / Hobbyking Logo by DMAX40
...turnigy trackstar logo / hobbyking logo by dmax40
thingiverse
hobbyking / trackstar brand logos
thingiverse
free
Hobbyking KK 2.1.5 adapter to any Quadrocopter by TheFallenElectron
..._atmel_644pa.html
250 class fpv race quadhttp://www.hobbyking.com/hobbyking/store/__78406__kim250_pro_fpv_multrotor_with_pcb.html
thingiverse
free

Hobbyking - Cylindrical Desiccant Box by Redemptioner
...cal desiccant box by redemptioner
thingiverse
up sized the original to fit the hobbyking brand filament spool size which is 56mm
Boat
3d_ocean
$5
Boat
...boat
3docean
boat game ready boaat low poly boat medi evil boat wooden boat
boat,medi evil boat, 4096* 4096* texture game ready
3d_export
$5
Boat and boat trailer
...boat and boat trailer
3dexport
boat and boat trailer square grid textures in one archive with 3d
archibase_planet
free

Boat
...boat
archibase planet
inflatable boat motor boat
inflatable boat - 3d model (*.gsm+*.3ds) for interior 3d visualization.
archibase_planet
free
Boat
...boat
archibase planet
boat fishing-boat trawler
boat fishing n110113 - 3d model (*.gsm+*.3ds) for interior 3d visualization.
archibase_planet
free
Boat
...boat
archibase planet
boat fishing-boat trawler
boat n310514 - 3d model (*.gsm+*.3ds+*.max) for exterior 3d visualization.
3d_export
$5

Boat
...boat
3dexport
boat with oars
3ddd
$1
boat
...boat
3ddd
лодка
boat
3d_export
$5
boat
...boat
3dexport
this is the full model of boat in solid works with stl file #boat #craft
archibase_planet
free

Boat
...boat
archibase planet
boat fishing-boat trawler
boat fishing 2 n110113 - 3d model (*.gsm+*.3ds) for exterior 3d visualization.
turbosquid
$12

Wooden Boat boat cartoon boat raft
...model wooden boat boat cartoon boat raft for download as max on turbosquid: 3d models for games, architecture, videos. (1617081)
Air
3ddd
$1
Calligaris air
...calligaris air
3ddd
air , calligaris
cтул calligaris air
3ddd
$1
Air freshener
...air freshener
3ddd
air freshener , освежитель
air freshener
design_connected
$16
Air
...air
designconnected
flexform air lounge chairs computer generated 3d model. designed by antonio citterio.
turbosquid
$250
Heat pump air air
... available on turbo squid, the world's leading provider of digital 3d models for visualization, films, television, and games.
3d_export
$5
air
...air
3dexport
3ddd
$1
Кухня AIR
...кухня air
3ddd
air , мария
кухня air фабрики "мария"
3ddd
$1
Лампа AIR
...лампа air
3ddd
boconcept , air
настольная лампа air, boconcept. в50½xø32см
3d_export
$40
air deflector
...air deflector
3dexport
air deflector
3d_export
$15
air purifier
...air purifier
3dexport
air purifier
3d_export
$5

macbook air
...macbook air
3dexport
macbook air