Thingiverse

Airsoft PPS XM26 - Bullpup Conversion Kit by DaXLR
by Thingiverse
Last crawled date: 3 years, 1 month ago
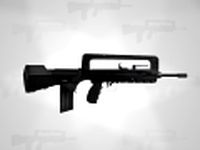
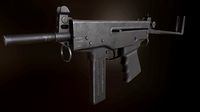
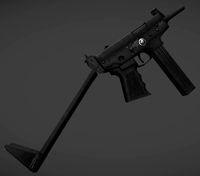
THIS IS NOT DESIGNED FOR USE WITH A REAL FIREARM. PICTURE DEPICTS AN AIRSOFT RIFLE, NOT A FIREARM
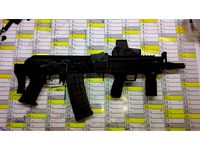
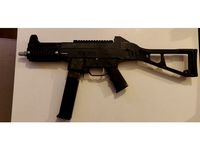
This is my Bullpup conversion kit for Airsoft PPS XM26.
The kit is designed to be mostly 'drop in' but some work is needed to make everything work smoothly.
What you will need in addition to the printed parts;
Six, 6-32 by 1'' Mechanical screws and matching hex nuts. (Close dimensions will also work, the slots have some play to them)
One or two small springs, approx 4mm diam. x 20mm. These are optional and are to help with returning the trigger.
Some electrical tape.
About 500mm of steel round bar, 3mm diam. (or close, the channels should accommodate up to 4mm)
Assembly;
First of all, test-fit everything before painting and final assembly. Depending on your printer, some sanding might be required for smooth operation.
Remove the locking pin that holds the stock in place and remove the stock+pistol grip assembly from the XM26. Keep the locking pin!
Remove the trigger guard by removing the two flat head screws that holds it in place. Keep the screws!
Remove the front and rear sight. You don't need to keep those.
Extend the compensator to full lenght (twist and pull).
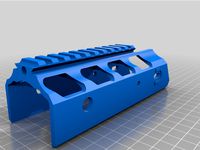
Put one half of the foregrip along the barrel and align it correctly. Release the compensator to create some tension and hold the foregrip in place.
Place and align the forward trigger
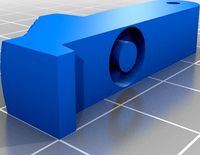
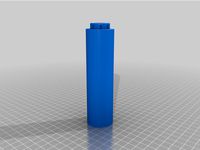
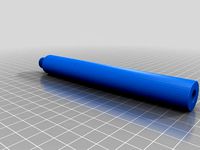
This is the trickier part; you'll need to form the steel bar into a remote linkage that goes from the front trigger all the way to the back trigger. refer to the pictures to give you an idea. The bar should run along the provided channel in the foregrip, then along a groove on the XM26. I recommend only linking the trigger on the right-hand side (ejection port).
Once the bar is formed, test the action. If it's not smooth you can either try to form the bar better, or add a spring on the forward trigger. If everything is done correctly, the spring should not be necessary.
Once the trigger link is installed, install the other half of the foregrip and bolt everything tight. You might need to put some electrical tape on the barrel to make a snug fit, otherwise the foregrip might slip and slide forward when priming!
Make sure the XM is not on safe (the safety is not acessible in bullpup form)
Install the buttstock by sliding it over the frame. You might need to angle it down a bit to pass the trigger. Re-use the locking pin and the two flat-head screws to secure it in place.
The locking pin hole is designed to be slightly off-center as to privide tension, but depending on your printer you might need a bit of drilling or filing so it's not too tight.
There you go! bullpup XM26. It works exactly the same as the stock XM, except much smaller.
This is my Bullpup conversion kit for Airsoft PPS XM26.
The kit is designed to be mostly 'drop in' but some work is needed to make everything work smoothly.
What you will need in addition to the printed parts;
Six, 6-32 by 1'' Mechanical screws and matching hex nuts. (Close dimensions will also work, the slots have some play to them)
One or two small springs, approx 4mm diam. x 20mm. These are optional and are to help with returning the trigger.
Some electrical tape.
About 500mm of steel round bar, 3mm diam. (or close, the channels should accommodate up to 4mm)
Assembly;
First of all, test-fit everything before painting and final assembly. Depending on your printer, some sanding might be required for smooth operation.
Remove the locking pin that holds the stock in place and remove the stock+pistol grip assembly from the XM26. Keep the locking pin!
Remove the trigger guard by removing the two flat head screws that holds it in place. Keep the screws!
Remove the front and rear sight. You don't need to keep those.
Extend the compensator to full lenght (twist and pull).
Put one half of the foregrip along the barrel and align it correctly. Release the compensator to create some tension and hold the foregrip in place.
Place and align the forward trigger
This is the trickier part; you'll need to form the steel bar into a remote linkage that goes from the front trigger all the way to the back trigger. refer to the pictures to give you an idea. The bar should run along the provided channel in the foregrip, then along a groove on the XM26. I recommend only linking the trigger on the right-hand side (ejection port).
Once the bar is formed, test the action. If it's not smooth you can either try to form the bar better, or add a spring on the forward trigger. If everything is done correctly, the spring should not be necessary.
Once the trigger link is installed, install the other half of the foregrip and bolt everything tight. You might need to put some electrical tape on the barrel to make a snug fit, otherwise the foregrip might slip and slide forward when priming!
Make sure the XM is not on safe (the safety is not acessible in bullpup form)
Install the buttstock by sliding it over the frame. You might need to angle it down a bit to pass the trigger. Re-use the locking pin and the two flat-head screws to secure it in place.
The locking pin hole is designed to be slightly off-center as to privide tension, but depending on your printer you might need a bit of drilling or filing so it's not too tight.
There you go! bullpup XM26. It works exactly the same as the stock XM, except much smaller.
Similar models
cg_trader
$10

DIY AIRSOFT KIT FOR AK TO BULLPUP PATR3 | 3D
...diy airsoft kit for ak to bullpup patr3 | 3d
cg trader
diy airsoft kit for ak to bullpup (patr3) ak stock
thingiverse
free
Bullpup AK kit
...programable mosfet). dimensions of my print were a little bit smaller than the blueprints, so it needed some sculpture to fit in.
thingiverse
free
H&K UMP 45 (Prop) by AFlyingCosmonaut
... plate in place.
screw on handrail and top rail using m5 screws. m5 threaded inserts should be used if the screws don't bite.
thingiverse
free

Airsoft Scar L stock by ChaserDK
...n.
possible to hold a battery.
need a m3x20 countersink head screw and a spring about 10x17mm
some minor sanding may be required.
grabcad
free

Airsoft Grenade Launcher
...you can angle to easier remove the shell, it also has a pump action locking mechanism.
( might be some bolts or screws missing )
thingiverse
free
Nerf Disruptor Bullpup kit
...nd 6x nuts. the long bolt goes on the back of the grip. the only extra hardware needed is a nerf screw to clamp onto the trigger.
thingiverse
free
Bullpup Nerf Jolt
...of the tolerances are tight, especially the nut, and may need to be scaled for your machine. everything is better as a bullpup ;)
thingiverse
free
Glock 19 Extended Holster Lock by div3boy
...ock
spring for the trigger lock
the instructions to install the spring trigger lock is on the original creator of this holster.
grabcad
free

HANDGUARD MP5 SD ACTUALIZED
...d you can put a lantern, laser, grip and install a short compensator, this compensator design is only for this upgrade compatible
grabcad
free

low_tec_twist_lock
...can be pushed in. since it releases itself after lifting up the container, there's no need for any removal of the twist lock.
Xm26


Daxlr
thingiverse
free

Tabletop Wargame Objective Markers by DaXLR
...ot!
made in solidworks, all the part files are included in the .zip, along with the individual stls
edit- added blank marker.
thingiverse
free

Nerf Roughcut Pump Upgrade by DaXLR
...rt a metal rod through the two attachment points.
this model is not perfect but that's as much time as i'll invest on it.
thingiverse
free

The Distant Star - Prop Replica - Destiny by DaXLR
...th painting.
if you make your own be sure to drop it in the 'make' section. i'd love to see your take on the project!
thingiverse
free

Nerf Stryfe Battery Tray Extender by DaXLR
... designed to be glued on top of a dremel'd out stock stryfe battery tray, so it cannot be used by itself or as a replacement.
thingiverse
free

WH40K Turn Counter by DaXLR
...till probably require a little sanding (especially on the top cap) but overall, i'm happy with how it looks and work for now.
thingiverse
free

Airsoft TM AA-12 Drum by DaXLR
...he drum and placed my button there, but you can wire it to a 3.5mm jack for example to be able to use aftermarket remote buttons.
thingiverse
free

The Lockpick Airsoft Mini Shell Launcher by DaXLR
...ite detailed build instructions as this is not a finished version. it works, however, i'm sure y'all can figure it out ;)
thingiverse
free

WH40K Turn Counter remixed by thelongrunsmoke
...by thelongrunsmoke thingiverse the original thing is design by daxlr to simplify assembly, i combined base with middle part,...
Bullpup
turbosquid
$1

Bullpup Rifle
... available on turbo squid, the world's leading provider of digital 3d models for visualization, films, television, and games.
turbosquid
free

CMX Bullpup AutoRifle
... available on turbo squid, the world's leading provider of digital 3d models for visualization, films, television, and games.
3d_export
free
Download free FAMASF1 3D Model
...download free famasf1 3d model 3dexport bullpup styled assaulr rifle blender game low poly 3d max...
3d_export
$15

Seburo Compact eXploder 3D Model
...model 3dexport pistol anime seburo sci-fi cyberpunk appleseed gun bullpup game fps shooter low-poly gamedev seburo compact exploder 3d...
cg_studio
$39

Amp dsr-1 Sniper Rifle3d model
...technical services dsr defensive assault gun military long range bullpup realistic detailed textures materials .fbx .max .obj - amp...
unity_asset_store
$15

Bullpup rifle
...ur workflow with the bullpup rifle asset from oleksandr dmytruk. find this & other guns options on the unity asset store.
thingiverse
free

AK Bullpup Concept for 28mm
...ak bullpup concept for 28mm
thingiverse
ak bullpup concept for 28mm miniatures.
thingiverse
free
Talon Claw Bullpup Shroud
...talon claw bullpup shroud
thingiverse
pab shroud edited for use on the talon claw bullpup
thingiverse
free
Bullpup Nerf Jolt
...of the tolerances are tight, especially the nut, and may need to be scaled for your machine. everything is better as a bullpup ;)
free3d
free

Bullpup Assault RifleBelgian v1
...bullpup assault riflebelgian v1
free3d
bullpup assault riflebelgian v1 printable, low poly model.
Pps
3ddd
$1

PP 240 chair
...pp , 240 , pp mobler
стул pp240 фирмы pp mobler
design_connected
$16

PP 501-503
...pp 501-503
designconnected
pp mobler pp 501-503 computer generated 3d model. designed by wegner, hans.
turbosquid
$25

PP-502
... available on turbo squid, the world's leading provider of digital 3d models for visualization, films, television, and games.
turbosquid
$8
PP Vase
... available on turbo squid, the world's leading provider of digital 3d models for visualization, films, television, and games.
design_connected
$11
PP 85 Tondern Table
... tondern table
designconnected
pp mobler pp 85 tondern table dining tables computer generated 3d model. designed by hans wegner.
turbosquid
$79

Walther PP 01 a
...ee 3d model walther pp 01 a for download as max, obj, and fbx on turbosquid: 3d models for games, architecture, videos. (1542938)
turbosquid
$35
PP-91 KEDR
...ty free 3d model pp-91 kedr for download as max, obj, and fbx on turbosquid: 3d models for games, architecture, videos. (1272160)
3d_export
$49

Audi PP Quattro 3D Model
...audi pp quattro 3d model
3dexport
audi pp quattro car vehical transportation
audi pp quattro 3d model mpavlos 9772 3dexport
turbosquid
$15
PP-91 Kedr
... available on turbo squid, the world's leading provider of digital 3d models for visualization, films, television, and games.
turbosquid
$9

PP 91 KEDR
... available on turbo squid, the world's leading provider of digital 3d models for visualization, films, television, and games.
Airsoft
turbosquid
$25

Mask Airsoft
... available on turbo squid, the world's leading provider of digital 3d models for visualization, films, television, and games.
turbosquid
$2

Airsoft Tomahawk
...irsoft tomahawk for download as 3ds, obj, fbx, blend, and stl on turbosquid: 3d models for games, architecture, videos. (1145041)
turbosquid
$4

Extension Barrel for Airsoft Gun
...model extension barrel for download as max, obj, fbx, and stl on turbosquid: 3d models for games, architecture, videos. (1239268)
3d_export
$30
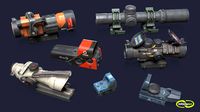
Gunsights
...trijicon rmr type, trijicon bac acog 4x32, aim m2 airsoft x2, vortex optics spr 1303 spitfire all models polygons...
thingiverse
free

AIRSOFT by Mr_akil
...airsoft by mr_akil
thingiverse
airsoft
thingiverse
free

Flashhider Airsoft
...flashhider airsoft
thingiverse
airsoft m4 flashhider
mounted @ my ares amoeba 008
thingiverse
free
Airsoft Suppressor by KevinIhle
...airsoft suppressor by kevinihle
thingiverse
airsoft suppressor
thingiverse
free

airsoft suppressor by jordan250
...airsoft suppressor by jordan250
thingiverse
airsoft suppressor
thingiverse
free
Airsoft Silencer by UKnights
...airsoft silencer by uknights
thingiverse
airsoft silencer
thingiverse
free
Airsoft suppresor by 3dpoplauki
...airsoft suppresor by 3dpoplauki
thingiverse
airsoft suppresor rings
Conversion
3ddd
$1

Conversation Seat
...шетка
the conversation seat made in englandhttp://www.squintlimited.com/products/the_conversation_seat/gold
+ max 2011
3d_export
$10

Converse 3D Model
...converse 3d model
3dexport
converse shoe pc unix mac
converse 3d model electropainter17075 38067 3dexport
turbosquid
$100

converse-shoe
...quid
royalty free 3d model converse-shoe for download as c4d on turbosquid: 3d models for games, architecture, videos. (1398427)
turbosquid
$10

Conversation Furniture
... available on turbo squid, the world's leading provider of digital 3d models for visualization, films, television, and games.
turbosquid
$7

Converse Allstars
... available on turbo squid, the world's leading provider of digital 3d models for visualization, films, television, and games.
design_connected
$16

Conversation Club Chair
...conversation club chair
designconnected
donghia conversation club chair chairs computer generated 3d model. designed by n/a.
design_connected
$27

Hemicycle Conversation Chair
...rsation chair
designconnected
ligne roset hemicycle conversation chair computer generated 3d model. designed by nigro, philippe.
3d_export
$24

Converse keds 3D Model
...converse keds 3d model
3dexport
converse all star ked shoe clothes sports
converse keds 3d model vermi1ion 26201 3dexport
3ddd
$1

Converse All-Star Shoes
...converse all-star shoes
3ddd
кеды , обувь
converse all-star shoes
design_connected
$18

CONVERSE Jack Purcell Sneakers
...converse jack purcell sneakers
designconnected
converse jack purcell sneakers computer generated 3d model.
Kit
turbosquid
$3

Bathroom Kit Baño kit
... available on turbo squid, the world's leading provider of digital 3d models for visualization, films, television, and games.
turbosquid
$19

Kit
... available on turbo squid, the world's leading provider of digital 3d models for visualization, films, television, and games.
3d_export
$20

Drift Kit
...drift kit
3dexport
turbosquid
$40

BitCoin Kit
...urbosquid
royalty free 3d model bitcoin kit for download as on turbosquid: 3d models for games, architecture, videos. (1519068)
turbosquid
$9

Industrial kit
...osquid
royalty free 3d model industrial kit for download as on turbosquid: 3d models for games, architecture, videos. (1144117)
turbosquid
$6

Kit Vases
...
turbosquid
royalty free 3d model kit vases for download as on turbosquid: 3d models for games, architecture, videos. (1285114)
turbosquid
free

Survival Kit
...rbosquid
royalty free 3d model survival kit for download as on turbosquid: 3d models for games, architecture, videos. (1637721)
turbosquid
$50

Ninja Kit
...rbosquid
royalty free 3d model ninja kit for download as fbx on turbosquid: 3d models for games, architecture, videos. (1672364)
turbosquid
$35

Brushes Kit
...osquid
royalty free 3d model brushes kit for download as max on turbosquid: 3d models for games, architecture, videos. (1216721)
turbosquid
$19

Kit Bedroom
...osquid
royalty free 3d model kit bedroom for download as max on turbosquid: 3d models for games, architecture, videos. (1290049)