Thingiverse
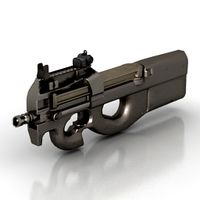
Airsoft P90 BTC Chimera/HPA trigger and selector microswitch conversion by malcolmnz
by Thingiverse
Last crawled date: 3 years, 12 months ago
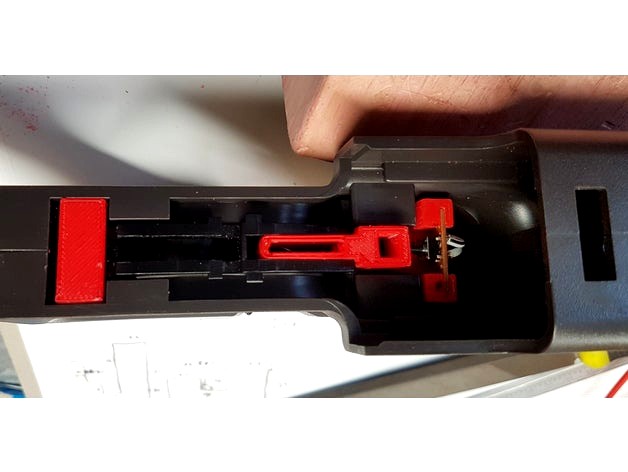
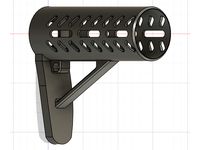
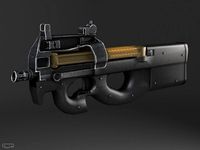
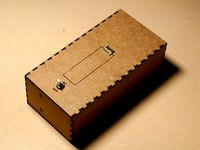
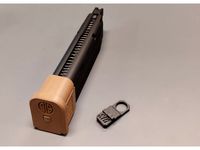
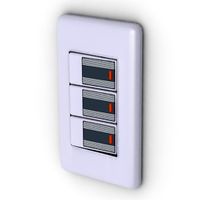
This is the 3D printed hardware you could use to convert a Tokyo Marui P90 from the standard trigger and selector mechanism, to micro switches for both jobs. This is intended to be used with either a BTC Chimera, a HPA system such as a Polarstar, or your own home brew setup.
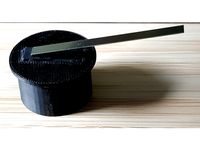
In some of the supplied pictures I used a switch I had lying around as an example. The first photo and the photo of the small tactile switch, show the correct switch, which is a SP0603 6mm SPST Micro Tactile switch from Jaycar Electronics. You should be able to find something similar nearly anywhere. https://www.jaycar.co.nz/6mm-spst-micro-tactile-switch/p/SP0603
The microswitch for the selector is also from Jaycar, and is an SM1036, also a very common design. One of the STL files models the body of this switch so you can compare. You do not have to print that part. https://www.jaycar.co.nz/spdt-sub-miniature-microswitch/p/SM1036
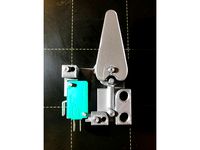
Trickiest part of the install is gluing the two selector mounts up inside the body. It is actually quite easy with a pair of angled tweezers and some super glue. Just hold each mount as far back and up as it will go. I haven't tried acetone to see if that will work, as I wanted to be able to remove it during development.
Cut some rectangles out of 1.2mm thick prototyping board to suit. The selector one has a rectangle cut into that to allow the bottom of the switch to sit flush with the bottom of the board. It cannot sit lower, as correctly installed the selector board mounts sit the board as low as possible.
The selector switch requires a small lump to be added to push on the micro switch, as per the photo. You can use whatever, I used some epoxy putty.
The trigger stop and trigger button depressor have a little extra meat on them. Sand these to suit. There should be no excess travel on the trigger microswitch, or during a game under stress you will definitely over squeeze it and break the glue on your mount or damage the switch itself.
I figure if you are actually undertaking such a conversion, a little gluing/soldering/sanding the trigger tolerance is probably no challenge to you.
This was all done in Sketchup, and printed on a completely stock DaVinci.
In some of the supplied pictures I used a switch I had lying around as an example. The first photo and the photo of the small tactile switch, show the correct switch, which is a SP0603 6mm SPST Micro Tactile switch from Jaycar Electronics. You should be able to find something similar nearly anywhere. https://www.jaycar.co.nz/6mm-spst-micro-tactile-switch/p/SP0603
The microswitch for the selector is also from Jaycar, and is an SM1036, also a very common design. One of the STL files models the body of this switch so you can compare. You do not have to print that part. https://www.jaycar.co.nz/spdt-sub-miniature-microswitch/p/SM1036
Trickiest part of the install is gluing the two selector mounts up inside the body. It is actually quite easy with a pair of angled tweezers and some super glue. Just hold each mount as far back and up as it will go. I haven't tried acetone to see if that will work, as I wanted to be able to remove it during development.
Cut some rectangles out of 1.2mm thick prototyping board to suit. The selector one has a rectangle cut into that to allow the bottom of the switch to sit flush with the bottom of the board. It cannot sit lower, as correctly installed the selector board mounts sit the board as low as possible.
The selector switch requires a small lump to be added to push on the micro switch, as per the photo. You can use whatever, I used some epoxy putty.
The trigger stop and trigger button depressor have a little extra meat on them. Sand these to suit. There should be no excess travel on the trigger microswitch, or during a game under stress you will definitely over squeeze it and break the glue on your mount or damage the switch itself.
I figure if you are actually undertaking such a conversion, a little gluing/soldering/sanding the trigger tolerance is probably no challenge to you.
This was all done in Sketchup, and printed on a completely stock DaVinci.
Similar models
3dwarehouse
free
SMD TACTILE SWITCH
...smd tactile switch
3dwarehouse
tactile switch spst-no top actuated surface mount.
thingiverse
free

Microswitch Tactile Power Button by r0ckR
...t. it works by bending the lever so that it pushes on the switch contact.
can be adjusted with a lighter if it triggers unpushed.
thingiverse
free

Airsoft P90 Micro Switch by 3dpaintballdesigns
...ngth of the trigger pull.
you will need mosfet (otherwise you will only have a full auto). i used burst wizard king kong super 2.
thingiverse
free

Krytac Trident 2 Selector Plug for HPA conversion by TheBurk
...d right selector lever.
it is a press fit but some people use a dot of glue.
please donate every design takes hours. thank you :)
thingiverse
free
Airsoft Steyr AUG rail kit + micro switch trigger
...the trigger pull.
the trigger needs 2x 6x3x2.5mm mr63zz bearings (ebay helps). m3x20mm screw and m3 nut for mounting the trigger.
thingiverse
free
Microswitch mounting bracket for furniture board by mmodzele
...ch on led light inside the drawer.
external diameter: 25mm
micro-switch dimensions:
length: 19.8 mm
width: 6.4 mm
height: 10.2 mm
thingiverse
free

Microswitch Extender by alf7
...ton of a micro switch.
the cover should be glued towards the housing.
i used a 2mm drill to enlarge the holes of the micro switch
thingiverse
free

Nerf Stryfe Microswitch Trigger by Markus1406
...ft trigger by big-e to it. (thanks to you guys!)
this trigger will only work if you put in a microswitch in a nerf stryfe!
cheers
thingiverse
free

SPST switch mount by ShopsmithVsEvil
...the little tabs down with a hot knife or similar and it fuses the switch to the mount (if...
thingiverse
free

nozzel mount with microswitch adaptor for z bed leveling by canibalu
...
a simple adaptation for adding a micro switch straitgh on the nozzle mount that is triggered when the nozzle presses on the bed
Malcolmnz
thingiverse
free
Polarstar Jack and Jack Mini Size Comparison by malcolmnz
...is for you to model your own conversion kits around, should the airsoft gun you want to convert be too short for a standard jack.
thingiverse
free
Keymod vertical grip with Polarstar FCU and battery storage by malcolmnz
...the bolt head is designed for a typical m4 pan head screw. the cover is designed to be hinged on a 2.5mm roll pin; cut to length.
thingiverse
free

Tokyo Marui MP7 AEP high-cap mag funnel by malcolmnz
...ting the hatch door closing on you as you try to do so. designed for the tokyo marui mp7 aep high-cap magazines and their clones.
thingiverse
free

Tokyo Marui AA12 Damo Edition outer barrel tri rail by malcolmnz
...mately 45mm in length (including the head).
there is the original shorter version here: https://www.thingiverse.com/thing:2456475
thingiverse
free

Tokyo Marui M870 loading arm by malcolmnz
...tokyo marui m870 loading arm by malcolmnz
thingiverse
made this for a friend. apparently it worked well.
thingiverse
free
Airsoft M11 Docter sight rail by malcolmnz
...secure it. can see through it to retain the iron sight availability. raises the sight enough to easily use with a full face mask.
thingiverse
free

Evike SR47 mag well spacer by malcolmnz
...amber from moving forward, eliminating the need for the hop chamber spring or o-rings on the barrel.
does not fit the bolt sr47.
thingiverse
free
Tokyo Marui AA12 Rear Tappet Plate by malcolmnz
...e on a tokyo marui aa12.
the extra thickness version has increased the width of the delicate parts to 0.8mm to aid with printing.
thingiverse
free

KSC M11 rail system by malcolmnz
...
quad rail for a ksc m11, retained by the silencer. it's a pretty tight fit so you can probably use it without the silencer.
Hpa
thingiverse
free

Supressor for 14CCW metric by rajifre
...suppressor with cone system to reduce sound. recommended for hpa or gas weapons. thread is metric...
thingiverse
free
HPA Buttstock Cover by Ayxman
...allet to get it all the way in, but now it doesn't move in any direction.
on the pictures i sanded and painted the buttstock.
thingiverse
free

HK45c mag cover HPA airsoft by nepametam
...hk45c mag cover hpa airsoft by nepametam
thingiverse
spodni krit na zasobnik pre hk45c gbb airsoft
thingiverse
free
München Hundesteuermark Geräuschreduzierer // Munich Dog Tax Tag Noise Reducer by PilotChris
...240 degrees c, but a test print in formfutura pla/hpa at 205 degrees worked even better. there is a...
thingiverse
free
Talon Claw U Super core HPA electric solenoid by 55samba
...pack/dp/b00jdtz5o0/ref=sr_1_2?dchild=1&keywords=%2310-24+1+post&qid=1585611363&sr=8-2
5a micro switch for the trigger
thingiverse
free
Handle and Feet for Benjamin PCP HPA Tank by euler357
...ww.amazon.com/dp/b00004z4bv
qty 6 - 8" cable ties are used to hold everything together.
https://www.amazon.com/dp/b01018dc96
thingiverse
free

Nerf Trilogy Quintuple Elite Shell
...half lengths. likely wont work in anything that isnt hpa the walls are thin, and the thinnest is...
thingiverse
free

Nerf Trilogy Sextuple Elite Shell
...shell thingiverse likely wont work in anything that isnt hpa the walls are thin, and the thinnest is...
thingiverse
free

WE G-Series HPA adapter
...zines.
demo:https://www.youtube.com/watch?v=hwbtsx65vie&feature=youtu.be
overview:https://www.youtube.com/watch?v=nzplpm9yq04
thingiverse
free

HPA tank cap ( G1/2-14 )
...hpa tank cap ( g1/2-14 )
thingiverse
cap with logo :)
P90
cg_studio
$49
FN P90 SubMachine Gun3d model
...
.3ds .c4d .fbx .lwo .max .obj - fn p90 submachine gun 3d model, royalty free license available, instant download after purchase.
3d_export
$14
P90 black 3D Model
...p90 black 3d model
3dexport
p90 p99 rifle gun
p90 black 3d model pio33d 67120 3dexport
cg_studio
$99
FN P903d model
...l
cgstudio
.max .obj .mb .lwo .fbx .c4d .3ds - fn p90 3d model, royalty free license available, instant download after purchase.
cg_studio
$10
Special FN P903d model
...el
cgstudio
.3ds .dxf .lwo .max .obj - special fn p90 3d model, royalty free license available, instant download after purchase.
3d_ocean
$15
AK-47
...counter strike csgo deagle glock gun kalashnikov m4a1 m4a4 p90 shotgun tec usp model of ak-47 created in cinema...
3d_ocean
$17
FN P90
...pon
low polygonal 3d model of belgium fn p90 good choice for video games possible in: c4d r11, c4d r15, max 2010, dae 1.4, fbx 6.
archibase_planet
free
Gun
...gun archibase planet gun automatic machine machine gun gun p90 n020515 - 3d model (*.gsm+*.3ds+*.max) for 3d...
archive3d
free

Gun 3D Model
...3d model archive3d gun automatic machine machine gun gun p90 n020515 - 3d model (*.gsm+*.3ds+*.max) for 3d...
humster3d
$40
3D model of Lenovo P90 Onyx Black
...tailed 3d model of lenovo p90 onyx black in various file formats. all our 3d models were created maximally close to the original.
humster3d
$40
3D model of Lenovo P90 Lava Red
...detailed 3d model of lenovo p90 lava red in various file formats. all our 3d models were created maximally close to the original.
Btc
3ddd
$1

BTC Colezione Europe M-88
... настенные
производитель btcinternational
страна италия
сайт производителя www.btcinternational.it
3ddd
$1
BTC
... madeira , витрина
art 468, 467 - витрины
art 477 - база под tv
3ddd
$1

BTC venezia articoloT523
... тв , тумба
btc international venezia collection articolot523
3ddd
free

BTC стол
...btc стол
3ddd
btc , круглый
небольшой стол с серебряным окрасом.
3d_export
$60
Broadcast camera 3D Model
...cnn news bbc live studio virtual hd high definition btc betacam camcorder professional broadcast camera 3d model braz 8047...
3d_export
$80
jimmy jib 3D Model
...cnn news bbc live studio virtual hd high definition btc betacam camcorder professional television jimmy jib 3d model braz...
3ddd
$1

BTC Art-5261 Poltrona Girevole
...btc art-5261 poltrona girevole
3ddd
girevole , poltrona
btc art-5261 poltrona girevole
3ddd
$1
Original BTC Hector Pleat Wall Light
...tor pleat wall light
3ddd
original btc , hector
бра original btc hector pleat wall light
3ddd
$1
Барный стул BTC Jude 5246
...е дерево, цвет вишня, цвет орех
размеры
длина глубина высота
48 см 49 см 115 см
стиль
классика
серия
jude
производитель
btc
3ddd
$1

Столик для цветов BTC
...столик для цветов btc
3ddd
подставка
классический деревянный столик для цветов
Selector
3ddd
$1

The unnatural selector
... статуэтка , стимпанк
стимпанк ружье the unnatural selector
310263 полигона.
3d_export
$5
Automatic Gear Selector Lever 3D Model
...elector lever
automatic gear selector lever 3d model download .c4d .max .obj .fbx .ma .lwo .3ds .3dm .stl sisli01 102955 3dexport
archibase_planet
free
Microphone
...archibase planet microphone selectable microphone conference microphone digital conference selector microphone n170912 - 3d model (*.gsm+*.3ds) for interior 3d...
archive3d
free

Microphone 3D Model
...model archive3d microphone selectable microphone conference microphone digital conference selector microphone n170912 - 3d model (*.gsm+*.3ds) for interior 3d...
3ddd
free
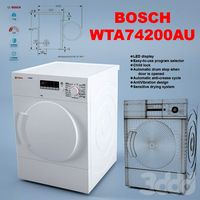
WTA74200AU Washer & Dryer
...3ddd стиральная машинка , bosch led display easy-to-use program selector child lock automatic drum stop when door is opened...
3d_export
free

selector de rangos
...selector de rangos
3dexport
del objeto:<br>x : 0.75 m<br>y : 0.75 m<br>z : 0.14 m
3d_export
free
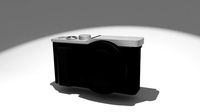
generic digital camera
...features face buttons, a raised bevel, shutters, a mode selector and a grip on either side. there is also...
3d_export
$14
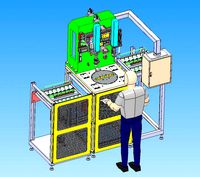
screw tightening machine
...workpiece is placed on the other side. the sleeve selector and label are attached on the upper end of...
thingiverse
free

Subaru shifter selector bushing by keenanc1
...hing.
middle bushing isn't needed however i made it for additional support to reduce wear on ends.
make sure to print 2 ends.
thingiverse
free

MMU2S M10 Passthrough Selector
...assthrough selector
thingiverse
designed for a better path from mmu2s selector to printer with m10 passthrough bowden connector.
Microswitch
thingiverse
free

Mostly Printed CNC X And Y Endstop Plate by kauz
...by kauz thingiverse this is a holder for common microswitchs for x and y at the same time. the...
thingiverse
free
Sequential shifter by T-Fork
...around 15mm a suitable spring a shift knob 2x microswitchs with a max width of 2 cm or 2x...
thingiverse
free

Button cap for 12mm microswitch by arpruss
...2mm microswitches. a bit of hot glue helps.
i made these as part of a larger project but i thought they deserved a separate page.
thingiverse
free

Filament Sensor Microswitch Remix by sethargo
...,
i had to remove the upper left corner because of my different type of microswitch.
thx my friend for the work and stay healthy!
thingiverse
free
Leave me alone box v. 2 by SimonFront
...box a bit better implemented spacers to hold the microswitch made a parts list [edit: see comments for link...
thingiverse
free

Magnet and string lamp by maschlue
...d=10mm, l=5mm m3 nuts and bolts for mounting the microswitch the main case parts need to be glued, i...
thingiverse
free
Large Rotary Photography Stand by LawSmith408
...uno rotary encoder:https://www.amazon.com/cylewet-encoder-15%c3%9716-5-arduino-cyt1062/dp/b06xqthdrr/ref=sr_1_3?dchild=1&keywords=arduino+rotary+encoder&qid=1584741994&sr=8-3 100 pack of ball bearingshttps://www.amazon.com/pgn-0-375-precision-chrome-bearing/dp/b07chy6kqw/ref=sr_1_5?dchild=1&keywords=3%2f8+ball+bearing&qid=1584742123&sr=8-5 push buttonhttps://www.amazon.com/easyget-standard-arcade-button-microswitchdp/b07d9cr5z9/ref=sr_1_5?dchild=1&keywords=arcade+button&qid=1584742156&sr=8-5 ...
thingiverse
free
Limit Switch (Contact Switch) Case by Team2052
...with a rubber band. the switch is a msw-0 microswitch with a lever that has an 8mm overhang to...
thingiverse
free

Pedal shifter by MBXT
...an satisfying clunk and feel. i use 1a 125v microswitchs and 1x m220 and 6x m26 bolts and 2xm2*4...
thingiverse
free
Microswitch mounting bracket for furniture board by mmodzele
...ch on led light inside the drawer.
external diameter: 25mm
micro-switch dimensions:
length: 19.8 mm
width: 6.4 mm
height: 10.2 mm
Chimera
3ddd
$1
chimera
... химера
chimera, скульптура с габаритными размерами 350 х 233 х 300мм. fbx и текстура прикреплены.
3ddd
$1

Artemide | Chimera
...uct_info.php?products_id=274 http://www.traumambiente.de/chimera-stehleuchte-p-7118.html?campaign=preisroboter
3ddd
free

Chimera
...chimera
3ddd
химера
chimara modelila v 3dmax i zbrush
cg_studio
$50

Artemide floor lamps collection vol 13d model
...aqua nuboli athena castore cadmo callimaco inverted shadows ilio chimera .max .obj - artemide floor lamps collection vol 1...
3d_export
$15
Chimera by Tilk Hero 3D Model
...ўр‚р в°рўвђ¦ р с‘р в»р с‘ р с‘р в·р с•р в±рўр‚р в°р в¶р вµр р…р с‘рўрџрўвђ¦
chimera by tilk hero 3d model tilk-hero 3598 3dexport
3d_ocean
$15

Dragon Base mesh
...base mesh 3docean alien animal base mesh basemesh brute chimera claw dragon fantasy game fantasygame game character low poly...
design_connected
$13

Chimera
...chimera
designconnected
parentesi quadra chimera computer generated 3d model.
3d_export
$6

4mariani collection 02
...4mariani collection 02 3dexport 4mariani collection 02<br>bolb armchair<br>chimera ...
thingiverse
free
E3D Chimera and Cyclops compact X-Carriage for Prusa i3 Style printers by smogit
...line.com/wiki/cyclops/chimera_on_prusa_i3
this carriage was inspired by a number of other designs, but remodelled from scratch.
3d_sky
free
chimera
...chimera
3dsky
sculpture
chimera, sculpture with dimensions 350 x 233 x 300mm. fbx and texture attached.
Airsoft
thingiverse
free

M24 Recessed Spare Mag by GibsonJ
...by gibsonj thingiverse designed for the snow wolf m24 (airsoft, this trigger guard replaces the original, adds a spare...
thingiverse
free

Micro AEG gearbox (airsoft) by sdfgeoff
...ls here on thingiverse, so with luck it should be allowable under the content policy.
https://www.youtube.com/watch?v=2cef-okmbak
thingiverse
free
AR 15 Magazine Stand (Real and Airsoft) by Tyrai_Tac
...erwhise it goes into the magwell completly.
hope you like it - now you can present your weapon on a table or in your gear room.
thingiverse
free

WE G39 magazine feed lip by Mdigibou
...not print in pla, it will wear out eventually. airsoft bb's are harder than pla pla+, petg, some versions...
thingiverse
free
Magazine loading aid for airsoft, SIG SAUER M17 by Leocoolex
...low for attachment on a carbiner or clip/cord.
loading your magazines has never been easier.
print a few and keep some spares ; )
thingiverse
free

Airsoft ak47 slide (cyma) by Kolofik_Boy
...slide (cyma) by kolofik_boy
thingiverse
functional slide for airsoft gun cyma ak47.
on ender 3 printed at about 2h 30m with abs.
thingiverse
free
airsoft folding launcher
...d.com
coming soon video!
visit my instagram to see innovations!https://www.instagram.com/xmoxix.td01
you can watch the demo video
thingiverse
free
A01 - Launching Sleeve by thehex
...is the sleeve used to launch the a01 40mm airsoft projectiles. to use this, install the sleeve in the...
thingiverse
free

KSC KWA MP9 TP9 GRIP by ktrktr79
...by ktrktr79 thingiverse ksc kwa mp9 tp9 grip for airsoft ...
thingiverse
free

Lancer Tactical M4 Airsoft AEG Silencer (No Threads) by IonComplex
...eak free.
thanks for taking a look!
other parts in this series:battery shell with rails
strap clip
rear battery stock
handle rail
Trigger
3ddd
$1
Флагшток
...have turbosmooth modifier. enabling turbosmooth modifier on any object trigger turbosmooth on other ones. 1st channel of flag's mapping...
3d_ocean
$15
Prison Tower
...low poly metal platform prison ready shooter sniper tower trigger turret watch watchtower prison tower sketchfab 3d preview https://sketchfab.com/models/039a9d9e801f40b9b641d60d1af6371c...
3d_ocean
$3

Light Fixture 01
...for game light lights low poly ready spot spotlight trigger typical voltage wall wall light walls light fixture 01...
3d_export
$39

Prison Tower 3D Model
...concrete metal exterior interior enterable ladders platform game enviroment trigger ready low prison tower 3d model sickleadzdk 95154...
3d_ocean
$10

Arrow Shooting Trap with Triggers
...3d model. ready for game. good for mobile games. good for rts games. 826 tris and 454 verts textures are 1024×1024. png, tga, psd
3d_export
$15
High Poly Sniper Crossbow 3D Model
...arrow weapon gun scope bolt missile pistol rope rifle trigger high poly sniper crossbow 3d model download .c4d .max...
3d_ocean
$5
Air condition Unit 06
...electric electronics environment fusebox game low poly small switches trigger unit voltage wall wind air condition unit 06 very...
3d_export
$15

Staple Gun 3D Model
...office school stationery handheld hand held portable powered manual trigger tacker nail fastener tools work industrial machine staple gun...
archive3d
free
Switch 3D Model
...switch 3d model archive3d switch button switch breaker switch trigger shin dong n080414 - 3d model (*.gsm+*.3ds) for interior...
cg_studio
$39
Prison Tower3d model
...concrete metal exterior interior enterable ladders platform game enviroment trigger ready low poly fps shooter .w3d .obj .max .fbx...
Conversion
3d_export
$10

Converse All Star 3D Model
...rse all star blender clothing shoe footware trainer sneaker baseball basketball
converse all star 3d model madog09 36404 3dexport
3d_export
$10
LAD LED Par56 Spotlight 3D Model
...10.archive contains 3d model (*.lwo), test scene (*.lws) and conversion to *.obj.p.s. sorry for low preview picture quality (i'm...
3d_ocean
$5

Oracle Structure - Temple
...with lathe modifier! - easy high to low poly conversion depending on your needs! - easy column...
3d_ocean
$3

Currency Conversion Sign
.... this is a low polygonal model, easy to animate. - poly count: 20 - formats: max /obj /fbx/3ds/dxf - high detail was preserve...
3ddd
$1

lights ITRE
...e
3ddd
converse 28 , itre
элитные итальянские светильники в стиле модерн и hi tech. itre
3ddd
free
Petrifieddesign The Tre Coffee Table
...accompanied with a glass top, but other mediums are available.
dimensions:
h: 18"
w:20" (wood)
w: 30" (glass top)
3ddd
$1

the sofa and chair stanley
...hic with classic sophistication. with its soft sweeping form and elegant features, stanley serves as an ideal conversation piece.
3ddd
$1

Conversation Seat
...шетка
the conversation seat made in englandhttp://www.squintlimited.com/products/the_conversation_seat/gold
+ max 2011
3ddd
$1

visualcomfort SL2705PN
...2 - keyless wattage: 2 - 25 t hard-wired (conversion available) ©efc...
archive3d
free
Sconce 3D Model
...lantern
sconce itre converse 28 n100510 - 3d model (*.gsm+*.3ds) for interior 3d visualization.