Thingiverse

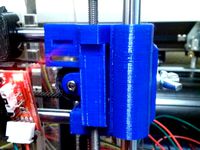
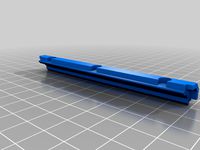
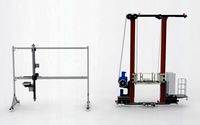
Adimlab Gantry-S Y Tensioner
by Thingiverse
Last crawled date: 4 years, 3 months ago
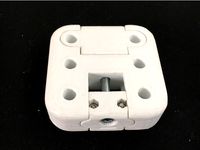
This is a remix of CR-10 Y-Axis Belt Tensioner Remix" by skartz. I changed as little as possible as I really liked the design. The things I did change were to make this work on the Gantry-S
As it turns out I had to change a bit more than I thought but kept the essential design. Mainly to how this thing is mounted and the clearance needed on the end of the 4020 extrusion.
To install:
Remove the two side screws from the 4020 extrusion, be careful to retain the OEM v slot nuts
Remove the hardware from the bracket for the idler. You will only need the idler.
Put the M4 x 30 screw into the back of the pulley and place a nut on the other side of the pulley to keep this screw from spinning. You could also use a hex head screw.
Place the belt around the idler, then use the M4 x 25 screw and M4 nylock nut to install the idler on the pulley. Be careful to keep the orientation of the belt correct.
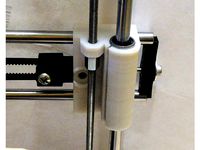
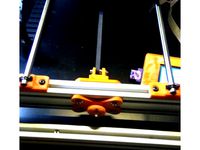
Flip the bracket over onto its back and slide the pulley into the bracket. Flip it back over and place it onto the end of the 4020 extrusion. Don't forget to put the original v slot nuts into the end of the 4020 extrusion.
Put the endcap on the end of the bracket, place the knob onto the end of the tension screw and tighten it up a little.
Make sure the screws are tight and the fit is good then adjust belt tension.
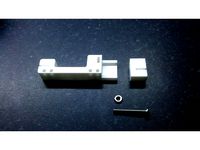
Hardware needed:
1x, M4 x 30 and M4 nut for the tension screw
1x, M4 nylock nut for the knob
1x, M4 x 25 and M4 nylock nut to attach the idler to the pulley assembly
2x, M4 x 10 and the original v slot nuts to mount to the 4020 extrusion
As it turns out I had to change a bit more than I thought but kept the essential design. Mainly to how this thing is mounted and the clearance needed on the end of the 4020 extrusion.
To install:
Remove the two side screws from the 4020 extrusion, be careful to retain the OEM v slot nuts
Remove the hardware from the bracket for the idler. You will only need the idler.
Put the M4 x 30 screw into the back of the pulley and place a nut on the other side of the pulley to keep this screw from spinning. You could also use a hex head screw.
Place the belt around the idler, then use the M4 x 25 screw and M4 nylock nut to install the idler on the pulley. Be careful to keep the orientation of the belt correct.
Flip the bracket over onto its back and slide the pulley into the bracket. Flip it back over and place it onto the end of the 4020 extrusion. Don't forget to put the original v slot nuts into the end of the 4020 extrusion.
Put the endcap on the end of the bracket, place the knob onto the end of the tension screw and tighten it up a little.
Make sure the screws are tight and the fit is good then adjust belt tension.
Hardware needed:
1x, M4 x 30 and M4 nut for the tension screw
1x, M4 nylock nut for the knob
1x, M4 x 25 and M4 nylock nut to attach the idler to the pulley assembly
2x, M4 x 10 and the original v slot nuts to mount to the 4020 extrusion
Similar models
thingiverse
free

Adimlab Gantry-S X Axis Tensioner
...the pulley.
m4 x 25 or m4 x 30 screw and a backing nut to keep this screw from spinning.
m4 nylock nut to insert into the knob.
.
thingiverse
free

Belt tensioner pulley for Tevo Tarantula by Banholm
...e belt tensioner to 2040 extrusion with m4x10 screws and m4 t-nuts.
use the turnwheel to adjust the belt tension.
start printing!
thingiverse
free

Sintron i3 X Axis End For Tension Idler by dl6lr
...tallation.
use a m5 nyloc nut and an 25mm m5 bolt with a 20teeth gt2 idler (18mm outer diameter, 9mm width, 5mm innder diameter).
thingiverse
free

Prusa i3 X-Axis Tensioner by BillyKalfus1
...rew pulls the tensioner closer to the back of the axis mount, pulling the pulleys back, and increasing the tension in the x-axis.
thingiverse
free
V-Slot 2020 gantry plate GT2 belt tensioner by uli
... designed for the v-slot gantry plate i designed.
material needed:
1 x hex screw m4 x25mm
1 x hex nut m4
2 x m2 x 12mm
2 x m2 nut
thingiverse
free
Anet A8 X Axis Tensioner by FredGenius
...se the two that are currently holding the belt, should be a few more left over from the build).
1x m4x30mm screw.
1x m4 half nut.
thingiverse
free
Sintron i3 X Axis Tension kit by JWag
...der washer into the two 3mm holes on the bracket. this should increase the strength of the bracket and keep it from delaminating.
thingiverse
free

Idler pulley bracket for v-slot surface mount by anthem
... but i suggest inserting your belt before mounting to the v-slot, or mount only one side and rotate the bracket up to get access.
thingiverse
free
Y belt tensioner for 2020 and 2040 aluminum extrusion by FFranzmann
...f prusa and haribo mod designs
you need to drill a hole for the m4 in your extrusion
added a version for 2020 although untested.
thingiverse
free
Folgertech prusa i3 x belt tensioner (drop in) by sexzual
...again may not be necessary)
1x m4 wing nut (could use normal nut with above lock washer, or lock nut and no lock washer)
Adimlab
thingiverse
free
ADIMlab web legs
...adimlab web legs
thingiverse
adimlab gantry web legs, assy required, glue if you want.
thingiverse
free

Adimlab gantry back brace by sRlinux
...adimlab gantry back brace by srlinux
thingiverse
a brace for the backside of the adimlab gantry.
thingiverse
free

ADIMLab Mk8 Extruder adapter
...dapter
thingiverse
this is for the commonly red replacement all aluminum extruder for the original adimlab large gantry printer.
thingiverse
free

ADIMLab Gantry Hemera Mount
...d accessories to mount the e3d hemera to the adimlab gantry. use the cooler of your choice or i have a remixed version available.
thingiverse
free

Adimlab Printer Feet Dampener by Pahls_racing
...dimlab printer feet dampener by pahls_racing
thingiverse
tpu dampeners for a adimlab 3d printer. lowered printer noise by 10 db.
thingiverse
free

ADIMLab Filament Senor Mount
...for my adimlab printer broke, and couldn't find files for it. recreated it. suggest printing it at 100% infill for strength
thingiverse
free
Adimlab Extruder Filament Guide
...that use the mk8 extruder. this was not designed by me. i'm posting this here as a convenient place to download for others.
thingiverse
free

Adimlab Filament Detector Extended
...ilament input to a location that is more inline with where 75% of your filament comes down instead of the final 10% of the spool.
thingiverse
free
ADIMLab Large Gantry Hemera Cooler Remix
...ntry hemera cooler remix
thingiverse
remix of hangtight's cooler for the hemera. made to fit my adimlab gantry hemera mount.
thingiverse
free

ADIMLab Rear Mount Spool Holder
...lder. has three holes for screws; i just used the two that came with the original mount.
printed in pla, should be +60% infill.
Gantry
turbosquid
$349
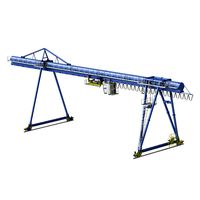
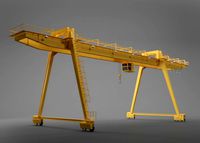
Gantry crane
...alty free 3d model gantry crane for download as ige and sldas on turbosquid: 3d models for games, architecture, videos. (1476278)
3d_export
free
firestone advertising gantry
...rs premises and<br>these advertisement gantries, were very popular in the 30-70's at grand prix races advertising tyres
turbosquid
$30
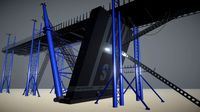
Derelict Launch Gantry
...alty free 3d model derelict launch gantry for download as fbx on turbosquid: 3d models for games, architecture, videos. (1669952)
turbosquid
$129
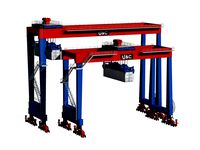
Gantry Crane RTG
...e 3d model gantry crane rtg for download as max, obj, and fbx on turbosquid: 3d models for games, architecture, videos. (1491933)
turbosquid
$120
Gantry stacker Assembly
...try stacker assembly for download as sldas, fbx, 3ds, and ige on turbosquid: 3d models for games, architecture, videos. (1648516)
turbosquid
$19
Train Signals Gantry
...l train signals gantry for download as 3ds, max, obj, and fbx on turbosquid: 3d models for games, architecture, videos. (1462242)
turbosquid
$5
STS Gantry Crane
... available on turbo squid, the world's leading provider of digital 3d models for visualization, films, television, and games.
turbosquid
$160

Bulk carrier with gantry crane
...carrier with gantry crane for download as lwo, obj, and blend on turbosquid: 3d models for games, architecture, videos. (1285258)
3d_export
$50

RMG Gantry Crane 3D Model
...t hoist rail rubber tyre tire rtg eot beam portal heigh tonne shipyard port
rmg gantry crane 3d model 5starsmodels 42860 3dexport
3d_export
$29
gantry crane
...istic model that will enhance the detail and realism of any of your rendering projects.<br>file formats: max, obj, fbx, 3ds
Tensioner
3d_export
$5

adjustable tension lock
...adjustable tension lock
3dexport
adjustable tension lock
turbosquid
$5

tension ring
...oyalty free 3d model tension ring for download as fbx and stl on turbosquid: 3d models for games, architecture, videos. (1553452)
turbosquid
$3

Tension Chair
...free 3d model tension chair for download as obj, c4d, and fbx on turbosquid: 3d models for games, architecture, videos. (1251503)
3d_export
$5
transformador de tension
...transformador de tension
3dexport
transformador de tension entrada 460vac salida 220vac marca audax
turbosquid
$20

Motorbike Chain Tensioner
...y free 3d model motorbike chain tensioner for download as stl on turbosquid: 3d models for games, architecture, videos. (1428322)
turbosquid
$25
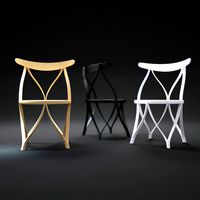
TENSION-WOOD-CHAIR
... available on turbo squid, the world's leading provider of digital 3d models for visualization, films, television, and games.
turbosquid
$25

tension-bentwood-chair
... available on turbo squid, the world's leading provider of digital 3d models for visualization, films, television, and games.
turbosquid
$19

Tension engagement ring
...n engagement ring for download as obj, fbx, 3dm, dwg, and stl on turbosquid: 3d models for games, architecture, videos. (1491631)
3d_export
$10

Ruby Tension set Ring 3D Model
...ruby tension set ring 3d model
3dexport
tension set ruby ring in 18k
ruby tension set ring 3d model rehansheikh 25254 3dexport
turbosquid
$20
Superficial Tension Exp. Image.max
... available on turbo squid, the world's leading provider of digital 3d models for visualization, films, television, and games.
Y
turbosquid
$1

Tetera y Galletas y Caf
... available on turbo squid, the world's leading provider of digital 3d models for visualization, films, television, and games.
3ddd
$1

Смеситель Y-CON
...смеситель y-con
3ddd
смеситель , y-con
смеситель y-con
3ddd
$1

Y-Chair
...y-chair
3ddd
tom dixon
y-chair designed by tom dixon,
3ds max + obj, corona
3ddd
$1

Y Chair compilation
....net/products/us/y-chair-sled-base
y chair swivel basehttp://www.tomdixon.net/products/us/y-chair-swivel-base
turbosquid
$190

Y-8
...y-8
turbosquid
royalty free 3d model y-8 for download as max on turbosquid: 3d models for games, architecture, videos. (1658891)
turbosquid
$7

Bench Y
...turbosquid
royalty free 3d model bench y for download as obj on turbosquid: 3d models for games, architecture, videos. (1488746)
turbosquid
$15

bonePile Y
...oyalty free 3d model bonepile y for download as blend and obj on turbosquid: 3d models for games, architecture, videos. (1546374)
turbosquid
$7

Y for Yarn
...d
royalty free 3d model y for yarn model for download as max on turbosquid: 3d models for games, architecture, videos. (1699732)
turbosquid
$2

FONT Y
...quid
royalty free 3d model font y for download as ma and obj on turbosquid: 3d models for games, architecture, videos. (1549457)
3ddd
$1

WOOD-y
...wood-y
3ddd
wooden guy