Thingiverse
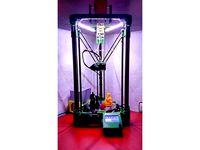
Add light for Delta / Kossel 3D printer by jack283
by Thingiverse
Last crawled date: 3 years ago
https://www.youtube.com/watch?v=JIw5MaWI3rM
Full tutorial can be found here: http://makerholik.com/3d-printing/light-up-your-3d-printer/
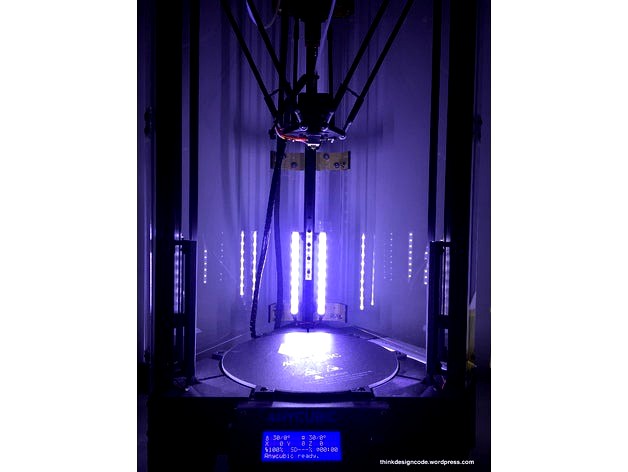
I decided to add LED for my Kossel 3d printer (My model is Anycubic Kossel Linear Plus) to make it easier for me to check if I need to print overnight.
Material:
6x LED stripes (12VDC, width: 1cm, length: 15cm each)
M3x10mm bolts and M3 T-nuts
Wires
Printed parts:
6x Part01
6x Part02
6x Part02_Mirror
I already show to you guys how to make it step by step in each picture. Just follow them and you can make it.
Here are all those steps:
Step 01: Using 12V LED stripe (1cm in width) and cut to 6 pieces (15cm each)
Step 02: Soldering all 6 LED stripes.
Step 03: Wire out all LED stripes.
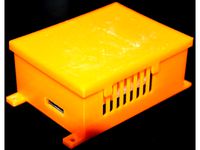
Step 04: Make a small board to attach all LED stripes, 12VDC power supply and ON/OFF switch
Step 05: Connect and test all LED stripes.
Step 06: Using a piece of thick tape to cover all circuit board.
Step 07: Using M3 bolts and M3 T-nuts for the board.
Step 08: Attach the board to the frame (below the heated bed)
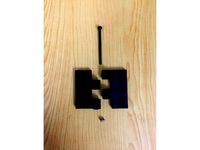
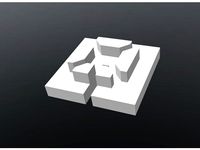
Step 09: Print 6xPart01, 6xPart02 and 6xPart02_Mirror to make 6 LED stripes holder.
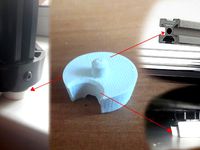
Step 10: Using super glue to attach LED stripe into LED stripe holder (Part01). Remember to attach the Part02 and Part02_Mirror to Part02 before doing this step.
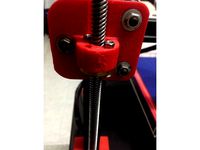
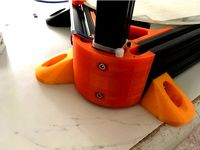
Step 11: Attach all LED stripes to 3d printer frame with M3 T-Nuts.
Step 12: Remove the heated bed and connect all LED stripes to the small board we've made before. For the 12VDC input, you can use directly from 3d printer power supply.
Step 13: For the ON/OFF switch, you can place it in front.
DONE!!!
Full tutorial can be found here: http://makerholik.com/3d-printing/light-up-your-3d-printer/
I decided to add LED for my Kossel 3d printer (My model is Anycubic Kossel Linear Plus) to make it easier for me to check if I need to print overnight.
Material:
6x LED stripes (12VDC, width: 1cm, length: 15cm each)
M3x10mm bolts and M3 T-nuts
Wires
Printed parts:
6x Part01
6x Part02
6x Part02_Mirror
I already show to you guys how to make it step by step in each picture. Just follow them and you can make it.
Here are all those steps:
Step 01: Using 12V LED stripe (1cm in width) and cut to 6 pieces (15cm each)
Step 02: Soldering all 6 LED stripes.
Step 03: Wire out all LED stripes.
Step 04: Make a small board to attach all LED stripes, 12VDC power supply and ON/OFF switch
Step 05: Connect and test all LED stripes.
Step 06: Using a piece of thick tape to cover all circuit board.
Step 07: Using M3 bolts and M3 T-nuts for the board.
Step 08: Attach the board to the frame (below the heated bed)
Step 09: Print 6xPart01, 6xPart02 and 6xPart02_Mirror to make 6 LED stripes holder.
Step 10: Using super glue to attach LED stripe into LED stripe holder (Part01). Remember to attach the Part02 and Part02_Mirror to Part02 before doing this step.
Step 11: Attach all LED stripes to 3d printer frame with M3 T-Nuts.
Step 12: Remove the heated bed and connect all LED stripes to the small board we've made before. For the 12VDC input, you can use directly from 3d printer power supply.
Step 13: For the ON/OFF switch, you can place it in front.
DONE!!!
Similar models
thingiverse
free

Anycubic Kossel heated bed + 200 glass by FaberFaberrimus
... base can be in pla.
you'll need:
6x m3 screws 30mm, nuts and washer
6x m4 screws 10mm, nuts and washer
6x springs 15mm heigh
thingiverse
free

AnyCubic Kossel Bed Clips by DaHai8
...0 t-nuts
6x m3x10mm hex head screws
highly recommend printing these in petg as pla will soften and warp from the heat of the bed.
thingiverse
free

FLSUN Kossel Delta Power Supply Mount by spool3d_canada
...sel:
http://spool3d.ca/delta-kossel-3d-printer-diy-kit/
attached with m4 screws and ssquare nuts onto the 2020 aluminium profile.
thingiverse
free

LED Strip for Anycubic I3 Mega by jancarstens
...printed all 6 attachements with anycubic i3 mega simultanously. it took 7,5 hours.
edit: i fixed the led with double-sided tape!
thingiverse
free

Enclosure Kossel / Delta 3D printer by jack283
...pply and also the filament as shown in my pictures above.
please feel free to comment below if you have any question. have fun!!!
thingiverse
free

Kossel Delta XT60 Socket Bracket by 8link
...t60 socket fits tightly but you are advised to use some superglue to hold it in place.
as always stl and sketchup file included.
thingiverse
free

Kossel Delta Extruder Light by 8link
... stripes from banggood.
you can connect these leds to fan1 connector on trigorilla mainboard they will only lit during printing.
thingiverse
free
Heated Bed MOSFET Module 280A by Try-n-Make-Me
...m4 screws and 2020 slot screws xm4 for attaching to printer. use tronxy community instructions for the wiring information. enjoy!
thingiverse
free

Kossel Foot and PSU Mount by jdawud
...ttach the feet to the center hole of the 2020 extrusions. t/channel nuts are used to attach the psu mounts to the 2020. channels.
thingiverse
free

QUBD Twoup MK2B heated bed supports by Jakontheroad
...ork with m3 screws and nuts to attach the bed to them.
i used 6 x 1/2 metal screws to attach the support to the bed (see photos)
Jack283
thingiverse
free
Hinge for aluminum extrusion by jack283
...2 parts: left and right and using m3x45mm bolt to join them together.
i design to hide all the bolt and nut for a better looking.
thingiverse
free

60mm Fan Mount for NEMA17 Stepper Motor by jack283
... jack283
thingiverse
this part will help attack 60mm fan to 3d printer motors. it will make sure your motor will always be cool.
thingiverse
free
Upgrade parts for Scalar S 3D printer by jack283
..., m4 screws to attach to 20x20mm aluminum extrusion.
z-axis angle bracket: use m4 screws to attach to 20x20mm aluminum extrusion.
thingiverse
free

Google home with adapter wall mount by jack283
...ier.
you can use a piece of wood, metal or acrylic and 2xm3 bolts to attach to the printed part to make the base for google home.
thingiverse
free

Wire / Wireless charging dock for iPhone and Apple Watch by jack283
..., you can use a glue gun to fix the lightning cable.
for the wireless charging, i use the wireless charge having a 10cm diameter.
thingiverse
free

SD card and micro SD card holder by jack283
... magnet to keep the cap in place.
please comment what you think that i can make better and don't hesitate to share your made.
thingiverse
free
Enclosure Kossel / Delta 3D printer by jack283
...pply and also the filament as shown in my pictures above.
please feel free to comment below if you have any question. have fun!!!
thingiverse
free

Anycubic Kossel stepper cover with wiring pass through
...i designed this to neatly hide the wiring for jack283 light mod for anycubic kossel lp. this gives you...
Kossel
thingiverse
free
kossel bottom by keisukelin
...kossel bottom by keisukelin
thingiverse
kossel bottom
thingiverse
free
Leg for kossel by exelon
...leg for kossel by exelon
thingiverse
leg for kossel
thingiverse
free
Extruder for kossel by spencer_chen7
...extruder for kossel by spencer_chen7
thingiverse
extruder for kossel
thingiverse
free
Kossel parts by breezer83
...kossel parts by breezer83
thingiverse
kossel parts
thingiverse
free

Anycubic Kossel PID calibration
...ir mount:
kossel raspberry camera ir mount
extruder pid calibration.
simple extruder temperature calibration of your 3d printer.
thingiverse
free

Kossel Medium by flux83
...kossel medium by flux83
thingiverse
vertex for upgraded kossel mini
thingiverse
free
Kossel Mini by salesmendesandre
...kossel mini by salesmendesandre
thingiverse
custom kossel mini
frame 20x20
thingiverse
free
leg for kossel by ionulet
...leg for kossel by ionulet
thingiverse
leg for kossel with channel for end- stop cables
thingiverse
free

Optical Endstops Mounts for Kossel (with Better Kossel carriages) by dellfer
...stops on the anycubic kossel with better kossel carriages by codefreak https://www.thingiverse.com/thing:2501337
more precission
thingiverse
free
kossel??????? by wangrui19890704
...kossel??????? by wangrui19890704
thingiverse
??2020?2060???
Delta
design_connected
$16
Delta
...delta
designconnected
arflex international spa delta computer generated 3d model. designed by koivisto, eero.
design_connected
$16
Delta
...delta
designconnected
lj lamps delta computer generated 3d model. designed by janowski-lenhart, sasha.
design_connected
$13
Delta
...delta
designconnected
emu group delta armchairs computer generated 3d model. designed by marin chiaramonte .
3ddd
$1

Delta Light
...delta light
3ddd
delta light , you-turn reo 3033
точечний светильник delta light
3ddd
$1
Blanco / delta
...blanco / delta
3ddd
blanco , мойка
мойка blanco delta со смесителем
3ddd
$1
Delta Light Spot
...delta light spot
3ddd
delta light
светильник фирмы delta light
3ddd
free
Bianchi Delta LVMDLT200100
...i delta lvmdlt200100
3ddd
bianchi delta , смеситель
смеситель bianchi delta lvmdlt200100
design_connected
free
Delta 190
...delta 190
designconnected
free 3d model of delta 190 by zanotta designed by progetti, emaf.
design_connected
$27
Delta 211
...delta 211
designconnected
zanotta delta 211 computer generated 3d model. designed by progetti, emaf.
design_connected
$27
Delta 234
...delta 234
designconnected
zanotta delta 234 computer generated 3d model. designed by progetti, emaf.
Add
3ddd
$1

Радиатор_ add-on
... add-on
http://www.tubesradiatori.com/eng.html#/collections/elements/add-on_en_0_2_79_1.html
design_connected
$16

Add Colour
...add colour
designconnected
stelton add colour computer generated 3d model. designed by jacobsen, arne.
3ddd
free
TUBES - Add-on
...tubes - add-on
3ddd
полотенцесушитель
3ddd
$1

Lammhults add chair
...dd
lammhults , add
http://www.lammhults.se/products/chairs-armchairs/add-chair
3d_export
$60
add blimp
...ginei.tga frame_diffuse.tga frame_normal.tga frame_specular.tga flare.tga spikesd.tga spikesi.tga spotlightsd.tga spotlightsd.tga
3ddd
$1

ADD lapalma
...add lapalma
3ddd
lapalma
http://www.lapalma.it/main/product.aspx?p=93
turbosquid
$5

Planetery Material add-on for Blender
... planetery material add-on for blender for download as blend on turbosquid: 3d models for games, architecture, videos. (1678092)
turbosquid
$8
Time Bomb (Mouse Add-on)
... available on turbo squid, the world's leading provider of digital 3d models for visualization, films, television, and games.
3ddd
$1

Add-Lighting 41607/1F NI
...hting
размеры, мм: 200х540х250
производство: испанияhttp://ligting.ru/index/style/styleid/1256/nameid/98170/tid/340867/
3d_ocean
$19

Panzer Add-On for Brutal (for Poser)
...ures: panzer: front shell armor, at 8594 polygons shell: rear shell armor, at 14600 polygons props: bandage/ face mask bangle/...
Printer
archibase_planet
free

Printer
...inter
archibase planet
printer laser printer pc equipment
printer n120614 - 3d model (*.gsm+*.3ds) for interior 3d visualization.
archibase_planet
free

Printer
...rchibase planet
laser printer office equipment computer equipment
printer - 3d model (*.gsm+*.3ds) for interior 3d visualization.
turbosquid
$100

Printer
...er
turbosquid
royalty free 3d model printer for download as on turbosquid: 3d models for games, architecture, videos. (1487819)
turbosquid
$3

Printer
...turbosquid
royalty free 3d model printer for download as max on turbosquid: 3d models for games, architecture, videos. (1670230)
turbosquid
$1

printer
...turbosquid
royalty free 3d model printer for download as max on turbosquid: 3d models for games, architecture, videos. (1595546)
turbosquid
$1

printer
...turbosquid
royalty free 3d model printer for download as max on turbosquid: 3d models for games, architecture, videos. (1595105)
turbosquid
$10

Printer
...id
royalty free 3d model printer for download as max and 3dm on turbosquid: 3d models for games, architecture, videos. (1607146)
turbosquid
$7

Printer
...royalty free 3d model printer for download as ma, ma, and obj on turbosquid: 3d models for games, architecture, videos. (1644580)
turbosquid
$30

Printer
... available on turbo squid, the world's leading provider of digital 3d models for visualization, films, television, and games.
turbosquid
$20

Printer
... available on turbo squid, the world's leading provider of digital 3d models for visualization, films, television, and games.
Light
archibase_planet
free

Light
...light
archibase planet
lamp lighting light
light - s2 - 3d model for interior 3d visualization.
archibase_planet
free

Light
...light
archibase planet
light luminaire lighting
light l0465 - 3d model (*.gsm+*.3ds) for interior 3d visualization.
3d_export
$5

lighting
...lighting
3dexport
lighting
3d_export
$5

lighting
...lighting
3dexport
lighting in livingroom
turbosquid
$3

Lighting Tree with Lights
...d model lighting tree with lights for download as max and 3ds on turbosquid: 3d models for games, architecture, videos. (1585507)
archibase_planet
free

Light
...light
archibase planet
luster lighting solution
light - s - 3d model for interior 3d visualization.
archibase_planet
free

Light
...light
archibase planet
luster lamp lighting
light 1 - 3d model for interior 3d visualization.
archibase_planet
free

Lights
...lights
archibase planet
surgical lights surgical lamp
surgical lights (floor) - 3d model for interior 3d visualization.
archibase_planet
free

Light
...light
archibase planet
lighting luminaire candlelight
light l0463 - 3d model (*.gsm+*.3ds) for interior 3d visualization.
3d_export
$18

street light-lighting-light-xia bing
...
3dexport
street light-lighting-light-xia bing<br>max 2015 v-ray 3 max 2015<br>textures<br>all files in zip...