Thingiverse

Acetone Smoothie by Deemoss
by Thingiverse
Last crawled date: 3 years, 1 month ago
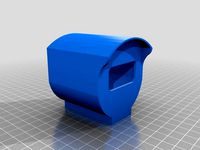
The Acetone Smoothie spins ABS-printed objects inside an Acetone-vapor vessel, resulting in a uniformly glossy surface without base scars. Acetone Smoothie can be made as simple or as sophisticated as you like. https://www.youtube.com/watch?v=qZ2M2RDUTAQ
The Smoothie is designed avoid pressure buildup by providing a vent in the 1st flange. Make sure you leave enough clearance between the spinning rod and the lid of your vessel. This means, that Acetone vapour will escape, which may be a hazard with DC BRUSHED MOTORS which produce sparks. STEPPER MOTORS do NOT produce sparks. USE IN WELL VENTILATED AREA
The simple version
If you want the simplest implementation and still get 90% of the benefit, this is for you.
A $4 geared DC motor (http://bit.ly/2gGYym8) - READ NOTE ABOUT SPARKS ABOVE
No bearings. You can modify the Smoothie_Flange1 and Smoothie_Flange2 STLs so that the axis hole is 5mm or print plastic bushings to fit in the flanges.
The advanced version
If you want to precisely control the rotation speed, pausing, changing of direction, timing etc., then this is for you. You could control the heating if you wanted to - not covered here - with a silicone heating pad, if you wanted to!
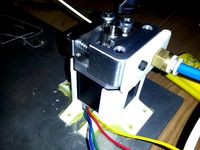
$3 stepper motor such as 28YBJ-48 (http://bit.ly/2gY0zbK)
$3 Arduino Nano (http://bit.ly/2g2g54g)
$5 Ball Bearings (http://bit.ly/2h5SFMu) or Brass Bearings $4 (http://bit.ly/2gYxSxH)
You will also need
2x 15mm M3 Hex bolts and matching nuts
A glass jar (size depends on your projects)
A 5mm rod or tube (length depends on your projects)
Notes
I use hot glue to attach the Smoothie to jar's lid.
As heat source I use the printer's heated bed.
I found out that attaching the part to the rod with Hot Glue works the best. To make life easier, I sometimes incorporate tabs with a 5mm hole inside the object. Then just insert the rod inside the object and secure it with hot glue on the exposed end.
The Moai used in the rendering is from http://www.thingiverse.com/thing:149271
The Smoothie is designed avoid pressure buildup by providing a vent in the 1st flange. Make sure you leave enough clearance between the spinning rod and the lid of your vessel. This means, that Acetone vapour will escape, which may be a hazard with DC BRUSHED MOTORS which produce sparks. STEPPER MOTORS do NOT produce sparks. USE IN WELL VENTILATED AREA
The simple version
If you want the simplest implementation and still get 90% of the benefit, this is for you.
A $4 geared DC motor (http://bit.ly/2gGYym8) - READ NOTE ABOUT SPARKS ABOVE
No bearings. You can modify the Smoothie_Flange1 and Smoothie_Flange2 STLs so that the axis hole is 5mm or print plastic bushings to fit in the flanges.
The advanced version
If you want to precisely control the rotation speed, pausing, changing of direction, timing etc., then this is for you. You could control the heating if you wanted to - not covered here - with a silicone heating pad, if you wanted to!
$3 stepper motor such as 28YBJ-48 (http://bit.ly/2gY0zbK)
$3 Arduino Nano (http://bit.ly/2g2g54g)
$5 Ball Bearings (http://bit.ly/2h5SFMu) or Brass Bearings $4 (http://bit.ly/2gYxSxH)
You will also need
2x 15mm M3 Hex bolts and matching nuts
A glass jar (size depends on your projects)
A 5mm rod or tube (length depends on your projects)
Notes
I use hot glue to attach the Smoothie to jar's lid.
As heat source I use the printer's heated bed.
I found out that attaching the part to the rod with Hot Glue works the best. To make life easier, I sometimes incorporate tabs with a 5mm hole inside the object. Then just insert the rod inside the object and secure it with hot glue on the exposed end.
The Moai used in the rendering is from http://www.thingiverse.com/thing:149271
Similar models
thingiverse
free

mason jar straw lid for smoothie by kriskitchen
...mason jar straw lid for smoothie by kriskitchen
thingiverse
mason jar straw lid for smoothie
3dwarehouse
free

Flange Coupling Connector
...flange coupling connector
3dwarehouse
5mm flange coupling connector. connector stepper motor to shaft
thingiverse
free
Cessna C172 Compass by Pietrogramma
... want to put the board inside the compass) and one without socket if you want put the board controller outside the compass).
ciao
thingiverse
free

Stepper motor mount for gauge by jmurphyca
...stepper motor mount for gauge by jmurphyca
thingiverse
i used a dab of hot glue to help hold it on.
thingiverse
free

Stepper Motor 5mm shaft to 8mm Threaded Rod Coupler
...r coupler
5mm stepper motor shaft to 8mm trapezoidal lead screw self centering rigid coupler.
ideal for mpcnc or z-motor coupling
thingiverse
free

Turn Table - photo movie image sequencer by linusjarbo
...) threaded rod (1) + nuts
2mmx2cm(2m) + nuts (this is to fasten small spur gear to stepper motor)
3mm (3m) for the stepper mount.
grabcad
free

SMAKN TB6600 Stepper Motor Driver
...tor driver
tb6600 upgraded version 32 segments 4a 40v 57/86 stepper motor driver
https://bit.ly/2ivta88
https://bit.ly/2gfavbj
thingiverse
free
NEMA Stepper Motor Mount by Raptorfx
... the stepper motor for the extruder to the ground plate of my printer. used hot glue to mount it, but also m3 screws can be used.
thingiverse
free

Fully Submersable Mason Jar Mixer for 130 DC Motor by KidSwidden
...er, then re-seat multiple pedestal / supports for different test subjects.
p.s. be sure to glue the top on - epoxy works wonders.
thingiverse
free

Microscope Support from cheap drill press with electronic adjustment. by IeC
...30cm threaded rod
-1x d8mm flange bearing
-1x 8mm nema17 coupling
-1x nema17 mottor
-1x stepper motor driver
-1x arduino mini pro
Deemoss
thingiverse
free
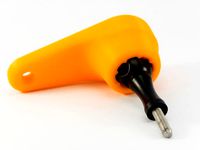
GoPro wrench screw tightener for mount by Deemoss
... tool to tighten the screws of the gopro mounts.
i printed this in abs with 4 top and bottom layers, and 4 sidewalls. infill 25%.
thingiverse
free
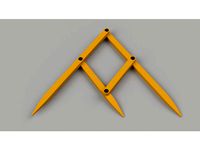
Fibonacci Golden Section Gauge Ruler Compass by Deemoss
...ngiverse
this is a fibonacci golden section gauge to help with the creation of your masterpiece.
hardware: x4 m4 12mm hex bolts.
thingiverse
free

Spinnaker boom bushing / bush / fitting by Deemoss
...ged (drilled) depending on number of perimeters used.
three 4mm attachment holes provided but i suggest glueing in place instead.
thingiverse
free
Remaining filament length calculator by Deemoss
...oss section of the filament. i have accounted for imperfect alignment of filament on the spool with a conservative factor of 0.8.
thingiverse
free

Bolt together Puzzle Sphere for kids by Deemoss
...elow!
hardware:
m6 flathead hex bolts 20mm (x4)
m6 flathead hex bolts 75mm (x1)
m6 knurl threaded inserts (x5)
4mm allen key (x1)
thingiverse
free

ZD Racing 1/8 shock rod end (4mm rod, m3.5 thread) by Deemoss
... for 4mm, m3.5 threaded rod.
version b is for flat printing, including bridging support.
printed in nylon at 0.15mm layer height.
thingiverse
free

Threading die guide by Deemoss
...our die stock holder (orange part in the illustration)
lubrication port
hardware
m5 40mm socket head screws (x8)
m5 hex nuts (x8)
thingiverse
free

ZD Racing Pirates 2, 3, 9116 large LiPo tray by Deemoss
...oned to allow for increased battery size.
max battery size on render graphic. i use it with cnhl g+ series 3s, 5000mah, 30c lipo.
thingiverse
free

IKEA vilmar chair plugs feet by Deemoss
...gave a smooth satin finish. i also post processed some plugs on my acetone smoothie, but the results were too shiny for my taste.
Smoothie
3d_export
$5

milk smoothies
...milk smoothies
3dexport
turbosquid
$1

Centerline Smoothie
... available on turbo squid, the world's leading provider of digital 3d models for visualization, films, television, and games.
turbosquid
$38

Double Bed Bed Linen 3D model summer smoothie
...el summer smoothie 3d model for download as max, obj, and fbx on turbosquid: 3d models for games, architecture, videos. (1369095)
3d_export
$19

Blender Smoothie Small
... cm: 11.9cm x 11.7cm x 31.6cm<br>- model parts: 7<br>- material count: 3<br>- xform: no<br>- boxtrick: no
3d_export
$10

Sauna stove
...version, in 1 day. in modeling, i used the smoothie group modifiers. vray mtl materials and render...
3d_ocean
$8

18 Realistic ceramic glass by Ad Trend
...materials. design by ad trend 6 water glasses 6 smoothie glasses 6 espresso cups technical details high quality 3dsmax...
free3d
free

Smoothie
...smoothie
free3d
a simple and untextured smoothie.
sketchfab
$19

Smoothie drink bottle
...smoothie drink bottle
sketchfab
smoothie drink bottle - buy royalty free 3d model by hq3dmod (@aivisastics)
thingiverse
free

Smoothie King Logo by kersten
...smoothie king logo by kersten
thingiverse
smoothie king logo
thingiverse
free

Smoothie opener, Öffner für Smoothie Deckel - Senioren by VolkerFi
...a relief.
hilfe zum flaschen öffnen für ~41mm smoothie deckel.
gerade für senioren oder menschen mit handycap eine erleichterung.
Acetone
turbosquid
$5

acetone
... available on turbo squid, the world's leading provider of digital 3d models for visualization, films, television, and games.
cg_studio
$10

Chemistry Vol.1 - Basic Organic Molecules3d model
...citric tartaric lactic glycolic acetic (ethanoic formic (methanoic acetofenone acetone (propanone) benzaldehyde (benzoic aldehyde) acetaldehyde (ethanal) folmaldehyde (methanal) purine...
thingiverse
free

base vase for acetone by manticus
...
thingiverse
this is a base for a vase used to clean abs prints with acetone vapor
the outer radius of the flower vase is 13.5mm
thingiverse
free

Support for aceton vapor by MoOSTiK
...support for aceton vapor by moostik
thingiverse
test
thingiverse
free

Aceton vapor mixer by jpnurro
...aceton vapor mixer by jpnurro thingiverse as the acetone is heavier than air the more think vapor cloud...
thingiverse
free

Acetone for ABS Gluing/smoothing by chrismolloy
...out $13 cad.
i needed to glue some abs and could not find my can of acetone. came across this and found out it was just acetone!
thingiverse
free

Acetone Funnel by Richy_T
... it that way.
unfortunately, i ran out of pla printing this so i don't have a picture. should have some fresh coming in soon.
thingiverse
free

Acetone Vape Tray by TekMason
...phaving problems with your ender3? see ender 3 troubleshootingfor the latest deals visit creality 3d printers and accessory deals
thingiverse
free

Acetone Smoothing Part Tray by chinman
...rack are chamfered so they lines of contact are small. this was 2 minute design and build...i'm sure it can be improved upon.
thingiverse
free

Alcohol Acetone Glue-Stick Station
...on.com/pana-brand-7oz-quantity-dispenser/dp/b0778tyb89/ref=sr_1_13?keywords=pana+7+oz&qid=1567003234&s=beauty&sr=1-13