Thingiverse
A8B_Boden_Conversion by allObjects
by Thingiverse
Last crawled date: 4 years ago
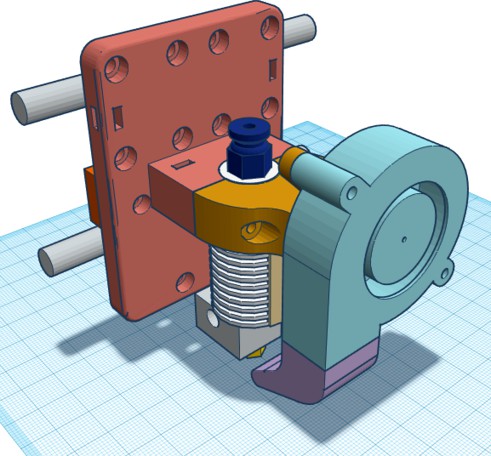
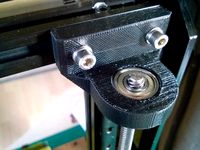
Conversion of Anet A8 to Bowden Drive from out of box Direct Drive with just re-using parts freed up by conversion. The A8B_..._print.stl are the only file you need to print, Screwes come from freed-up direct drive and what came with the printer.
Got inspired by dldesign - https://www.thingiverse.com/thing:2077676 - found via youtube https://www.youtube.com/watch?v=n8nE3fI1zmg
From dldesign I took the hot end carriage - actually only the plate - and added my details to it. The hot end mount and belt fixture I replaced with my design in order to use the parts from the direct drive (no new parts screws, screes, just a few prints). I dimensioned the mount to accommodate the 30mm AND 40mm fan. The 30mm fan came with the hot end and included a snap on air guid that serves at the same time as fan mount. The extra space for the 40mm fan - ex direct drive - I made in case I would need more cooling (so far not happened yet).
For snug fit the hot end, I printed it to measure - which always ends almost always with tighter openings, even with well calibrated printers and prints. To actually seat the hot end, I put its heat sink between the mounting parts, pressed them together while heating it up with a solder iron until it 'forms' itself in. In case it is not tight enough, sand slightly one or both of the facing surfaces of the mounting parts. This way it is not need much pressure to appy by the screws an risk breaking the mounting - of which dldesign talks about - but more the hot molding / fusing that is responsible for an air tight, gap free seat.
Because of the different position of the extruder nozzle relative to the cooling fan, I had to redesign the air duct. I chose resized version of the original, out of the box, simple design, because it fares quite well compared to many much more elaborate ones, so many 'printers' say in their posts. The print has DIY support that is to be broken out and off after print. The duct inserts snug into the fan outlet.
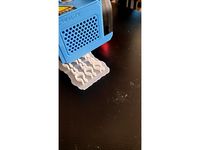
To prevent the cooling air stream blowing at the hot end / hot end block, I made a (blue) 'oversized coat' from a aluminum beer can. It is held in place by the screw that clamps the heating element. First heating up rendered quite interesting, malty smell... ;-) - from coating or from beer residue? ...I prefer to think of the latter... and it was that way.
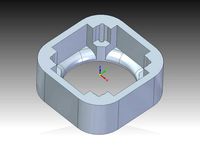
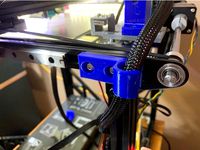
3Displacement 's - https://www.thingiverse.com/thing:3583021- found via youtube https://www.youtube.com/watch?v=BDBJaQmhlw0 is the closest to what I was envisioning for the extrusion driver stepper motor setup in regard of easing forces inferred by the variable bending of the bowden tube. To reduce them even more with even a shorter tube led me to the very lean setup on the x-axis mount, Where the motor itself is part of the gimbal. Since the motor axle extends only on one side, I complemented it with a printed stub in simple snap on cradle that takes advantage of the motor's socket to stay on.
Currently, the motor-gimbal is held mainly by gravity and secured with a wire or paper clip brace in mounds in the gimbal arms. Where print material bears print material in the back, I used a snip from the same beer can as bearing lining...
The gimbal has a piece that snug fit slides into the opening of the right-side x-axis mount and holds itself with a snap-on gripper. Sand slide in part slightly if it requires force to push in (and may break something). - I had thought of mounting it on the left side next to the x-axis motor, but decided otherwise because it is already crowded there and would need a much more elaborate mount (and most likely additional parts / new screws / bolts / nuts).
To be frank, the design was not necessarily for the sake of being a lean and go with re-use-only of freed up parts: the current lock down and related delayed shippings left me no choice but to be resourceful in order to pull thru in one shot! For the record, I ordered 5x11x4mm ball bearings for the gimbal and will make a re-design of the arms for a more professional setup.
Final comment: Even though marked as remix, there is not much remix left, because I finally modified the carriage plate as well... In a next version I will go for slide in / clamped glide bearings to lighten the extruder carriage even more and achieve greater closeness of extruder nuzzle and x-axis guides and even faster prints (80..100mm/s right now with good results).
Got inspired by dldesign - https://www.thingiverse.com/thing:2077676 - found via youtube https://www.youtube.com/watch?v=n8nE3fI1zmg
From dldesign I took the hot end carriage - actually only the plate - and added my details to it. The hot end mount and belt fixture I replaced with my design in order to use the parts from the direct drive (no new parts screws, screes, just a few prints). I dimensioned the mount to accommodate the 30mm AND 40mm fan. The 30mm fan came with the hot end and included a snap on air guid that serves at the same time as fan mount. The extra space for the 40mm fan - ex direct drive - I made in case I would need more cooling (so far not happened yet).
For snug fit the hot end, I printed it to measure - which always ends almost always with tighter openings, even with well calibrated printers and prints. To actually seat the hot end, I put its heat sink between the mounting parts, pressed them together while heating it up with a solder iron until it 'forms' itself in. In case it is not tight enough, sand slightly one or both of the facing surfaces of the mounting parts. This way it is not need much pressure to appy by the screws an risk breaking the mounting - of which dldesign talks about - but more the hot molding / fusing that is responsible for an air tight, gap free seat.
Because of the different position of the extruder nozzle relative to the cooling fan, I had to redesign the air duct. I chose resized version of the original, out of the box, simple design, because it fares quite well compared to many much more elaborate ones, so many 'printers' say in their posts. The print has DIY support that is to be broken out and off after print. The duct inserts snug into the fan outlet.
To prevent the cooling air stream blowing at the hot end / hot end block, I made a (blue) 'oversized coat' from a aluminum beer can. It is held in place by the screw that clamps the heating element. First heating up rendered quite interesting, malty smell... ;-) - from coating or from beer residue? ...I prefer to think of the latter... and it was that way.
3Displacement 's - https://www.thingiverse.com/thing:3583021- found via youtube https://www.youtube.com/watch?v=BDBJaQmhlw0 is the closest to what I was envisioning for the extrusion driver stepper motor setup in regard of easing forces inferred by the variable bending of the bowden tube. To reduce them even more with even a shorter tube led me to the very lean setup on the x-axis mount, Where the motor itself is part of the gimbal. Since the motor axle extends only on one side, I complemented it with a printed stub in simple snap on cradle that takes advantage of the motor's socket to stay on.
Currently, the motor-gimbal is held mainly by gravity and secured with a wire or paper clip brace in mounds in the gimbal arms. Where print material bears print material in the back, I used a snip from the same beer can as bearing lining...
The gimbal has a piece that snug fit slides into the opening of the right-side x-axis mount and holds itself with a snap-on gripper. Sand slide in part slightly if it requires force to push in (and may break something). - I had thought of mounting it on the left side next to the x-axis motor, but decided otherwise because it is already crowded there and would need a much more elaborate mount (and most likely additional parts / new screws / bolts / nuts).
To be frank, the design was not necessarily for the sake of being a lean and go with re-use-only of freed up parts: the current lock down and related delayed shippings left me no choice but to be resourceful in order to pull thru in one shot! For the record, I ordered 5x11x4mm ball bearings for the gimbal and will make a re-design of the arms for a more professional setup.
Final comment: Even though marked as remix, there is not much remix left, because I finally modified the carriage plate as well... In a next version I will go for slide in / clamped glide bearings to lighten the extruder carriage even more and achieve greater closeness of extruder nuzzle and x-axis guides and even faster prints (80..100mm/s right now with good results).
Similar models
thingiverse
free
Satsana V59 for Fargo 3D Direct Drive by Troke
... at the heating block.
opened a little more the hole to reach the screw at the back of the model that goes to the mounting plate.
thingiverse
free

E3D adjustable hot-end holder by xammax
... then use m4 screws to mount the hot end and the extruder.
printed with pla (no issue, there is not much heat left on that end.
thingiverse
free
Satsana Ender 3V2 with Direct Drive Conversion by bgyen
...
parts: 4020 fan (screws for fan), 5015 blower fan (screw for fan), 1xm3 8mm screw to attach fan duct to the direct drive bracket
thingiverse
free
CR-10 E3D V6 Direct Drive by Zvir
... cable from the extruder motor
move the z axis end stop
the motor may be too warm for pla, but in my case it works fine with pla.
thingiverse
free
Sunhokey i4 z axis bearing (m8 trapezoidal) by pindemand
...rse
i made this bearing mount for the end of the z axis lead screw. much more stabil. more mods. will come.
i use 608zz bearings
thingiverse
free

Ender 3 - Direct Drive - Filament Runout by briandregeril
...screws w/t-nuts to mount to a standard 20x20 extrusion
sensor: amazon.com/dp/b07n2gqhqt
bearing: amazon.com/gp/product/b00nx23hgq
thingiverse
free
Solidoodle 3 X axis 40mm fan mount by downeym
...quired.
others have published fan mounts, but i couldn't find any that seemed to fit very well, so i just designed my own.
thingiverse
free

NEMA 17 to 40mm Fan Adapter by ChrisMagno
...r nema 17 to cool your hot motor.
i created the ducts to direct air over the the 4 sides, and away from the hot end or the print.
thingiverse
free

Ender 3 fan mount for Z stepper-motor by dadul96
...you to cover the fan so that nothing can get sucked in. i printed this fan grill cover: https://www.thingiverse.com/thing:2802474
thingiverse
free

Volcano Direct Mount for CR-10 printer by jailcee
...e so that the fan body clears the left side of the gantry. mount a 40mm fan with at least 7cfm and enjoy a much quieter printer.
Boden
design_connected
$16
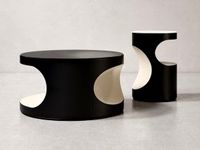
Boden Small Tables
...boden small tables
designconnected
minotti boden small tables computer generated 3d model. designed by guillaumier, gordon.
thingiverse
free

Sparschwein Boden by Chrizzlys
...ches schweinderl hätten's denn gern?
in diesem fall, eines mit boden! damit das sauer ersparte kleingeld nicht verloren geht.
3dbaza
$4
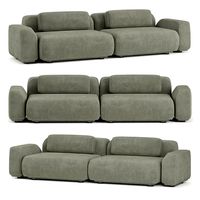
Rove Concepts Boden Sofa (319839)
...rove concepts boden sofa (319839)
3dbaza
rove concepts boden sofa 3d model
3dbaza
$4

Rove Concepts Boden Sofa Sectional (319845)
...rove concepts boden sofa sectional (319845)
3dbaza
rove concepts boden sectional sofa 3d model
thingiverse
free
Boden tube clip for CR-10 V2 by actionman247
...boden tube clip for cr-10 v2 by actionman247
thingiverse
boden tube clip for cr-10 v2
thingiverse
free

Boden Tube Holder x6 by ToxicTeaParty
...en tubes in place on the underside of an ikea lack enclosure so you can easily swap between filaments that you have in a dry box.
thingiverse
free

CR-6 Cable & Boden Support by b12pac
... m3 x 8 countersink screws and supports the ribbon cable as well as keeping the boden tube vertical where it enters the retainer.
thingiverse
free

Prusa i3 MK2 boden holder cap by Crunch3D
...or the filament and so i could use a full boden tube to the extruder.
now it only helps to stabilize the angle from the filament.
thingiverse
free
Boden and Cable guide by biga888
... guide by biga888
thingiverse
i did not want to disconnect my cables, so i cut a slot to make it easy to move cables in and out.
thingiverse
free
LYNDEN NXT Boden / base by Jakob_Corleone
....
my first version of the lynden nxt base. it is without clips yet. maybe i will add them later but for now this works just fine.
Conversion
3ddd
$1

Conversation Seat
...шетка
the conversation seat made in englandhttp://www.squintlimited.com/products/the_conversation_seat/gold
+ max 2011
3d_export
$10

Converse 3D Model
...converse 3d model
3dexport
converse shoe pc unix mac
converse 3d model electropainter17075 38067 3dexport
turbosquid
$100

converse-shoe
...quid
royalty free 3d model converse-shoe for download as c4d on turbosquid: 3d models for games, architecture, videos. (1398427)
turbosquid
$10

Conversation Furniture
... available on turbo squid, the world's leading provider of digital 3d models for visualization, films, television, and games.
turbosquid
$7

Converse Allstars
... available on turbo squid, the world's leading provider of digital 3d models for visualization, films, television, and games.
design_connected
$16

Conversation Club Chair
...conversation club chair
designconnected
donghia conversation club chair chairs computer generated 3d model. designed by n/a.
design_connected
$27

Hemicycle Conversation Chair
...rsation chair
designconnected
ligne roset hemicycle conversation chair computer generated 3d model. designed by nigro, philippe.
3d_export
$24

Converse keds 3D Model
...converse keds 3d model
3dexport
converse all star ked shoe clothes sports
converse keds 3d model vermi1ion 26201 3dexport
3ddd
$1

Converse All-Star Shoes
...converse all-star shoes
3ddd
кеды , обувь
converse all-star shoes
design_connected
$18

CONVERSE Jack Purcell Sneakers
...converse jack purcell sneakers
designconnected
converse jack purcell sneakers computer generated 3d model.