Thingiverse

A3+ Drawing Machine (EBB Driver Board) by nicomont1234
by Thingiverse
Last crawled date: 2 years, 11 months ago
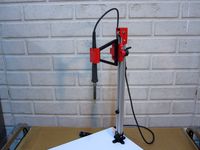
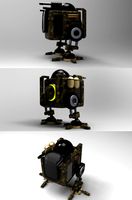
DIY A3+ Drawing Machine (using the EBB Driver Board)
This 'Drawing Machine'/ Cartesian Plotter is based on the
AxiDraw from Evil Mad Scientist and uses their EBB Driver Board to control the steppers and servo for simplicity - it's great for a first time user of plotters, like me and I find it incredibly user friendly when used with
Inkscape.
As a starting point, I used
henryarnold's files and modified them to allow the machine to be fixed to a board, strengthened in some areas (as my machine is larger) and added stepper covers to be more in keeping with a finished product. I won't be including instructions, as henryarnold provides a great PDF to follow already (and I also think that by looking at the photos and complete assembly file I've included, the construction is quite self-explanatory.
To keep the servo wire out of the way, I used a piece wire (actually taken from an RC plane push rod). One end is trapped between the servo screw and 3D print and the other end has the servo wire taped to it, to keep it suspended in the air.
Supplies:
A drawing board (to mount the machine to. I used a smooth/wipeable melamine faced furniture board) 580mm x 450mm x 18mm, QTY 1
A Spool of PETG ,QTY 1
Some PLA ,QTY 1
EiBotBoard, QTY 1
9V 1.5A AC/DC Power Supply Adapter 5.5mm x 2.1mm
Pen Holder, QTY 1
Precision Hardened Steel Smooth Rods - 8mm, 490mm, QTY 4
V-Slot Linear Rail – 20x60mm - Black Anodise, 470mm, QTY 1
M5 Low Profile Bolts - 25mm, QTY 10
M3 Cap Head Bolts - 10mm, QTY 16 (2 are used to help fix the EBB board to the x_support_cover)
M4 Button Head Bolts - 20mm, QTY 6
M4 Flat Washer, QTY 10
M5 Brass threaded heat insert, QTY 6
M4 Brass threaded heat insert, QTY 6
M3 Brass threaded heat insert, QTY 6 (2 are used to help fix the EBB board to the x_support_cover)
4mm Dia self tapping Button Head wood screw - 20mm, QTY 4 (to fix the machine to the drawing board)
GT2 Pulley 16 Teeth 5mm Bore, 2 metre length Timing Belt, QTY 1 (enough to cut into the 2 lengths needed)
LM8UU Linear Ball Bearings 8mm ID Dia, 15mm OD, 24mm length, QTY 8
MF104ZZ 4x10x4mm Metal Shielded Flange Ball Bearing, QTY 10
EleksMaker® 42HS34-1304A 1.8° Hybrid Stepper Motor 2 Phase, QTY 2 (I chose this brand of stepper because it can handle a higher current than the unbranded versions)
1M 4pin Stepper Motor Cable XH2.54 Male, QTY 2 (These will be cut down in length to suit. One end is cut off to screw into the EBB board terminal blocks)
MGN9 100mm Linear Rail Guide with MGN9H Linear Block, QTY 1
Micro Servo Tower Pro MG90S 9g, QTY 1 (I bought an official one with metal gears. It'll last longer)
Servo Extension Lead 26 AWG, 800mm, QTY 1
A few tips:
There is an opening at each end of the aluminium extrusion, even after the 3D print is bolted on - this is to hide the cables in.
Depending on what brand of threaded brass heat inserts you buy (or the outside dia), pressing them in may cause some of the thin walls of the plastic to bulge out. They will still work out in the end.
For setup, just go through the very useful
The AxiDraw User Guide
Similar models
thingiverse
free

Tormach 1100 Stepper Motor Driver Adapter by Daiuto64
...rn0a/ref=ppx_yo_dt_b_search_asin_title?ie=utf8&psc=1
m3 x 5mm x 5.3mm brass cylindrical knurled threaded insert embedded nuts
thingiverse
free

Dual Torqueboards VESC 6 Enclosure by AaronTech2
... 6's to mount to the tail of your mountain board. i used m4 bolts for the lid with brass heat thread inserts on the box side.
thingiverse
free

Dual Trampa MK4 VESC6 Hex Box by AaronTech2
...on the tail of your electric mountain board. i used m4 bolts for the lid with brass heat inserts for the threads on the box side.
thingiverse
free
Heat-Set Insert Press with Spring Return
...providing a simpler solution. a constant force spring maybe similar to what is in a tape measure. it always...
thingiverse
free

Taz 6 style Externally Accessable Y axis belt tensioner by piercet
... an adjusted endplate that will clear the tensioner bolt and washer. if you are using a more stock taz you do not need that part.
grabcad
free

M4 x 6mm threaded brass insert
...m4 x 6mm threaded brass insert
grabcad
m4 x 6mm threaded brass insert with outer diameter of 5.3mm.
grabcad
free

ESS+C25 Standoff
...ned part, however 3d printing should work well. use at your own risk, i am not responsible for injury or damage caused from use.
thingiverse
free

AM8 M4 y-tensioner with threaded insert by redleader36
...to allow for a 10mm deep m4 insert.
the tensioner block i use is from fenixprints here: https://www.thingiverse.com/thing:2781061
thingiverse
free

MP Mini Z Axis M4 Lead Screw Guide Version 1 by Light-Design
... will still slightly bend moving up and down the z-axis. i would recommend a stainless steel m4 threaded rod if that is an issue.
grabcad
free

Garmin Edge Mount
...for use with a 31.8mm handlebar. i've designed the clamp for use with a m4 bolt and heat set threaded insert for 3d printing.

Ebb
3ddd
$1
Ebb And Flow Pillar Lamp Golden Smoke
... lamp golden smoke
3ddd
ebb&flow , pillar
ebb and flow pillar lamp golden smoke
3ddd
$1

Ebb And Flow Julian Carafe Lampshade Clear
...e clear
3ddd
ebb&flow , julian carafe
ebb and flow julian carafe lampshade clear
3ddd
$1
Neo Metro Ebb Concept 55
...енне начинаете верить в то, что цвет электрического света действительно обладает правом первородства по отношению к цвету краски.
turbosquid
$22

Ebb Flow Speak Up and Glow in a Dome Table Lamp
...d glow in a dome table lamp for download as max, fbx, and obj on turbosquid: 3d models for games, architecture, videos. (1607193)
3ddd
$1

Стол и стулья
...стулья 3ddd vitra , eames , обеденный обеденный стол ebb gehl for john lewis mira 6 seater dining table...
3dfindit
free

Ebb Bench
...ebb bench
3dfind.it
catalog: leland
thingiverse
free
Ebb & Flow Kit by SAMFILI
...ebb & flow kit by samfili
thingiverse
ebb & flow kit
thingiverse
free

Ebb and Flow Screen by omarreul
...ebb and flow screen by omarreul
thingiverse
3/4 thread for ebb and flow bulkhead fitting
thingiverse
free

Ebb & Flow Fittings by mrdc04
...ebb & flow fittings by mrdc04
thingiverse
fits into hydrofarm fittings to create an ebb & flow or flood and drain.
thingiverse
free

Case for EiBotBoard (EBB) by TeeVau2
...as not satisfied with the unprotected ebb at the eggbot from evil mad scientist.
so i've created a small housing for the pcb.
A3
3ddd
$1

AUDI A3 2007
...audi a3 2007
3ddd
audi , a3
audi a3 2007
3ddd
free

Botero A3
...botero a3
3ddd
botero , masiero
современный бра botero a3. моделил по фото.
design_connected
$13

A3 Stool
...a3 stool
designconnected
gubi a3 stool computer generated 3d model. designed by lorey, paul.
3ddd
$1

Slipper Bath A3
...slipper bath a3
3ddd
toto
slipper bath a3
turbosquid
$25

AUG A3
...uid
royalty free 3d model aug a3 for download as fbx and obj on turbosquid: 3d models for games, architecture, videos. (1563951)
3d_export
$39

Samsung Galaxy A3 and A3 Duos Black 3D Model
...ellphone smartphone cellular high detailed photoreal vray hdri
samsung galaxy a3 and a3 duos black 3d model nongon 93820 3dexport
3d_export
$39

Samsung Galaxy A3 and A3 Duos White 3D Model
...ellphone smartphone cellular high detailed photoreal vray hdri
samsung galaxy a3 and a3 duos white 3d model nongon 93861 3dexport
3d_export
$39

Samsung Galaxy A3 and A3 Duos Silver 3D Model
...llphone smartphone cellular high detailed photoreal vray hdri
samsung galaxy a3 and a3 duos silver 3d model nongon 94016 3dexport
turbosquid
$39

Asteroid-A3
... available on turbo squid, the world's leading provider of digital 3d models for visualization, films, television, and games.
turbosquid
$26

Audi A3
... available on turbo squid, the world's leading provider of digital 3d models for visualization, films, television, and games.
Driver
archibase_planet
free

At-At driver
...er
archibase planet
at-at driver pilot soldier imperial army
at-at driver - 3d model (*.gsm+*.3ds) for interior 3d visualization.
3d_export
$5

screw driver
...screw driver
3dexport
small sized screw driver
3d_ocean
$5
Screw Driver
...river industrial machine mechanical screw tool
detailed model of screw driver. all materials are included. model is render ready.
archive3d
free

At-At driver 3D Model
...ilot soldier imperial army
at-at driver - 3d model (*.gsm+*.3ds) for interior 3d visualization.
turbosquid
$60

Street Drivers
...uid
royalty free 3d model street drivers for download as fbx on turbosquid: 3d models for games, architecture, videos. (1211321)
turbosquid
$25

SCREW DRIVERS
...quid
royalty free 3d model screw drivers for download as max on turbosquid: 3d models for games, architecture, videos. (1560558)
turbosquid
$15

DVD driver
...osquid
royalty free 3d model dvd driver for download as max on turbosquid: 3d models for games, architecture, videos. (1237955)
turbosquid
$2
Screw Driver
...squid
royalty free 3d model screw driver for download as max on turbosquid: 3d models for games, architecture, videos. (1208607)
turbosquid
free

Screw driver
...ree 3d model screw driver for download as blend, fbx, and obj on turbosquid: 3d models for games, architecture, videos. (1598537)
turbosquid
$118

Driver Seat
... available on turbo squid, the world's leading provider of digital 3d models for visualization, films, television, and games.
Drawing
archibase_planet
free
Drawing
...drawing
archibase planet
cooking hood kitchen furniture
drawing air - 3d model for interior 3d visualization.
3d_export
$35

house drawing
...house drawing
3dexport
house drawing
3d_export
$5
drawing of planter
...drawing of planter
3dexport
drawing of planter
turbosquid
$15
Draws
... available on turbo squid, the world's leading provider of digital 3d models for visualization, films, television, and games.
turbosquid
$15

draws
... available on turbo squid, the world's leading provider of digital 3d models for visualization, films, television, and games.
design_connected
$13
Draw Table
...draw table
designconnected
rex kralj draw table computer generated 3d model. designed by studio rex kralj.
3d_export
$22
750x1060 jaw crusher set drawing 105 CAD drawings
...750x1060 jaw crusher set drawing 105 cad drawings
3dexport
750x1060 jaw crusher set drawing (105 cad drawings)
turbosquid
$5

Table with draw
...id
royalty free 3d model table with draw for download as max on turbosquid: 3d models for games, architecture, videos. (1232200)
turbosquid
$2
Drawing Wire
...uid
royalty free 3d model drawing wire for download as blend on turbosquid: 3d models for games, architecture, videos. (1462970)
turbosquid
$1

Drawing Table
...quid
royalty free 3d model drawing table for download as 3ds on turbosquid: 3d models for games, architecture, videos. (1310235)
Board
archibase_planet
free
Board
...e planet
board information board bulletin board
board information n310813 - 3d model (*.gsm+*.3ds) for interior 3d visualization.
archibase_planet
free
Board
...board
archibase planet
board cutting board kitchen ware
board n051011 - 3d model (*.gsm+*.3ds) for interior 3d visualization.
archibase_planet
free

Board
...board
archibase planet
board blackboard school board
board school n290114 - 3d model (*.gsm+*.3ds) for interior 3d visualization.
archibase_planet
free
Board
...board
archibase planet
slate board
board - 3d model (*.gsm+*.3ds) for interior 3d visualization.
archibase_planet
free
Board
...board
archibase planet
blackboard board school furniture
board - 3d model for interior 3d visualization.
archibase_planet
free
Board
...board
archibase planet
board shelf stand
board - 3d model (*.gsm+*.3ds) for interior 3d visualization.
archibase_planet
free

Board
...board
archibase planet
kitchen ware board
board - 3d model (*.gsm+*.3ds) for interior 3d visualization.
archibase_planet
free
Board
...board
archibase planet
kitchen ware board
board n150410 - 3d model (*.gsm+*.3ds) for interior 3d visualization.
archibase_planet
free

Board
...board
archibase planet
board office supplies stationery
board - 3d model (*.gsm+*.3ds) for interior 3d visualization.
archibase_planet
free

Board
...board
archibase planet
board gym
board evminov n240613 - 3d model (*.gsm+*.3ds) for interior 3d visualization.
Machine
archibase_planet
free

Machine
...machine
archibase planet
sewing-machine sewing machine equipment
singer machine- 3d model for interior 3d visualization.
archibase_planet
free

Machine
...hine
archibase planet
percolator equipment coffee-machine
machine n230708 - 3d model (*.gsm+*.3ds) for interior 3d visualization.
archibase_planet
free
Machine
...chibase planet
percolator coffee-machine kitchen equipment
coffee machine - 3d model (*.gsm+*.3ds) for interior 3d visualization.
archibase_planet
free
Slot machine
...ase planet
slot machine slot-machine playing machine
slot machine n260311 - 3d model (*.gsm+*.3ds) for interior 3d visualization.
turbosquid
$7

Machine
...ne
turbosquid
royalty free 3d model machine for download as on turbosquid: 3d models for games, architecture, videos. (1391792)
3d_ocean
$10
War machine
...war machine
3docean
camuflage machine robot war war machine
war machine created in 3dmax 2009 15.497-poly count
turbosquid
$7

machine
...turbosquid
royalty free 3d model machine for download as obj on turbosquid: 3d models for games, architecture, videos. (1452674)
3d_ocean
$12
Weighing-machine
...weighing-machine
3docean
market shop weighing-machine
3d model weighing-machine
archibase_planet
free

Sewing machine
...ine
archibase planet
sewing machine sewing-machine
sewing machine n080311 - 3d model (*.gsm+*.3ds) for interior 3d visualization.
archibase_planet
free
Coffee machine
...se planet
coffee machine percolator coffee-machine
coffee machine n010715 - 3d model (*.gsm+*.3ds) for interior 3d visualization.