Thingiverse
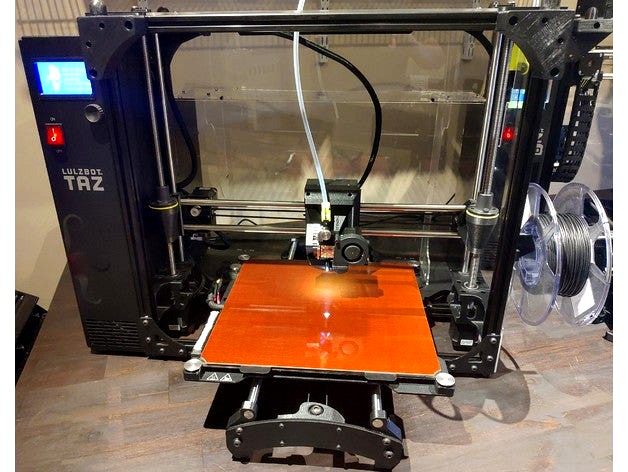
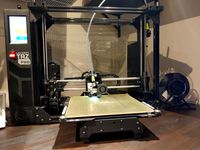
Taz 6 New Toolhead Carriage Conversion Mod - Use Toolheads from Taz Mini 2, Taz WE, and Taz Pro on your Taz 6 natively!
by Thingiverse
Last crawled date: 4 years, 2 months ago
A'hoy'hoy!
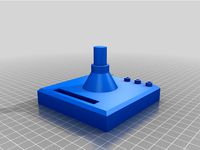
Lulzbot has changed their toolhead design to make it a much smaller and more efficient package, thanks in large part to the Titan Aero design. If you want to use any of these new toolheads on your Taz 6, you need to either A) Buy a really overpriced and somewhat (IMO) miserable carriage adapter, or B) strip the parts off, and mount them onto your own design that will fit the 6.
I've been doing quite a bit of engineering work on the Taz 6 and Taz Pro designs as of late (for example, the Taz Pro Leadscrew conversion, or my Taz 6 that uses the Archim board which is what the Taz Pro uses to give it quiet operation), and I will be adopting the new toolhead style. I don't want to keep two different types of toolheads on hand - ones that'll only work on the 6, vs ones that will work on the Pro, or on the 6 with a crummy adapter. So I figured I'd instead design new carriage mounts (X Motor & X Idler).
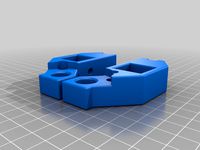
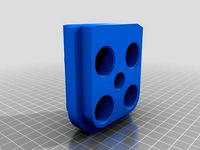
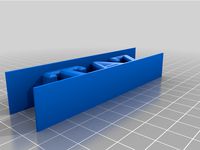
These are those.
Please note the Idler assembly uses dual 625RS bearings and a different screw - it uses the same general design as the Taz Pro but with a lead screw mount. You will also need to change the connector on your E1 harness to be the new MicroFit 3 connector, and you may need to slide your bed mount 1mm to the right (I had to offset the X-Min switch 1mm to the right to provide enough clearance that I felt comfortable it would not bind in any assembly)
IMPORTANT NOTE: The new toolheads have no "X Max" switch connected on the toolhead, and the Taz Pro and Taz Workhorse don't have an X-Max located on the chassis, either. The Taz 6 expects one on the toolhead. If you use this design, you will need to do 1 of 2 things:
Jumper the "X-MAX" plug so it's always closed
Alternatively, if you don't like jumpers, mod the firmware; in the Marlin configuration.h file, comment out "#define USE_XMAX_PLUG"
This jumper or firmware mod is 100% required or the homing sequence will abort in the middle of the sequence and start dropping the head into the 4th levelling pad, rather than sliding forward to the home button.
You will also need to slightly offset the table position by adjusting the table mount. For example, on the Taz 6, the rear assembly spacer is 110mm. For this assembly, it will need to be 116mm (6mm moved towards the rear over default). Alternatively, you can mod the firmware to change the home button position. The positional changes required are very marginal and they are required because the nozzle on the new toolhead design is slightly different than the nozzle position of the original Taz 6 heads.
You're dipping into pretty heavy duty printer mod territory by taking this on. This will completely void your warranty. If you want a 100% conversion, you're going to have to change the electrical connector that terminates the end of the harness as well. All of this is something that you should only undertake if you know what you're doing. Also note, this mod will make it so that you cannot use any of the 'old' design toolheads - the toolheads that are compatible with this are the Titan Aero designs only. The single extruder v2.1 design, for example - no chance. It appears however that you may be able to use the Dual Extruder v3 on the "new" carriage design, though I'm not too sure of the specifics - the Taz Workhorse repository has a conversion plate so that owners of a Taz Workhorse can upgrade to use the Dual Extruder, but I've not tested the fit.
Use this at your own risk. I've included a version with a mount space for the Z-Max (per the original Taz 6 design), and a version without the Z-Max switch mount (in case you want to use my other thingiverse mod that adds Z-Max switches to the Z-Upper, like the Taz Pro, which is what I'll be doing). If you chose the version with the Z-Max switch mounted on the motor mount (rather than the modded uppers) than the switch mounts opposite to the way it did on the Taz 6 - instead of mounting on the back, it mounts on the front - and you run the connecting wires through the pass-thru hole. I won't be using that design, so how it fairs overall is unknown.
For the balance of the carriage parts that are required to complete this (eg, everything in this bundle not prefixed "Taz 6 Slim") are not my design - I've simply included the Carriage design files from Lulzbot's Workhorse Edition repository. These Are provided for convenience, and given the scope of license from Lulzbot, I am able to redistribute - but I am not taking credit for any of Lulzbot's design parts. For more information about Lulzbot or to access their repo, visit http://www.lulzbot.com, http://ohai.lulzbot.com, and http://download.lulzbot.com
Finally - I believe this should increase your Z print volume by a small amount, to the tune of maybe ~11mm, and the bushing design used on this (from the Taz Pro) should provide significantly less drag on the bars from warped/squeezed IGUS bushings! That should hopefully translate to more accurate, cleaner prints, with cooler running motors.
Cheers!
Lulzbot has changed their toolhead design to make it a much smaller and more efficient package, thanks in large part to the Titan Aero design. If you want to use any of these new toolheads on your Taz 6, you need to either A) Buy a really overpriced and somewhat (IMO) miserable carriage adapter, or B) strip the parts off, and mount them onto your own design that will fit the 6.
I've been doing quite a bit of engineering work on the Taz 6 and Taz Pro designs as of late (for example, the Taz Pro Leadscrew conversion, or my Taz 6 that uses the Archim board which is what the Taz Pro uses to give it quiet operation), and I will be adopting the new toolhead style. I don't want to keep two different types of toolheads on hand - ones that'll only work on the 6, vs ones that will work on the Pro, or on the 6 with a crummy adapter. So I figured I'd instead design new carriage mounts (X Motor & X Idler).
These are those.
Please note the Idler assembly uses dual 625RS bearings and a different screw - it uses the same general design as the Taz Pro but with a lead screw mount. You will also need to change the connector on your E1 harness to be the new MicroFit 3 connector, and you may need to slide your bed mount 1mm to the right (I had to offset the X-Min switch 1mm to the right to provide enough clearance that I felt comfortable it would not bind in any assembly)
IMPORTANT NOTE: The new toolheads have no "X Max" switch connected on the toolhead, and the Taz Pro and Taz Workhorse don't have an X-Max located on the chassis, either. The Taz 6 expects one on the toolhead. If you use this design, you will need to do 1 of 2 things:
Jumper the "X-MAX" plug so it's always closed
Alternatively, if you don't like jumpers, mod the firmware; in the Marlin configuration.h file, comment out "#define USE_XMAX_PLUG"
This jumper or firmware mod is 100% required or the homing sequence will abort in the middle of the sequence and start dropping the head into the 4th levelling pad, rather than sliding forward to the home button.
You will also need to slightly offset the table position by adjusting the table mount. For example, on the Taz 6, the rear assembly spacer is 110mm. For this assembly, it will need to be 116mm (6mm moved towards the rear over default). Alternatively, you can mod the firmware to change the home button position. The positional changes required are very marginal and they are required because the nozzle on the new toolhead design is slightly different than the nozzle position of the original Taz 6 heads.
You're dipping into pretty heavy duty printer mod territory by taking this on. This will completely void your warranty. If you want a 100% conversion, you're going to have to change the electrical connector that terminates the end of the harness as well. All of this is something that you should only undertake if you know what you're doing. Also note, this mod will make it so that you cannot use any of the 'old' design toolheads - the toolheads that are compatible with this are the Titan Aero designs only. The single extruder v2.1 design, for example - no chance. It appears however that you may be able to use the Dual Extruder v3 on the "new" carriage design, though I'm not too sure of the specifics - the Taz Workhorse repository has a conversion plate so that owners of a Taz Workhorse can upgrade to use the Dual Extruder, but I've not tested the fit.
Use this at your own risk. I've included a version with a mount space for the Z-Max (per the original Taz 6 design), and a version without the Z-Max switch mount (in case you want to use my other thingiverse mod that adds Z-Max switches to the Z-Upper, like the Taz Pro, which is what I'll be doing). If you chose the version with the Z-Max switch mounted on the motor mount (rather than the modded uppers) than the switch mounts opposite to the way it did on the Taz 6 - instead of mounting on the back, it mounts on the front - and you run the connecting wires through the pass-thru hole. I won't be using that design, so how it fairs overall is unknown.
For the balance of the carriage parts that are required to complete this (eg, everything in this bundle not prefixed "Taz 6 Slim") are not my design - I've simply included the Carriage design files from Lulzbot's Workhorse Edition repository. These Are provided for convenience, and given the scope of license from Lulzbot, I am able to redistribute - but I am not taking credit for any of Lulzbot's design parts. For more information about Lulzbot or to access their repo, visit http://www.lulzbot.com, http://ohai.lulzbot.com, and http://download.lulzbot.com
Finally - I believe this should increase your Z print volume by a small amount, to the tune of maybe ~11mm, and the bushing design used on this (from the Taz Pro) should provide significantly less drag on the bars from warped/squeezed IGUS bushings! That should hopefully translate to more accurate, cleaner prints, with cooler running motors.
Cheers!
Similar models
thingiverse
free

Taz 6 Workhorse Low Profile X Carriage Cover by magdong
... voids warranty, standard disclaimers.
print in abs with the same settings as the lulzbot workhorse carriage cover gcode.
cheers,
thingiverse
free

E3D Titan Aero Standard Toolhead for LulzBot TAZ by ITWorks
...the duct tip for use with the 3mm titan aero
"duct_tip_2_1.75mm.stl" is the duct tip for use with the 1.75mm titan aero
thingiverse
free
Taz Pro Lead Screw Design Conversion
...se, but this is all at your own risk and i don't provide any support for this.
hope this helps someone.
use at your own risk.
thingiverse
free

Hemera Mount Bracket for Modern Lulzbot Carraige (Pro, Workhorse, Mini 2)
...back plate, inspired by the one that e3d provided (4008893).
feel free to use; use at your own risk; not for commercial purposes.
thingiverse
free

Custom Taz X Ends and X Carriage based off Lulzbot Mini by TechsavvyCNC
...ount can be downloaded from the lulzbot website: http://devel.lulzbot.com/easy_taz_mini/daffodil/production_parts/printed_parts/
thingiverse
free

Wilson ii X carriage utilizing Lulzbot Taz toolhead by wilson5710
...lson ii but attached to the x-carriage of a lulzbot. i also created nut locations to replace the brass inserts that lulzbot uses.
thingiverse
free

Taz 6 Mod - Add Z-Max switches to Z-Uppers to implement self-levelling gantry
...dstop_harness.pdf
this design is implemented and performed at your own risk, is not supported, and voids your warranty.
have fun!
thingiverse
free

Lulzbot toolhead latch by paulybot
...dev site here and mounted them on the wall. http://devel.lulzbot.com/taz/nutmeg/production_parts/printed_parts/x_carriage_guide/
thingiverse
free

E3D Titan Aero "Mirror" Toolhead for LulzBot Taz by ITWorks
...a list of the items you need to built your own, visit our site https://itworks3d.com/product/lulzbot-taz-e3d-titan-aero-toolhead/
thingiverse
free
Taz Pro 12mm Smooth Rod Y-Axis Upgrade - See WARNING!
...s your warranty, and could damage the machine if not done properly. you have been warned! this is done entirely at your own risk.
Toolhead
thingiverse
free

FLUX TOOLHEAD by yaoalen
...flux toolhead by yaoalen
thingiverse
you can put toolhead hear
thingiverse
free
RL550B toolhead by xxbombamanxx
...rl550b toolhead by xxbombamanxx
thingiverse
toolhead for dillon rl 550 b.
thingiverse
free

Olmec Toolhead by 3DPrinthings
...erse
olmec toolhead holds small tools like screwdrivers and hex keys ...
printed with matteforge filament (www.3dprinthings.eu).
thingiverse
free
Dillon 550 Toolhead Stand by RPR308
...dillon 550 toolhead stand by rpr308
thingiverse
toolhead stand for dillon 550
thingiverse
free

FLUX Toolheads BOX by wyp8711
...8711
thingiverse
flux delta+ toolheads box
※uploaded files are optimized
flux tools box:http://www.thingiverse.com/thing:2282697
thingiverse
free
Simple and Double Dillon XL 650 Toolhead stand
...ble stand for dillon xl 650 toolhead.
simple toolhead stand is 100mm x 120mm x 30mm
double toolhead stand is 200mm x 120mm x 30mm
thingiverse
free

Snapmaker 2 Toolhead Holder by gatonero
...r snapmaker 2. i designed it in freecad. it works with snapmaker 2.0 quick tool changer https://www.thingiverse.com/thing:4700986
thingiverse
free
Lulzbot TAZ 5 Sharpie/Pen Toolhead by wrvn97
...lulzbot taz 5 sharpie/pen toolhead by wrvn97
thingiverse
toolhead for holding writing utensils on a taz 5.
thingiverse
free

Creality E3D V6 Toolhead
...ns are compatable with bltouch.
to be honest i made this a while ago so i'm not entirely sure whats required on installation.
thingiverse
free

Snapmaker 2.0 ToolHead holder by JH1616
...ng downwards. wich leads to laser lense are not getting dirty / dusty. and you can leave the filament in when changing toolheads.
Toolheads
thingiverse
free
FLUX TOOLHEAD by yaoalen
...flux toolhead by yaoalen
thingiverse
you can put toolhead hear
thingiverse
free
RL550B toolhead by xxbombamanxx
...rl550b toolhead by xxbombamanxx
thingiverse
toolhead for dillon rl 550 b.
thingiverse
free
Olmec Toolhead by 3DPrinthings
...erse
olmec toolhead holds small tools like screwdrivers and hex keys ...
printed with matteforge filament (www.3dprinthings.eu).
thingiverse
free
Dillon 550 Toolhead Stand by RPR308
...dillon 550 toolhead stand by rpr308
thingiverse
toolhead stand for dillon 550
thingiverse
free
FLUX Toolheads BOX by wyp8711
...8711
thingiverse
flux delta+ toolheads box
※uploaded files are optimized
flux tools box:http://www.thingiverse.com/thing:2282697
thingiverse
free
Simple and Double Dillon XL 650 Toolhead stand
...ble stand for dillon xl 650 toolhead.
simple toolhead stand is 100mm x 120mm x 30mm
double toolhead stand is 200mm x 120mm x 30mm
thingiverse
free
Snapmaker 2 Toolhead Holder by gatonero
...r snapmaker 2. i designed it in freecad. it works with snapmaker 2.0 quick tool changer https://www.thingiverse.com/thing:4700986
thingiverse
free
Lulzbot TAZ 5 Sharpie/Pen Toolhead by wrvn97
...lulzbot taz 5 sharpie/pen toolhead by wrvn97
thingiverse
toolhead for holding writing utensils on a taz 5.
thingiverse
free
Creality E3D V6 Toolhead
...ns are compatable with bltouch.
to be honest i made this a while ago so i'm not entirely sure whats required on installation.
thingiverse
free
Snapmaker 2.0 ToolHead holder by JH1616
...holder by jh1616 thingiverse universal toolheadholder for snapmaker a350 toolheads it works well together with the "snapmaker 2 quick...
Taz
3d_ocean
$19

TAZ RIGGED
...ax version only texture is used only for wb logo, taz dont need texture no special render engine needed, just unzip and render...
3d_export
$5

Taz character 3D Model
...taz character 3d model
3dexport
taz toon character cartoon
taz character 3d model supercigale 22095 3dexport
cg_studio
$10

Taz 3D3d model
...taz 3d3d model
cgstudio
.3ds .max - taz 3d 3d model, royalty free license available, instant download after purchase.
cg_studio
$15

Taz Rigged3d model
...ged3d model
cgstudio
.3ds .fbx .max .obj - taz rigged 3d model, royalty free license available, instant download after purchase.
3d_export
$10

Taz Toy Calendar 3D Model
... 3d model
3dexport
taz toy calendar day month year looney tunes cartoon kid child
taz toy calendar 3d model nkfrds 49687 3dexport
3d_export
$10

Taz Tasmanian Devil RIGGED 3D Model
...y tunes anime bunny rigged material fantasy creature diable dessin
taz tasmanian devil rigged 3d model supercigale 28390 3dexport
3d_export
$19
Thylacine 3D Model
...animalia chordata mammalia marsupial dog extinct animals tiger tassie taz thylacine 3d model poly3dmodels 90790...
3d_export
$12

Bowl Decorated 3D Model
...bowl decorated 3d model 3dexport bowl tazn elements ceramics kitchen plastic cup container decorative cake biscuits...
3ddd
$1

Crate & Barrel Serveware
...crate & barrel поднос -http://www.crateandbarrel.com/feast-platter/s186961 набор ножей для сыра -http://www.crateandbarrel.com/tazcheese-knife-3-piece-set/s681377 бокал...
thingiverse
free
TAZ by Taz8373
...taz by taz8373
thingiverse
my 1st print
Carriage
archibase_planet
free

Carriage
...arriage
archibase planet
perambulator baby carriage pram
carriage n250908 - 3d model (*.gsm+*.3ds) for interior 3d visualization.
3d_export
free

carriage
...carriage
3dexport
old fashion carriage model, more files here:
3d_export
free

carriage
...carriage
3dexport
game cart
3d_ocean
$15

Barrel Carriage
...ieval oak old transport wheels wine wood
this model contains a barrel and a carriage. it is a medieval type of wood oak carriage.
3d_export
$5

Medieval carriage
...medieval carriage
3dexport
medieval carriage in fairy style
turbosquid
$89

Carriage
... available on turbo squid, the world's leading provider of digital 3d models for visualization, films, television, and games.
turbosquid
free
carriage
... available on turbo squid, the world's leading provider of digital 3d models for visualization, films, television, and games.
3d_export
$65

carriage
...carriage
3dexport
simple rendering of the scene file
3d_export
$65
carriage
...carriage
3dexport
simple rendering of the scene file
3d_export
$65

carriage
...carriage
3dexport
simple rendering of the scene file
Conversion
3ddd
$1

Conversation Seat
...шетка
the conversation seat made in englandhttp://www.squintlimited.com/products/the_conversation_seat/gold
+ max 2011
3d_export
$10

Converse 3D Model
...converse 3d model
3dexport
converse shoe pc unix mac
converse 3d model electropainter17075 38067 3dexport
turbosquid
$100

converse-shoe
...quid
royalty free 3d model converse-shoe for download as c4d on turbosquid: 3d models for games, architecture, videos. (1398427)
turbosquid
$10

Conversation Furniture
... available on turbo squid, the world's leading provider of digital 3d models for visualization, films, television, and games.
turbosquid
$7

Converse Allstars
... available on turbo squid, the world's leading provider of digital 3d models for visualization, films, television, and games.
design_connected
$16

Conversation Club Chair
...conversation club chair
designconnected
donghia conversation club chair chairs computer generated 3d model. designed by n/a.
design_connected
$27

Hemicycle Conversation Chair
...rsation chair
designconnected
ligne roset hemicycle conversation chair computer generated 3d model. designed by nigro, philippe.
3d_export
$24

Converse keds 3D Model
...converse keds 3d model
3dexport
converse all star ked shoe clothes sports
converse keds 3d model vermi1ion 26201 3dexport
3ddd
$1

Converse All-Star Shoes
...converse all-star shoes
3ddd
кеды , обувь
converse all-star shoes
design_connected
$18

CONVERSE Jack Purcell Sneakers
...converse jack purcell sneakers
designconnected
converse jack purcell sneakers computer generated 3d model.
Mod
design_connected
$13

MOD. 4233 - MOD. 4234 Table Lamp
...mod. 4233 - mod. 4234 table lamp
designconnected
arcahorn mod. 4233 - mod. 4234 table lamp computer generated 3d model.
design_connected
$11

MOD.1095
...mod.1095
designconnected
mod.1095 computer generated 3d model. designed by sarfatti, gino.
3ddd
$1

fireplaces mod Spec
...fireplaces mod spec
3ddd
камин
fireplaces mod spec 180x90x125h
3ddd
free

Flos Mod. 2129
... mod
фабрика: flos
модель: mod. 2129
описание: подвесной светильник, металл, белый, черный.
сайт: www.flos.com
turbosquid
$32

MOD A 001
... available on turbo squid, the world's leading provider of digital 3d models for visualization, films, television, and games.
turbosquid
$15

Mod 70..
... available on turbo squid, the world's leading provider of digital 3d models for visualization, films, television, and games.
turbosquid
$10

MOD Sofa
... available on turbo squid, the world's leading provider of digital 3d models for visualization, films, television, and games.
turbosquid
$1
pc mod
... available on turbo squid, the world's leading provider of digital 3d models for visualization, films, television, and games.
turbosquid
$1

Mod-Lite
... available on turbo squid, the world's leading provider of digital 3d models for visualization, films, television, and games.
turbosquid
free
Robot Mod
... available on turbo squid, the world's leading provider of digital 3d models for visualization, films, television, and games.
Natively
3d_export
$5

christmas nativity scene
...christmas nativity scene
3dexport
christmas nativity scene with flat figures, table and everything in the picture
3d_ocean
$19
Native American Clothes
...ale, female, girl and kid. there is file (obj, max, 3ds and max) with all model inside and one model per file. create with 3ds...
3ddd
$1
Native shell decor
...статуэтка , ракушка , ожерелье
декор из ракушек
design_connected
$13

NATIVE UNION Retro Pop Phone
...native union retro pop phone
designconnected
native union retro pop phone computer generated 3d model.
3d_export
$14

native american headband
...;- normal<br>- roughness<br>2048x2048 png texture<br>672 poly<br>676 vert<br>in subdivision level 0
3d_export
$15

native american tomahawk game ready
...n, roughness, albedo, heigh, metallic<br>if you have any questions or suggestions, please write to me, i think we can agree
3d_export
$7

cartoon native american indian canoe
...ncluded in the .blend file. the model is clean and alone in the other provided files, centred at origin and has real-world scale.
3d_export
$9

low poly cartoon native indian woman
...cluded in the .blend file. the model is clean and alone in the other provided files, centered at origin and has real-world scale.
3d_export
$10

photorealistic living room in native blend file
...ill find two zip file which contains textures and blend file for download, by the way textures are already packed in .blend file.
turbosquid
$15

24 Inch Rim with Tire and Grasshopper Pattern - A mix of NURBs and Polygonal data - Native Alias Model
... - native alias model for download as max, obj, fbx, and wire on turbosquid: 3d models for games, architecture, videos. (1388290)
Mini
3d_ocean
$39

Mini Cooper
...mini cooper
3docean
cabrioler cooper mini
mini cooper cabrioler
3d_export
$30

Mini lathe
...mini lathe
3dexport
mini lathe
3d_export
$5

mini mouse
...mini mouse
3dexport
mini mouse
3d_export
$5

mini house
...mini house
3dexport
mini house
3d_export
free

Mini Mecha
...mini mecha
3dexport
concept of mini mecha
3d_ocean
$20

Mini Gun
...mini gun
3docean
gatling gun gun machine gun mini gun weapon
model of a mini gatling gun.
3ddd
free

Herve mini
... кофейный , herve
http://www.mobiliavenanti.it/ru/products/hervè-mini
3d_export
$5

mini wall
...mini wall
3dexport
mini wall for living room
3d_export
$5

mini bank
...mini bank
3dexport
mini bank 3d model
3ddd
$1
LEGO Star Wars Mini AT-AT and Mini-AT-TE
... star wars , конструктор
набор lego star wars mini at-at and mini-at-te.
Pro
turbosquid
$29

Pro
...ree 3d model mac pro for download as obj, c4d, fbx, and blend on turbosquid: 3d models for games, architecture, videos. (1505782)
3d_export
$5

iphone 13 pro max and pro
...3 pro max and 13 pro the model is made in four colors (graphite, gold, silver, and blue), all of which are attached in the files.
3d_export
free

sapphire pro
...sapphire pro
3dexport
sapphire pro 3d printer head mask
3d_export
$4

macbook pro
...macbook pro
3dexport
macbook pro 13" inch 2020 years model
3ddd
free

GentleLase Pro
... syneron , candela
gentlelase pro аппарат для лазерной эпиляции
turbosquid
$5

Alien pro
...osquid
royalty free 3d model alien pro for download as blend on turbosquid: 3d models for games, architecture, videos. (1678446)
turbosquid
$5

iphone11 pro
...uid
royalty free 3d model iphone11 pro for download as blend on turbosquid: 3d models for games, architecture, videos. (1562707)
3ddd
$1

Mac Pro (appel)
...mac pro (appel)
3ddd
компьютер , apple
mac pro
3ddd
$1
Aviation PRO
... aviation
http://www.oligo.de/en/products/system-luminaires/prod/st-aviation-pro-1.html
turbosquid
$20

Airpods pro
...free 3d model airpods pro for download as blend, fbx, and obj on turbosquid: 3d models for games, architecture, videos. (1659836)
6
3d_export
$18

tulip 6
...tulip 6
3dexport
tulip 6
3d_export
$5
hinge 6
...hinge 6
3dexport
hinge 6
3ddd
$1
MASIERO / FLASHWOOD STL 6 + 6
...6
3ddd
masiero
торшер flashwood stl 6 + 6 фабрики masiero
http://www.masierogroup.com/c87_697/it/flashwood%20stl%206%20+%206.ashx
turbosquid
$39
A-6
... available on turbo squid, the world's leading provider of digital 3d models for visualization, films, television, and games.
3ddd
$1
6 ковров
...6 ковров
3ddd
ковры , ковер
6 ковров
3ddd
free

IPhone 6
... 6
3ddd
apple , iphone , телефон
apple iphone 6
3ddd
$1

Люстра Masiero classica 6145 6+6
... masiero classica 6145 6+6
3ddd
masiero
люстра - masiero
каталог -сlassica
артикул - 6145 6+6
диаметр - 1300 мм
высота - 600 мм
3ddd
$1

Pillows #6
...pillows #6
3ddd
подушка
pillows #6
3ds max 2011, fbx + textures
3d_ocean
$15

iPhone 6 & 6 Plus
...ew apple’s iphone 6 and iphone 6 plus in all 3 color variations! in this pack you will find 6 extremely detailed models of app...
3d_ocean
$15

iPhone 6
...iphone 6
3docean
3d model iphone iphone phone technics
new iphone 6
New
3d_export
$5

New-feather
...new-feather
3dexport
new-feather
3d_export
$6

new style
...new style
3dexport
new style room
3ddd
free
New Items
...ew items
3ddd
new items , барный
барный стул от китайского производителя фирмы new items
3d_export
$6

Logo new
...logo new
3dexport
new american style logo
3d_export
$10
New jersey
...new jersey
3dexport
new jersey stp and stl format
design_connected
$20
New Deal
...new deal
designconnected
new deal computer generated 3d model.
3d_ocean
$15
New bed
... for this bed all this file format include in zip file 3ds,obj,max,zip file change material and re-size very easy very for render
3ddd
free
Sofa-New Classic
...sofa-new classic
3ddd
new classic
sofa,new classic
design_connected
$13
New Antiques
...new antiques
designconnected
cappellini new antiques computer generated 3d model. designed by wanders, marcel.
design_connected
$18

New York
...new york
designconnected
saba italia new york computer generated 3d model. designed by bicego, sergio.
2
design_connected
$11

No 2
...no 2
designconnected
sibast no 2 computer generated 3d model. designed by sibast, helge.
turbosquid
$99

Smilodon 2 Pose 2
... available on turbo squid, the world's leading provider of digital 3d models for visualization, films, television, and games.
turbosquid
$20

Barrel Barricade 2-2
... available on turbo squid, the world's leading provider of digital 3d models for visualization, films, television, and games.
3ddd
$1

Кровать, 2 тумбочки, 2 светильника
...кровать, 2 тумбочки, 2 светильника
3ddd
кровать, 2 тумбочки, 2 светильника
нормальное качество
формат 3ds max
без текстур
3ddd
free

Кровать, 2 тумбочки, 2 светильника
...кровать, 2 тумбочки, 2 светильника
3ddd
кровать, 2 тумбочки, 2 светильника
нормальное качество
формат 3ds max
без текстур
design_connected
$27
Confluences 2 2-Seater Sofa
... 2-seater sofa
designconnected
ligne roset confluences 2 2-seater sofa computer generated 3d model. designed by nigro, philippe.
3d_export
$17

Beard RealTime 2 Version 2
...beard realtime 2 version 2
3dexport
beard realtime low poly 2 version 2. hope you like it! thank you very much!
3ddd
$1
ALPEREN-2
...alperen-2
3ddd
комод , alperen-2
комод с зеркалом alperen-2
3d_export
$5
hinge 2
...hinge 2
3dexport
hinge 2
3ddd
$1
витраж№2
...витраж№2
3ddd
витраж№2 :-)
Use
3ddd
$1

US flag
...us flag
3ddd
флаг
us flag
3d_export
free

Among us
...among us
3dexport
among us red
3d_export
free

Among Us
...character from the game "among us". it can be use as a toy or...
3d_export
$6

among us
...among us
3dexport
doll from among us in red
3d_export
$5

amoung us
...amoung us
3dexport
amoung us character. was created by cinema 4d 19
3d_export
$5
Humvee us
...humvee us
3dexport
humvee us 3d model good quality for animation
3d_export
$15

among us
...among us 3dexport turbosmooth modifier can be use to increase mesh resolution if...
3d_export
$25

mailbox us
...mailbox us
3dexport
low poly model mailbox us. modeling in the blender, texturing in substance painter
design_connected
$13
Use Me
...use me
designconnected
sitland use me computer generated 3d model. designed by paolo scagnellato.
3d_export
$5

Among Us
...rt
the among us model comes in a variety of colors that can be customized by anyone, and even works with little in the animation