Thingiverse

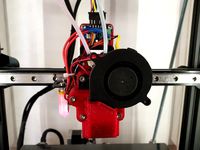
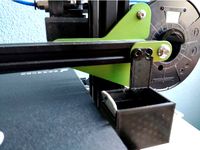
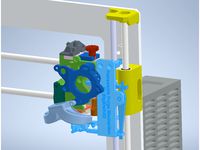
Prusa MK3S MMU2S purge bucket _NEW version by Forfelet
by Thingiverse
Last crawled date: 3 years, 3 months ago
It's a remix from my original design.
I redesigned the holder to match with my new X axis (https://www.thingiverse.com/thing:3670659)
Now, this purge bucket can be installed on all X axis versions (stock, Bear, ...)
Z-axis top right should be replace for that. STL is available (directly remixed from Prusa website).
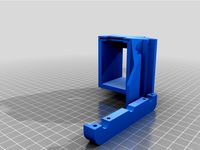
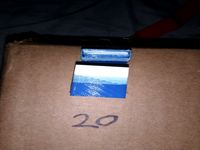
To print correctly (PETG 0.2mm 20% grid), please print these parts according to the last picture. Don't print the Holder lying flat.
Holder : supports everywhere
Spacer: supports from build plate only
Trigger: no supports
Bucket: supports from build plate only
Materials needed:
1 screw M3x20 for trigger, but you can use the trigger without screw with stock extruder (not tested on others)
1 screw M3x4
1 rubber band or a spring 20.6x5.1. I advise you the spring.
Please follow this instruction list: (also available in Files with pictures)
HARDWARE PART :
Add screw on the trigger (according to the trigger used)
Add rubber band (or spring) between holder and spacer
Add screw on the spacer to hold the bucket (need adjustment after the installation)
Remove Z-axis top right
Remove rod 8mm
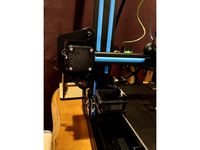
Install holder with spacer and trigger
Put the rod 8mm (be careful with bearing)
Replace Z-axis top right by the new part
Check rotation if it's free. It's NOK, check that all supports on holder are removed. (I know, it's not easy...)
Adjust position of the bucket and the screw on the trigger
Perform a Calibration Z.
It's finished for the Hardware part!
SOFTWARE PART:
In PrusaSlicer,
go to "Print Settings" and uncheck "Wipe tower"
go to "Printer Settings" and copy/paste this script in the tool change section:
; toolchange from [current_extruder] to [next_extruder], layer [layer_num]
{if current_extruder != next_extruder}
;before tool change
M106 S0 ;turn off fan
G92 E0 ;turn off retraction
G1 E-0.8 F2100 ;retract
G1 Y100 F12000 ;break filament before lifting
G1 X200 F12000 ;move head to position
; G91;change in relative position
{if layer_z < 25.0}
G1 Z26; z-lift if lower than 25 mm
{endif}
G90;transition to absolute position
G4 S0 ;clean up buffer movement
G1 X240 F12000 ;move head to purge area
G1 X250 F2000
G1 X254 F1000 ;extend the buscket
;end of pre-tool change gcode
; Start cleaning the filament before extraction
M220 B ; turn aux v1.0.5
M220 S100 ; change of loading tool
;(Replace tip shaping section if doing Vintagepc tip shaping)
;*Begin PLA Tip shaping*****
G1 E0.7644 F3639
G1 E0.8248 F3926
G1 E0.8483 F8483
G1 E-15.000 F6000
G1 E-24.500 F1200
G1 E-7.000 F600
G1 E-3.500 F360
{if layer_num < 1}
M104 S[first_layertemperature[nextextruder]] ; toolchange set the extruder temperature - first layer
{else}
M104 S[temperature[next_extruder]] ; toolchange set the extruder temperature - other layers
{endif}
G1 E20.000 F488
G1 E-20.000 F326
G1 E-35.000 F2000
G4 S0
;*End PLA Tip shaping*****
;---------------;
T[next_extruder] ;tool change
;start the purge after changing the tool
M107 ;turn off fan
G92 E0 ;reset the position of the extrusion
G1 E12 F400 ;filament support
G1 E50 F700 ;acceleration for nozzle loading
G1 E43 F150;nozzle purge,3
G1 E6 F180;nozzle purge E66 F200
G1 E11 F200;nozzle purge
G1 E10 F250;nozzle purge
G1 E10 F280;nozzle purge
G1 E3.0000 F300
G1 E3.0000 F350; retract 20mm at a speed of 110
M106 S255 ;turn on fan
G4 S2 ;cool the filament
G92 E0 ;reset the position of the extrusion
{if layer_num > 0}
G1 E-[retract_lengthtoolchange[next_extruder]] F1500 ;retract to avoid seepage
{else}
; no retraction on first toolchange
{endif}
{if layer_z > .25}
M106 S51
{endif}
G1 X240 F5000 ;bucket go back home
G1 X200 F12000 ;bucket go back home
M220 R ; restore speed
;end of tool purge gcode
{else}
; no extruder change
{endif}
It's finished for the Software part and this installation !
Slice and test !
I redesigned the holder to match with my new X axis (https://www.thingiverse.com/thing:3670659)
Now, this purge bucket can be installed on all X axis versions (stock, Bear, ...)
Z-axis top right should be replace for that. STL is available (directly remixed from Prusa website).
To print correctly (PETG 0.2mm 20% grid), please print these parts according to the last picture. Don't print the Holder lying flat.
Holder : supports everywhere
Spacer: supports from build plate only
Trigger: no supports
Bucket: supports from build plate only
Materials needed:
1 screw M3x20 for trigger, but you can use the trigger without screw with stock extruder (not tested on others)
1 screw M3x4
1 rubber band or a spring 20.6x5.1. I advise you the spring.
Please follow this instruction list: (also available in Files with pictures)
HARDWARE PART :
Add screw on the trigger (according to the trigger used)
Add rubber band (or spring) between holder and spacer
Add screw on the spacer to hold the bucket (need adjustment after the installation)
Remove Z-axis top right
Remove rod 8mm
Install holder with spacer and trigger
Put the rod 8mm (be careful with bearing)
Replace Z-axis top right by the new part
Check rotation if it's free. It's NOK, check that all supports on holder are removed. (I know, it's not easy...)
Adjust position of the bucket and the screw on the trigger
Perform a Calibration Z.
It's finished for the Hardware part!
SOFTWARE PART:
In PrusaSlicer,
go to "Print Settings" and uncheck "Wipe tower"
go to "Printer Settings" and copy/paste this script in the tool change section:
; toolchange from [current_extruder] to [next_extruder], layer [layer_num]
{if current_extruder != next_extruder}
;before tool change
M106 S0 ;turn off fan
G92 E0 ;turn off retraction
G1 E-0.8 F2100 ;retract
G1 Y100 F12000 ;break filament before lifting
G1 X200 F12000 ;move head to position
; G91;change in relative position
{if layer_z < 25.0}
G1 Z26; z-lift if lower than 25 mm
{endif}
G90;transition to absolute position
G4 S0 ;clean up buffer movement
G1 X240 F12000 ;move head to purge area
G1 X250 F2000
G1 X254 F1000 ;extend the buscket
;end of pre-tool change gcode
; Start cleaning the filament before extraction
M220 B ; turn aux v1.0.5
M220 S100 ; change of loading tool
;(Replace tip shaping section if doing Vintagepc tip shaping)
;*Begin PLA Tip shaping*****
G1 E0.7644 F3639
G1 E0.8248 F3926
G1 E0.8483 F8483
G1 E-15.000 F6000
G1 E-24.500 F1200
G1 E-7.000 F600
G1 E-3.500 F360
{if layer_num < 1}
M104 S[first_layertemperature[nextextruder]] ; toolchange set the extruder temperature - first layer
{else}
M104 S[temperature[next_extruder]] ; toolchange set the extruder temperature - other layers
{endif}
G1 E20.000 F488
G1 E-20.000 F326
G1 E-35.000 F2000
G4 S0
;*End PLA Tip shaping*****
;---------------;
T[next_extruder] ;tool change
;start the purge after changing the tool
M107 ;turn off fan
G92 E0 ;reset the position of the extrusion
G1 E12 F400 ;filament support
G1 E50 F700 ;acceleration for nozzle loading
G1 E43 F150;nozzle purge,3
G1 E6 F180;nozzle purge E66 F200
G1 E11 F200;nozzle purge
G1 E10 F250;nozzle purge
G1 E10 F280;nozzle purge
G1 E3.0000 F300
G1 E3.0000 F350; retract 20mm at a speed of 110
M106 S255 ;turn on fan
G4 S2 ;cool the filament
G92 E0 ;reset the position of the extrusion
{if layer_num > 0}
G1 E-[retract_lengthtoolchange[next_extruder]] F1500 ;retract to avoid seepage
{else}
; no retraction on first toolchange
{endif}
{if layer_z > .25}
M106 S51
{endif}
G1 X240 F5000 ;bucket go back home
G1 X200 F12000 ;bucket go back home
M220 R ; restore speed
;end of tool purge gcode
{else}
; no extruder change
{endif}
It's finished for the Software part and this installation !
Slice and test !
Similar models
thingiverse
free
A20M A10M BigMac MKII 5015 Blower
...
g1 e70 f3000
g92 e0
g1 e30 f200
g92 e0
g4 s3
g0 f10000
; end extruder 2
g92 e0
g1 e-5 f6000
g1 x-10.5 f8000
g1 e-70 f3000
g92 e0
thingiverse
free
SVO2 Purge Bucket and GCODE by RedSquirrelHobbies
... positioning on
g1 z-1 f1000 ; lower nozzle by 1mm
g90 ; absolute positioning on
m400 ; wait for finish
thingiverse
free
Geeetech A10t Purge Bucket with removable bucket by 123TaDa
...ipe
g0 x0 f2000 ; return
m211 s1 ; turn on soft stops once more
g1 e-0.5 ; try to prevent pips
g92 e0
; start extruder script end
thingiverse
free

A10M A20M Purge extension (Aibecy hotend) by deakbannok
...91 ; switch from absolute positioning to relative positioning
g1 z-0.4 f800 ;
g90 ; return to absolute
g1 e6.5 f3600.0 ;
g92 e0 ;
thingiverse
free

Purge Bucket for A10M (cleaned up) by carterlewellyn
... e0 ;reset extruder positioning
g1 e-2 f5000 ;retract filament to resting spot
g92 e0 ;reset extruder positioning
i hope it helps
thingiverse
free
Kossel Magnetic Effector by Debio
... 8mm, my retraction speed is 40mm/sec, my toolchange retraction distance is 90mm, and my toolchange retraction speed is 50mm/sec.
thingiverse
free
nozzle cleaning bin by Calo_pc
...
g1 e125 f3000 ;extrude the new selected filament to the nozzle
g92 e0;
g1 e4 f180;
g92 e0;
//g1 e-3 f3600 ; retract the filament
thingiverse
free

E3D v6 dual extrusion by dunno_k
...g
g1 e-150.000 f12000 ; reatrac fully fast to rip of eventual strings
t[new_tool]
g92 e0
g1 e151.000 f900 ; prime extruder
g92 e0
thingiverse
free

Bukito Purge box
...ing code for use with purge box
g28 ;home
g1 z.1 f6000 ;move the platform down .1mm
;prime the extruder
g92 e0
g1 f200 e10
g92 e0
thingiverse
free
Filament mixer / dual extrusion / mixing extruder by techwit
...ge to snap off
g92 e0
---snip---
my setup is a e3d lite using a pair of these extruders http://www.thingiverse.com/thing:1708020
Forfelet
thingiverse
free

Purge - Mount Right remixed by Forfelet
...purge - mount right remixed by forfelet
thingiverse
i added 2 nuts (m3) to extend the lifetime of this part.
thingiverse
free

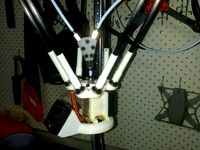
Splitter for MMU2S 5 paths by Forfelet
...nd ptfe od4mm id3mm
2 versions available,
both versions are ok.
if your filament tips are not perfect, please use the version v2.
thingiverse
free

MMU2-front PTFE Holder PC4-M10 by Forfelet
...://www.thingiverse.com/thing:4680412
designed for pc4-m10, now it's possible to remove entirely the selector from mmu2s unit.
thingiverse
free

Prusa Mk3S MMU2S Tower Print Buffer without spools holder by Forfelet
...ools holder by forfelet
thingiverse
this buffer is excellent, but i don't need the spools holder. so, i modify the fixation.
Mmu2S
thingiverse
free

MMU2S Adapter Printer
...mmu2s adapter printer
thingiverse
proper piece to upgrade an mk3 mmu2 to an mk3s mmu2s
thingiverse
free
mmu2s extension by mumg
...mmu2s extension by mumg
thingiverse
added support of endstop for mmu2 idler
thingiverse
free

MMU2 Buffer horizontal stand
...mmu2 buffer horizontal stand
thingiverse
the mmu2 stand is designed for the ikea lack housing and two stacked samla dryboxes.
thingiverse
free

MMU2S M10 Passthrough Selector
...assthrough selector
thingiverse
designed for a better path from mmu2s selector to printer with m10 passthrough bowden connector.
thingiverse
free

Spiral tree MMU2
...spiral tree mmu2
thingiverse
not suitable for printing in vase mode
thingiverse
free

Prusa MMU2 Light Bar
...prusa mmu2 light bar
thingiverse
simple remix of mr_tantrum's prusa mk3/mk3s light bar in order to accommodate for the mmu2
thingiverse
free

Prusa MMU2 tube holder for filament
...prusa mmu2 tube holder for filament
thingiverse
wall tubes 6pcs holder between filament and mmu2 unit
thingiverse
free

Sonicare Toothbrush Holder for MMU2/S
...e toothbrush holder for mmu2/s
thingiverse
added color rings on the top of the toothbrush stands, to print it with prusa mmu2/s.
thingiverse
free

MMU2s Quick Test by MrPUSH
...thingiverse
i made this mmu2s quick test because i wanted something that would switch colors quickly. i usually add a 10mm brim.
thingiverse
free

Idles MMU2 Beermat
...d this at 95mm x 95mm x 2mm with 100% infill.
for more beermats, see my group:
https://www.thingiverse.com/groups/beermats/things
Purge
3d_export
$20

yoda
...of the few jedi to survive the great jedi purge<br>features:<br>high quality polygon model - correctly scaled accurate representation of...
3dfindit
free

IAQ-PURGE
...iaq-purge
3dfind.it
catalog: nuaire
thingiverse
free

Purge Bucket by Gavster29
...purge bucket by gavster29
thingiverse
replacement purge bucket, to use with cheap brushes from amazon
thingiverse
free

Nereus Purge Bucket
...nereus purge bucket
thingiverse
it's all in the name: this is a purge bucket for dual extrusion adapted to tevo nereus.
thingiverse
free

Bac pour Purge A20M
...bac pour purge a20m
thingiverse
bac pour purge a20m
thingiverse
free
Purge Calibration Cube
...urge calibration cube
thingiverse
just a simple cube to calibrate how much material you need to purge in between filament swaps.
thingiverse
free
Skelestruder -> Retractable Purge Mechanism
... of these 3 parts:
purge - mount_right.stl
purge - bracket.stl
purge - action.stl
then assemble as standard.
thanks! =dbigbrain3d
thingiverse
free

Purge Pan by bsbmx
...nce inside the 'bowl', but its purpose is just to collect purged and wasted plastic, so it doesn't need to be pretty.
thingiverse
free

Purge Bucket Anet by horus2678
...purge bucket anet by horus2678
thingiverse
allow to purge anet printer in a bucket instead drawing lines
thingiverse
free

Mosquito hotend -> RETRACTABLE PURGE MECHANISM
... of these 3 parts:
purge - mount_right.stl
purge - bracket.stl
purge - action.stl
then assemble as standard.
thanks! =dbigbrain3d
Mk3S
turbosquid
$129

MK3 Tank
... available on turbo squid, the world's leading provider of digital 3d models for visualization, films, television, and games.
turbosquid
$100

Toyota Supra MK3
... available on turbo squid, the world's leading provider of digital 3d models for visualization, films, television, and games.
turbosquid
$30

Challenger I Mk3 Falcon
... available on turbo squid, the world's leading provider of digital 3d models for visualization, films, television, and games.
turbosquid
$10

American Frag hand grenade MK3
...free 3d model american frag hand grenade mk3 for download as on turbosquid: 3d models for games, architecture, videos. (1393624)
turbosquid
$20

Mk3 US Navy Combat Knife
...ty free 3d model mk3 us navy combat knife for download as fbx on turbosquid: 3d models for games, architecture, videos. (1172791)
3d_export
$29

Ford Fiesta MK3 Modified 3D Model
...7 tumerfx mtumer mehmet t?mer 1993 1995 1996 wrc special modifed modifiye
ford fiesta mk3 modified 3d model mtumer 30698 3dexport
3d_export
$99

Toyota Supra Mk3 19861993 3D Model
...ort fast coupe japan 1986 1987 1988 1989 1990 1991 1992 1993 tuning turbo
toyota supra mk3 19861993 3d model squir 62530 3dexport
turbosquid
$5

Timothy Oulton Mars Chair MK3
...on mars chair mk3 for download as 3ds, max, obj, fbx, and dae on turbosquid: 3d models for games, architecture, videos. (1209782)
3d_export
$150

Handley page halifax MK3 RAF 3D Model
...mk3 bomber british ww2 war second world royal air force raf airplane
handley page halifax mk3 raf 3d model tartino 87044 3dexport
turbosquid
$2

Frame Filament Guide Clip-On for Prusa Mk3
...rame filament guide clip-on for prusa mk3 for download as stl on turbosquid: 3d models for games, architecture, videos. (1634730)
Bucket
archibase_planet
free

Bucket
...bucket
archibase planet
pail bucket tub
bucket - 3d model for interior 3d visualization.
3d_ocean
$5

Bucket
...bucket
3docean
bucket cleaning galvanized gavanised stainless steel zinc zinc coated
a galvanized bucket
turbosquid
free
Bucket bucket With Water
... available on turbo squid, the world's leading provider of digital 3d models for visualization, films, television, and games.
archibase_planet
free
Bucket
...bucket
archibase planet
bucket pail
bucket n250308 - 3d model (*.gsm+*.3ds) for interior 3d visualization.
archibase_planet
free

Bucket
...bucket
archibase planet
tub bucket pail
bucket - 3d model (*.gsm+*.3ds) for interior 3d visualization.
archibase_planet
free

Bucket
...bucket
archibase planet
bucket pail bin
bucket n280612 - 3d model (*.gsm+*.3ds) for interior 3d visualization.
archibase_planet
free

Bucket
...bucket
archibase planet
pail bucket tub
bucket 2 - 3d model (*.gsm+*.3ds) for interior 3d visualization.
archibase_planet
free

Bucket
...bucket
archibase planet
fire fighting equipment dip-bucket
bucket - 3d model (*.gsm+*.3ds) for interior 3d visualization.
3d_export
$5

bucket
...bucket
3dexport
scratched galvanized bucket. fbx, obj, blend, and testura formats
3ddd
$1
Wooden bucket
...wooden bucket
3ddd
wooden bucket , ведро
wooden bucket
Prusa
turbosquid
$2
Frame Filament Guide Clip-On for Prusa Mk3
...rame filament guide clip-on for prusa mk3 for download as stl on turbosquid: 3d models for games, architecture, videos. (1634730)
3d_export
free

prusa i3 mk3s laser mount for opt lasers
...to learn more about the blue laser technology that conceived the cutting and engraving laser heads from opt lasers, please visit:
turbosquid
free

Prusa small printer adapter holder
...er for download as ipt, skp, dwg, dxf, fbx, ige, obj, and stl on turbosquid: 3d models for games, architecture, videos. (1642936)
3d_export
$30

geisha by jonathan adler
...** i did a 3d printing test in the prusa software, you can find it among the attached images.<br>exchange:<br>.blend...
thingiverse
free

Prusa without Prusa (rc2) by madless
...prusa without prusa (rc2) by madless
thingiverse
just the main part of prusa rc2 faceshield, without writing.
enjoy :)
thingiverse
free

Prusa by acejbc
...prusa by acejbc
thingiverse
prusa knob info
m3 8mm screw
thingiverse
free

Prusa house
...prusa house
thingiverse
how prusa house could look like...
thingiverse
free

Prusa Mk2 "Fake Prusa" LCD cover by anraf1001
...r by anraf1001
thingiverse
version of prusa's lcd cover with "fake prusa" instead of "original prusa"
thingiverse
free

Prusa stabilizator by gutiueugen
...prusa stabilizator by gutiueugen
thingiverse
prusa stabilizator
thingiverse
free

Keychain Prusa by rbarbalho
...keychain prusa by rbarbalho
thingiverse
keychain with text prusa.
New
turbosquid
$119

New New Beetle
... available on turbo squid, the world's leading provider of digital 3d models for visualization, films, television, and games.
3d_export
$5

New-feather
...new-feather
3dexport
new-feather
3d_export
$6

new style
...new style
3dexport
new style room
3ddd
free
New Items
...ew items
3ddd
new items , барный
барный стул от китайского производителя фирмы new items
3d_export
$6

Logo new
...logo new
3dexport
new american style logo
3d_export
$10
New jersey
...new jersey
3dexport
new jersey stp and stl format
design_connected
$20

New Deal
...new deal
designconnected
new deal computer generated 3d model.
3d_ocean
$15
New bed
... for this bed all this file format include in zip file 3ds,obj,max,zip file change material and re-size very easy very for render
3ddd
free

Sofa-New Classic
...sofa-new classic
3ddd
new classic
sofa,new classic
design_connected
$13
New Antiques
...new antiques
designconnected
cappellini new antiques computer generated 3d model. designed by wanders, marcel.
Version
3ddd
$1

Diamond version
...nd , version , ванна
visionnaire - diamond bath
turbosquid
$50
LibraryMini Version
...free 3d model librarymini version for download as max and jpg on turbosquid: 3d models for games, architecture, videos. (1617724)
design_connected
$34

Barocco Version 01
...barocco version 01
designconnected
zanotta barocco version 01 computer generated 3d model. designed by progetti, emaf.
design_connected
$27

Barocco Version 02
...barocco version 02
designconnected
zanotta barocco version 02 computer generated 3d model. designed by progetti, emaf.
turbosquid
free
![Door [2 versions]](/t/13243146.jpg)
Door [2 versions]
...rbosquid
free 3d model door [2 versions] for download as fbx on turbosquid: 3d models for games, architecture, videos. (1223985)
turbosquid
$2
seat version 0.1
...
royalty free 3d model seat version 0.1 for download as blend on turbosquid: 3d models for games, architecture, videos. (1432653)
3d_export
$10

magnolia grandiflora mature version
...magnolia grandiflora mature version
3dexport
magnolia grandiflora mature version
3d_export
$8
room assets and voxel version
...room assets and voxel version
3dexport
room assets and voxel version
turbosquid
$35

Zil Civilian version
... model zil civilian version for download as cgf, fbx, and obj on turbosquid: 3d models for games, architecture, videos. (1639420)
turbosquid
$3

Chair 3 versions
...3d model chair 3 versions for download as blend, fbx, and obj on turbosquid: 3d models for games, architecture, videos. (1657530)