Thingiverse
Gyroman by LoboCNC
by Thingiverse
Last crawled date: 2 years, 11 months ago
Watch the video: https://youtu.be/8qM3Bao3zJQ
UPDATE: You can now buy all of the non-printed parts for this thing from:https://www.freewebstore.org/assemble-store
(note: I am not affiliated with assemble.network)
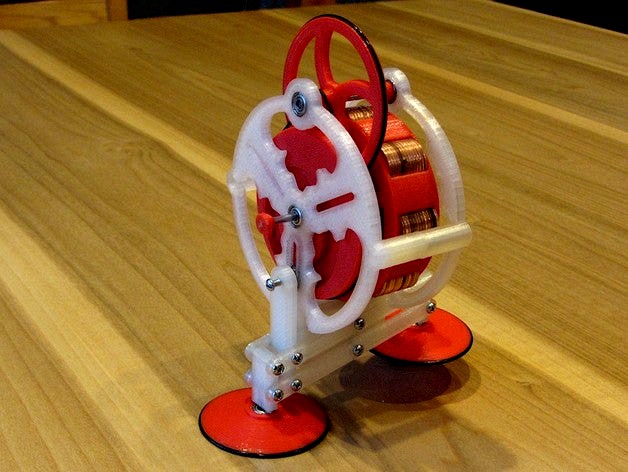
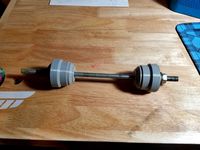
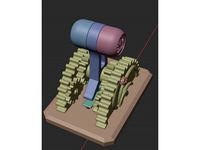
This fiendishly clever walking toy was invented by my friend John Jameson back in 1981. It mechanically couples a spinning gyroscope (thru some gearing) to a pair of feet that stomp up and down. When one foot goes down, the body actually lifts up and then starts to precess clockwise. Then when the other foot comes down the body lifts again but this time precesses counterclockwise - and voila, it walks!
All the parts you need (bearings, screws, etc.) are listed in the instructions, including the 104 pennies used for the flywheel mass. I've included a 3D PDF file which will let you view the entire assembly from all angles, hide components, etc.
This 3D printable version that I designed is kinematically a little different from the original, but you can read the history of the original at: http://cyberneticzoo.com/walking-machines/1981-the-walking-gyro-john-w-jameson-american/
Instructions
UPDATE: I've added a flywheel that works with 0.02 Euro coins. Also note that RobertCL has done a flywheel remix for 1p UK coins: http://www.thingiverse.com/thing:794106
You will need the following parts:
2 side.stl
1 flywheel.stl
1 retainingring.stl
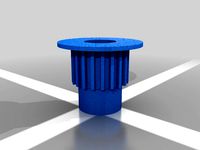
1 pulley.stl
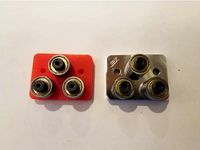
1 eccentric.stl
4 bar.stl
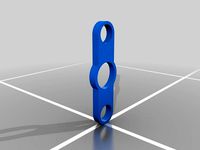
1 link.stl
2 leg_short.stl
2 foot.stl
1 collar.stl
1 hook.stl
1 pullring.stl
20 4-40 x 3/8" pan head screws (McMaster 90272A108)
1 4-40 x 5/8" pan head screw
10 3mm bore, 10mm OD, 4mm thick ball bearings (623ZZ)
......(I purchased 10 for $2.15 at http://www.ebay.com/itm/161255478926)
4 #4 washer, 0.22 OD x 0.031 thick (McMaster 90295A359)
1 3mm rod x 1.9" long (McMaster 5544T222)
1 3mm rod x 2.5" long (McMaster 5544T222)
4 O-rings 1/16" thick x 1 7/8 OD (McMaster 9452K118)
3ft 30# test Spectra braided fishing line
superglue
104 pennies
Before starting, take a good look at the 3D PDF file gyroman3d.pdf. It will give you a good idea of how everything goes together.
Acquire all the parts. You can buy most of the hardware from mcmaster.com (I've listed their part numbers), although it may be cheaper if you can find some of the items in a hardware or hobby store. For the pennies, I'd recommend getting 2 rolls of brand-new pennies. Pennies are suppose to weigh exactly 2.5g, but I've found a number of them tipping the scale at 3g.
Print all of the parts. I used PLA, 0.2mm layers, 3 perimeters and 30% infill, except for the flywheel where I used 20% infill. All of the parts need to be pretty flat, so if you don't have a heated bed, use a raft 3-4 mm tall.
Press 2 bearings into each side, one bearing into each foot, and 2 bearings (stacked) into the eccentric. Use a vise or arbor press because you don't want them to get cocked as you are pressing them in. If you don't have either, you can carefully tap them in with a hammer.
Fit two of the O-rings into the grooves on the feet. This is kind of tricky. Once in place, run a tiny bead of superglue along the top edge to hold the O-ring in place.
Screw the feet to the bottoms of the legs with a washer between the bearing and the leg. Screw the 4 bars onto the legs, and then screw the link between the 4 bars. Tighten the screws all the way and then back off 1/8 turn so that the legs can pivot up and down freely.
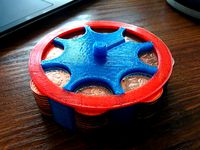
Assemble 13 pennies into each slot in the flywheel. Make sure the entire stack it sitting flat (it's a tight fit). Fit the retaining ring over the pennies, snapping it into place (another tight fit). The retaining ring should be flush with the top of the flywheel. Use a few drops of superglue on each stack of pennies to hold them in place. (If the pennies rattle, you'll lose flywheel energy.)
Press the short 3mm rod onto the pulley, with one bearing thickness of the shaft sticking out one end. Press the collar onto the other end of the short shaft, again, with one bearing thickness of shaft sticking out the end. Press the long 3mm shaft into the flywheel, with one bearing thickness plus one washer thickness protruding from one end. (If you don't get a tight fit with flywheel on the rod, you can secure the rod with a 4-40 setscrew.)
Put a washer over the short end flywheel axle and insert into the center bearing on one side. Place one O-ring over the small pulley on the flywheel. Insert the collar-end of the pulley axle into the other bearing, going thru the O-Ring. (Don't try to fit the O-Ring into the pulley groove yet.) Place another O-ring over the small diameter groove in the pulley and also over the flywheel axle. Now slide the eccentric onto the flywheel axle. (Don't try to fit the O-ring into place yet.) Put one more washer on the end of the flywheel shaft.
Slide the other side onto the two axles and loosely screw the two sides together. Work the first O-ring up and over the large diameter groove in the pulley. The second O-ring is a little trickier. There is a little nub on the eccentric that you can hook the O-ring on. Then rotate the eccentric around until the O-ring is pulled around the diameter of the eccentric. Tighten the screws holding the two sides together. At this point you should be able to spin the flywheel and everything should rotate smoothly.
Screw the leg assembly onto the body with the link on the side with the eccentric. Now place a bearing in the eccentric slot and push it so that it exactly lines up with the slot in the side piece. Tip the body on its side so that the bearing drops into the slot in the side piece. Slide the bearing up or down so that it stays captured in the slot in the side. Stick a second bearing in the eccentric slot and push it so that it again lines up with the slot in the side. Now push the first bearing so that it exactly overlaps with the second bearing. Insert the long 4-40 screw into the link and screw it in so that it goes through the bores of both bearings. The screw should be almost touching the bottom of the slot in the eccentric.
Tap the hook onto the end of the flywheel axle. Tie a loop in one end of the fishing line. Tie the other end of the fishing line to the pullring. CAUTION - Do not pull on the fishing line with your bare hands. It is extremely strong and extremely thin, and it will cut your hand to ribbons!
Hook the loop end of the fishing line over the hook and then spin the pulley to wrap the line up on the axle. Try to keep the wraps neat. Now let-er rip!
UPDATE: You can now buy all of the non-printed parts for this thing from:https://www.freewebstore.org/assemble-store
(note: I am not affiliated with assemble.network)
This fiendishly clever walking toy was invented by my friend John Jameson back in 1981. It mechanically couples a spinning gyroscope (thru some gearing) to a pair of feet that stomp up and down. When one foot goes down, the body actually lifts up and then starts to precess clockwise. Then when the other foot comes down the body lifts again but this time precesses counterclockwise - and voila, it walks!
All the parts you need (bearings, screws, etc.) are listed in the instructions, including the 104 pennies used for the flywheel mass. I've included a 3D PDF file which will let you view the entire assembly from all angles, hide components, etc.
This 3D printable version that I designed is kinematically a little different from the original, but you can read the history of the original at: http://cyberneticzoo.com/walking-machines/1981-the-walking-gyro-john-w-jameson-american/
Instructions
UPDATE: I've added a flywheel that works with 0.02 Euro coins. Also note that RobertCL has done a flywheel remix for 1p UK coins: http://www.thingiverse.com/thing:794106
You will need the following parts:
2 side.stl
1 flywheel.stl
1 retainingring.stl
1 pulley.stl
1 eccentric.stl
4 bar.stl
1 link.stl
2 leg_short.stl
2 foot.stl
1 collar.stl
1 hook.stl
1 pullring.stl
20 4-40 x 3/8" pan head screws (McMaster 90272A108)
1 4-40 x 5/8" pan head screw
10 3mm bore, 10mm OD, 4mm thick ball bearings (623ZZ)
......(I purchased 10 for $2.15 at http://www.ebay.com/itm/161255478926)
4 #4 washer, 0.22 OD x 0.031 thick (McMaster 90295A359)
1 3mm rod x 1.9" long (McMaster 5544T222)
1 3mm rod x 2.5" long (McMaster 5544T222)
4 O-rings 1/16" thick x 1 7/8 OD (McMaster 9452K118)
3ft 30# test Spectra braided fishing line
superglue
104 pennies
Before starting, take a good look at the 3D PDF file gyroman3d.pdf. It will give you a good idea of how everything goes together.
Acquire all the parts. You can buy most of the hardware from mcmaster.com (I've listed their part numbers), although it may be cheaper if you can find some of the items in a hardware or hobby store. For the pennies, I'd recommend getting 2 rolls of brand-new pennies. Pennies are suppose to weigh exactly 2.5g, but I've found a number of them tipping the scale at 3g.
Print all of the parts. I used PLA, 0.2mm layers, 3 perimeters and 30% infill, except for the flywheel where I used 20% infill. All of the parts need to be pretty flat, so if you don't have a heated bed, use a raft 3-4 mm tall.
Press 2 bearings into each side, one bearing into each foot, and 2 bearings (stacked) into the eccentric. Use a vise or arbor press because you don't want them to get cocked as you are pressing them in. If you don't have either, you can carefully tap them in with a hammer.
Fit two of the O-rings into the grooves on the feet. This is kind of tricky. Once in place, run a tiny bead of superglue along the top edge to hold the O-ring in place.
Screw the feet to the bottoms of the legs with a washer between the bearing and the leg. Screw the 4 bars onto the legs, and then screw the link between the 4 bars. Tighten the screws all the way and then back off 1/8 turn so that the legs can pivot up and down freely.
Assemble 13 pennies into each slot in the flywheel. Make sure the entire stack it sitting flat (it's a tight fit). Fit the retaining ring over the pennies, snapping it into place (another tight fit). The retaining ring should be flush with the top of the flywheel. Use a few drops of superglue on each stack of pennies to hold them in place. (If the pennies rattle, you'll lose flywheel energy.)
Press the short 3mm rod onto the pulley, with one bearing thickness of the shaft sticking out one end. Press the collar onto the other end of the short shaft, again, with one bearing thickness of shaft sticking out the end. Press the long 3mm shaft into the flywheel, with one bearing thickness plus one washer thickness protruding from one end. (If you don't get a tight fit with flywheel on the rod, you can secure the rod with a 4-40 setscrew.)
Put a washer over the short end flywheel axle and insert into the center bearing on one side. Place one O-ring over the small pulley on the flywheel. Insert the collar-end of the pulley axle into the other bearing, going thru the O-Ring. (Don't try to fit the O-Ring into the pulley groove yet.) Place another O-ring over the small diameter groove in the pulley and also over the flywheel axle. Now slide the eccentric onto the flywheel axle. (Don't try to fit the O-ring into place yet.) Put one more washer on the end of the flywheel shaft.
Slide the other side onto the two axles and loosely screw the two sides together. Work the first O-ring up and over the large diameter groove in the pulley. The second O-ring is a little trickier. There is a little nub on the eccentric that you can hook the O-ring on. Then rotate the eccentric around until the O-ring is pulled around the diameter of the eccentric. Tighten the screws holding the two sides together. At this point you should be able to spin the flywheel and everything should rotate smoothly.
Screw the leg assembly onto the body with the link on the side with the eccentric. Now place a bearing in the eccentric slot and push it so that it exactly lines up with the slot in the side piece. Tip the body on its side so that the bearing drops into the slot in the side piece. Slide the bearing up or down so that it stays captured in the slot in the side. Stick a second bearing in the eccentric slot and push it so that it again lines up with the slot in the side. Now push the first bearing so that it exactly overlaps with the second bearing. Insert the long 4-40 screw into the link and screw it in so that it goes through the bores of both bearings. The screw should be almost touching the bottom of the slot in the eccentric.
Tap the hook onto the end of the flywheel axle. Tie a loop in one end of the fishing line. Tie the other end of the fishing line to the pullring. CAUTION - Do not pull on the fishing line with your bare hands. It is extremely strong and extremely thin, and it will cut your hand to ribbons!
Hook the loop end of the fishing line over the hook and then spin the pulley to wrap the line up on the axle. Try to keep the wraps neat. Now let-er rip!
Similar models
thingiverse
free

Side purge block for Makergear M2 by wpt7308
... the top of the penny, then lock fixture in place. i put a piece of aluminum foil over the top of my screen
and a trash can below
3dwarehouse
free

Washer, fender, 1/4' Screw Size, 0.281' ID, 1' OD, McMaster-Carr 91525A120
...; od, mcmaster-carr 91525a120
3dwarehouse
washer, fender, 1/4' screw size, 0.281' id, 1' od, mcmaster-carr 91525a120
thingiverse
free
Penny Fidget Spinner by jamesdoolin
...o add counter weight.
(2) put bearing into center hole.
(3) put the caps on either side of the bearing.
(4) have fun, and spin!!!
thingiverse
free
J2X Guitar Fret Wire Bender & Unbender by jm7905
...from aluminum and cnc milled. this is a very similar model, but has some printer-friendly changes and requires a...
thingiverse
free

Yarn Winder (gear driven) by Seminex222
...t
yarnguide:
i tapped a m4 thread into it and bent a small keychain-ring to make the guide
if something is unclear - improvise :d
thingiverse
free
MXL Robot Pulleys by sonozap
... the drive teeth. each one is best printed with a raft with 60% fill, 2 shells. print with largest pulley diameter on platform.
grabcad
free

CloudWheel Discovery 40t HDT5 pulley with bearing press in
...wn risk, i still have not had one made yet and do not know if it will actually fit in clone flywheels or not till i have one made
thingiverse
free

Penny Spinner with Penny Insert Tool by benchemist
...e longer one is used to press them in. i usually use a vise or a clamp.
use your favorite bearing cap for the 608 center bearing.
thingiverse
free

Pulley block (soft mount) for 7-8mm OD rope by MachineKing
...e it into the pulley block. insert the rope through the pulley block, the washers and the 608 bearing as seen in the photo's.
thingiverse
free
1 1/8" and or 1 1/5" headset press
...l fit both 1 1/8" and 1 1/5" bearing cups. i used a 3/8ths" threaded rod with nuts and thick washers on each end.
Gyroman
thingiverse
free

Aust 5c compatible flywheel for Gyroman by robonut
...n by robonut
thingiverse
flywheel for lobocnc's excellent gyroman model, remixed with a flywheel for the australian 5c coin.
thingiverse
free

Customized Mount Remix Left by shivinteger
...- attribution - share alike [6] thing title : gyroman [6] thing url : http://www.thingiverse.com/thing:766501 [6] thing author :...
thingiverse
free
Gyroman - UK 1p Compatible Flywheel by RobertCL
... coins fit, but i haven't actually assembled my gyroman yet to check that it works, but i see no reason why it shouldn't.
thingiverse
free

Gyroman - AU 1c Coin Compatible Flywheel by LukeTansell
...ch adds up to a mass of about 350 grams. the greater the mass, the longer it should spin.
tested on up! plus 2 printer (afinia)
Lobocnc
thingiverse
free

Dry-Bag Spool Holder by LoboCNC
... from sliding around.
from there, just follow the instructions in the video to get your spool in the bag and secured to the base.
thingiverse
free
peugeot 206 phone holder by Muthinor
...the gps a lot). gps phone holder: https://www.thingiverse.com/thing:2195345 original lobocnc https://www.thingiverse.com/thing:4432319 notched drlex version: https://www.thingiverse.com/thing:4538021 thanks to all of...
thingiverse
free

PushDrill Clip-in EndCap by Racoon2020
...clip-in endcap by racoon2020 thingiverse the endcap provided by lobocnc does not hold in place. this one does, need...
thingiverse
free

Humidity Gauge Spool Bracket by LoboCNC
...ols with an internal hole diameter of 1.75" to 2.25" diameter. accommodates gauges with a nominal 1.625" diameter.
thingiverse
free

Quick Clamp by LoboCNC Bigger Pad 35x35mm by Swiffi
...c bigger pad 35x35mm by swiffi
thingiverse
just my design of a insta360 go camera mount for the diatone tinawhoop. super simple.
thingiverse
free

Hygrometer Swirl Bracket by vivamus3d
...i liked the the humidity gauge spool bracket by lobocnc but it neither fit well for my hygrometers (had...
thingiverse
free
Roller Squeegee/Roller Towel for Court Drying by LoboCNC
...er towels, but a damp towel will only dry about 1/2 the area of a completely dry towel. you'll want to have a bunch on hand.
thingiverse
free
Steam Punk Wall Switch by Hank106
...the prints a pantene finish (https://www.thingiverse.com/thing:3783279) and the other lobocnc (www.thingiverse.com/thing:649284). this design keeps the normal up is on...
thingiverse
free

Snap-on Snow Guards for Tapered Standing Seam Roofs by LoboCNC
...se injury or damage.
printing
use at least 4 perimeter lines and a 35% full triangular infill. this part needs to be very stiff.
thingiverse
free

PRINT-IN-PLACE IRIS BALL by hahcutt
...will forgive the smaller gap. the original model by lobocnc is a really good piece of work and i...