Cults
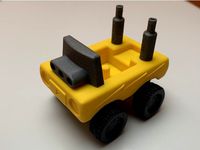
Fully printable Monster Truck
by Cults
Last crawled date: 6 years, 1 month ago
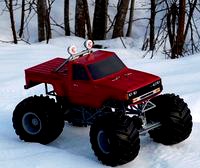
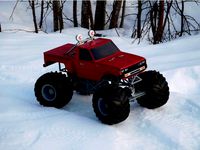
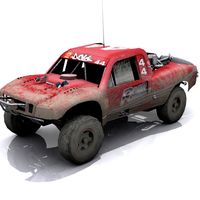
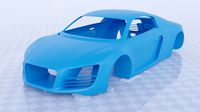
Fully printable monster truck with four link suspension and four wheel drive and steering with three differentials. I wanted a monster truck that actually looks like a monster truck, and not a truggy with large wheels.
If you want to support my work you can use any of the Ebay or Banggood-links below before making purchases.
----
High performance with the new drive train and axle housings:
https://youtu.be/uLqwb3P9NfM
New van body:
https://youtu.be/2taKQ4_r750
----
NEWS 29.10.2017
I made a new van body for it. [get it here](https://www.thingiverse.com/thing:2655178) [or here](https://cults3d.com/en/3d-model/various/80-s-van-body-for-the-ursa-monster-truck)
----
19.10.2017
I added a new roll bar with [mounts for 22 mm LED light buckets](https://hobbyking.com/en_us/turnigy-high-power-headlight-system.html)
----
12.10.2017
Added a new rollbar. Rollbar02.stl. Slightly easier to print and without lights.
----
07.10.2017
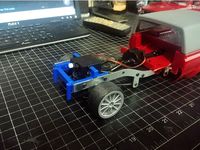
New side frames are up now. They allow side mounting of the batteries and are ideal for saddle packs for a lower CG to reduce the chance of rolling over. They can also be used with two shorty packs in parallel or even two full size packs if you want insane duration.
The file name for the new frame is Option - Frame01-sidemount.STL
----
05.10.2017
Added medium length suspension arms. These fall in between the existing short and long arms. The files are MidWB01 and 02. I like to use short length suspension in the front and medium length in the rear.
----
29.09.2017
There was an error in the central gearbox housing. The new diff didn't fit. I have changed the the flattest side of the gearbox housing slightly to make room for the upgraded differential.
I added a new set of steering links with ball links for adjustment and separate front and rear steering cross links. The front part is the same length as the old links. The rear link is 1 mm longer to give some toe in in the rear end. The file name is Steeringlink03
Also new is a set of servo savers for the recommended servos. Servosaver02 is for the Corona while 03 is for servos with a larger 21 teeth flange.
----
25.09.2017
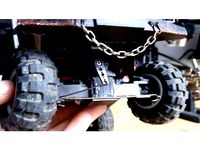
I have uploaded new heavy duty axle housings. The file name is GB03. They use the same gears as GB02, but are printed in a different orientation and are braced. they are stronger in every way and I doubt they will ever break. The truck can finally be jumped without splitting the gearbox housings. :)
Attach the bottom half with M2x8 screws. Attach the top of the diff/input housing with M2x8 or M2x12 screws. Use an M2x8 or M2x12 screws to attach the ball on top.
----
25.09.2017
Added mirrors and windshield wipers for the body. A little bit of detail make s a big difference. I uploaded a photo of the car with them installed.
----
19.09.2017:
I added new versions of all the drive shafts and hubs with holes and slots for a 2mmx13mm pin to increase the load capability and wear resistance of the rive couplings. The files start with "option - pindrives". Make the pins from 2mm piano wire or brass tubing. Make them 13 mm long. I haven't tried them myself yet, but pin drive works great with PLA in another project car other car.
----
Updated the center diff to the same stronger gear type as the axle gearboxes. Also updated the locking adapters for the diffs to fit the new diff style. Difflock02.stl
----
There was an error with the printable tire. It was wider than the wheel. I have uploaded Wheel02.STL which fits the printed tires. I also added new narrow tires which fit the original Wheels01.stl and take less elastomer to print.
----
Added left and right tires for those that want to try printing tires. They are designed to fit the rims,and should be printable.
----
I have uploaded new front and rear diffs. They use stronger and coarser gears. I have run my PLA version hard for a few times with no problems so it's definitely stronger than before. The updated file is GB02-gears.stl
----
New abuse video with a new lighter printed body. I printed it with 2% infill which saved 130 g. The rear diff now has two ABS bevel gears, which seems to hold up really well. I suspect ABS will be a good, cheap material for bevel gears.
https://youtu.be/253u5Jxf34w
----
A couple of abuse-videos. It has nylon (Taulman 910) bevel gears in the diffs here. 35t motor and 2S 6Ah lipo:
https://youtu.be/Z1vkdOQ-rEY
https://youtu.be/YAPbxRjT4TU
----
21.05.2017
Removed the "gears01" file and replaced it with gear sets specific to the gearboxes they are for, to avoid confusion. The new gear files are called CGB-gears and GB02-gears
Changed the diff bevels slightly to improve gear mesh.
Fixed a slight error in GB02.
Added a servo saver and the associated links.
----
18.05.2017
Added a special version of the GB02 input called GB02-input-onepiece. It's a one piece part that requires that you pause the print between 22.2 mm and 23 mm and install both ball bearings before you continue the print. This creates a stronger part without gaps.
Also changed GB02 with a stronger version after I broke mine while jumping.
----
16.05.2017
I made small changes to GB02-input and mating bevel gears (in gears01). If they break, the new parts have deeper gear mesh for higher strength.
----
Made slight changes to the lower suspension arms to improve the strength of the screw holes of the clamps. Also slight changes to the outside of GB02 for strength around the bottom area. Still compatible with the previous version.
----
Added split frame sides for small printers. Frame01-split01.stl and Frame01-split02.stl
----
Most of the parts have been changed recently, and I consider the design finished, so If you have downloaded parts earlier I recommend you download them again to get the latest versions. The drive train and spindles have all been upgraded.
-----
I added two optional short suspension kits for shortening the wheelbase. Use in the front, rear or both as desired. Each kit shortens the wheelbase by 20 mm.
----
I uploaded shaft02.STL over again because there was a problem with the parts. The 3x19 mm rod wouldn't fit between the couplings.
-----
I added a new axle gearbox assembly which uses a new input shaft which doesn't require carbon rods or filing of flats on the rods. It's easier to make and is stronger. It is uploaded as GB02.STL and GB02-input.STL. I also updated Shaft02.STL with a more robust design. Note that GB01 is still available, but I recommend the new version. The new version replaces two of the 3x7x3 mm bearings per axle for the same 12x18x4mm bearings used everywhere else.
Here's a video showing the performance with a 35T motor and lipos. I don't recommend runnign a lower turn than this. The photo showing the motor and pinion is taken after all my testing is done. The pinin shows no sign of use. Looks new. If you want to run higher turns that's fine:
https://youtu.be/5AwsShacXhs
-----
I added a photo of the truck with a cool lexan body from Banggood.com. Also attached is a photo of body post drilling dimensions, and a photo of the frame without body. Check out the new video with the lexan body.
-----
News:
Changed "Frame03.STL" with an extra cross tube and also made small changed to "Spindle01.STL". Working on all the rive shafts now so new GB-housings, shafts and couplings will come up some time in the next few days.
-----
News:
I uploaded some stronger spindles and live axle housings with stronger spindle lugs.
-----
I made a body for it as well tonight. It is based on a Tokyo Marui Big Bear Datsun body, with modifications to better fit this truck. It has been widened to fit over the batteries and has special body posts. I attached photos both without and with paint.
----
I appreciate any donations for my hard work and releasing for free, but only if you enjoy the model. ;)
Indoor video:
https://youtu.be/QcU0pcj3w-Y
Outdoor video:
https://youtu.be/ImmNC9to3ko
https://youtu.be/ViAJE4_pjs8
https://youtu.be/re-wnSXd8GE
Torture test video with lexan body:
https://youtu.be/vNq2D7YLXdA
----
Assembly notes:
-Tighten the suspension arm clamps around the axle balls untill they allow some movement, but not too tight. The ball joint needs to be able to move with suspension travel.
-The axle gearbox halves may have some uglyness in the top where the 7mm bearing goes. Just remove any excess plastic threads and stuff the bearing in there. I've done it to many units without failure. I might improve this part of the design later on.
-Apply a small amount of grease to the inside of all drive joints so that the plastic knuckles don't melt from friction. I use cheap bicycle lithium grease. Any grease will do.
-Apply grease to all gears. This prevents melting and keeps them working for long. I made closed gearboxes so that they could be greased without contamination. I use cheap bicycle lithium grease. Any grease will do.
-The drive shafts and drive knuckles can be a little tight. They will bed in.
-The gears will bed in if they feel rough in the beginning. Most of the gears seem to be very strong and show no signs of overloading. The differential bevel gears can break with very rough use if they are made from PLA. I eventually printed them from Taulman 910 nylon, which survived my torture tests.
-The smallest differential gears need small shafts to hold them in place. Make these short pieces from 1,75mm filament. Super easy and plenty strong with five shafts on total per diff.
-Ball bearings can be a tight fit, depending on how accurate your printer prints. The holes are designed slightly oversize. Just press them in there or carefully hammer with something that ensures the force hits the outside race. :)
-The lower links flex when the car rolls. This is by design and works well.
-Some parts have alternative parts so that the builder can create variations and change the look of the truck.
-The screws all thread into the plastic parts without any metal nuts. It may be difficult to screw them in the first time.
-Though the hardware list calls for machine screws, similarly sized self tapping screws will work fine in most cases. The exception being where the part is supposed to pivot on the screw, like the spindles and suspension link hinges. The length can also be different than the recommended in many cases as the holes are usually much deeper than necessary.
-The rear steering servo needs to be reversed. If it can not be reversed in the radio the longer servo link can be used instead by connecting to the top servo arm instead of the bottom.
-The diff lock gear is not recommended for jumps and high speed bashing because it increases the load on the whole drive train.
-GB02 is recommended, but if you for some reason still want to use GB01, here are instructions: On GB01 The input shaft on the live axle is made from 3mm carbon fiber rod. File flats on each end to fit in the gear and shaft joint and . The flats don't have to be perfect. Also apply CA glue to the flats when assembling. The gear ratio between the input and wheels is 5:1.
----
Required hardware:
-Minimum 2 channel transmitter and receiver. [This is the cheapest i can recommend](https://www.banggood.com/Flysky-FS-GT2G-2_4GHz-Transmitter-With-Receiver-For-Car-And-Boat-p-1058725.html?p=HD240528697332015103)
[This is better because you can mix the steering in programming](https://www.banggood.com/RadioLink-RC4GS-2_4G-4CH-Car-Controller-Transmitter-R4FG-G-Gyro-Inside-Receiver-for-RC-Car-Boat-4-p-1169456.html?p=HD240528697332015103)
-540 or 380 motor and ESC. The prototype uses a 21t GoolRC brushed motor for overload testing. [I recommend a minimum of 35T](https://www.banggood.com/540-Motor-60A-ESC-Carbon-Brushed-Shaft-3_175mm-For-110-RC-Car-p-1187528.html?p=HD240528697332015103)
The best ESC for it is the [Hobbywing Quicrun 80A "Crawler Brushed" ESC](https://www.banggood.com/Hobbywing-QuicRun-ESC-110-18-WP-Crawler-Brush-Brushed-80A-Electronic-Speed-Controller-p-1191275.html?p=HD240528697332015103) which can be set up to run with reduced brake and reduced punch which extends the gear life considerably: )
-Metal gear servos. Maximum 23mm body length. [I use these](https://hobbyking.com/en_us/corona-ds-843mg-digital-high-torque-micro-servo-4-8kg-0-10sec-8-5g.html)
[These also work well, but are a little weaker](https://www.banggood.com/EMAX-ES3302-Servo-Ultra-thin-Steering-Gear-Emax-Servo-p-940116.html?p=HD240528697332015103)
-Six cell Sub-C ni-mh battery or [2S hard body lipo](https://www.banggood.com/Giant-Power-11_1V-6000mAh-3S-65C-Lipo-Battery-T-Plug-Hardcase-Pack-p-1080404.html?p=HD240528697332015103), or saddle pack for the newest saddle frame (recommended).
-The springs are made from regular road bicycle tubes. Cut them as wide as you need to get the necessary tension. The butyl is very durable and won't rot. I used one of my old punctured tubes. I also use [these rubber bands to hold the battery in place](https://www.banggood.com/Wholesale-Kenda-Bicycle-Inner-Tire-700c-18-or-23c-F-or-V-Inner-Tube-Road-Bike-Inner-Tyre-p-66651.html?p=HD240528697332015103)
-In addition to the printable body you can use other bodies. [I ordered this body which fits well](https://www.banggood.com/RC-Car-Spare-Parts-Shell-For-Traxxas-Grave-Digger-RC-110-RTR-Truck-p-961475.html?p=HD240528697332015103)
-Four monster tires. I have not designed printable tires for it because it would take an absurd amount of rubber to make them and it's just so cheap for good tires. It probably takes less time to order and receive than it takes to print as well. :P [I use the chevron version of the two in the following links](https://rover.ebay.com/rover/1/711-53200-19255-0/1?icep_id=114&ipn=icep&toolid=20004&campid=5338226872&mpre=https%3A%2F%2Fwww.ebay.com%2Fitm%2F4Pcs-Set-Ruber-Tires-Rim-For-HSP-HPI-1-10-RC-Bigfoot-Monster-Racing-Car-12mm-Hex%2F311960463871)
[Or these tires](https://rover.ebay.com/rover/1/711-53200-19255-0/1?icep_id=114&ipn=icep&toolid=20004&campid=5338226872&mpre=https%3A%2F%2Fwww.ebay.com%2Fitm%2FOff-Road-Monster-Truck-D-132MM-W-72-Tyre-Tires-Fit-1-10-HSP-HPI-Redcat-RC-3003%2F262010734312%3Fhash%3Ditem3d010e86e8%3Ag%3AHIcAAOSwe~dTxkgf)
-[7 3mmx19mm carbon fiber, steel or brass shafts for the diffs and live axle gearboxes](https://www.banggood.com/3x2x500mm-Stainless-Steel-Rod-Capillary-Tube-p-1058744.html?p=HD240528697332015103)
-[2mm steel rod for the pin drive shafts and diff bevel gears](https://www.banggood.com/22mm-250500mm-1_52mm-Thickness-304-Stainless-Steel-Round-Tube-Rod-p-1064909.html?p=HD240528697332015103)
-[4 to 8 3x7x3 ball bearings](https://www.banggood.com/10pcs-683ZZ-3x7x3mm-Ball-Bearings-Deep-Groove-Double-Shielded-Miniature-Ball-Bearings-p-1148730.html?p=HD240528697332015103)
-20 12x18x4 ball bearings. Search for "12x18x4 20pcs" on ebay for cheap bearings.
-44 M2x8 screws - differential gearbox assembly, upper four link clamp and steering link assembly. 24 of them for assembly of the two piece wheels.
-2 M2.5x22 screws - For mounting a 380 sie motor.
-22 M3x8 screws - Main frame assembly and steering spindle assembly.
-8 M3x12 screws - Lower suspension link and upper rubber band posts.
-6 M3x22 screws (M3x24 can also be used) - 540 Motor mount and lower rubber band posts.
-4 M4x20 screws - For the wheels.
----
Steeringlink01.STL - Steering links.
Steeringlink02.STL - Offset steering link for the servo saver.
Servosaver01.STL - Servo saver for installing onto the servo arm.
Bodypost01.STL - Shortest body post.
Bodypost02.STL - Body post.
Bodypost03.STL - Body post.
Bodypost04.STL - Body post.
Bodypost05.STL - Longest body post.
Bodypost05.STL - Body post for the rear of the Banggood Vampire Ghost Lexan body. Use file Body04.STL for the front posts for that body.
Suspension01.stl - Lower suspension links. Alternative 1. Choose the one you like.
Suspension02.stl - Lower suspension links. Alternative 2. Choose the one you like.
Suspension03.stl - Upper suspension links.
Suspension04.stl - Lower suspension bushing and rubber band flanges.
CGB-380.STL - Central gearbox and pinion for 380 size motors.
CGB-540.STL - Central gearbox and pinion for 540 size motors.
CGB-gears.STL - Central gearbox gears.
GB01.stl - Old version live axle gearbox housing.
GB01-input.stl - Input coupling and bevel gear for the old GB01 housing.
GB02.stl - New and improved version live axle gearbox housing.
GB02-gears.STL - GB02 gears.
GB02-input.stl - Input coupling and bevel gear for the new GB02 housing.
Difflock01.STL - Locking "gears" for the old style diff. Use if you want to lock the diff.
Difflock02.STL - Locking "gears" for the new stronger diffs.
Shaft01.STL - Live axle drive shafts
Shaft02.STL - Central drive shafts.
Spindle01.STL -Steering spindles.
Frame01.stl - Main frame sides.
Frame02.stl - Front and rear frame pieces. Alternative version 1.
Frame03.stl - Front and rear frame pieces. Alternative version 2.
Frame04.stl - Front and rear frame pieces. Alternative version 3.
Wheel01.stl - Monster truck wheel. Narrow type. Recommended for bought tires.
Wheel02.stl - Monster truck wheel. Wide type. Fits wide printed tires.
TireLeft.STL - Wide printable left tire. 83 mm width. Fits wide wheel.
TireRight.STL - Wide printable right tire. 83 mm width.Fits wide wheel.
TireLeft-narrow.STL - Narrow printable left tire. 73 mm width. Fits narrow wheel.
TireRight-narrow.STL - Narrow printable right tire. 73 mm width. Fits narrow wheel.
Body01.STL - The nose of the pickup body.
Body02.STL - The cabin of the pickup body.
Body03.STL - The bed of the pickup body.
Body04.STL - Posts with extra room for the thick printable body.
ShortWB01.STL - Suspension kit for shortening the wheelbase. option 1 arms.
ShortWB02.STL - Suspension kit for shortening the wheelbase. option 2 arms.
If you want to support my work you can use any of the Ebay or Banggood-links below before making purchases.
----
High performance with the new drive train and axle housings:
https://youtu.be/uLqwb3P9NfM
New van body:
https://youtu.be/2taKQ4_r750
----
NEWS 29.10.2017
I made a new van body for it. [get it here](https://www.thingiverse.com/thing:2655178) [or here](https://cults3d.com/en/3d-model/various/80-s-van-body-for-the-ursa-monster-truck)
----
19.10.2017
I added a new roll bar with [mounts for 22 mm LED light buckets](https://hobbyking.com/en_us/turnigy-high-power-headlight-system.html)
----
12.10.2017
Added a new rollbar. Rollbar02.stl. Slightly easier to print and without lights.
----
07.10.2017
New side frames are up now. They allow side mounting of the batteries and are ideal for saddle packs for a lower CG to reduce the chance of rolling over. They can also be used with two shorty packs in parallel or even two full size packs if you want insane duration.
The file name for the new frame is Option - Frame01-sidemount.STL
----
05.10.2017
Added medium length suspension arms. These fall in between the existing short and long arms. The files are MidWB01 and 02. I like to use short length suspension in the front and medium length in the rear.
----
29.09.2017
There was an error in the central gearbox housing. The new diff didn't fit. I have changed the the flattest side of the gearbox housing slightly to make room for the upgraded differential.
I added a new set of steering links with ball links for adjustment and separate front and rear steering cross links. The front part is the same length as the old links. The rear link is 1 mm longer to give some toe in in the rear end. The file name is Steeringlink03
Also new is a set of servo savers for the recommended servos. Servosaver02 is for the Corona while 03 is for servos with a larger 21 teeth flange.
----
25.09.2017
I have uploaded new heavy duty axle housings. The file name is GB03. They use the same gears as GB02, but are printed in a different orientation and are braced. they are stronger in every way and I doubt they will ever break. The truck can finally be jumped without splitting the gearbox housings. :)
Attach the bottom half with M2x8 screws. Attach the top of the diff/input housing with M2x8 or M2x12 screws. Use an M2x8 or M2x12 screws to attach the ball on top.
----
25.09.2017
Added mirrors and windshield wipers for the body. A little bit of detail make s a big difference. I uploaded a photo of the car with them installed.
----
19.09.2017:
I added new versions of all the drive shafts and hubs with holes and slots for a 2mmx13mm pin to increase the load capability and wear resistance of the rive couplings. The files start with "option - pindrives". Make the pins from 2mm piano wire or brass tubing. Make them 13 mm long. I haven't tried them myself yet, but pin drive works great with PLA in another project car other car.
----
Updated the center diff to the same stronger gear type as the axle gearboxes. Also updated the locking adapters for the diffs to fit the new diff style. Difflock02.stl
----
There was an error with the printable tire. It was wider than the wheel. I have uploaded Wheel02.STL which fits the printed tires. I also added new narrow tires which fit the original Wheels01.stl and take less elastomer to print.
----
Added left and right tires for those that want to try printing tires. They are designed to fit the rims,and should be printable.
----
I have uploaded new front and rear diffs. They use stronger and coarser gears. I have run my PLA version hard for a few times with no problems so it's definitely stronger than before. The updated file is GB02-gears.stl
----
New abuse video with a new lighter printed body. I printed it with 2% infill which saved 130 g. The rear diff now has two ABS bevel gears, which seems to hold up really well. I suspect ABS will be a good, cheap material for bevel gears.
https://youtu.be/253u5Jxf34w
----
A couple of abuse-videos. It has nylon (Taulman 910) bevel gears in the diffs here. 35t motor and 2S 6Ah lipo:
https://youtu.be/Z1vkdOQ-rEY
https://youtu.be/YAPbxRjT4TU
----
21.05.2017
Removed the "gears01" file and replaced it with gear sets specific to the gearboxes they are for, to avoid confusion. The new gear files are called CGB-gears and GB02-gears
Changed the diff bevels slightly to improve gear mesh.
Fixed a slight error in GB02.
Added a servo saver and the associated links.
----
18.05.2017
Added a special version of the GB02 input called GB02-input-onepiece. It's a one piece part that requires that you pause the print between 22.2 mm and 23 mm and install both ball bearings before you continue the print. This creates a stronger part without gaps.
Also changed GB02 with a stronger version after I broke mine while jumping.
----
16.05.2017
I made small changes to GB02-input and mating bevel gears (in gears01). If they break, the new parts have deeper gear mesh for higher strength.
----
Made slight changes to the lower suspension arms to improve the strength of the screw holes of the clamps. Also slight changes to the outside of GB02 for strength around the bottom area. Still compatible with the previous version.
----
Added split frame sides for small printers. Frame01-split01.stl and Frame01-split02.stl
----
Most of the parts have been changed recently, and I consider the design finished, so If you have downloaded parts earlier I recommend you download them again to get the latest versions. The drive train and spindles have all been upgraded.
-----
I added two optional short suspension kits for shortening the wheelbase. Use in the front, rear or both as desired. Each kit shortens the wheelbase by 20 mm.
----
I uploaded shaft02.STL over again because there was a problem with the parts. The 3x19 mm rod wouldn't fit between the couplings.
-----
I added a new axle gearbox assembly which uses a new input shaft which doesn't require carbon rods or filing of flats on the rods. It's easier to make and is stronger. It is uploaded as GB02.STL and GB02-input.STL. I also updated Shaft02.STL with a more robust design. Note that GB01 is still available, but I recommend the new version. The new version replaces two of the 3x7x3 mm bearings per axle for the same 12x18x4mm bearings used everywhere else.
Here's a video showing the performance with a 35T motor and lipos. I don't recommend runnign a lower turn than this. The photo showing the motor and pinion is taken after all my testing is done. The pinin shows no sign of use. Looks new. If you want to run higher turns that's fine:
https://youtu.be/5AwsShacXhs
-----
I added a photo of the truck with a cool lexan body from Banggood.com. Also attached is a photo of body post drilling dimensions, and a photo of the frame without body. Check out the new video with the lexan body.
-----
News:
Changed "Frame03.STL" with an extra cross tube and also made small changed to "Spindle01.STL". Working on all the rive shafts now so new GB-housings, shafts and couplings will come up some time in the next few days.
-----
News:
I uploaded some stronger spindles and live axle housings with stronger spindle lugs.
-----
I made a body for it as well tonight. It is based on a Tokyo Marui Big Bear Datsun body, with modifications to better fit this truck. It has been widened to fit over the batteries and has special body posts. I attached photos both without and with paint.
----
I appreciate any donations for my hard work and releasing for free, but only if you enjoy the model. ;)
Indoor video:
https://youtu.be/QcU0pcj3w-Y
Outdoor video:
https://youtu.be/ImmNC9to3ko
https://youtu.be/ViAJE4_pjs8
https://youtu.be/re-wnSXd8GE
Torture test video with lexan body:
https://youtu.be/vNq2D7YLXdA
----
Assembly notes:
-Tighten the suspension arm clamps around the axle balls untill they allow some movement, but not too tight. The ball joint needs to be able to move with suspension travel.
-The axle gearbox halves may have some uglyness in the top where the 7mm bearing goes. Just remove any excess plastic threads and stuff the bearing in there. I've done it to many units without failure. I might improve this part of the design later on.
-Apply a small amount of grease to the inside of all drive joints so that the plastic knuckles don't melt from friction. I use cheap bicycle lithium grease. Any grease will do.
-Apply grease to all gears. This prevents melting and keeps them working for long. I made closed gearboxes so that they could be greased without contamination. I use cheap bicycle lithium grease. Any grease will do.
-The drive shafts and drive knuckles can be a little tight. They will bed in.
-The gears will bed in if they feel rough in the beginning. Most of the gears seem to be very strong and show no signs of overloading. The differential bevel gears can break with very rough use if they are made from PLA. I eventually printed them from Taulman 910 nylon, which survived my torture tests.
-The smallest differential gears need small shafts to hold them in place. Make these short pieces from 1,75mm filament. Super easy and plenty strong with five shafts on total per diff.
-Ball bearings can be a tight fit, depending on how accurate your printer prints. The holes are designed slightly oversize. Just press them in there or carefully hammer with something that ensures the force hits the outside race. :)
-The lower links flex when the car rolls. This is by design and works well.
-Some parts have alternative parts so that the builder can create variations and change the look of the truck.
-The screws all thread into the plastic parts without any metal nuts. It may be difficult to screw them in the first time.
-Though the hardware list calls for machine screws, similarly sized self tapping screws will work fine in most cases. The exception being where the part is supposed to pivot on the screw, like the spindles and suspension link hinges. The length can also be different than the recommended in many cases as the holes are usually much deeper than necessary.
-The rear steering servo needs to be reversed. If it can not be reversed in the radio the longer servo link can be used instead by connecting to the top servo arm instead of the bottom.
-The diff lock gear is not recommended for jumps and high speed bashing because it increases the load on the whole drive train.
-GB02 is recommended, but if you for some reason still want to use GB01, here are instructions: On GB01 The input shaft on the live axle is made from 3mm carbon fiber rod. File flats on each end to fit in the gear and shaft joint and . The flats don't have to be perfect. Also apply CA glue to the flats when assembling. The gear ratio between the input and wheels is 5:1.
----
Required hardware:
-Minimum 2 channel transmitter and receiver. [This is the cheapest i can recommend](https://www.banggood.com/Flysky-FS-GT2G-2_4GHz-Transmitter-With-Receiver-For-Car-And-Boat-p-1058725.html?p=HD240528697332015103)
[This is better because you can mix the steering in programming](https://www.banggood.com/RadioLink-RC4GS-2_4G-4CH-Car-Controller-Transmitter-R4FG-G-Gyro-Inside-Receiver-for-RC-Car-Boat-4-p-1169456.html?p=HD240528697332015103)
-540 or 380 motor and ESC. The prototype uses a 21t GoolRC brushed motor for overload testing. [I recommend a minimum of 35T](https://www.banggood.com/540-Motor-60A-ESC-Carbon-Brushed-Shaft-3_175mm-For-110-RC-Car-p-1187528.html?p=HD240528697332015103)
The best ESC for it is the [Hobbywing Quicrun 80A "Crawler Brushed" ESC](https://www.banggood.com/Hobbywing-QuicRun-ESC-110-18-WP-Crawler-Brush-Brushed-80A-Electronic-Speed-Controller-p-1191275.html?p=HD240528697332015103) which can be set up to run with reduced brake and reduced punch which extends the gear life considerably: )
-Metal gear servos. Maximum 23mm body length. [I use these](https://hobbyking.com/en_us/corona-ds-843mg-digital-high-torque-micro-servo-4-8kg-0-10sec-8-5g.html)
[These also work well, but are a little weaker](https://www.banggood.com/EMAX-ES3302-Servo-Ultra-thin-Steering-Gear-Emax-Servo-p-940116.html?p=HD240528697332015103)
-Six cell Sub-C ni-mh battery or [2S hard body lipo](https://www.banggood.com/Giant-Power-11_1V-6000mAh-3S-65C-Lipo-Battery-T-Plug-Hardcase-Pack-p-1080404.html?p=HD240528697332015103), or saddle pack for the newest saddle frame (recommended).
-The springs are made from regular road bicycle tubes. Cut them as wide as you need to get the necessary tension. The butyl is very durable and won't rot. I used one of my old punctured tubes. I also use [these rubber bands to hold the battery in place](https://www.banggood.com/Wholesale-Kenda-Bicycle-Inner-Tire-700c-18-or-23c-F-or-V-Inner-Tube-Road-Bike-Inner-Tyre-p-66651.html?p=HD240528697332015103)
-In addition to the printable body you can use other bodies. [I ordered this body which fits well](https://www.banggood.com/RC-Car-Spare-Parts-Shell-For-Traxxas-Grave-Digger-RC-110-RTR-Truck-p-961475.html?p=HD240528697332015103)
-Four monster tires. I have not designed printable tires for it because it would take an absurd amount of rubber to make them and it's just so cheap for good tires. It probably takes less time to order and receive than it takes to print as well. :P [I use the chevron version of the two in the following links](https://rover.ebay.com/rover/1/711-53200-19255-0/1?icep_id=114&ipn=icep&toolid=20004&campid=5338226872&mpre=https%3A%2F%2Fwww.ebay.com%2Fitm%2F4Pcs-Set-Ruber-Tires-Rim-For-HSP-HPI-1-10-RC-Bigfoot-Monster-Racing-Car-12mm-Hex%2F311960463871)
[Or these tires](https://rover.ebay.com/rover/1/711-53200-19255-0/1?icep_id=114&ipn=icep&toolid=20004&campid=5338226872&mpre=https%3A%2F%2Fwww.ebay.com%2Fitm%2FOff-Road-Monster-Truck-D-132MM-W-72-Tyre-Tires-Fit-1-10-HSP-HPI-Redcat-RC-3003%2F262010734312%3Fhash%3Ditem3d010e86e8%3Ag%3AHIcAAOSwe~dTxkgf)
-[7 3mmx19mm carbon fiber, steel or brass shafts for the diffs and live axle gearboxes](https://www.banggood.com/3x2x500mm-Stainless-Steel-Rod-Capillary-Tube-p-1058744.html?p=HD240528697332015103)
-[2mm steel rod for the pin drive shafts and diff bevel gears](https://www.banggood.com/22mm-250500mm-1_52mm-Thickness-304-Stainless-Steel-Round-Tube-Rod-p-1064909.html?p=HD240528697332015103)
-[4 to 8 3x7x3 ball bearings](https://www.banggood.com/10pcs-683ZZ-3x7x3mm-Ball-Bearings-Deep-Groove-Double-Shielded-Miniature-Ball-Bearings-p-1148730.html?p=HD240528697332015103)
-20 12x18x4 ball bearings. Search for "12x18x4 20pcs" on ebay for cheap bearings.
-44 M2x8 screws - differential gearbox assembly, upper four link clamp and steering link assembly. 24 of them for assembly of the two piece wheels.
-2 M2.5x22 screws - For mounting a 380 sie motor.
-22 M3x8 screws - Main frame assembly and steering spindle assembly.
-8 M3x12 screws - Lower suspension link and upper rubber band posts.
-6 M3x22 screws (M3x24 can also be used) - 540 Motor mount and lower rubber band posts.
-4 M4x20 screws - For the wheels.
----
Steeringlink01.STL - Steering links.
Steeringlink02.STL - Offset steering link for the servo saver.
Servosaver01.STL - Servo saver for installing onto the servo arm.
Bodypost01.STL - Shortest body post.
Bodypost02.STL - Body post.
Bodypost03.STL - Body post.
Bodypost04.STL - Body post.
Bodypost05.STL - Longest body post.
Bodypost05.STL - Body post for the rear of the Banggood Vampire Ghost Lexan body. Use file Body04.STL for the front posts for that body.
Suspension01.stl - Lower suspension links. Alternative 1. Choose the one you like.
Suspension02.stl - Lower suspension links. Alternative 2. Choose the one you like.
Suspension03.stl - Upper suspension links.
Suspension04.stl - Lower suspension bushing and rubber band flanges.
CGB-380.STL - Central gearbox and pinion for 380 size motors.
CGB-540.STL - Central gearbox and pinion for 540 size motors.
CGB-gears.STL - Central gearbox gears.
GB01.stl - Old version live axle gearbox housing.
GB01-input.stl - Input coupling and bevel gear for the old GB01 housing.
GB02.stl - New and improved version live axle gearbox housing.
GB02-gears.STL - GB02 gears.
GB02-input.stl - Input coupling and bevel gear for the new GB02 housing.
Difflock01.STL - Locking "gears" for the old style diff. Use if you want to lock the diff.
Difflock02.STL - Locking "gears" for the new stronger diffs.
Shaft01.STL - Live axle drive shafts
Shaft02.STL - Central drive shafts.
Spindle01.STL -Steering spindles.
Frame01.stl - Main frame sides.
Frame02.stl - Front and rear frame pieces. Alternative version 1.
Frame03.stl - Front and rear frame pieces. Alternative version 2.
Frame04.stl - Front and rear frame pieces. Alternative version 3.
Wheel01.stl - Monster truck wheel. Narrow type. Recommended for bought tires.
Wheel02.stl - Monster truck wheel. Wide type. Fits wide printed tires.
TireLeft.STL - Wide printable left tire. 83 mm width. Fits wide wheel.
TireRight.STL - Wide printable right tire. 83 mm width.Fits wide wheel.
TireLeft-narrow.STL - Narrow printable left tire. 73 mm width. Fits narrow wheel.
TireRight-narrow.STL - Narrow printable right tire. 73 mm width. Fits narrow wheel.
Body01.STL - The nose of the pickup body.
Body02.STL - The cabin of the pickup body.
Body03.STL - The bed of the pickup body.
Body04.STL - Posts with extra room for the thick printable body.
ShortWB01.STL - Suspension kit for shortening the wheelbase. option 1 arms.
ShortWB02.STL - Suspension kit for shortening the wheelbase. option 2 arms.
Similar models
cults
free

Lynx - Fully 3D-printable 1/10 4wd buggy
...wheels01.stl - wheels for standard 2.2" tires, or printable tires
wing01.stl - wing
wingmount01.stl - separate wing mounts
thingiverse
free

Lynx - Fully 3D-printable 1/10 4wd buggy by tahustvedt
...s
wheels01.stl - wheels for standard 2.2" tires, or printable tires
wing01.stl - wing
wingmount01.stl - separate wing mounts
thingiverse
free
Ursa (bear) - Fully printable Monster Truck by tahustvedt
...time. -though the hardware list calls for machine screws, similary sized self tapping screws will work fine in most...
thingiverse
free

Ossum Jeep Hotrod Conversion Kit by Intashu
...for mock v8 engine to stick out?
update log:
7/28/17
added chopped fenders and tub that remove the front fenders from the design.
thingiverse
free

CV joints for tahustvedt's Ursa (bear) - Fully printable Monster Truck by zxcvbn
...s, v2 longer and radius in the bottom of the groove.
12/5/17
updated to latest versions
using tig welding wire 1.8mm for the pins
thingiverse
free
simple FWD/4WD front axle for DIY RC truck by Spone
... bevel gear" (https://www.thingiverse.com/thing:1733067)
20.11.2017 update:
servo for steering glued straight to gear cover.
cults
free

80's van body for the Ursa monster truck
...
https://www.banggood.com/20w-electric-hot-melt-glue-gun-sticks-trigger-with-50-glue-sticks-p-961296.html?p=hd240528697332015103
thingiverse
free

80'S VAN BODY FOR THE URSA MONSTER TRUCK by tahustvedt
...3
https://www.banggood.com/20w-electric-hot-melt-glue-gun-sticks-trigger-with-50-glue-sticks-p-961296.html?p=hd240528697332015103
thingiverse
free
WPL C24 lowrider servo and body mount by skr00zloose
...s.
the shortened axles, suspension trusses, wheels, and tires i've built for this project are also available on thingiverse.
thingiverse
free

MN D90 Axle servo mount with steering link by Msantoyo
... an axle servo mount for al mn d90 - 99 models, i also include the steering link correcting the tire angle for better turn radius
Monstertruck
cg_studio
$110

MonsterTruck gc13d model
...gc13d model
cgstudio
.3ds .lws .mb - monstertruck gc1 3d model, royalty free license available, instant download after purchase.
3d_export
$25

Monster truck 3D Model
...monster truck 3d model 3dexport truck jeep monstertruck cartoon funny happy car wheel big lovely monster truck...
cg_studio
$25

Monster truck3d model
...monster truck3d model cgstudio truck jeep monstertruck cartoon funny happy car wheel big lovely .obj .fbx...
thingiverse
free
MonsterTruck - SuperThings compatible by thetro
...monstertruck - superthings compatible by thetro
thingiverse
a simple toy monster truck - compatible to superthings figures.
thingiverse
free

Monstertruck Mashup by Doxster
... be done to this kit! if you can imagine it you can make it!
all of the creation of new parts and remixing was done in tinkercad.
thingiverse
free

MonsterTruck simplified cnc/laser by ZenziWerken
...s, you just need to find a solution for the engraved tires.
visit https://www.zenziwerken.de/en/spielsachen for more toy designs.
thingiverse
free

RC Rim by Attila_D
...rim by attila_d thingiverse rc rim for sword 1:10 monstertruck ...
thingiverse
free

Atelier de réparation/révision Modèle RC by Dan13l
...réparation/révision modèle rc by dan13l thingiverse dessiné pour le monstertruck wltoys...
thingiverse
free
Airless-Tire 1:5 Lighter version by Piinu
...this one im going to print for my 1:5 monstertruck then i will schow u...
thingiverse
free
Mini Monster Truck/Car/Smart With Suspension - REMIX by brimstone326
...cut off the top and added the tongue. the monstertruck and monsterstealth bodies were my design and drawn in...
Rc
3ddd
$1
RC Helicopter
...rc helicopter
3ddd
вертолет
mini rc helicopter
93.329 polys
3d_export
$7
rc helicopter model
...rc helicopter model
3dexport
rc helicopter model
3d_ocean
$25
RC F1
...rc f1
3docean
auto car control f1 formula race rc remote speed
remote control f1 car
turbosquid
$10
rc plane
...lane
turbosquid
free 3d model rc plane for download as blend on turbosquid: 3d models for games, architecture, videos. (1295828)
turbosquid
$75
RC buggy
... available on turbo squid, the world's leading provider of digital 3d models for visualization, films, television, and games.
turbosquid
$30
RC Jet
... available on turbo squid, the world's leading provider of digital 3d models for visualization, films, television, and games.
turbosquid
$10
RC-Car
... available on turbo squid, the world's leading provider of digital 3d models for visualization, films, television, and games.
turbosquid
$8
RC Airfield
... available on turbo squid, the world's leading provider of digital 3d models for visualization, films, television, and games.
turbosquid
$4
RC Hovercraft
... available on turbo squid, the world's leading provider of digital 3d models for visualization, films, television, and games.
turbosquid
free

rc car.blend
... available on turbo squid, the world's leading provider of digital 3d models for visualization, films, television, and games.
Monster
3d_export
$5
monster
...monster
3dexport
very realistic monster
3d_export
free

monster
...monster
3dexport
bloody monster! (looks terrifying)
3d_ocean
$12

Monster
... this code “envatoguest2016” . visit our store high details 3d character model for small monster , useful for animations, movi...
3d_ocean
$15

Monster
...monster
3docean
android game ios java main model monster playdesign
polycount :1118 texture :1024×1024png
3d_ocean
$8

Monster Man
...monster man
3docean
giant monster
monster man software: 3ds max, mental ray.
turbosquid
$60

MONSTER
...turbosquid
royalty free 3d model monster for download as max on turbosquid: 3d models for games, architecture, videos. (1220728)
turbosquid
$60

Monster
...turbosquid
royalty free 3d model monster for download as fbx on turbosquid: 3d models for games, architecture, videos. (1320840)
turbosquid
$15
Monster
...turbosquid
royalty free 3d model monster for download as ztl on turbosquid: 3d models for games, architecture, videos. (1417804)
turbosquid
$10

Monster
...turbosquid
royalty free 3d model monster for download as ztl on turbosquid: 3d models for games, architecture, videos. (1576749)
turbosquid
$10

Monster
...turbosquid
royalty free 3d model monster for download as ztl on turbosquid: 3d models for games, architecture, videos. (1479023)
Truck
3d_export
$8

truck
...truck
3dexport
truck
archibase_planet
free

Truck
...truck
archibase planet
truck truck crane car
truck toyota n071013 - 3d model (*.gsm+*.3ds) for exterior 3d visualization.
archibase_planet
free

Truck
...truck
archibase planet
truck lorry car
truck - 3d model (*.gsm+*.3ds) for exterior 3d visualization.
archibase_planet
free

Truck
...truck
archibase planet
truck lorry car
truck n260213 - 3d model (*.gsm+*.3ds) for exterior 3d visualization.
3d_export
$5

truck
...truck
3dexport
3d model of a truck, made for optimus prime!
3d_ocean
$19
Truck
...truck
3docean
four-wheel max truck
precision four-wheel drive truck with mud mask effect, the door can be opened
archibase_planet
free

Truck
...truck
archibase planet
truck car broken car lorry
truck broken - 3d model (*.gsm+*.3ds) for exterior 3d visualization.
archibase_planet
free

Truck
...truck
archibase planet
truck lorry autotruck
truck kenworth t600 n280113 - 3d model (*.gsm+*.3ds) for exterior 3d visualization.
archibase_planet
free

Truck
...
archibase planet
truck freightliner lorry car
truck freightliner n200314 - 3d model (*.gsm+*.3ds) for exterior 3d visualization.
archibase_planet
free

Truck
...truck
archibase planet
truck lorry autotruck
truck 4 eu n160614 - 3d model (*.gsm+*.3ds) for exterior 3d visualization.
Fully
turbosquid
$50

Drone fully rigged
...
royalty free 3d model drone fully rigged for download as max on turbosquid: 3d models for games, architecture, videos. (1282280)
turbosquid
$12

FULLY PARAMETRIC CHAIR
...alty free 3d model fully parametric chair for download as rvt on turbosquid: 3d models for games, architecture, videos. (1280209)
turbosquid
$10

firetruck-fully-rigged
...yalty free 3d model firetruck-fully-rigged for download as ma on turbosquid: 3d models for games, architecture, videos. (1653811)
turbosquid
$6

Fully rigged character
...ty free 3d model fully rigged character for download as blend on turbosquid: 3d models for games, architecture, videos. (1486076)
turbosquid
$3
Fully Rigged shark
...ee 3d model fully rigged 3d shark model for download as blend on turbosquid: 3d models for games, architecture, videos. (1517695)
turbosquid
$75

Fully Customizable Hospital
... available on turbo squid, the world's leading provider of digital 3d models for visualization, films, television, and games.
turbosquid
free

Fully Rigged Link
... available on turbo squid, the world's leading provider of digital 3d models for visualization, films, television, and games.
design_connected
$16

Troy W Fully Covered
...troy w fully covered
designconnected
magis troy w fully covered computer generated 3d model. designed by wanders, marcel.
cg_studio
$99

Pepe fully rigged3d model
...ully rigged3d model
cgstudio
.max - pepe fully rigged 3d model, royalty free license available, instant download after purchase.
3d_export
$60

Ankylosaur 8K - fully animated
...ankylosaur 8k - fully animated
3dexport
Printable
3d_export
$2
printable audi car
...printable audi car
3dexport
printable audi car
turbosquid
$23

Printable Statue
...ty free 3d model printable statue for download as obj and stl on turbosquid: 3d models for games, architecture, videos. (1415137)
turbosquid
$1

heart printable
...y free 3d model heart printable for download as stl and sldpr on turbosquid: 3d models for games, architecture, videos. (1209566)
turbosquid
$1
Printable Hook
...
royalty free 3d model 3d printable hook for download as stl on turbosquid: 3d models for games, architecture, videos. (1413683)
turbosquid
$30
Printable support
... model 3d printable support for download as max, 3ds, and stl on turbosquid: 3d models for games, architecture, videos. (1689342)
turbosquid
$7

Printable Mug
...e 3d model 3d printable mug for download as obj, fbx, and stl on turbosquid: 3d models for games, architecture, videos. (1496940)
turbosquid
$40

Printable cottage
... available on turbo squid, the world's leading provider of digital 3d models for visualization, films, television, and games.
turbosquid
$4

Printable dice
... available on turbo squid, the world's leading provider of digital 3d models for visualization, films, television, and games.
turbosquid
$10

Printable Pot
...rintable pot 3d print model for download as ztl, stl, and obj on turbosquid: 3d models for games, architecture, videos. (1608486)
3d_export
$40

wagtail printable
...printable
3dexport
3d printable model of wagtail bird.<br>dimensions:<br>h-149 mm<br>w-71 mm<br>l-185 mm
Car
3d_export
$5

car
...car
3dexport
luxury car high quality car
3d_export
$5

car
...car
3dexport
luxury car high quality car
3d_export
$5

car
...car
3dexport
luxury car high quality car
3d_export
$5

car
...car
3dexport
luxury car high quality car
3d_export
$5

car
...car
3dexport
luxury car high quality car
archibase_planet
free
Car
...
archibase planet
car sports car motor-car sportster
car nascar#1 n300114 - 3d model (*.gsm+*.3ds) for exterior 3d visualization.
archibase_planet
free

Car
...ibase planet
car motor-car sportster sports car
car gablota xform n190214 - 3d model (*.gsm+*.3ds) for exterior 3d visualization.
archibase_planet
free

Car
...car
archibase planet
car motor car transport
car vaz 2104- 3d model for interior 3d visualization.
3d_export
$15

car
...car
3dexport
car
3d_export
free

car
...car
3dexport
car