Thingiverse
DIY Smart Garage Door Remote
by Thingiverse
Last crawled date: 4 years, 2 months ago
This is a very useful, home security DIY garage door remote controller. If your Android or Apple smart phone is eWeLink compatible, which it likely is, then you can open and close your garage door from anywhere in the world. The eWeLink app is also compatible with Amazon Alexa & Google Home. My preferred way to open and close my garage doors are with an Alexa connected device or the Alexa app widget on my phone. After installation, normal garage door remote and wall button functionality are maintained.
Skill Level: Advanced-Beginner to Intermediate electronics, relays and mains high voltage experience level suggested.
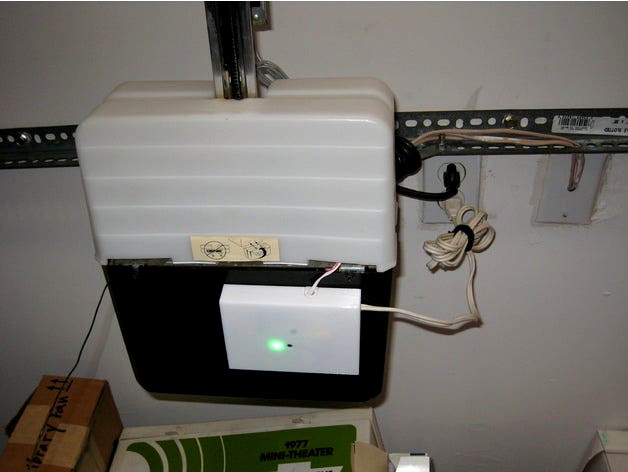
The first image is looking upwards at my Genie garage door opener motor with the DIY remote case attached with double-sided tape.
Your Sonoff Basic needs to have updated firmware that supports "Inching" mode. If not, then you must update your eWeLink phone app and upload the most recent Sonoff Basic firmware to your Sonoff Basic switch and set it to Inching mode. Inching mode allows you to set the Sonoff Basic so that it only turns "ON" for a set period of time before turning off. Change this setting to 0.5 seconds so it mimics you pushing the button in your garage to open or close your garage door. YouTube has videos. Search for "How to Firmware Upgrade Sonoff WiFi Smart Switch." Ignore the Tasmota videos.
Inching mode automatically turns the Sonoff switch on, pauses for the set time and then turns it off. For this reason the smart speaker voice command to open and close the door is the same: "Garage Door On." This command mimics you pushing the wall switch in your garage to open or close the door. The phrase "Garage Door" is whatever you decide to label it in the eWeLink app.
Before taking on this project be sure to test your garage door opener to see if temporarily shorting the first two wall switch wires will open your garage door. These are the first two connectors out of four garage opener connections as shown with the red arrows in the second image. You can test if it works directly on the opener like I did, but it is safer to temporarily remove the wall switch from the wall and test the two wires while standing on the floor. I was up on a ladder when I tested the wires. When the opener kicked in it startled me and I almost fell off the ladder.
This project worked as I expected with my old Genie garage door opener. However, when I shorted the first two connectors on my new, replacement Chamberlain opener for my double door, nothing happened. I discovered the Chamberlain wall switch controller sends a code to the opener. Simply shorting the first two terminals does nothing. The only solution was to solder two wires to the SMD micro switch in the wall switch controller so that the Sonoff half-second on/off timer would mimic a button push. See the Chamberlain wall switch PCB in the 2nd to the last image. The last image shows the garage remote plugged into the Chamberlain door switch with 3.5mm mono audio jacks.
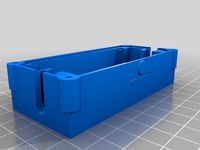
In the third image the red double-sided tape on the base keeps things held down during assembly. Two 5mm screw holes are provided in the base for wall mounting if needed. I included a lot of images so you can see how to wire the relay to the Sonoff.
The vertical rounded tab on the base has a hole in it. The hole is for a 3.5mm female mono audio jack. This allows the wires to the garage door motor to be terminated with a 3.5mm male jack for an easier to separate, cleaner installation. I didn't have the male/female jacks at the time the original pictures were taken.
Main Components:Sonoff Basic Smart WiFi Wireless Light Switch, about $5AC110V Relay LY2NJ, about $2Miscellaneous: 110v power cord with 2-prong polarized plug, wire, spade connectors, double-sided tape and (2) screws (optional).
Final Comment: Why did I create this? I have a security camera facing my two garage doors. It's easy to see whether they are left open or are closed via Tiny Cam Pro on my Android phone. One day, while a half-hour away from home, I saw I had left the double door open which gave anyone complete access to the rest of my home. I switched into panic mode and raced home. From that day on I set about to come up with a low cost, easy to implement solution to this predicament.
Because this device is so helpful and easy to make, I am sharing it with you. Likes, images and makes are greatly appreciated. Thank you.
-VegasGuy
Update 12/08/2019: I added text to the base to indicate "L" for line voltage and "N" for neutral when inserting the mains voltage wires into the Sonoff. FYI: The wide prong is neutral. The narrow prong is line voltage (hot). The rest of the wires do not require attention to polarity.
Update 12/12/2019: I modified the cover so that the hole for the Sonoff reset button has an internal self-centering cone. This stops the button from getting hung up inside the case during assembly. If you use the cone version some feedback as to how well it works would be welcomed.
Update 01/18/20: I added a 6mm hole to the base near the relay connectors. This hole allows the user to run hidden wires behind the drywall to a wall mounted garage door button. I deleted the image for the previous STL when I uploaded the new version. But Thingiverse has so far not regenerated a new image for the base of this version. If you know why, and possibly how to regenerate the image, please let me know.
Skill Level: Advanced-Beginner to Intermediate electronics, relays and mains high voltage experience level suggested.
The first image is looking upwards at my Genie garage door opener motor with the DIY remote case attached with double-sided tape.
Your Sonoff Basic needs to have updated firmware that supports "Inching" mode. If not, then you must update your eWeLink phone app and upload the most recent Sonoff Basic firmware to your Sonoff Basic switch and set it to Inching mode. Inching mode allows you to set the Sonoff Basic so that it only turns "ON" for a set period of time before turning off. Change this setting to 0.5 seconds so it mimics you pushing the button in your garage to open or close your garage door. YouTube has videos. Search for "How to Firmware Upgrade Sonoff WiFi Smart Switch." Ignore the Tasmota videos.
Inching mode automatically turns the Sonoff switch on, pauses for the set time and then turns it off. For this reason the smart speaker voice command to open and close the door is the same: "Garage Door On." This command mimics you pushing the wall switch in your garage to open or close the door. The phrase "Garage Door" is whatever you decide to label it in the eWeLink app.
Before taking on this project be sure to test your garage door opener to see if temporarily shorting the first two wall switch wires will open your garage door. These are the first two connectors out of four garage opener connections as shown with the red arrows in the second image. You can test if it works directly on the opener like I did, but it is safer to temporarily remove the wall switch from the wall and test the two wires while standing on the floor. I was up on a ladder when I tested the wires. When the opener kicked in it startled me and I almost fell off the ladder.
This project worked as I expected with my old Genie garage door opener. However, when I shorted the first two connectors on my new, replacement Chamberlain opener for my double door, nothing happened. I discovered the Chamberlain wall switch controller sends a code to the opener. Simply shorting the first two terminals does nothing. The only solution was to solder two wires to the SMD micro switch in the wall switch controller so that the Sonoff half-second on/off timer would mimic a button push. See the Chamberlain wall switch PCB in the 2nd to the last image. The last image shows the garage remote plugged into the Chamberlain door switch with 3.5mm mono audio jacks.
In the third image the red double-sided tape on the base keeps things held down during assembly. Two 5mm screw holes are provided in the base for wall mounting if needed. I included a lot of images so you can see how to wire the relay to the Sonoff.
The vertical rounded tab on the base has a hole in it. The hole is for a 3.5mm female mono audio jack. This allows the wires to the garage door motor to be terminated with a 3.5mm male jack for an easier to separate, cleaner installation. I didn't have the male/female jacks at the time the original pictures were taken.
Main Components:Sonoff Basic Smart WiFi Wireless Light Switch, about $5AC110V Relay LY2NJ, about $2Miscellaneous: 110v power cord with 2-prong polarized plug, wire, spade connectors, double-sided tape and (2) screws (optional).
Final Comment: Why did I create this? I have a security camera facing my two garage doors. It's easy to see whether they are left open or are closed via Tiny Cam Pro on my Android phone. One day, while a half-hour away from home, I saw I had left the double door open which gave anyone complete access to the rest of my home. I switched into panic mode and raced home. From that day on I set about to come up with a low cost, easy to implement solution to this predicament.
Because this device is so helpful and easy to make, I am sharing it with you. Likes, images and makes are greatly appreciated. Thank you.
-VegasGuy
Update 12/08/2019: I added text to the base to indicate "L" for line voltage and "N" for neutral when inserting the mains voltage wires into the Sonoff. FYI: The wide prong is neutral. The narrow prong is line voltage (hot). The rest of the wires do not require attention to polarity.
Update 12/12/2019: I modified the cover so that the hole for the Sonoff reset button has an internal self-centering cone. This stops the button from getting hung up inside the case during assembly. If you use the cone version some feedback as to how well it works would be welcomed.
Update 01/18/20: I added a 6mm hole to the base near the relay connectors. This hole allows the user to run hidden wires behind the drywall to a wall mounted garage door button. I deleted the image for the previous STL when I uploaded the new version. But Thingiverse has so far not regenerated a new image for the base of this version. If you know why, and possibly how to regenerate the image, please let me know.
Similar models
thingiverse
free

Sonoff SV Enclosure by Jackie_P
... holes on the right side. the wires operating the garage door opener, as well as the magnetic switch will be coming through them.
thingiverse
free

Wifi Alexa Garage Door Hack - Project Box by W5CYF
...ve wireless relay to trigger the remote. this is the project box for wifi board and garage door remote. used with amazon alaxa.
thingiverse
free
ZigBee On/Off relay enclosure
... made an enclosure with button. also this hiding power line connections, and making the relay usable as standalone remote switch.
grabcad
free

Smart foot/manual switch
...cm height. the size like ordinary switch.
warning! in safety reasons for hoigh voltage wires connection use sonoff usermonual.
thingiverse
free

Honda Accessory Plate for Hidden Garage Door Opener
...ed plate, and mount into car (with garage opener unplugged)
6) mount newly modified garage door opener under the dash with velcro
thingiverse
free

CHAMBERLAIN GARAGE DOOR OPENER WALL MOUNT
... wall mount for my chamberlain klik3u garage opener to mount in the house for the detached garage. attached with a command strip.
thingiverse
free

Sonoff Basic Wall Switch Enclosure by pitation
... the wire guides keep the wites tamed and in place. i suggest you attach 14awg solid wires about 6" long before closing it.
thingiverse
free

Liftmaster garage opener wall unit button by conceptdestiny
...l fit chamberlain/liftmaster/craftsman garage door opener wall control. designed for models 78lm and 41a5273, but may fit others.
thingiverse
free

Chamberlain Garage door remote case by Josh303
...ase for a chamberlain garage door remote. which you can put on a key ring. the original ring of the case was broken.
print in tpu
thingiverse
free

Buttons for Three Button Genie Garage Door Opener Remote by jaredaz
...tton garage door remote by genie. the undersides take a little cleanup on my printer, if you have awesome bridging you might not.
Remote
archibase_planet
free

Remote
...remote
archibase planet
tv remote remote controller remote
remote - 3d model for interior 3d visualization.
archibase_planet
free

Remote
...e
archibase planet
remote control remote controller remote
remote n140512 - 3d model (*.gsm+*.3ds) for interior 3d visualization.
turbosquid
$1

Remote
...
turbosquid
royalty free 3d model remote for download as obj on turbosquid: 3d models for games, architecture, videos. (1487515)
3d_export
$5

Tv Remote
...tv remote
3dexport
tv remote
3d_ocean
$7

Remote controller
... control switcher tv remote
remote controller for tv, sound systems etc easy to edit textures photo real rendered with mental ray
turbosquid
$39

remote
...free 3d model remote for download as obj, fbx, blend, and dae on turbosquid: 3d models for games, architecture, videos. (1387531)
archive3d
free

Remote 3D Model
...l
archive3d
tv remote remote controller remote
remote - 3d model for interior 3d visualization.
turbosquid
$11
Remote
... available on turbo squid, the world's leading provider of digital 3d models for visualization, films, television, and games.
turbosquid
$10

remote
... available on turbo squid, the world's leading provider of digital 3d models for visualization, films, television, and games.
archive3d
free

Remote 3D Model
...remote controller remote
remote n140512 - 3d model (*.gsm+*.3ds) for interior 3d visualization.
Smart
3ddd
$1

SMART
...smart
3ddd
стул smart
3d_export
$5

smart tv
...smart tv
3dexport
beautiful smart tv
turbosquid
$15

Smart
... available on turbo squid, the world's leading provider of digital 3d models for visualization, films, television, and games.
3ddd
$1

CTSsalotti / Smart
...ctssalotti / smart
3ddd
ctssalotti , угловой
ctssalotti smart 2800х1700
3ddd
$1
Gala Smart раковина
...gala smart раковина
3ddd
gala , smart
производитель gala
модель smart
design_connected
$13

Smart&Sleek
...smart&sleek
designconnected
wisteria smart&sleek computer generated 3d model.
3d_export
$5

Smart 3D Model
...smart 3d model
3dexport
smart car small mercedes
smart 3d model pio33d 67449 3dexport
3d_export
$15

Smart 3D Model
...smart 3d model
3dexport
smart auto car compact_car compat
smart 3d model savmart 95148 3dexport
3d_export
$12

samsung smart tv
...samsung smart tv
3dexport
samsung smart tv
3ddd
$1

Smart
...smart
3ddd
материалы вирей. модель не моя. переделал под вирей просто.
Diy
3d_export
free
DIY 3D Printer
...diy 3d printer
3dexport
diy 3d printer model
turbosquid
$3
Diy Desk to Bench
...odel diy desk to bench for download as 3ds, max, obj, and fbx on turbosquid: 3d models for games, architecture, videos. (1506589)
turbosquid
$2

DIY Moon Light
...model diy moon light for download as obj, fbx, blend, and dae on turbosquid: 3d models for games, architecture, videos. (1501170)
3d_export
$8
DIY CNC Router 3D Model
...diy cnc router 3d model
3dexport
cnc; router; diy; homemade
diy cnc router 3d model maikeru86 58463 3dexport
3d_export
free

Download free Diying Plant 3D Model
...download free diying plant 3d model
3dexport
diying plant blender
diying plant 3d model visitorsama 98607 3dexport
3ddd
$1

DIY coffee table + decor
... рамка для фото
кофейный столик diy 400х350х600(h) мм. моделился по фото. внимание: материалы - corona.
turbosquid
$3

Diy Wire Lamp Shade
...free 3d model diy wire lamp shade for download as 3ds and fbx on turbosquid: 3d models for games, architecture, videos. (1347605)
cg_studio
$12

DIY MONGOLIAN LAMB STOOLS3d model
... hair soft pile white
.max - diy mongolian lamb stools 3d model, royalty free license available, instant download after purchase.
cg_studio
$10

DIY MONGOLIAN LAMB STOOLS3d model
...ol goat ewe furniture
.max - diy mongolian lamb stools 3d model, royalty free license available, instant download after purchase.
turbosquid
$3

DIY Hanging Hot Air Balloon
...ty free 3d model diy hanging hot air balloon for download as on turbosquid: 3d models for games, architecture, videos. (1701544)
Garage
3d_export
free

garage
...garage
3dexport
garage
3d_export
$10

garage
...garage
3dexport
garage with colored gates
3d_export
$5

garage
...garage
3dexport
old rusty garage with graffiti
archibase_planet
free
Garage
...arage
archibase planet
construction building garage
multistoried garage n011009 - 3d model (*.3ds) for exterior 3d visualization.
archibase_planet
free
Garage
...arage
archibase planet
garage carport awning
garage carport n040915 - 3d model (*.gsm+*.3ds+*.max) for exterior 3d visualization.
3d_export
$9

garage
...garage
3dexport
low poly garage included texture. object: 1 faces: 315 vertices:459
turbosquid
free
Garage
...garage
turbosquid
free 3d model garage for download as skp on turbosquid: 3d models for games, architecture, videos. (1606634)
turbosquid
$39
Garage
...
turbosquid
royalty free 3d model garage for download as fbx on turbosquid: 3d models for games, architecture, videos. (1687250)
3d_export
$15

house with garage
...house with garage
3dexport
house with garage
3d_export
free

artoon garage
...artoon garage
3dexport
сartoon garage
Door
3d_export
$5
door handle of doors
...door handle of doors
3dexport
door handle of doors
3d_ocean
$4

Door
...3docean
architecture door gate gothic door old style door
door, 3d door, gothic door, architecture, old style door, gate, 3d gate
3d_ocean
$10

Door
...door
3docean
design door doors home house indoor interior opening doors
door design
archibase_planet
free
Door
...r
archibase planet
door sliding door interior door rail door
door n250515 - 3d model (*.gsm+*.3ds) for interior 3d visualization.
archibase_planet
free
Door
...door
archibase planet
door sash door sash-door interior door
door 900 - 3d model (*.gsm+*.3ds) for interior 3d visualization.
archibase_planet
free
Door
...door
archibase planet
door sash door sash-door interior door
door 600 - 3d model (*.gsm+*.3ds) for interior 3d visualization.
archibase_planet
free

Door
...door
archibase planet
door sash door sash-door interior door
door 800 - 3d model (*.gsm+*.3ds) for interior 3d visualization.
archibase_planet
free
Door
...door
archibase planet
door sash door sash-door interior door
door 800 - 3d model (*.gsm+*.3ds) for interior 3d visualization.
archibase_planet
free
Door
...door
archibase planet
door sash door sash-door interior door
door 700 - 3d model (*.gsm+*.3ds) for interior 3d visualization.
archibase_planet
free
Door
...door
archibase planet
door sash door sash-door interior door
door 600 - 3d model (*.gsm+*.3ds) for interior 3d visualization.