Thingiverse

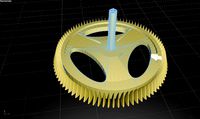
92T 48p gear adapter for Toranado Precision Geared Extruder by DopeJohnny
by Thingiverse
Last crawled date: 3 years, 4 months ago
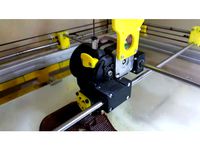
Since the hardware sets for the Toranado Precision Geared Extruder aren't sold anymore I looked for a metal gear alternative. I found some gears for RC cars that fit with some tinkering. Here is a solution to use these gears on the Toranado v2.1. I also added a shaft collar for an M4 grub screw. As of release (Nov 2020), I have this running very well for almost 2 years. Please report back in the comments how well the assembly worked for you or what values you had to change!
There are some additional .stl to adjust the fit. If you need to do more changes: I added User Parameters in the .f3d Fusion360 file (Source), so you can change all important dimensions precisely without messing up everything else. I also reverse engineered the gear cover.
Assembly Instructions
Step 1: Get all the parts
92T 48p and 19T 48p gears You can buy them on Aliexpress. Usually they are for RC cars.
M3x6 bolt (x2) ISO 4017, DIN 7984 or similar bolts with a low head, alternatively you can use self-tapping screws that are used in the original Toranado project (DIN 7981 M2.2 or imperal #2)
M4 grub screw e.g. from an old lead screw coupling
Glue e.g. acetone if you use ABS or super glue, ...
5mm shaft to glue both pieces together
Grease lithium or ball bearing
5mm drill bit and 5mm reamer (optional)
Step 2: Prepare and print
The 19T gear comes with a 3mm hole. But the Nema14 has a 5mm shaft. Remove the grub screw and widen the hole with a 5mm drill bit. If you have a 5mm reamer, use it!
The shaft in the Toranado will need a flat side, so the grub screw has good grip. Use a file or an angle grinder.
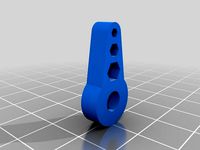
Print the adapter_0.00 and cover_0.00
Try to fit the 92T gear to the adapter and both pieces to the 5mm shaft. It must fit firmly without any slack. If it's too loose, reprint the .stl with a positive value (e.g. +0.05). You can also do your own adjustments in the .f3d Fusion360 source files. There are user parameters. When everything fits nicely, I also recommend to print 1 or 2 spares so you are prepared if something goes wrong.
Step 3: Glueing the cover and the adapter
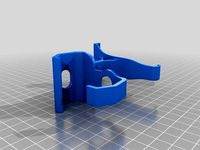
Mount the gear cover to the 5mm shaft for the Toranado. Insert a M4 grub screw and TIGHTEN IT! This is very important or the gear won't run true!
Put some glue on the flat side of the gear cover. Especially on the "arms" and the outer ring. Mount the adapter to the shaft so you can press both flat sides of the pieces together. Don't cover the hole of the adapter disk with any of the cover's arms! Let it dry then unmount it.
Step 4: Assembly
Mount the gear to the adapter and secure it with 2 bolts (M3 or #2). Put some grease on the gear and put it in your Toranado. Align the grub screw to the flat side on the shaft and tighten it. Give it a spin and check if it runs fairly true.
Loosen the 3 stepper bolts (there is a hole for that in the adapter). Mount the 19T gear to the stepper shaft. Adjust the stepper position so the gears mesh nicely. Turn the gears and make sure they don't bind up - some slack is better than binding up and losing steps. Then tighten the stepper bolts.
Step 5: E-Steps
Because the gear is 92T instead of the original 94T the E-Steps are slightly lower.
I use 512 steps/mm for my Toranado with 1.8deg Nema14 stepper, MK7 hobbed gear and 1/16 microstepping.
There are some additional .stl to adjust the fit. If you need to do more changes: I added User Parameters in the .f3d Fusion360 file (Source), so you can change all important dimensions precisely without messing up everything else. I also reverse engineered the gear cover.
Assembly Instructions
Step 1: Get all the parts
92T 48p and 19T 48p gears You can buy them on Aliexpress. Usually they are for RC cars.
M3x6 bolt (x2) ISO 4017, DIN 7984 or similar bolts with a low head, alternatively you can use self-tapping screws that are used in the original Toranado project (DIN 7981 M2.2 or imperal #2)
M4 grub screw e.g. from an old lead screw coupling
Glue e.g. acetone if you use ABS or super glue, ...
5mm shaft to glue both pieces together
Grease lithium or ball bearing
5mm drill bit and 5mm reamer (optional)
Step 2: Prepare and print
The 19T gear comes with a 3mm hole. But the Nema14 has a 5mm shaft. Remove the grub screw and widen the hole with a 5mm drill bit. If you have a 5mm reamer, use it!
The shaft in the Toranado will need a flat side, so the grub screw has good grip. Use a file or an angle grinder.
Print the adapter_0.00 and cover_0.00
Try to fit the 92T gear to the adapter and both pieces to the 5mm shaft. It must fit firmly without any slack. If it's too loose, reprint the .stl with a positive value (e.g. +0.05). You can also do your own adjustments in the .f3d Fusion360 source files. There are user parameters. When everything fits nicely, I also recommend to print 1 or 2 spares so you are prepared if something goes wrong.
Step 3: Glueing the cover and the adapter
Mount the gear cover to the 5mm shaft for the Toranado. Insert a M4 grub screw and TIGHTEN IT! This is very important or the gear won't run true!
Put some glue on the flat side of the gear cover. Especially on the "arms" and the outer ring. Mount the adapter to the shaft so you can press both flat sides of the pieces together. Don't cover the hole of the adapter disk with any of the cover's arms! Let it dry then unmount it.
Step 4: Assembly
Mount the gear to the adapter and secure it with 2 bolts (M3 or #2). Put some grease on the gear and put it in your Toranado. Align the grub screw to the flat side on the shaft and tighten it. Give it a spin and check if it runs fairly true.
Loosen the 3 stepper bolts (there is a hole for that in the adapter). Mount the 19T gear to the stepper shaft. Adjust the stepper position so the gears mesh nicely. Turn the gears and make sure they don't bind up - some slack is better than binding up and losing steps. Then tighten the stepper bolts.
Step 5: E-Steps
Because the gear is 92T instead of the original 94T the E-Steps are slightly lower.
I use 512 steps/mm for my Toranado with 1.8deg Nema14 stepper, MK7 hobbed gear and 1/16 microstepping.
Similar models
thingiverse
free

Shaft collar for Toranado Precision Geared Extruder by jhelmstetter
...ght: 6mm
variable dimensions:
inside diameter
outside diameter
height
set screw diameter
thanks for doing the hard work printbus!
thingiverse
free

fischertechnik stepper coupler
...ting, please bold the mounting hub with the adapter together. you can now push the adapter onto the shaft. lock it with the hole.
thingiverse
free
TORANADO + ULTIMAKER + Gear Extruder (NEMA17 + NEMA14) by fa_su_me
...ruder (nema17 + nema14) by fa_su_me
thingiverse
toranado + ultimaker + gear extruder (nema17 + nema14)
1.75mm flament
.rar files
thingiverse
free

Focuser support for Celestron C5 by ym1964
...end of the scope shaft.
many arduino projects use step motor as electronic focuser.
i used eqfocuser and i'm fully satisfied.
thingiverse
free

Bead chain gear for stepper motors with 5mm shaft, e.g. for Polargraph plotter by rincey12
...printer the 5mm hole was a bit too tight, a bit of work with a 5mm drill fixed this. the m3 makes its own thread when screwed in.
thingiverse
free

flat to 5mm shaft coupler by TM2114L3
...d you may split the shaft (thick collar and high infill and i have had no issues). fine threads seem to spin with to much torque.
thingiverse
free

5mm D Shaft Scooter Wheel Adapter
...such as nema 17 steppers for your robotics needs. similar to the pololu 2673 adapters but obviously not as...
thingiverse
free

Stepper Shaft Adapter by ahmlol
...rod and two machine-screws as tighteners for the shaft.
comment your improvement ideas or contact me if you need the cad-files :)
thingiverse
free
Servo attachment - For Nema 14 Stepper Motor by AnetA24U
... up the hole for the stepper shaft to fit. use a screw with a 4-5mm head and 5mm in length to tighten the stepper motor in place.
grabcad
free

NEMA14 Stepper Motor with Screw
...nema14 stepper motor with screw
grabcad
nema14 stepper motor with screw model i made
92T
thingiverse
free

Blade 130S Main Gear
...blade 130s main gear thingiverse 92t 0.4module. tested, works well. i recommend advanced printing. nozzle:...
thingiverse
free

Cooling fan spur gear - Option part for MKUltra 1/10 4WD Buggy by tahustvedt
...the body of the mkultra 4wd rc buggy. 87t, 92t and 97t gears are included. mkultra can be downloaded...
cults
free

Cooling fan spur gear - Option part for MKUltra 1/10 4WD Buggy
...the body of the mkultra 4wd rc buggy. 87t, 92t and 97t gears are included. 48dp. mkultra can be...
3dwarehouse
free

Engine Building Pt 1 (Block formation and addition of oil pan).
...what we are building is a detroit diesel 6v 92t series diesel engine. this only covers the beginning phases...
Dopejohnny
thingiverse
free

R2D2 Cookie Cutter - 2 piece design by DopeJohnny
... easier to release the dough and to accomendate for different thickness. i also resized it - the cookies will be about 75mm tall.
thingiverse
free

Mount for Rush Cherry Antenna by DopeJohnny
... and feed it through. i didn't put a slit in it. you can do that manually, but i doubt it will hold the antenna tightly then.
thingiverse
free

Soldering Iron Stand for TS100 by DopeJohnny
...g wool
sponge (60x60mm)
self-adhesive rubber feet
i also added .iges and fusion 360 source files if you want to make any changes.
thingiverse
free

Fatshark Lens Protector by DopeJohnny
... it works with the tpu slicer settings.
i also added a .stl without my integrated supports (_nis) and the fusion360 source file.
thingiverse
free

Phone stand for Corsair K70/K65 RGB by DopeJohnny
... second measurement is for the lip (a high lip will cover your screen). see the drawing if this explanation isn't sufficient.
thingiverse
free

Smoke Stopper with switch and G4 socket by DopeJohnny
...files so you can customize it.
the pictures are from an earlier version. i did some improvements to the parts after i printed it.
thingiverse
free

Wrist Rest Spacer for Corsair K70/K65 RGB by DopeJohnny
...as convenient to mount as the stock wrist rest.
v1.1 has some holes on the side walls so the supports are a bit easier to remove.
thingiverse
free
GameClip for encased Samsung Galaxy S6 by DopeJohnny
... infill mesh). just merge the objects when you applied all settings.
this is licensed under the gnu gpl v2. there is no warranty.
thingiverse
free

Replacement Headband for Koss KPH30i by DopeJohnny
...e: 0.4mmlayer height: max. 0.2mmwalls: 0.8mm (2 perimeters)bottom / top thickness: 0.8mminfill: 20%supports: yes, buildplate only
thingiverse
free

18mm inductive proximity sensor mount for Toranado Precision Geared Extruder LH v2.1 by DopeJohnny
...31 // x offset: -left +right [of the nozzle]#define y_probe_offset_from_extruder -35 // y offset: -front +behind [the nozzle]
48P
turbosquid
$2

SPUR GEAR 48P 40T 20PA 0.833PD
... available on turbo squid, the world's leading provider of digital 3d models for visualization, films, television, and games.
turbosquid
$2

SPUR GEAR 48P 39T 20PA 0.813PD
... available on turbo squid, the world's leading provider of digital 3d models for visualization, films, television, and games.
turbosquid
$2

SPUR GEAR 48P 38T 20PA 0.792PD
... available on turbo squid, the world's leading provider of digital 3d models for visualization, films, television, and games.
turbosquid
$2

SPUR GEAR 48P 37T 20PA 0.771PD
... available on turbo squid, the world's leading provider of digital 3d models for visualization, films, television, and games.
turbosquid
$2

SPUR GEAR 48P 36T 20PA 0.75PD
... available on turbo squid, the world's leading provider of digital 3d models for visualization, films, television, and games.
turbosquid
$2

SPUR GEAR 48P 35T 20PA 0.729PD
... available on turbo squid, the world's leading provider of digital 3d models for visualization, films, television, and games.
turbosquid
$2

SPUR GEAR 48P 34T 20PA 0.708PD
... available on turbo squid, the world's leading provider of digital 3d models for visualization, films, television, and games.
turbosquid
$2

SPUR GEAR 48P 33T 20PA 0.688PD
... available on turbo squid, the world's leading provider of digital 3d models for visualization, films, television, and games.
turbosquid
$2

SPUR GEAR 48P 32T 20PA 0.667PD
... available on turbo squid, the world's leading provider of digital 3d models for visualization, films, television, and games.
turbosquid
$2

SPUR GEAR 48P 31T 20PA 0.646PD
... available on turbo squid, the world's leading provider of digital 3d models for visualization, films, television, and games.
Toranado
thingiverse
free

40mm fan adaptor for toranado extruder by yanickr1973
...m fan adaptor for toranado extruder by yanickr1973
thingiverse
this is an adaptor i made for a 40mm fan on the toranado extruder
thingiverse
free

TORANADO Support for K8200 Alu Profile by Trojan3D
...ado support for k8200 alu profile by trojan3d
thingiverse
as requested here you have the toranado support for the velleman k8200
thingiverse
free

Toranado 40x40mm 12VDC Cooling Fan Cover by Toranado3D
...toranado 40x40mm 12vdc cooling fan cover by toranado3d
thingiverse
toranado 40x40mm cooling fan cover (12vdc).
thingiverse
free

Toranado 30x30mm 12VDC Cooling Fan Cover by Toranado3D
...toranado 30x30mm 12vdc cooling fan cover by toranado3d
thingiverse
toranado 30x30mm cooling fan cover (12vdc).
thingiverse
free
TORANADO + ULTIMAKER + Gear Extruder (NEMA17 + NEMA14) by fa_su_me
...ruder (nema17 + nema14) by fa_su_me
thingiverse
toranado + ultimaker + gear extruder (nema17 + nema14)
1.75mm flament
.rar files
thingiverse
free

Toranado 18mm Inductive Proximity Sensor Bracket by funbobby2001
...w what screws are supposed to be used for these mounting holes on the toranado? please leave a comment.
let me know how it works.
thingiverse
free

Gearcover for toranado extruder by wildur
...gearcover for toranado extruder by wildur
thingiverse
pour amorcer et purger le fil sans avoir a débrayer le roulement
thingiverse
free
Prometheus for Toranado by Prot0typ1cal
...less.
edit 30sep2016:
added plus sizes for the 30mmvent and idlerholder. original files tend to be too tight on the hot end neck.
thingiverse
free

Toranado With the Horizontal Rods by Walker330
... and the motor, although hot, is colder than my mk8.
thank toranado3d for his invention: toranado 2.1https://youtu.be/c47huo0qcei
thingiverse
free

Toranado Capacitative Proximity Sensor Bracket by gvalente
...easures, without the inner thread he used :)
toranado precision geared 1.75mm extruder - http://www.thingiverse.com/thing:1246951
Precision
turbosquid
$40
Precision Screwdriver
...model precision screwdriver for download as 3ds, max, and obj on turbosquid: 3d models for games, architecture, videos. (1301545)
cg_studio
$59

Precision mountain3d model
...n mountain3d model
cgstudio
.max - precision mountain 3d model, royalty free license available, instant download after purchase.
turbosquid
$10
Lazer Precision rifle
...lty free 3d model lazer precision rifle for download as blend on turbosquid: 3d models for games, architecture, videos. (1313439)
3d_export
$7
Precision Indicator
...includes all scene, lighting, cameras, materials and textures. many file formats are available. the visuals are in 4k resolution.
turbosquid
$59

Dell Precision 7510 Laptop
... dell precision 7510 laptop for download as max, fbx, and obj on turbosquid: 3d models for games, architecture, videos. (1678133)
turbosquid
$45
11 Precision Metals Bldg03
... available on turbo squid, the world's leading provider of digital 3d models for visualization, films, television, and games.
turbosquid
$37

Kelly Wearstler Precision bench
... available on turbo squid, the world's leading provider of digital 3d models for visualization, films, television, and games.
turbosquid
$18
Kelly Wearstler Precision table
... available on turbo squid, the world's leading provider of digital 3d models for visualization, films, television, and games.
3d_export
$60

Fender Precision Bass 3D Model
...uitar frets instrument electric bassguitar 4string rock blues pop music
fender precision bass 3d model rendersteel 86834 3dexport
3d_export
$5

precision centrifugal pump
...ceed 180℃ and the inlet pressure does not exceed 0.8mpa.<br>drawings can only be used as a reference for mechanical design!
Extruder
3ddd
$1

Extruded Chair
...extruded chair
3ddd
extruded , tom dixon
inspired by tom dixon extruded chair
turbosquid
$15

Extruded Table
... extruded table for download as blend, dae, fbx, obj, and stl on turbosquid: 3d models for games, architecture, videos. (1634137)
turbosquid
$2

3D Printer Extruder
...d
royalty free 3d model 3d printer extruder for download as on turbosquid: 3d models for games, architecture, videos. (1537359)
turbosquid
$1

Zombie extruded text
...oyalty free 3d model zombie extruded text for download as obj on turbosquid: 3d models for games, architecture, videos. (1322198)
turbosquid
$4

Extruder conical screw
...el extruder conical screw for download as sldpr, ige, and stl on turbosquid: 3d models for games, architecture, videos. (1524433)
turbosquid
$50

3d PRINTER - Extruder
... available on turbo squid, the world's leading provider of digital 3d models for visualization, films, television, and games.
turbosquid
$15

Extruded Table 2
...xtruded table 2 for download as blend, dae, fbx, obj, and stl on turbosquid: 3d models for games, architecture, videos. (1621846)
turbosquid
$10

Maya Extrude Tool
... available on turbo squid, the world's leading provider of digital 3d models for visualization, films, television, and games.
3d_export
$5

world earth extrude map
...world earth extrude map
3dexport
3ddd
$1

Simply Elegant Extruded Tree Coffee Table Design
...ble by link studios. the silhouette of a tree is visible at one angle, extruded from the surface to create the support structure.
Geared
3d_ocean
$4
Gears
...gears
3docean
gear gears iron
4 different size of gears
3d_export
$5
gear
...gear
3dexport
gear
3d_export
free
Gears
...gears
3dexport
gears
3d_export
$5
gear
...gear
3dexport
a simple model of gear
3d_export
$5

gear
...gear
3dexport
gear for transmission , case machine
3d_ocean
$3
Gears
...nical parts process steampunk vehicle wheel work
10 different gear models volume 01-10 files: .3ds .c4d .obj note: you need vray
3d_ocean
$1

Spur Gear
...spur gear
3docean
decoration gear
a typical spur gear
3d_ocean
$4
Gear wheels
...gear wheels
3docean
engine engineering gear gears industry machinery mechanical toothwheel wheel
pair of gear wheels : animated.
turbosquid
$9
Gear
...gear
turbosquid
royalty free 3d model gear for download as on turbosquid: 3d models for games, architecture, videos. (1712328)
turbosquid
$2

Gears
...rs
turbosquid
royalty free 3d model gears for download as ma on turbosquid: 3d models for games, architecture, videos. (1166710)
Gear
3d_ocean
$4
Gears
...gears
3docean
gear gears iron
4 different size of gears
3d_export
$5
gear
...gear
3dexport
gear
3d_export
free
Gears
...gears
3dexport
gears
3d_export
$5
gear
...gear
3dexport
a simple model of gear
3d_export
$5
gear
...gear
3dexport
gear for transmission , case machine
3d_ocean
$3
Gears
...nical parts process steampunk vehicle wheel work
10 different gear models volume 01-10 files: .3ds .c4d .obj note: you need vray
3d_ocean
$1
Spur Gear
...spur gear
3docean
decoration gear
a typical spur gear
3d_ocean
$4
Gear wheels
...gear wheels
3docean
engine engineering gear gears industry machinery mechanical toothwheel wheel
pair of gear wheels : animated.
turbosquid
$9
Gear
...gear
turbosquid
royalty free 3d model gear for download as on turbosquid: 3d models for games, architecture, videos. (1712328)
turbosquid
$2
Gears
...rs
turbosquid
royalty free 3d model gears for download as ma on turbosquid: 3d models for games, architecture, videos. (1166710)
Adapter
3d_export
$10
Adapter 3D Model
...adapter 3d model
3dexport
adapter
adapter 3d model mur 20260 3dexport
archive3d
free

Adapter socket 3D Model
...dapter socket adapter
adapter socket n090211 - 3d model (*.3ds) for interior 3d visualization.
turbosquid
$400

cell adaptation
...
royalty free 3d model cell adaptation for download as blend on turbosquid: 3d models for games, architecture, videos. (1701655)
archive3d
free
Adapter 3D Model
...ups pc equipment
adapter extron n180813 - 3d model (*.gsm+*.3ds) for interior 3d visualization.
turbosquid
$5

usb adapter
...royalty free 3d model usb adapter for download as ige and stl on turbosquid: 3d models for games, architecture, videos. (1582234)
turbosquid
$15
Power adapter
...free 3d model power adapter for download as max, obj, and fbx on turbosquid: 3d models for games, architecture, videos. (1510024)
turbosquid
$8

USB adapter
...e 3d model usb adapter for download as max, fbx, obj, and dwg on turbosquid: 3d models for games, architecture, videos. (1713542)
turbosquid
$30

adapter.3ds
... available on turbo squid, the world's leading provider of digital 3d models for visualization, films, television, and games.
turbosquid
$15

Nokia Adapter
... available on turbo squid, the world's leading provider of digital 3d models for visualization, films, television, and games.
turbosquid
$15
Universal adapter
... available on turbo squid, the world's leading provider of digital 3d models for visualization, films, television, and games.