Thingiverse
80x20 aluminum exrtrusion Y-axis for Prusa type printers (Tronxy/Anet/Zonestar/Folgertech) by ArtemKuchin
by Thingiverse
Last crawled date: 3 years ago
I wanted to redo the y-axis on my Tronxy P802MA for lower noise and better overall quality. There are many way to go, but I chose wheel just to try. I already had a very good experience after converting X-axis to 20x20 extrusion with minigantry.
So, I found https://www.thingiverse.com/thing:1278055
But the problem with that design that I wanted to leave my 16 tooth pulley because table is heavy and 20 tooth pulley would reduce holding power by 25-30%. Not good. Resolution is also a little concern, but not the primary one.
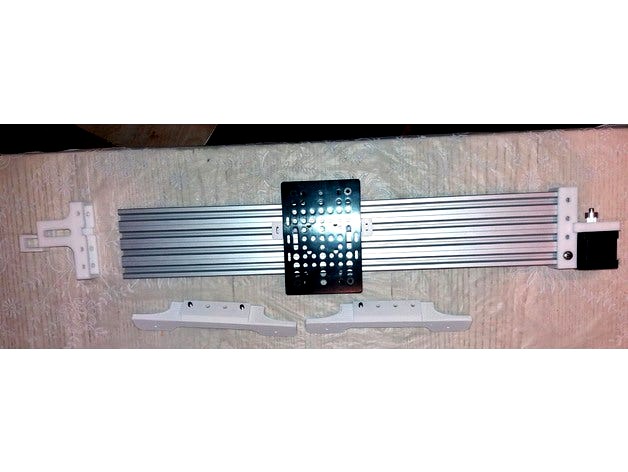
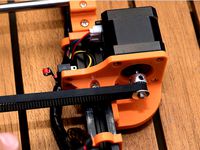
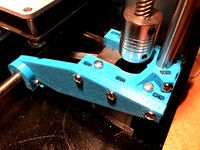
So, I did my version where belt goes inside v groove and strictly parallel to the axis. The most difficult part was to design a good belt holder while keeping it inside v-groove and parallel at all points.
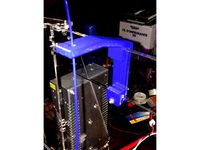
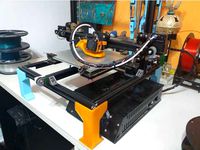
I have finished the convertion. Printed test 20x20 cube, the size on x and y match to 2/100th of a millimeter. The noise reduction is huge.
However, I noticed that the motor and the idler add considerable length to y-axis, while I want everything to be compact. Since I plan to fully rebuild printer to aluminum extrusion I consider this conversion a temporary step just to test wheel operation on vslot. For the next version I will plan to put motor and idler under the extrusion, so, they will not add any length to the axis.
Because it is a temporary solution I did not design a low profile mount to the base for the axis. I just did two clip-on mount for my tronxy p802 which clip onto the acrylic frame (front and back parts). For your printer you would need to find solution for yourself.
BOM:
16 5x10 screws
4 5x20 screws (for table mount)
Full gantry for 80x20 extrusion with wheel (see https://www.thingiverse.com/thing:1278055)
10 t-nuts
5mm nuts
25mm 3mm screw, nuts (for tentioner, see https://www.thingiverse.com/thing:1285301)
Two small screws (2-3 mm, depends on end switch) for end switch mount.
Washers, etc.
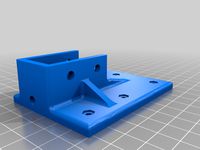
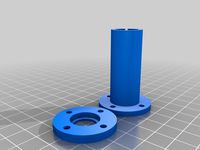
PRINTED PARTS
See images on how to position then when printing.
Everything is printed with 0.25mm layer. I used 0.6mm nozzle to speed things up. 3 shells.
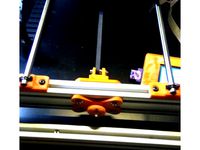
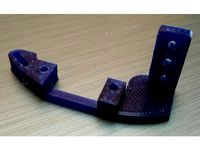
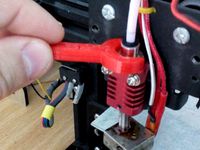
gantryhook-v3 - a belt hook, actually like crocodile jaw. Space is very limited, the jaw is too thin. After placing the belt between the teeth knot the jaw with some reliable material. I used thin fish line. Do it very tightly. Use someone’s help to hold the knot while you do the second knot. Print to the side so the teeth a very good quality, not supports. 100% infill. No support.
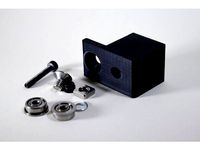
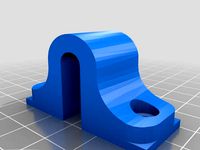
y-belt-tentioner – idler part. Supports are needed. 40% infill.
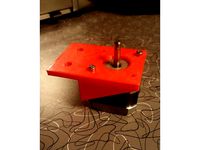
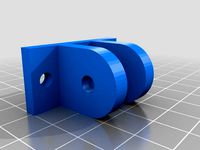
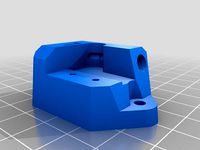
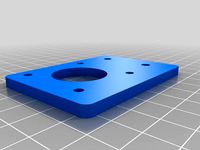
y-motor-holder – motor holder. Supports are needed. 40% infill.
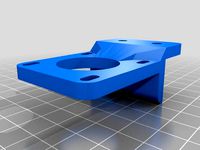
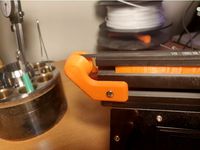
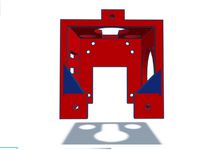
y-mount – clip on for the axis to acrylic frame. Supports are needed. 40% infill. In shown orientation the top part (where extrusion is mounted) is flattest. When assembling the axis put this part with crews and t-nuts on the extrusion, clip the axis on the frame then remove the frame and tighten the screws. It is a mess, I know.
y-tablespacer – it is a spacer between gantry and table holder.
Notes on table
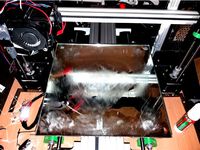
I use the original aluminum table from my tronxy as a table holder. And the table itself is fully glass now, I don’t use any aluminum under the glass. I have been using such setup since june 2017 and never had a problem. I will post this conversion later separately.
Models
All models are also provided in SolidWorks format. Feel free to play around, but add a remix to my thing if you post what you did.
So, I found https://www.thingiverse.com/thing:1278055
But the problem with that design that I wanted to leave my 16 tooth pulley because table is heavy and 20 tooth pulley would reduce holding power by 25-30%. Not good. Resolution is also a little concern, but not the primary one.
So, I did my version where belt goes inside v groove and strictly parallel to the axis. The most difficult part was to design a good belt holder while keeping it inside v-groove and parallel at all points.
I have finished the convertion. Printed test 20x20 cube, the size on x and y match to 2/100th of a millimeter. The noise reduction is huge.
However, I noticed that the motor and the idler add considerable length to y-axis, while I want everything to be compact. Since I plan to fully rebuild printer to aluminum extrusion I consider this conversion a temporary step just to test wheel operation on vslot. For the next version I will plan to put motor and idler under the extrusion, so, they will not add any length to the axis.
Because it is a temporary solution I did not design a low profile mount to the base for the axis. I just did two clip-on mount for my tronxy p802 which clip onto the acrylic frame (front and back parts). For your printer you would need to find solution for yourself.
BOM:
16 5x10 screws
4 5x20 screws (for table mount)
Full gantry for 80x20 extrusion with wheel (see https://www.thingiverse.com/thing:1278055)
10 t-nuts
5mm nuts
25mm 3mm screw, nuts (for tentioner, see https://www.thingiverse.com/thing:1285301)
Two small screws (2-3 mm, depends on end switch) for end switch mount.
Washers, etc.
PRINTED PARTS
See images on how to position then when printing.
Everything is printed with 0.25mm layer. I used 0.6mm nozzle to speed things up. 3 shells.
gantryhook-v3 - a belt hook, actually like crocodile jaw. Space is very limited, the jaw is too thin. After placing the belt between the teeth knot the jaw with some reliable material. I used thin fish line. Do it very tightly. Use someone’s help to hold the knot while you do the second knot. Print to the side so the teeth a very good quality, not supports. 100% infill. No support.
y-belt-tentioner – idler part. Supports are needed. 40% infill.
y-motor-holder – motor holder. Supports are needed. 40% infill.
y-mount – clip on for the axis to acrylic frame. Supports are needed. 40% infill. In shown orientation the top part (where extrusion is mounted) is flattest. When assembling the axis put this part with crews and t-nuts on the extrusion, clip the axis on the frame then remove the frame and tighten the screws. It is a mess, I know.
y-tablespacer – it is a spacer between gantry and table holder.
Notes on table
I use the original aluminum table from my tronxy as a table holder. And the table itself is fully glass now, I don’t use any aluminum under the glass. I have been using such setup since june 2017 and never had a problem. I will post this conversion later separately.
Models
All models are also provided in SolidWorks format. Feel free to play around, but add a remix to my thing if you post what you did.
Similar models
thingiverse
free

Tronxy X1 Y-Axis Limit Switch Mount by simonwilson
...s for mounting the switch to this printed part and uses an m4 screw and t-nut for attaching the mounting bracket to the extrusion
thingiverse
free
10 series extrusion Y axis motor mount by BDP1988
...eries.
the motor mount is for a standard nema 17 stepper motor.
i am not sure if these parts are compatible with 2020 extrusion.
thingiverse
free
Y belt tensioner for 2020 and 2040 aluminum extrusion by FFranzmann
...f prusa and haribo mod designs
you need to drill a hole for the m4 in your extrusion
added a version for 2020 although untested.
thingiverse
free

Anet A8 Plus Y-Axis Motor Mount/Belt Holder/Idler-Tensioner Plate by derektata
...e for two m5 hex bolts to feed through, and everything being secured to the frame using three m4x12mm flathead screws and t-nuts.
thingiverse
free
Y Axis motor mount for 20mm aluminum extrusion by Zzyzxx71
...te y axis motor mount - here she is.
it places the belt lower than initially designed, and adds support against the extrusion.
thingiverse
free
Belt Idler for Y Axis - M5 idler size (2020 Mount) by eldor_x
...ler from the original y idler using an m5 thread to screw through it.
you will need 2x m4 8mm screws and 2x m4 t-nut to mount it
thingiverse
free
TRONXY X3 Y Stepper Motor Support (with no 2020 extrusion) by jopereira
...h my bed support mod: https://www.thingiverse.com/thing:2436602
uses m4x8mm screws with t-nuts.
original (m2?) screws for switch.
thingiverse
free

Hevo corexy system
...the disc.
source:https://cad.onshape.com/documents/fe7ef93aeb21687c26dace27/w/ac0cc948d4102d237be16f5c/e/cda881af6fa70062f4562796
thingiverse
free
Tronxy X3 Belt Idler by 1sPiRe
...d° - gearbest°
tronxy x3° from gearbest°
12% off coupon from gearbest : gbte
part of my tronxy x3 upgrades collection
° affiliate
thingiverse
free
Tronxy X1 Y-Idler
...ace a captive nut part way through the print.
this y-idler can go with my y-motor mount:https://www.thingiverse.com/thing:4224115
Exrtrusion
thingiverse
free

The Flash Coaster (Dual Exrtrusion) by Jaydawgx7
... have also included the factory file for anyone using simplify3d. i have added a tool change script to try to stop color bleeding
thingiverse
free

20x20 Exrtrusion tool caddy. by Kaiso
... 20x20 extrusion using m5 screws and extrusion nuts. i'll include a .igs file so others can alter it to suit their purposes.
Artemkuchin
thingiverse
free
Better Undertale Heart Cookie Cutter by ArtemKuchin
...undertale heart cookie cutter by artemkuchin
thingiverse
added some plastic to make it sturdier and also made sharp bottom part.
thingiverse
free

2020 X-Axis Upgrade for Tronxy P802 by ArtemKuchin
.... i designed a hook to mini gantry keep belt parallel with 16 teeth pulley. take a look:https://www.thingiverse.com/thing:2774747
thingiverse
free

Skew calibration check for XY and Z (zx,zy) axes (axis) by ArtemKuchin
... same.
print params
pla. 1 shell. 5% infill. no supports. 1 bottom layer. 3 top layers. layer 0.15-0.25mm depends on nozzle size.
thingiverse
free
Full glass hotbed conversion by ArtemKuchin
...r, but luckily, the heater detached from glass very easily. so, i just cut new mirror and reattached the heater. works perfectly.
thingiverse
free
Hook for mini gantry for 20x20 aluminum extrusion x-axis conversion by ArtemKuchin
... weight is a lot more and we need as much torque as we can get.
update 06/02/2018:
printed 0.5kg of plastic with it- not problem.
80X20
thingiverse
free

Profile 80x20 by Vallekano
...profile 80x20 by vallekano
thingiverse
profile 80x20
thingiverse
free

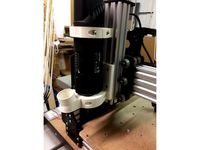
Makita router (RT0700, RT0701C) CNC holder for C-Beam or 80x20
... rt0701c) cnc holder for c-beam or 80x20
thingiverse
holder for makita router rt0700 or rt0701c mounted on c-beam (workbee cnc).
thingiverse
free

80x20 L-Brackets by Team1418
...iderably lighter than their aluminium counterparts, but are not as strong.
keep it awesome
team 1418
http://www.team1418.org/
thingiverse
free

Cable plugger T4001
...plugger t4001 thingiverse cable clippers for construction aluminium profiles 80x20 ...
thingiverse
free

55mm Motor Mount for 60mm or 80mm Extrusion by peteroakes
...a 55mm spindle for a cnc machine, attaches to 80x20 or 80x40 extrusions there is also one for 60x20...
thingiverse
free

Simple PCB Case by r1r3nn3
...pcb project. the supported sizes are: 60x40 70x30 70x50 80x20 ...
thingiverse
free

Cobblebot Little Monster Full Graphics Mount by Phelps3D
...the full graphics lcd to the top of the 80x20 extrusion using two of the m5x8 bolts and t-nuts....
3dbaza
$6

Office workplace IKEA 115 (338881)
...cabinet, anthracite 42x37x155 cm<br>bergshult bergshult pershult hanging shelf, white/white 80x20 cm<br>taggad taggad wall clock, white/grey 38...
thingiverse
free
Workbee VSlot Mount For Kress 1050 by Patrickl91
...able to mount it on a workbee cnc with 80x20 cbeam as z support. also change magnet to 3x6...
Zonestar
thingiverse
free

Zonestar Blower by juliocfranco
...zonestar blower by juliocfranco
thingiverse
beter eficience blower for dual extruder zonestar 805
thingiverse
free
Zonestar Z5 by Cinefil001
...zonestar z5 by cinefil001
thingiverse
pièces pour zonestar z5 fourni dans la carte sd
thingiverse
free
hotted container zonestar
...metal plank for the zonestar z5mr2 (p802qr2)
este adaptador fue hecho para colocarse en la placa de metal original de la zonestar
thingiverse
free

Zonestar Power Adapter by ReePlay
...zonestar power adapter by reeplay
thingiverse
for my new zonestar printer
reeplay
thingiverse
free
Zonestar P802n mounting by Ashley1973
...zonestar p802n mounting by ashley1973
thingiverse
zonestar p802n mounting shorter to suit the 802n
thingiverse
free

Damper for Zonestar P802M by Bengelen
...damper for zonestar p802m by bengelen
thingiverse
made the mount 1 mm smaller to fit my zonestar p802m
thingiverse
free

Cable chain for Zonestar Z6FB by wmon
...cable chain for zonestar z6fb by wmon
thingiverse
cable chain for zonestar z6fb
thingiverse
free
Zonestar P802Q Bracing by ioquatix
...the zonestar p802q/p802qa 3d printer.
for latest parts and more details visit https://github.com/ioquatix/zonestar-p802q-bracing.
thingiverse
free

ZoneStar Lower Filament Guide by JKCreate
...zonestar lower filament guide by jkcreate
thingiverse
a lower filament guide for the zonestar p802qr2.
thingiverse
free
Zonestar Z6 - Z axis stabilizer
...zonestar z6 - z axis stabilizer
thingiverse
zonestar z6 - z axis stabilizer
Folgertech
thingiverse
free

FolgerTech Kossel Rev B Parts by thosmos
...folgertech kossel rev b parts by thosmos
thingiverse
stock folgertech kossel rev b parts
thingiverse
free

Adjustable Z endstop Folgertech 2020 by Joe558
...adjustable z endstop folgertech 2020 by joe558
thingiverse
this is an adjustable z endstop for the folgertech prusa i3 2020.
thingiverse
free

Folgertech Kossel Power supply cover by J7R3AN
...kossel power supply cover by j7r3an
thingiverse
power supply cover for the folgertech kossel with a mount for a plug and switch.
thingiverse
free

Folgertech FT-5 extruder cable holder by thomasdr
...folgertech ft-5 extruder cable holder by thomasdr
thingiverse
folgertech ft-5 extruder cable managment.
thingiverse
free
Filament Guide - Folgertech Prusa I3 by Gerdarumba
...h prusa i3 by gerdarumba
thingiverse
filament guide for a folgertech prusa i3 - acrylic.
designed to fit the 6mm acrylic frame.
thingiverse
free

Folgertech E3D Direct Drive Inductive Proximity Mounts by phpapple
...
modified mount for the folgertech prusa i3 that supports an inductive proximity sensor. uses the stock folgertech screw holes.
thingiverse
free

Folgertech Prusa I3 2020 power supply bracket by ahntorage
...folgertech prusa i3 2020 power supply bracket by ahntorage
thingiverse
power supply brackets for folgertech i3 prusa
thingiverse
free
FolgerTech i3 BLTouch and Fan Mount by kedibekar3D
...ch prusa i3 fan + bltouch mount, adjusted for clearance.
works with fan manifold from: http://www.thingiverse.com/thing:1161013
thingiverse
free
Folgertech FT5 Head 2D by tauscnc
...in 2d dxf format.
note: linear bearing is 26.95 mm width but my drawing is set at 26.50 to allow some compression of wood parts.
thingiverse
free

Folgertech FT-5 Z End Stop Mount by thomasdr
...folgertech ft-5 z end stop mount by thomasdr
thingiverse
folgertech ft-5 z end stop mount for the left side.
Tronxy
thingiverse
free
LMF8LUU for tronxy x5s
...lmf8luu for tronxy x5s
thingiverse
lmf8luu for tronxy x5s
thingiverse
free
TRONXY XY2PRO by MaiMaiFACTORY
...tronxy xy2pro by maimaifactory
thingiverse
tronxy xy2-pro
sadebox
thingiverse
free

Power_supply_cover for TRONXY by Karollo
...power_supply_cover for tronxy by karollo
thingiverse
power supply cover for tronxy.
thingiverse
free
Tronxy support by d3m1sf
...tronxy support by d3m1sf
thingiverse
soporte para impresora tronxy x3.
thingiverse
free
Tronxy 13mm wrench
...tronxy 13mm wrench
thingiverse
13mm wrench for hotend fitting on tronxy x1...
thingiverse
free

Tronxy x5s by alex190074
...tronxy x5s by alex190074
thingiverse
tronxy x5s cart x fully adjustable only !!
thingiverse
free
Tronxy Logo
...tronxy logo
thingiverse
made this logo
thingiverse
free

Patas TronXY X3 - Vitofeli - TronXY Legs by Todopic
...todopic
thingiverse
patas separadoras para la tronxy x3, permite colocar la caja de control debajo y aprovechas mejor el espacio
thingiverse
free
TRONXY X5S EXTRUDER by ADAM98
...tronxy x5s extruder by adam98
thingiverse
tronxy x5s extruder
thingiverse
free

Belt tensioner Tronxy by jpalianak
...belt tensioner tronxy by jpalianak
thingiverse
belt tensioner tronxy
Anet
thingiverse
free

Anet by derbodesign
...anet by derbodesign
thingiverse
logo anet
thingiverse
free

Anet e10 , Anet v1.0 by jonathan_943D
...anet e10 , anet v1.0 by jonathan_943d
thingiverse
soporte de ventilador de 80mm, para controladora anet v1.0
thingiverse
free

Anet A8 Anet AM8 Y belt holder
...anet a8 anet am8 y belt holder
thingiverse
anet a8 anet am8 y belt holder
thingiverse
free

Anet A8 Probe Bracket for anet sensor by chelrix
...anet a8 probe bracket for anet sensor by chelrix
thingiverse
anet a8 probe bracket for anet official sensor and marlin firmware
thingiverse
free

Anet logo by JUST3D_PRNTNG
...anet logo by just3d_prntng
thingiverse
anet logo
thingiverse
free

Fan nozzle for Anet A8 with original Anet levelsensor by peteruhlmann
...et levelsensor by peteruhlmann
thingiverse
here is an improved fan nozzle for the anet a8 with original level sensor from anet.
thingiverse
free

Anet Et4 Box
...anet et4 box
thingiverse
tool box for anet et4
thingiverse
free

Anet Logo by Superflex_Plastic_Fantastic
...anet logo by superflex_plastic_fantastic
thingiverse
anet logo to incorporate into designs.
thingiverse
free

Box for Anet ET4
...box for anet et4
thingiverse
this is a simple box for tool of anet et4
thingiverse
free

Anet V1.0 Board Kühlung (80mm Lüfter) / Anet A8 by MadCre8
...anet v1.0 board kühlung (80mm lüfter) / anet a8 by madcre8
thingiverse
anet v1.0 board kühlung (80mm lüfter) / anet a8
Prusa
turbosquid
$2

Frame Filament Guide Clip-On for Prusa Mk3
...rame filament guide clip-on for prusa mk3 for download as stl on turbosquid: 3d models for games, architecture, videos. (1634730)
3d_export
free

prusa i3 mk3s laser mount for opt lasers
...to learn more about the blue laser technology that conceived the cutting and engraving laser heads from opt lasers, please visit:
turbosquid
free

Prusa small printer adapter holder
...er for download as ipt, skp, dwg, dxf, fbx, ige, obj, and stl on turbosquid: 3d models for games, architecture, videos. (1642936)
3d_export
$30

geisha by jonathan adler
...** i did a 3d printing test in the prusa software, you can find it among the attached images.<br>exchange:<br>.blend...
thingiverse
free

Prusa without Prusa (rc2) by madless
...prusa without prusa (rc2) by madless
thingiverse
just the main part of prusa rc2 faceshield, without writing.
enjoy :)
thingiverse
free

Prusa by acejbc
...prusa by acejbc
thingiverse
prusa knob info
m3 8mm screw
thingiverse
free

Prusa house
...prusa house
thingiverse
how prusa house could look like...
thingiverse
free

Prusa Mk2 "Fake Prusa" LCD cover by anraf1001
...r by anraf1001
thingiverse
version of prusa's lcd cover with "fake prusa" instead of "original prusa"
thingiverse
free

Prusa stabilizator by gutiueugen
...prusa stabilizator by gutiueugen
thingiverse
prusa stabilizator
thingiverse
free

Keychain Prusa by rbarbalho
...keychain prusa by rbarbalho
thingiverse
keychain with text prusa.
Aluminum
3d_export
$5

aluminum crutch
...aluminum crutch
3dexport
aluminum crutch
3d_export
free

aluminum cane
...aluminum cane
3dexport
aluminum cane
3d_export
$5

the aluminum canister
...
3dexport
the aluminum canister is designed for storing and transporting liquids( water), fuels and lubricants (gasoline, oils).
turbosquid
$2
Aluminum Wheel
...uid
royalty free 3d model aluminum wheel for download as fbx on turbosquid: 3d models for games, architecture, videos. (1371918)
turbosquid
$2
aluminum pulley
...
royalty free 3d model aluminum pulley for download as sldpr on turbosquid: 3d models for games, architecture, videos. (1671716)
turbosquid
$40

Aluminum Can
... free 3d model aluminum can for download as 3ds, max, and obj on turbosquid: 3d models for games, architecture, videos. (1301606)
turbosquid
$15

Curved aluminum
...ee 3d model curved aluminum for download as max, obj, and fbx on turbosquid: 3d models for games, architecture, videos. (1260293)
turbosquid
$12

Aluminum pot
... free 3d model aluminum pot for download as max, fbx, and obj on turbosquid: 3d models for games, architecture, videos. (1653492)
3d_export
$5

Aluminum Bottle
... for shampoo, conditioner or any liquids (500ml 17floz) separated all parts, able to customize any color, material and finishing.
turbosquid
$19

Aluminum windows
...model aluminum windows for download as max, max, fbx, and obj on turbosquid: 3d models for games, architecture, videos. (1646740)
Axis
3ddd
$1

Мария Axis
...
3ddd
кухня , классическая , axis
модель кухни.
3d_export
$22

Axis robot 6-axis robotic arm
...ing parts drawings, standard parts purchased parts list, can be produced directly according to the drawings, welcome to download!
3ddd
free

Versatile Axis
...ddd
nexus , плитка
http://bvtileandstone.com/ceramic-porcelain/versatile-axis/
3d_export
$19

robot 2 axis
...robot 2 axis
3dexport
robot 2 axis
turbosquid
$40

Axis R5F
... available on turbo squid, the world's leading provider of digital 3d models for visualization, films, television, and games.
turbosquid
$40

Axis S5F
... available on turbo squid, the world's leading provider of digital 3d models for visualization, films, television, and games.
turbosquid
$30

Axis Athlon
... available on turbo squid, the world's leading provider of digital 3d models for visualization, films, television, and games.
turbosquid
$10

Linear Axis
... available on turbo squid, the world's leading provider of digital 3d models for visualization, films, television, and games.
3d_export
$15

drawing axis
...drawing axis
3dexport
simple rendering of the scene file
3ddd
$1

versatile axis ARC
...versatile axis arc
3ddd
versatile , плитка
versatile axis arc red dot design award
Y
turbosquid
$1

Tetera y Galletas y Caf
... available on turbo squid, the world's leading provider of digital 3d models for visualization, films, television, and games.
3ddd
$1

Смеситель Y-CON
...смеситель y-con
3ddd
смеситель , y-con
смеситель y-con
3ddd
$1

Y-Chair
...y-chair
3ddd
tom dixon
y-chair designed by tom dixon,
3ds max + obj, corona
3ddd
$1

Y Chair compilation
....net/products/us/y-chair-sled-base
y chair swivel basehttp://www.tomdixon.net/products/us/y-chair-swivel-base
turbosquid
$190

Y-8
...y-8
turbosquid
royalty free 3d model y-8 for download as max on turbosquid: 3d models for games, architecture, videos. (1658891)
turbosquid
$7

Bench Y
...turbosquid
royalty free 3d model bench y for download as obj on turbosquid: 3d models for games, architecture, videos. (1488746)
turbosquid
$15

bonePile Y
...oyalty free 3d model bonepile y for download as blend and obj on turbosquid: 3d models for games, architecture, videos. (1546374)
turbosquid
$7

Y for Yarn
...d
royalty free 3d model y for yarn model for download as max on turbosquid: 3d models for games, architecture, videos. (1699732)
turbosquid
$2

FONT Y
...quid
royalty free 3d model font y for download as ma and obj on turbosquid: 3d models for games, architecture, videos. (1549457)
3ddd
$1

WOOD-y
...wood-y
3ddd
wooden guy
Printers
archibase_planet
free

Printer
...inter
archibase planet
printer laser printer pc equipment
printer n120614 - 3d model (*.gsm+*.3ds) for interior 3d visualization.
archibase_planet
free

Printer
...rchibase planet
laser printer office equipment computer equipment
printer - 3d model (*.gsm+*.3ds) for interior 3d visualization.
turbosquid
$100

Printer
...er
turbosquid
royalty free 3d model printer for download as on turbosquid: 3d models for games, architecture, videos. (1487819)
turbosquid
$3

Printer
...turbosquid
royalty free 3d model printer for download as max on turbosquid: 3d models for games, architecture, videos. (1670230)
turbosquid
$1

printer
...turbosquid
royalty free 3d model printer for download as max on turbosquid: 3d models for games, architecture, videos. (1595546)
turbosquid
$1

printer
...turbosquid
royalty free 3d model printer for download as max on turbosquid: 3d models for games, architecture, videos. (1595105)
turbosquid
$10

Printer
...id
royalty free 3d model printer for download as max and 3dm on turbosquid: 3d models for games, architecture, videos. (1607146)
turbosquid
$7

Printer
...royalty free 3d model printer for download as ma, ma, and obj on turbosquid: 3d models for games, architecture, videos. (1644580)
turbosquid
$30

Printer
... available on turbo squid, the world's leading provider of digital 3d models for visualization, films, television, and games.
turbosquid
$20

Printer
... available on turbo squid, the world's leading provider of digital 3d models for visualization, films, television, and games.
Type
3d_export
$5

s type
...s type
3dexport
s type formats max 3ds obj stl
3d_export
$5

l-type conveyor
...l-type conveyor
3dexport
l-type conveyor
3d_export
$5

volkswagen type 2
...volkswagen type 2
3dexport
volkswagen type 2
turbosquid
$150
RBC types
...osquid
royalty free 3d model rbc types for download as blend on turbosquid: 3d models for games, architecture, videos. (1343563)
turbosquid
$1

B-Type
...urbosquid
royalty free 3d model b-type for download as blend on turbosquid: 3d models for games, architecture, videos. (1609608)
3ddd
$1

shoes type A
...shoes type a
3ddd
туфли
shoes
turbosquid
$39

R-type
...oyalty free 3d model r-type for download as max, obj, and fbx on turbosquid: 3d models for games, architecture, videos. (1303675)
turbosquid
$5

melon type
...ee 3d model melon galia type for download as ma, fbx, and obj on turbosquid: 3d models for games, architecture, videos. (1557188)
3d_export
free
three different type
...three different type
3dexport
three different type: mace, axe, sword
turbosquid
$49

Types of Placentation
... available on turbo squid, the world's leading provider of digital 3d models for visualization, films, television, and games.