Thingiverse
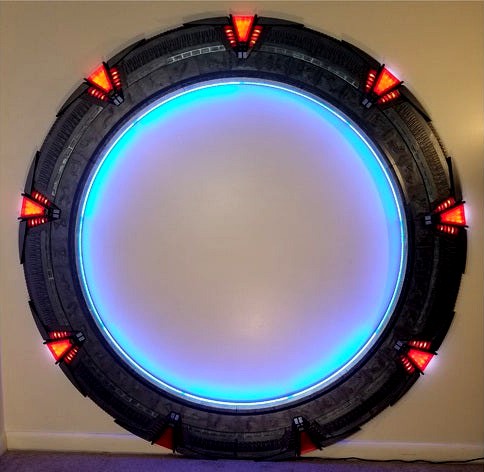
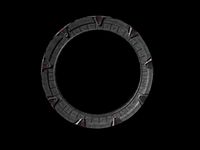
5ft Lighted Stargate by JDM755
by Thingiverse
Last crawled date: 3 years ago
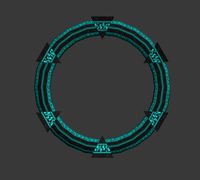
5ft Lighted Stargate controlled by arduino
(Just a heads up its a very long print 900+ hours)
Not a beginner project. Need an understanding of wiring/soldering. Need a understanding of programming arduino boards to load my program.
Stargate Activation video link https://youtu.be/aMC3CDZYe2s
Stargate Glyphs Spinning video link https://youtu.be/WGO_9QlkYmY
The Stargate is designed to snap together using dovetail connections and superglue to make the assembly permanent. Sanding on some pieces may be needed to make them fit better. I have tweaked the design since i printed it to give more room for wire management, use less plastic, and to make pieces fit together better.
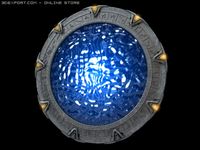
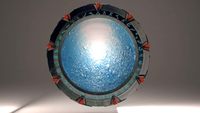
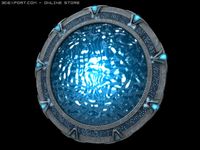
I wired the wormhole LED's in 6 different zones (see "Wormhole Wiring Zones" image) to give it an event horizon puddle effect on the wall.
For wiring use the "Wiring Diagram" image.
Setting up the audio files: Unzip and add the 4 audio files onto the micro SD card.
Things you'll need:
a 3D printer with a print bed around 300x300mm
7 1kg Spools of Grey PLA (might only need 6 spools I had a few failed prints & design changes)
1 1kg Spool of Translucent Red PLA
1 1kg Spool of Clear PLA (optional if you want to hide the wormhole LED's)
27 8x22x7mm Skateboard Bearings (optional if you want the glyph ring to spin - https://www.amazon.com/gp/product/B00EPNN62M/ref=oh_aui_search_detailpage?ie=UTF8&psc=1)
1 Arduino Mega2560 Pro Mini V1.1 (https://www.ebay.com/itm/New-Small-Meduino-Mega2560-R3-Pro-Mini-ATMEGA16U2-Arduino-Mega2560-Compatible/162593120251?hash=item25db4e1ffb:g:-9cAAOSwyQtVnMbp)
2 2" Diameter Round Internal Magent Speaker (optional if you want sounds - https://www.amazon.com/gp/product/B008999QCM/ref=oh_aui_search_detailpage?ie=UTF8&psc=1)
1 16.4ft Roll Blue LED Light Strip (https://www.amazon.com/gp/product/B01EKDUROG/ref=oh_aui_detailpage_o08_s00?ie=UTF8&psc=1)
1 16.4ft Roll White LED Light Strip (not sure on the brand i had some leftover from another project)
3 Bottles of Jacquard Lumiere Metallic Acrylic Paint 2.25 Ounces-Pewter (if you want the gate to have a brushed aluminum look - https://www.amazon.com/gp/product/B003W17T6M/ref=oh_aui_search_detailpage?ie=UTF8&psc=1)
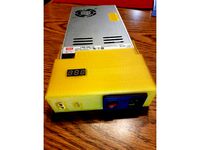
1 DFPlayer Mini MP3 Player Module (optional if you want sounds - https://www.amazon.com/gp/product/B072JWFTHW/ref=oh_aui_search_detailpage?ie=UTF8&psc=1)
1 Micro SD Card (optional if you want sounds - https://www.amazon.com/SanDisk-microSD-High-Capacity-microSDHC/dp/B00488G6P8/ref=sr_1_26?s=pc&rps=1&ie=UTF8&qid=1529881189&sr=1-26&keywords=Micro+SD&refinements=p_85%3A2470955011)
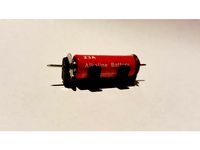
1 1k Ohm Resistors (optional if you want sounds)
15 Logic Level N-Channel Power Mosfet (https://www.amazon.com/gp/product/B06W9F1QGF/ref=oh_aui_detailpage_o07_s00?ie=UTF8&psc=1)
Various colors 22 AWG Gauge Solid Hook-Up Wire (https://www.amazon.com/gp/product/B010T5Y6PU/ref=oh_aui_search_detailpage?ie=UTF8&psc=1)
heat shrink kit (optional for clean looking wire connections - https://www.amazon.com/gp/product/B06ZXRLPTZ/ref=oh_aui_search_detailpage?ie=UTF8&psc=1)
1 DC/DC Converter 12V Step Down to 9V (https://www.amazon.com/gp/product/B00A71E52G/ref=oh_aui_search_detailpage?ie=UTF8&psc=1)
1 12V 2A Power Supply (https://www.amazon.com/gp/product/B019Q3U72M/ref=oh_aui_search_detailpage?ie=UTF8&psc=1)
Lots of Super Glue (I think that I bought 5 packs of - https://www.walmart.com/ip/3G-Liquid-Superglue-4-Pack/37415084 - cheaper in the store)
Sandpaper (Assorted Grits)
Your preferred filler for touch ups (I used - https://www.amazon.com/gp/product/B0002JM8PY/ref=oh_aui_search_detailpage?ie=UTF8&psc=1)
Parts to Print:
9 Bottom Center
9 Bottom Left
9 Bottom Right
9 Center Crystal
9 Left Crystal
9 Right Crystal
9 Left Crystal Cover
9 Right Crystal Cover
9 Outer Center
9 Outer Left
9 Outer Right
9 Outer Chevron Left
9 Outer Chevron Right
1 of each glyph (39 in total)
27 Inner
27 Wormhole LED Cover (Optional)
2 Speaker Mount (Optional)
I have attached the standard 7 chevron activation .ino program for the arduino. I will be adding other variations soon.
If anybody makes one please share pictures! I'd love to see your version of my design.
Updates:
June 28, 2018 - I added a cover for the back of the center crystal so that no white light could get out and shine on the wall. Just superglue to the back of the crystal after all wiring and light tests are finished.
December 09, 2018 - I added more ".ino" files so you can now have options on how many Chevrons are used. (you know you want to dial Pegasus and Destiny too)
(Just a heads up its a very long print 900+ hours)
Not a beginner project. Need an understanding of wiring/soldering. Need a understanding of programming arduino boards to load my program.
Stargate Activation video link https://youtu.be/aMC3CDZYe2s
Stargate Glyphs Spinning video link https://youtu.be/WGO_9QlkYmY
The Stargate is designed to snap together using dovetail connections and superglue to make the assembly permanent. Sanding on some pieces may be needed to make them fit better. I have tweaked the design since i printed it to give more room for wire management, use less plastic, and to make pieces fit together better.
I wired the wormhole LED's in 6 different zones (see "Wormhole Wiring Zones" image) to give it an event horizon puddle effect on the wall.
For wiring use the "Wiring Diagram" image.
Setting up the audio files: Unzip and add the 4 audio files onto the micro SD card.
Things you'll need:
a 3D printer with a print bed around 300x300mm
7 1kg Spools of Grey PLA (might only need 6 spools I had a few failed prints & design changes)
1 1kg Spool of Translucent Red PLA
1 1kg Spool of Clear PLA (optional if you want to hide the wormhole LED's)
27 8x22x7mm Skateboard Bearings (optional if you want the glyph ring to spin - https://www.amazon.com/gp/product/B00EPNN62M/ref=oh_aui_search_detailpage?ie=UTF8&psc=1)
1 Arduino Mega2560 Pro Mini V1.1 (https://www.ebay.com/itm/New-Small-Meduino-Mega2560-R3-Pro-Mini-ATMEGA16U2-Arduino-Mega2560-Compatible/162593120251?hash=item25db4e1ffb:g:-9cAAOSwyQtVnMbp)
2 2" Diameter Round Internal Magent Speaker (optional if you want sounds - https://www.amazon.com/gp/product/B008999QCM/ref=oh_aui_search_detailpage?ie=UTF8&psc=1)
1 16.4ft Roll Blue LED Light Strip (https://www.amazon.com/gp/product/B01EKDUROG/ref=oh_aui_detailpage_o08_s00?ie=UTF8&psc=1)
1 16.4ft Roll White LED Light Strip (not sure on the brand i had some leftover from another project)
3 Bottles of Jacquard Lumiere Metallic Acrylic Paint 2.25 Ounces-Pewter (if you want the gate to have a brushed aluminum look - https://www.amazon.com/gp/product/B003W17T6M/ref=oh_aui_search_detailpage?ie=UTF8&psc=1)
1 DFPlayer Mini MP3 Player Module (optional if you want sounds - https://www.amazon.com/gp/product/B072JWFTHW/ref=oh_aui_search_detailpage?ie=UTF8&psc=1)
1 Micro SD Card (optional if you want sounds - https://www.amazon.com/SanDisk-microSD-High-Capacity-microSDHC/dp/B00488G6P8/ref=sr_1_26?s=pc&rps=1&ie=UTF8&qid=1529881189&sr=1-26&keywords=Micro+SD&refinements=p_85%3A2470955011)
1 1k Ohm Resistors (optional if you want sounds)
15 Logic Level N-Channel Power Mosfet (https://www.amazon.com/gp/product/B06W9F1QGF/ref=oh_aui_detailpage_o07_s00?ie=UTF8&psc=1)
Various colors 22 AWG Gauge Solid Hook-Up Wire (https://www.amazon.com/gp/product/B010T5Y6PU/ref=oh_aui_search_detailpage?ie=UTF8&psc=1)
heat shrink kit (optional for clean looking wire connections - https://www.amazon.com/gp/product/B06ZXRLPTZ/ref=oh_aui_search_detailpage?ie=UTF8&psc=1)
1 DC/DC Converter 12V Step Down to 9V (https://www.amazon.com/gp/product/B00A71E52G/ref=oh_aui_search_detailpage?ie=UTF8&psc=1)
1 12V 2A Power Supply (https://www.amazon.com/gp/product/B019Q3U72M/ref=oh_aui_search_detailpage?ie=UTF8&psc=1)
Lots of Super Glue (I think that I bought 5 packs of - https://www.walmart.com/ip/3G-Liquid-Superglue-4-Pack/37415084 - cheaper in the store)
Sandpaper (Assorted Grits)
Your preferred filler for touch ups (I used - https://www.amazon.com/gp/product/B0002JM8PY/ref=oh_aui_search_detailpage?ie=UTF8&psc=1)
Parts to Print:
9 Bottom Center
9 Bottom Left
9 Bottom Right
9 Center Crystal
9 Left Crystal
9 Right Crystal
9 Left Crystal Cover
9 Right Crystal Cover
9 Outer Center
9 Outer Left
9 Outer Right
9 Outer Chevron Left
9 Outer Chevron Right
1 of each glyph (39 in total)
27 Inner
27 Wormhole LED Cover (Optional)
2 Speaker Mount (Optional)
I have attached the standard 7 chevron activation .ino program for the arduino. I will be adding other variations soon.
If anybody makes one please share pictures! I'd love to see your version of my design.
Updates:
June 28, 2018 - I added a cover for the back of the center crystal so that no white light could get out and shine on the wall. Just superglue to the back of the crystal after all wiring and light tests are finished.
December 09, 2018 - I added more ".ino" files so you can now have options on how many Chevrons are used. (you know you want to dial Pegasus and Destiny too)
Similar models
thingiverse
free

Desk Fan by NebNorse
...lpages04?ie=utf8&psc=1
motor control: https://www.amazon.com/gp/product/b01cnl6imc/ref=od_aui_detailpages04?ie=utf8&psc=1
thingiverse
free
End cap for Meanwell LRS-350-12 by didjareally
...t/b005vulxa0/ref=oh_aui_search_detailpage?ie=utf8&psc=1
meanwell lrs-350-12 power supply:https://holiday.lighting/psorderform
thingiverse
free

12 Function Deep Dish Button Box by coyoteyz13
..._title_o03_s00?ie=utf8&psc=1
https://www.amazon.com/gp/product/b07vhcb1q4/ref=ppx_yo_dt_b_search_asin_title?ie=utf8&psc=1
thingiverse
free
23A Battery Holder by jack_dark
...an get this office supply assortment: https://www.amazon.com/gp/product/b01eim4yvq/ref=oh_aui_search_detailpage?ie=utf8&psc=1
thingiverse
free
M3d - USB Hub clips by mrhea00
...arch_detailpage?ie=utf8&psc=1
fan:https://www.amazon.com/gp/product/b003xn24gy/ref=oh_aui_search_detailpage?ie=utf8&psc=1
thingiverse
free

Sonoff Enclosure by JeffLZ
...title_o00_s00?ie=utf8&psc=1
https://www.amazon.com/gp/product/b00qvb6qpu/ref=ox_sc_saved_title_1?smid=atvpdkikx0der&psc=1
thingiverse
free
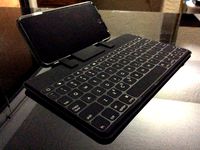
Stand for Logitech Keys to Go & iPhone (with Spigen Case) by Jamesdavid
....amazon.com/gp/product/b00tevgk3m/ref=ox_sc_act_title_1?ie=utf8&psc=1&smid=a2awkzbcpmnly2
then this is the thing for you.
thingiverse
free

Scale/Steel Rule Holder by jsmith14
...h_detailpage?ie=utf8&psc=1
https://www.amazon.com/gp/product/b0002fulfm/ref=oh_aui_search_detailpage?ie=utf8&psc=1
enjoy!
thingiverse
free

Fan Holder by SimonFrick
...sjw6/ref=oh_aui_search_detailpage?ie=utf8&psc=1
https://www.youtube.com/channel/uchtapctfn0ypiip5kdwocyq
instagram: 3d_fabrik
thingiverse
free

FPV Helmkamera MK2 by Scorch1262
..._s00?ie=utf8&psc=1
5,8ghz antennen:https://www.amazon.de/gp/product/b06xkrxhb5/ref=oh_aui_search_detailpage?ie=utf8&psc=1
Jdm755
thingiverse
free

Tevo Tornado 2020 Wire Guards - Various Sizes by JDM755
...tevo tornado 2020 wire guards - various sizes by jdm755
thingiverse
simple and effective wire management/concealer
thingiverse
free
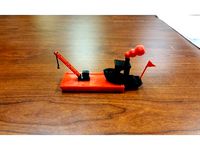
Barge for #3DBenchy by JDM755
...parts, which are less detailed and easier to print.
update 22 january 2018
i added the mk2 crane that's bigger and can rotate
thingiverse
free

Bearing Spool Holder - No Screws Needed by JDM755
... in a drybox and it works great.
04/11/2018 update
remixed my original design to make it more universal to fit more spool sizes!
thingiverse
free

Remix - Filament Runout Sensor for Marlin and Octoprint by JDM755
...fe tube push fitting connector's)https://www.amazon.com/gp/product/b01ib81ihg/ref=oh_aui_detailpage_o06_s00?ie=utf8&psc=1
thingiverse
free

Stock Hot-end Fan Cover Replacement for Tevo Tornado by JDM755
...rill bit to make the holes for the cooling fan.
i included the sketch-up master file for it in case anybody wanted to modify it.
thingiverse
free

C525 Cam Holder for Tevo Tornado by JDM755
...e new mount! use that silver screw to attach the mount then just attach to adjustable arm. printed with 100% infill for strength.
thingiverse
free

Tornado/CR-10 E3D V6 Mount by JDM755
...t i used from old hotend
i don't like my slicer supports for intricate parts so i added a version with custom supports added.
thingiverse
free

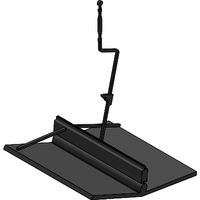
Tevo Tornado Octoprint Controlled LED Light Bar by JDM755
...- light bar
2 - half top bracket
1 - left rail clamp
1 - right rail clamp
4 - screw
updates:
09 nov 2019 - added upgraded designs
thingiverse
free
Stargates Pack
...modified from 'glitch' work (sg1 / sga) https://www.thingiverse.com/thing:39976https://www.thingiverse.com/thing:3153542 and 'jdm755#39; work sgu (chevron only) https://www.thingiverse.com/thing:3941645 gates where painted using...
5Ft
turbosquid
$4

Scroll 5ft Bed Frame plus Night Pillow Top Mattress
... available on turbo squid, the world's leading provider of digital 3d models for visualization, films, television, and games.
3dfindit
free
Diva 5ft Ceiling Panel
...diva 5ft ceiling panel
3dfind.it
catalog: wenger corporation
3dfindit
free

Makenzie 5ft Straight Bench MKSB-5R
...makenzie 5ft straight bench mksb-5r
3dfind.it
catalog: wishbone
3dfindit
free
Makenzie 5ft Straight Bench MKSB-5W
...makenzie 5ft straight bench mksb-5w
3dfind.it
catalog: wishbone
3dfindit
free

Makenzie 5ft Straight Bench MKSB-5L
...makenzie 5ft straight bench mksb-5l
3dfind.it
catalog: wishbone
thingiverse
free
5ft TAZ 3D Printer Model by ReginaFabricam
...a model of a taz if it had a 5 foot print area. it is based on a design i created from a friend telling me he built a 5 foot taz.
thingiverse
free
Star Guardian Lulu's Wand 5ft Long 1/1 Scale by BennnyBoi
... fit a 200x200 mm 3d printer bed. this will fit on a printer 200/200 this was a request from zanderyurami anyways hope you enjoy.
free3d
$49

Woman Clothes 001
...with textures. blazer removes itself easily. height 180cm / 5ft ...
thingiverse
free

Replacement Christmas Tree Legs by DAcreates
...christmas tree legs for a homebase cascading fiber optic 5ft ...
Stargate
turbosquid
$1
stargate
...d
royalty free 3d model stargate for download as obj and fbx on turbosquid: 3d models for games, architecture, videos. (1448510)
turbosquid
free
Stargate
... available on turbo squid, the world's leading provider of digital 3d models for visualization, films, television, and games.
3d_export
$99

Stargate 3D Model
...stargate 3d model
3dexport
stargate gate
stargate 3d model superwow 14502 3dexport
3d_export
$20
Stargate 3D Model
...stargate 3d model
3dexport
stargate star gate sg water space
stargate 3d model oo 27089 3dexport
turbosquid
$25

Stargate door
...quid
royalty free 3d model stargate door for download as obj on turbosquid: 3d models for games, architecture, videos. (1319630)
turbosquid
$5

Anubis stargate
...id
royalty free 3d model anubis stargate for download as obj on turbosquid: 3d models for games, architecture, videos. (1319636)
3d_export
$10

Stargate 3D Model
...stargate 3d model
3dexport
stargate 3d model achylesus 77571 3dexport
turbosquid
$20

Stargate and support
... available on turbo squid, the world's leading provider of digital 3d models for visualization, films, television, and games.
3d_export
$10
Stargate 3D Model
...tar gate future sci fi fantasy alien space planet travel wormhole military army secret
stargate 3d model juliokron 92867 3dexport
3d_export
$20
Stargate Atlantis 3D Model
...stargate atlantis 3d model
3dexport
stargate star gate sg water space atlantis
stargate atlantis 3d model oo 28255 3dexport
Lighted
archibase_planet
free

Light
...light
archibase planet
lamp lighting light
light - s2 - 3d model for interior 3d visualization.
archibase_planet
free

Light
...light
archibase planet
light luminaire lighting
light l0465 - 3d model (*.gsm+*.3ds) for interior 3d visualization.
3d_export
$5

lighting
...lighting
3dexport
lighting
3d_export
$5

lighting
...lighting
3dexport
lighting in livingroom
turbosquid
$3

Lighting Tree with Lights
...d model lighting tree with lights for download as max and 3ds on turbosquid: 3d models for games, architecture, videos. (1585507)
archibase_planet
free

Light
...light
archibase planet
luster lighting solution
light - s - 3d model for interior 3d visualization.
archibase_planet
free

Light
...light
archibase planet
luster lamp lighting
light 1 - 3d model for interior 3d visualization.
archibase_planet
free

Lights
...lights
archibase planet
surgical lights surgical lamp
surgical lights (floor) - 3d model for interior 3d visualization.
archibase_planet
free

Light
...light
archibase planet
lighting luminaire candlelight
light l0463 - 3d model (*.gsm+*.3ds) for interior 3d visualization.
3d_export
$18

street light-lighting-light-xia bing
...
3dexport
street light-lighting-light-xia bing<br>max 2015 v-ray 3 max 2015<br>textures<br>all files in zip...