Thingiverse

4L Filament Drybox Roller System by shinondon
by Thingiverse
Last crawled date: 3 years, 3 months ago
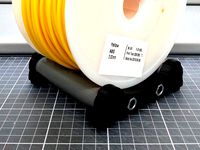
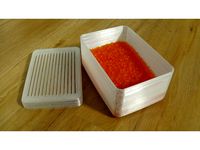
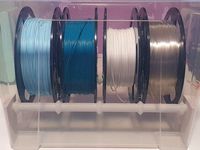
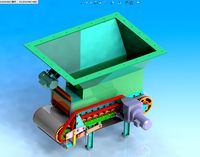
Spool holder and roller system for those 4L cereal drybox. This is a multi height, yolk and cradle design for most sub 1kg spools of filament. it allows the spool to roll freely inside the drybox via the 608 bearings. Designed to use with 1/2" PVC pipe as the spool rod since PVC pipe is so cheap. I also included a simple file for a printed rod if a person chooses.
spools wider than 69-70mm won't work- spool rubs on container. I have had limited success with heatgun and reshaping the container to get another few mm out of it.
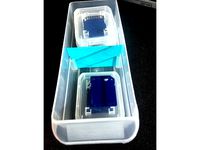
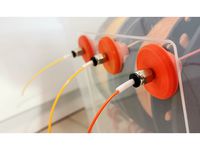
I used additional PTFE guide tubes for the filament which allows me to grab a box and load the filament into a printer without snags.The design allows room under the spool for dessicant. There is a endcap.stl file for the endcap which should be printed in flex filament
Parts needed:
(6) M3 x 5-8mm bolts
(6) embedment nuts M3 (3-7mm length, 4.6 mm dia)
(1) drybox
(2) 608 bearings 8x22x7mm
(1) x length of 1/2" PVC pipe (can be substituted for included file)
(2) M3 x 10+ mm bolts (optional if you choose to print the filament pass thru)
(2) M3 nut (optional if you choose to print the filament pass thru)
Instructions:
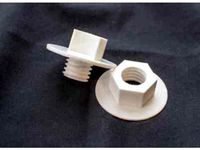
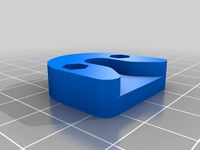
Mount the embedment nuts into the yolk. There will be 6 total. MAKE SURE TO MOUNT OR PUSH THROUGH EMBEDMENT NUTS ON THE SIDE WITH THE CHAMFER. See pictures
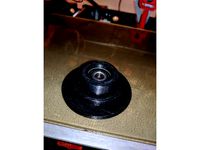
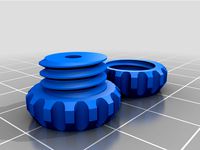
Mount bearings onto bearing holders (i use quick clamps to mount the bearings since the clamp pushes evenly and the bearings mount tight)
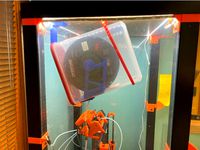
The "Y" part of the design is made for alignment purposes. This will GENTLY rest against the upper lip of the drybox during initial alignment.
Once you find the middle of the box front to back, score a line from top to bottom on the side of the box for reference. Place the yolk at the top of the box (lid off) and allow it to rest against the lip. (picture with red markings) Align the bottom hole with the mark you made previously and mark all 3 holes of the yolk on the drybox. Repeat on both sides. Drill out the 3 holes on each side for a total of 6 holes.
Mount yolk on the inside with the M3 screws. and make sure CHAMFER IS AGAINST DRYBOX WALL. (this is why the embedment nuts get pushed through from the chamfer side)
Use cradle inserts to adjust height of the spool. I typically need 2 per side.
PVC pipe- cut 65mm
Mount bearing holders into PVC pipe. These should be snug not tight.
***changes **
12/27/2020 added file endcap.stl
spools wider than 69-70mm won't work- spool rubs on container. I have had limited success with heatgun and reshaping the container to get another few mm out of it.
I used additional PTFE guide tubes for the filament which allows me to grab a box and load the filament into a printer without snags.The design allows room under the spool for dessicant. There is a endcap.stl file for the endcap which should be printed in flex filament
Parts needed:
(6) M3 x 5-8mm bolts
(6) embedment nuts M3 (3-7mm length, 4.6 mm dia)
(1) drybox
(2) 608 bearings 8x22x7mm
(1) x length of 1/2" PVC pipe (can be substituted for included file)
(2) M3 x 10+ mm bolts (optional if you choose to print the filament pass thru)
(2) M3 nut (optional if you choose to print the filament pass thru)
Instructions:
Mount the embedment nuts into the yolk. There will be 6 total. MAKE SURE TO MOUNT OR PUSH THROUGH EMBEDMENT NUTS ON THE SIDE WITH THE CHAMFER. See pictures
Mount bearings onto bearing holders (i use quick clamps to mount the bearings since the clamp pushes evenly and the bearings mount tight)
The "Y" part of the design is made for alignment purposes. This will GENTLY rest against the upper lip of the drybox during initial alignment.
Once you find the middle of the box front to back, score a line from top to bottom on the side of the box for reference. Place the yolk at the top of the box (lid off) and allow it to rest against the lip. (picture with red markings) Align the bottom hole with the mark you made previously and mark all 3 holes of the yolk on the drybox. Repeat on both sides. Drill out the 3 holes on each side for a total of 6 holes.
Mount yolk on the inside with the M3 screws. and make sure CHAMFER IS AGAINST DRYBOX WALL. (this is why the embedment nuts get pushed through from the chamfer side)
Use cradle inserts to adjust height of the spool. I typically need 2 per side.
PVC pipe- cut 65mm
Mount bearing holders into PVC pipe. These should be snug not tight.
***changes **
12/27/2020 added file endcap.stl
Similar models
thingiverse
free

Filament Dry Box 1/2" PVC Holder with Backing Plate and PVC Clip by nohtype
...h.
the pvc clips are for keeping the spools in place.
hardware utilized
1x 1/2" pvc pipe
8x m3 screws & nuts: m3 x 20 mm
thingiverse
free

Drybox PVC Mount by dwcline
...box pvc mount by dwcline
thingiverse
a dry box mount for 1" pvc pipe - includes a shim for mounting inside a sterilite box.
thingiverse
free
Wall Mount Spool Holder by BuzzAldrin
...g is secured with 8mm nuts on each side.
more parts are to follow including the bracket to actually mount the holder to the wall.
thingiverse
free
Filament Spool Roller by JamesRX
...bearing x 4 (or any bearing /w 8mm hole can fit inside the pvc pipe)
m8 screw rod x 2 (20mm longer than the pvc pipe)
m8 nut x8
thingiverse
free

1/2" PVC Pipe Support by zeropt
...tside of a shelf or box and is designed to support a standard 1/2 inch pvc pipe. the mounting holes were designed for 3/16 bolts.
thingiverse
free

Logitech C270 PVC Pipe Mount
...unt to the top of a 1/2" sch 40 pvc pipe.
items needed:
2x 6-32 screws x 1/2" long
2x 6-32 hex nuts
1x 6" zip tie
thingiverse
free

Filament drybox by LHelge
...crews
9 x m3 nuts
1 x m6 nut
4 x m8 nuts
1 x 150 mm m8 threaded rod
2 x 608 bearings
1 x pneumatic fitting with m6 thread
1 x box
thingiverse
free

Drybox fitting by albino
...ainst outside of container then trace and cut hole. use 4 mm screws with nuts on outside to mount with gasket material of choice.
thingiverse
free
Dry Box Pipe Holder by Mike32259
...e holder by mike32259
thingiverse
use 2 sets of these to support a 3/4" pvc pipe in a dry box to hold your filament spools.
thingiverse
free

Delta Spool Holder by Verohomie
...u may need to sand the inside hole of the plugs for a perfect fit. fyi the plugs are designed with a 21.5mm diameter center hole.
Shinondon
thingiverse
free
akro mills divider by shinondon
...akro mills divider by shinondon
thingiverse
run of the mill dividers for akro mills drawer system.
thingiverse
free

center punch end by shinondon
...inondon
thingiverse
rubberized end support for your palm. this is a slide on sock for a center punch. designed for tpu filament.
thingiverse
free

wall mount caliper holder by shinondon
...verse
plenty of room for various caliper widths and grubscrew. used pla and petg with 40% or higher infill. modeled on 123design
thingiverse
free

dishwasher divert by shinondon
...e
the top portion in the photo is not included due to my own idiocy. maybe in the future i will add those files.
printed in abs
thingiverse
free

cable slicer by shinondon
...de with another tool if needed
added a circumference slicing hump to the blade area which looks like a slight hump in the bottom.
thingiverse
free

sponge holder by shinondon
...for this since i've been too lazy.... thank you peter.
new feet are in the dl's named: "sponge_feet_final_new"
thingiverse
free

iphone charging base by shinondon
...on the cable so it stays in place. on the foot area, some silicon or other sticky stuff works great at keeping the dock in place.
thingiverse
free

hitch reverse lights by shinondon
...t-white/dp/b01myyus2r/ref=sr_1_5?ie=utf8&qid=1513792429&sr=8-5&keywords=led+diode+5mm+with+resistor
printed with petg
Drybox
thingiverse
free
Filament Drybox Trockenbox
...filament drybox trockenbox
thingiverse
i use this drybox for the storagebox of my filament.
thingiverse
free
Gravity Rewinder Drybox
...files. any future updated files and instructions have moved to https://www.prusaprinters.org/prints/25858-gravity-rewinder-drybox
thingiverse
free

Drybox nozzle by Shiyaku
...drybox nozzle by shiyaku
thingiverse
for 1.75mm
thingiverse
free
Drybox filament passthrough port by GameFan
...d into the wall of a drybox through a 12mm - 13mm hole and screwed into place from the other side.
suitable for 1.75mm filament.
thingiverse
free
Drybox Filament Tap
... drybox and screw the parts together from both sides. optionally add a suitable o-ring or some silicone to increase airtightness.
thingiverse
free
Samla Drybox Spool Holders
...d spools for ikea samla 22l drybox. measure your tube diameter and use openscad or online custimizer to create required stl files
thingiverse
free
M8 rod holder for Drybox
...with counterpart by wtlx.
i changed the cutouts for the nuts to be on the inside parts.
holds an m8 rod. mounting hardware is m3.
thingiverse
free

Silica gel container for Ikea 365 drybox
...silica gel container for ikea 365 drybox
thingiverse
modified silica gel box without hygrometer for the drybox from twotone74.
thingiverse
free

Filament drybox Lid with Window by Lambcook
...filament drybox lid with window to enable the spool to be seen. glue clear plastic film, such as spool wrapping, over the window.
thingiverse
free

Hefty Drybox by hayseedbyte
...hefty drybox by hayseedbyte
thingiverse
just a quick base to hold pvc in the bottom of a hefty air-tight container.
4L
3ddd
$1
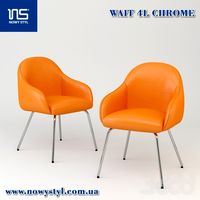
WAIT 4L CHROME
...wait 4l chrome
3ddd
новый стиль
новый стиль - wait 4l chrome
turbosquid
$10

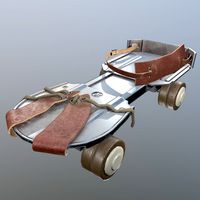
Renault 4L Concept
... available on turbo squid, the world's leading provider of digital 3d models for visualization, films, television, and games.
turbosquid
$19

Basketball ball 4L bicolor
... available on turbo squid, the world's leading provider of digital 3d models for visualization, films, television, and games.
turbosquid
$19
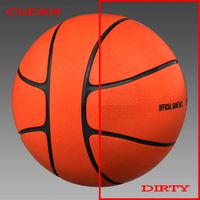
Basketball ball 4L orange
... available on turbo squid, the world's leading provider of digital 3d models for visualization, films, television, and games.
3ddd
$1
Voltolina Laguna 4L
...voltolina laguna 4l
3ddd
voltolina
люстра voltolina, серия laguna.http://www.voltolina.com/eng/prodotto.php?prid=laguna
cg_studio
$19
Basketball ball 4L bicolor3d model
...j .mb .max .fbx .c4d .3ds - basketball ball 4l bicolor 3d model, royalty free license available, instant download after purchase.
turbosquid
$10

Arrmet srl Mani Fabric 4L SL
...ree 3d model arrmet srl mani fabric 4l sl for download as max on turbosquid: 3d models for games, architecture, videos. (1552388)
3d_export
$19
Basketball ball 4L orange 3D Model
...demark orange ball sport basketball basket height bicolor show street
basketball ball 4l orange 3d model mikebibby 89140 3dexport
3d_export
$19
Basketball ball 4L bicolor 3D Model
...orange ball sport basketball basket height bicolor show street white
basketball ball 4l bicolor 3d model mikebibby 89191 3dexport
turbosquid
$24
Motor Oil Container Lotos Aurum 4L 2020
...oil container lotos aurum 4l 2020 for download as max and max on turbosquid: 3d models for games, architecture, videos. (1601595)
Roller
turbosquid
$26
Roller A
...urbosquid
royalty free 3d model roller a for download as fbx on turbosquid: 3d models for games, architecture, videos. (1350603)
turbosquid
$3
Roller
...oyalty free 3d model roller for download as 3ds, max, and obj on turbosquid: 3d models for games, architecture, videos. (1460818)
3ddd
$1
edilkamin roller
...edilkamin roller
3ddd
камин
edilkamin roller 360
3ddd
$1
Roller Blinds
...roller blinds
3ddd
рулонная
roller blinds black out finish
turbosquid
$50
Roller
... roller for download as max, max, c4d, max, max, fbx, and obj on turbosquid: 3d models for games, architecture, videos. (1700762)
3d_export
$10
rollers
...lers
3dexport
this is low-poly model of rollers.<br>model:<br>- low-poly<br>- textured<br>- uv unwrapped
3d_export
$28
Roller 3D Model
...roller 3d model
3dexport
roller construction boss evil
roller 3d model adagio15740837 50561 3dexport
3d_export
$6
hopper roller conveyor
...hopper roller conveyor
3dexport
hopper roller conveyor
3d_export
$12

roller skates
...roller skates
3dexport
3d_ocean
$19
roller skate
...can scanned skates skating sport
3d scan of roller skate. the model has been retopologized and made fully compatible with zbrush.
Filament
3ddd
$1

Filament Cage
...filament cage
3ddd
лофт , filament cage
модель бра, делалась по фото!
turbosquid
$3

FILAMENT COUNTER
...d
royalty free 3d model filament counter for download as stl on turbosquid: 3d models for games, architecture, videos. (1563049)
3d_export
$5

Filament lamp 3D Model
...filament lamp 3d model
3dexport
filament lamp 3d model kevin 54161 3dexport
3d_export
$5

Filament bulb candle 3D Model
...filament bulb candle 3d model
3dexport
filament bulb-candle
filament bulb candle 3d model kevin 54163 3dexport
3d_export
$5

Filament led light bulb
...filament led light bulb
3dexport
realistic 3d model of filament light bulb with v-ray materials.
3d_export
$5

Filament led light bulb
...filament led light bulb
3dexport
realistic 3d model of filament light bulb with v-ray materials.
3d_export
$5

Filament led light bulb
...filament led light bulb
3dexport
realistic 3d model of filament light bulb with v-ray materials.
3d_export
$5

Filament led light bulb
...filament led light bulb
3dexport
realistic 3d model of filament light bulb with v-ray materials.
3d_export
$5

Filament led light bulb
...filament led light bulb
3dexport
realistic 3d model of filament light bulb with v-ray materials.
3ddd
$1

Factory filament metal shade
...factory filament metal shade
3ddd
restoration hardware
restoration hardware. 20th c. factory filament metal shade.
System
archibase_planet
free

System
...m
archibase planet
fire alarm system fire alarm box
security light system - 3d model (*.gsm+*.3ds) for interior 3d visualization.
archibase_planet
free

Spider system
...stem spider glass system
spider system to fix glass stefano galli n050912 - 3d model (*.gsm+*.3ds) for interior 3d visualization.
3ddd
$1

Euforia System
...euforia system
3ddd
euforia
euforia system
3d_export
$50

Roof system Truss system 3D Model
...oof system truss system 3d model
3dexport
roof system truss truss stage
roof system truss system 3d model aleksbel 38970 3dexport
3ddd
$1

DVD System
...dvd system
3ddd
dvd , schneider
dvd system
design_connected
free

Seating system
...seating system
designconnected
free 3d model of seating system
3d_export
$5

solar system
...solar system
3dexport
solar system in c4d, with 8k nasa textures
3ddd
$1

Quanta System
...quanta system
3ddd
медицина
quanta system.
лазерное оборудование для медицинских центров
3d_export
$15

solar system
...nd the other the sun, the earth and the moon, the latter has an animation with camera movement included, the files are in spanish
3d_export
$14

missile system
...missile system
3dexport