Thingiverse
3D Printer Enclosure - PVC - Any Size by RonnieG303
by Thingiverse
Last crawled date: 2 years, 11 months ago
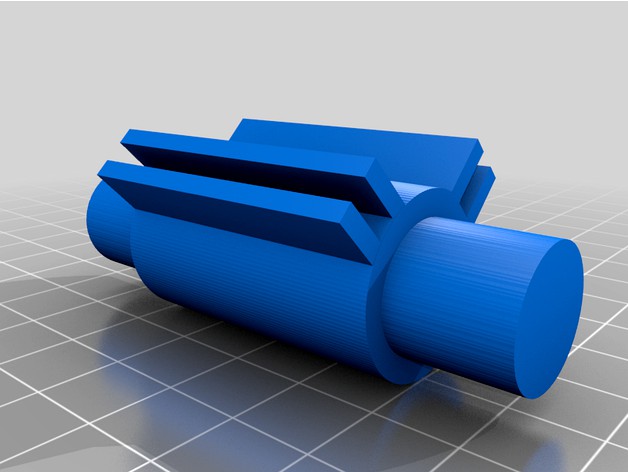
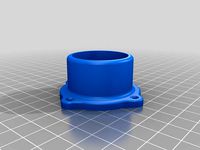
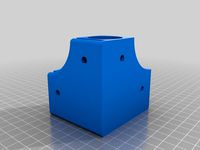
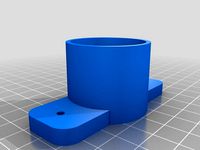
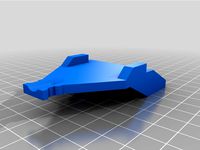
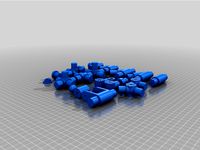
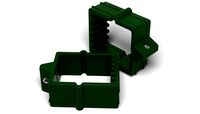
This DIY kit consists of various printable joints and other common parts to make a relatively inexpensive printer (or other device) enclosure using 1/2 inch US standard PVC pipe as its main frame members. The joints are designed with .1 inch retainer slots for .093 PLGA clear plastic panels, available at most US big box home improvement stores.
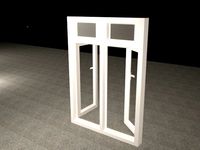
For purpose of illustrating the possibilities, I am including two examples of completely assembled enclosures, one a basic 24x24x24 inch that should work for most basic smaller printers, and a larger one, 24w x 32d x 36h with 2 doors, which would be suitable for larger printers, like CR10 and Longer LK4/LK5, with room for a top mount spool holder for direct feed setups. You should be able design an enclosure with just about any combination of dimensions with the included stl files.
The enclosures are intended to use 1/4" plywood or panel board for their roof and floor. Use of a sturdy roof is recommended if you intend to mount or store spools of filament on top. However, installing a floor at all is completely optional. If used, those would be attached to the top and bottom of the printed corners using standard 1" or 1-1/4" drywall screws.
You could also drill selected corner retention clips and mount 1/8" pressboard or cardboard on some walls instead of using PLGA panels, and/or stretch plastic sheeting around some or all of the other walls and door(s). In that case, you would probably also be able to eliminate all or most of the panel supports. .125" cabinet end panels, with a little sanding where it will go into the retainer fingers, would also work. Re: https://www.homedepot.com/p/Hampton-Bay-Hampton-0-125x34-5x23-25-in-Base-Cabinet-End-Panel-in-Unfinished-Beech-KASKB35-UF/302980492. I will be using some of this material for the back wall of my prototype enclosure.
Updates:
2011-05-09:
Moved door from inset to outside front of enclosure
Added photo (screen shot) of prototype enclosure
Major update to assembly instructions
2011-05-11:
Improved cylinder shapes from 20 to 120 sides for much better roundness and smoother finish. Larger file sizes but not much longer print times. Not all printers will be able to replicate this degree of roundness accuracy. Reducing layer height to .1mm could help, but would add significantly to print times.
2011-05-12:
Added special corner connectors and panel supports for back wall of .125 wood
Similar models
thingiverse
free

Wall Mount Filament Holder (universal) by PSomeone
...ng piece of 1" pvc sch40 pipe (designed to be snug fit - pvc will flex to fit)
some spools with fit 2 wide some only 1 spool
thingiverse
free

TUSH - US 1/2" PVC Framed Filament Spool Holder by RonnieG303
... pvc connector sizes, have been well proven in several of my other pvc based projects. only a few details are added for this one.
thingiverse
free

1 inch PVC wall bracket by wuthehun
...rackets, mounted them to some shelf supports above my 3d printer, and put a length of pvc between them to hold my filament spool.
thingiverse
free
spool holder for 1 inch pvc to wall mount by landsharkxx
...wanted to have a my pvc spool holder mounted to the wall so i designed this to do so. can be mounted on printer if you want also.
thingiverse
free

3/4 inch PVC Mount for Filament spool. by Vorticon
...d slide some 3/4 inch pvc tube over it and have it fit snug. this was done to create a filament spool mount on top of my printer.
thingiverse
free

Spool holder PVC 1.5 inch by mikeyroth
...ool holder pvc 1.5 inch by mikeyroth
thingiverse
spool holder for 1.5" pvc wanted something to mount to my printer cabinet
thingiverse
free
Printer Enclosure 3/4" PVC Corner Bracket by Noah410
...d to for 3/4 schedule 40 pvc pipe and 3/16 thick paneling. use m5 20mm long bolts and low profile nuts (8mm wide, 2.7-3mm thick).
thingiverse
free

spool holder wall mount by Corsairs
...ll mount by corsairs
thingiverse
print 2 of these and use 1 inch or 3/4 inch pvc pipe and mount to a wall to hold your filament.
thingiverse
free
1" PVC Holder / Mount by chris400p
.... fired up 123d and watched a couple youtube videos and came up with this. if you print one and use it please add a picture :)
thingiverse
free

1 1/4 in. (43mm) PVC wall mount for spools by woomugen
... made to get the spools i mostly use off the floor. make sure you screw them into a wall stud!! use a 1 1/4 inch (43mm) pvc pipe.
Ronnieg303
thingiverse
free
Longer LK5 Bed Connector Cable Bracket by RonnieG303
...rt framework i added to the underside of the bracket makes it very sturdy, even if it does increase support and print time a bit.
thingiverse
free

US 3/4 Inch PVC Connectors Kit by RonnieG303
...art, the same as outside diameter of us 3/4" pvc pipe
a shaft part, the same as inside diameter of us 3/4" pvc pipe
thingiverse
free
US 1/2 inch PVC Connectors Kit by RonnieG303
...ingiverse.com/thing:4850204
like the original thing, these parts are designed for a snug fit into us standard 1/2" pvc pipe.
thingiverse
free

SpeedDrive for Winsinn Dual Gear Extruder or Longer Extruder by RonnieG303
...ase for longer printers that supports al longer stock parts, including extruder, extruder stepper motor, and filament out sensor.
thingiverse
free

Longer Bowden Extruder and Filament Sensor Kit by RonnieG303
...ajor rewrite of notes and instructions. now should work with almost all open source printers, including most direct drive mounts.
thingiverse
free
TUSH - US 1/2" PVC Framed Filament Spool Holder by RonnieG303
... pvc connector sizes, have been well proven in several of my other pvc based projects. only a few details are added for this one.
Pvc
turbosquid
$39
pvc window
...bosquid
royalty free 3d model pvc window for download as max on turbosquid: 3d models for games, architecture, videos. (1205578)
turbosquid
$19

window PVC
...bosquid
royalty free 3d model window pvc for download as 3ds on turbosquid: 3d models for games, architecture, videos. (1204830)
turbosquid
$15
PVC Band
...turbosquid
royalty free 3d model pvc band for download as ma on turbosquid: 3d models for games, architecture, videos. (1287079)
turbosquid
$3
Pvc taping
...bosquid
royalty free 3d model pvc taping for download as max on turbosquid: 3d models for games, architecture, videos. (1161550)
turbosquid
$1

PVC Fittings
... available on turbo squid, the world's leading provider of digital 3d models for visualization, films, television, and games.
turbosquid
$1

PVC elbow
... available on turbo squid, the world's leading provider of digital 3d models for visualization, films, television, and games.
turbosquid
free

PvC Window
... available on turbo squid, the world's leading provider of digital 3d models for visualization, films, television, and games.
turbosquid
$29

Pvc cabinet
... pvc cabinet for download as blend, dae, fbx, obj, stl, and x on turbosquid: 3d models for games, architecture, videos. (1669537)
turbosquid
$10

PVC PIPE FITTING
...d
royalty free 3d model pvc pipe fitting for download as skp on turbosquid: 3d models for games, architecture, videos. (1164250)
turbosquid
$17
Glass PVC Table
...ee 3d model glass pvc table for download as max, obj, and fbx on turbosquid: 3d models for games, architecture, videos. (1267063)
Enclosure
3d_export
free

electrical enclosure
...l enclosure where electrical devices like (relays, contactors, busbars ) are kept in order to protect from hazardous environment.
turbosquid
$100

GPU Enclosure
...yalty free 3d model gpu enclosure for download as obj and stl on turbosquid: 3d models for games, architecture, videos. (1381061)
3d_export
$5

Electrical Enclosure
...ed. also has tower lights attaced on the top.<br>file format that are available:<br>.step<br>.obj<br>.stl
archive3d
free

Enclosure 3D Model
...closure 3d model
archive3d
shower enclosure-acquarius- 3d model for interior 3d visualization.
archive3d
free

Enclosure 3D Model
...enclosure 3d model
archive3d
shower enclosure-omega- 3d model for interior 3d visualization.
archive3d
free

Enclosure 3D Model
...enclosure 3d model
archive3d
shower enclosure-vega - 3d model for interior 3d visualization.
archive3d
free

Enclosure 3D Model
...enclosure 3d model
archive3d
shower enclosure-zenith - 3d model for interior 3d visualization.
turbosquid
$20

shower enclosure
... available on turbo squid, the world's leading provider of digital 3d models for visualization, films, television, and games.
turbosquid
$14

Dumpster Enclosure
... available on turbo squid, the world's leading provider of digital 3d models for visualization, films, television, and games.
turbosquid
$25

3d printer enclosure
... model 3d printer enclosure for download as ipt, skp, and fbx on turbosquid: 3d models for games, architecture, videos. (1634310)
Printer
archibase_planet
free

Printer
...inter
archibase planet
printer laser printer pc equipment
printer n120614 - 3d model (*.gsm+*.3ds) for interior 3d visualization.
archibase_planet
free

Printer
...rchibase planet
laser printer office equipment computer equipment
printer - 3d model (*.gsm+*.3ds) for interior 3d visualization.
turbosquid
$100

Printer
...er
turbosquid
royalty free 3d model printer for download as on turbosquid: 3d models for games, architecture, videos. (1487819)
turbosquid
$3

Printer
...turbosquid
royalty free 3d model printer for download as max on turbosquid: 3d models for games, architecture, videos. (1670230)
turbosquid
$1

printer
...turbosquid
royalty free 3d model printer for download as max on turbosquid: 3d models for games, architecture, videos. (1595546)
turbosquid
$1

printer
...turbosquid
royalty free 3d model printer for download as max on turbosquid: 3d models for games, architecture, videos. (1595105)
turbosquid
$10

Printer
...id
royalty free 3d model printer for download as max and 3dm on turbosquid: 3d models for games, architecture, videos. (1607146)
turbosquid
$7

Printer
...royalty free 3d model printer for download as ma, ma, and obj on turbosquid: 3d models for games, architecture, videos. (1644580)
turbosquid
$30

Printer
... available on turbo squid, the world's leading provider of digital 3d models for visualization, films, television, and games.
turbosquid
$20

Printer
... available on turbo squid, the world's leading provider of digital 3d models for visualization, films, television, and games.
Size
3d_export
$7
shoes size from 5 inch size to 11 inch
...shoes size from 5 inch size to 11 inch
3dexport
shoes design women model sizing from 5 inch to 11 inch
turbosquid
$15

Closet-small size
...
royalty free 3d model closet-small size for download as max on turbosquid: 3d models for games, architecture, videos. (1186088)
turbosquid
$5

Full size Futon
...id
royalty free 3d model full size futon for download as max on turbosquid: 3d models for games, architecture, videos. (1339638)
turbosquid
$4

mid size sword
...d
royalty free 3d model mid size sword for download as blend on turbosquid: 3d models for games, architecture, videos. (1160246)
turbosquid
$3

Mid size hammer
...
royalty free 3d model mid size hammer for download as blend on turbosquid: 3d models for games, architecture, videos. (1160647)
turbosquid
$19
Beaker 3 Sizes
...yalty free 3d model beaker 3 sizes for download as ma and obj on turbosquid: 3d models for games, architecture, videos. (1645955)
turbosquid
$20

Full Sized Bed
...d model full sized bed for download as max, 3ds, fbx, and obj on turbosquid: 3d models for games, architecture, videos. (1547542)
turbosquid
$45
King Size Bed
... available on turbo squid, the world's leading provider of digital 3d models for visualization, films, television, and games.
turbosquid
$15

Queen size bed
... available on turbo squid, the world's leading provider of digital 3d models for visualization, films, television, and games.
turbosquid
$14

Bed - Full Size
... available on turbo squid, the world's leading provider of digital 3d models for visualization, films, television, and games.
Any
3ddd
$1

Calligaris / ANY
...calligaris / any
3ddd
calligaris
http://www.calligaris.biz/catalogue/dining/chairs/any/cs-1090
turbosquid
$4

Anis and powder
... model anis and powder for download as lwo, fbx, stl, and obj on turbosquid: 3d models for games, architecture, videos. (1626302)
turbosquid
$15

Any lamp
... available on turbo squid, the world's leading provider of digital 3d models for visualization, films, television, and games.
turbosquid
$10
Any sconce
... available on turbo squid, the world's leading provider of digital 3d models for visualization, films, television, and games.
3ddd
$1

Ani spot
... прожектор
http://bosma.ru/catalogue/product/12
экспозиционный прожектор на шинопроводе
turbosquid
$100

Chibi Anies Bas
...ee 3d model chibi anies bas for download as 3ds, obj, and c4d on turbosquid: 3d models for games, architecture, videos. (1447000)
turbosquid
$29

Cake - for any party
... available on turbo squid, the world's leading provider of digital 3d models for visualization, films, television, and games.
turbosquid
$25

parthanon ani 3_recover
... available on turbo squid, the world's leading provider of digital 3d models for visualization, films, television, and games.
turbosquid
$19
Calligaris Chair ANY
... available on turbo squid, the world's leading provider of digital 3d models for visualization, films, television, and games.
3ddd
free

Коллекция светильников ANI (BOSMA)
...(трековый прожектор)
ani mini spot (трековый прожектор)
файлы .ies к светильникам
трековая система босмаhttp://bosma.ru