Thingiverse
3D Printer Electronics Enclosure by jonbourg
by Thingiverse
Last crawled date: 3 years, 4 months ago
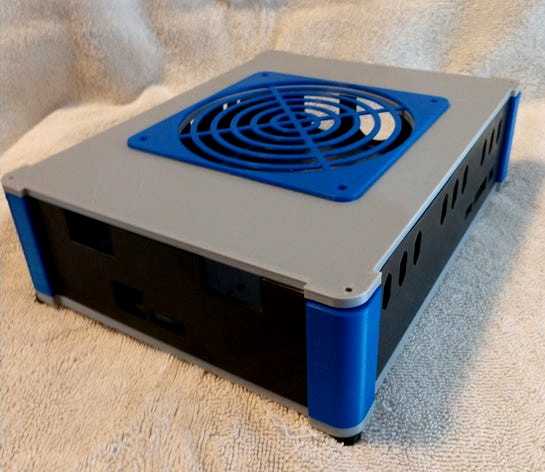
This is a larger electronics enclosure than my other design. It is 170mm wide by 220mm long and 64mm tall (68mm with the printed feet). This can be placed next to your printer or underneath it. If you place this underneath your printer it will need to be raised up on some legs. There are many designs available on Thingiverse including mine https://www.thingiverse.com/thing:3592374.
I made this enclosure for my Adimlab printer, but it is designed to hold many popular control boards and a Raspberry Pi (3B+ or 4). If you want a control board added just let me know. It's also big enough to hold other electronics, like buck converters and MOSFETs depending on which control board is installed. I have not made mount holes for all things like buck converters etc. You can either drill holes or use glue.
For the Adimlab printers, there is an option to attach the stock LCD screens into a housing on the front.
Most of the boards have the USB/SD ports on the front, but a few of the larger boards have the ports on the left side. This is to enable room for placement of wiring, particularly the power wires. If you would like to have a different configuration let me know. Some boards can be configured for different sides, but the larger boards are pretty much set as they are.
Currently, the cooling fan is a 120mm x 15mm fan, but other configurations can be added. For instance, a smaller fan can be used, the fan could be mounted on the outside, or fans could be mounted on the side of the enclosure.
Currently will hold any of these boards (more can be added):
Adimlab version 1 blackboard and Adimlab version 2 whiteboard (LCD Option)
Duet Maestro
MKS Gen L
MKS Robin Lite
MKS Robin nano (LCD Option)
MKS SBASE
MKS SGen L
SKR Pro
SKR 1.3, 1.4, and 1.4 Turbo
SKR Mini E3
For each board find and print the box side panel(s) and the other parts specifically listed for that board. For the other side panels of the box use the Box_Side_AA files.
Each board has it's own mounting standoff. The board standoffs have a cutout on one edge that will need to be placed facing the outside of the box. This is to account for the lip around the bottom.
Hardware:
Use self-tapping M3 screws to attach the bottom to the corners and the lid. The bottom screws will need to be long enough like M3 x 16 for a nice tight fit.
Use self-tapping M3 screws to mount the boards to the standoffs M3 x 6 or M3 x 8 should work.
Use M3 screws and nuts to attach the standoffs, the SKR Pro side box, and the cooling fan.
If desired use some glue to stiffen up the enclosure during assembly.
This is the type of self-tapping screws recommended: https://www.amazon.com/Zinc-Plated-Tapping-Assortment-Drilling-Storage/dp/B07DLWSQD5/ref=sr_1_3?dchild=1&keywords=self+tapping+m3+screws&qid=1602278163&sr=8-3
I did use parametric resources here on Thingiverse and I thank these designers for their most excellent work. I also recommend getting some tie strap anchors to assist with cable management. There are several to choose from on Thingiverse.
Please post makes!
UPDATE: 12/1/2020 Added a new lid with a cutout for an 80mm fan. I didn't include a grill, there are many to choose from. Here's a simple one. https://www.thingiverse.com/thing:1176407
UPDATE: 10/24/2020 Added a new LCD option for the MKS Nano. This option includes a new box bottom with a mounting hole for the Nano that is moved to allow more clearance for the LCD flat ribbon cable. There is also a new top and mounting brackets for the LCD enclosure. The enclosure for the LCD is this thing. https://www.thingiverse.com/thing:2993069
UPDATE: 10/15/2020 Changed LCD names with "LCD" at the beginning. Loaded a new LCD option for a BTT TFT35 E3 which should also fit the stock Ender 3 screen.
Similar models
thingiverse
free
SKR V1.3 Base with 3010 fan mounts.
...r v1.3 board. i added spaces for m3 nuts on the bottom and two side mounts that can hold a 3010 fan, like the ones from a e3d v6.
thingiverse
free

Robin Lite, SKR 1.3, MKS Gen L, SKR Mini, Raspberry Pi Control Box by jonbourg
...in_title?ie=utf8&psc=1
fan: https://www.amazon.com/gp/product/b00t9d680u/ref=ppx_yo_dt_b_search_asin_title?ie=utf8&psc=1
thingiverse
free

Adimlab Gantry-S Enclosure for Robin Lite & MKS Nano, Stock Location, Improved Cooling by jonbourg
...or the adimlab gantry-s printer. this will fit in the stock location and offers improved cooling ability and room for the board.
thingiverse
free

Adimlab PSU Covers JB Remix by jonbourg
...nting it to the side of the printer to make it easy to reach. see my switch box here: https://www.thingiverse.com/thing:3783109
thingiverse
free

Lerdge-S Board enclosure by PeterG79
... the extension board to the mount and screwed the mount directly on the side of the enclosure with some screws i had lying around
thingiverse
free

BTT SKR 1.4 mount for Meanwell Powersupply by eThings
...s to the bracket. the cable holder is optional on both sides.
it is part of my printer: https://www.thingiverse.com/thing:4783875
thingiverse
free

Adimlab Upgraded Gantry Pro Electronics Mods by welchk
...rinter bed. it also puts the lcd in a mount on the front. there are holes to mount everything to the aluminum frame using t-nuts.
thingiverse
free
PI / MKS SKR Mount by poeschl
...e board.
for assembly i used m3 screws and nuts for the skr and m2 for the pi. the extrusions i mounted the mount are 3030's.
thingiverse
free

Cover / 70mm Fan Mount for Geeetech GT2560 by esurplusplus
...s (m3 screws with the heads cut off) into the cover (long enough to go through the board/standoff/and printer frame) and m3 nuts.
thingiverse
free
MKS MOSFET 2020 holder by Euter
... screws with spacers to mount mks mosfet. you can mount mks mosfet to both sides. m3 holes are designed to be tapped with m3 tap.
Jonbourg
thingiverse
free

Dalek by jonbourg
...dalek by jonbourg
thingiverse
yet another dalek!
thingiverse
free
Superdome! by jonbourg
...superdome! by jonbourg
thingiverse
the louisiana (mercedes benz) superdome!
thingiverse
free
Lincoln Memorial by jonbourg
...lincoln memorial by jonbourg
thingiverse
lincoln memorial in washington dc
thingiverse
free

The USS Kidd DD661 by jonbourg
...the uss kidd dd661 by jonbourg
thingiverse
now moored in baton rouge as a museum and history education center
thingiverse
free

Louisiana State Capitol by jonbourg
...louisiana state capitol by jonbourg
thingiverse
here's another state capitol building i did.
thingiverse
free

New Orleans Arena by jonbourg
...ans arena by jonbourg
thingiverse
model of the new orleans arena or the smoothie king center. home to the new orleans pelicans!
thingiverse
free

Fountain Place in Dallas Texas by jonbourg
...fountain place in dallas texas by jonbourg
thingiverse
iconic building in dallas designed by i. m. pei
thingiverse
free

Boeing TX by jonbourg
...cool airplane that is in competition with some others to be selected to replace the very old t-38 talon. i hope this plane wins!
thingiverse
free
Fleur De Lis by jonbourg
...fleur de lis by jonbourg
thingiverse
a 2d converted to 3d fleur de lis! can be used for wall art, keychain, coaster etc.
thingiverse
free
Republic RC-3 Seabee by jonbourg
...republic rc-3 seabee by jonbourg
thingiverse
plane used in james bond movie the man with the golden gun
Enclosure
3d_export
free

electrical enclosure
...l enclosure where electrical devices like (relays, contactors, busbars ) are kept in order to protect from hazardous environment.
turbosquid
$100

GPU Enclosure
...yalty free 3d model gpu enclosure for download as obj and stl on turbosquid: 3d models for games, architecture, videos. (1381061)
3d_export
$5

Electrical Enclosure
...ed. also has tower lights attaced on the top.<br>file format that are available:<br>.step<br>.obj<br>.stl
archive3d
free

Enclosure 3D Model
...closure 3d model
archive3d
shower enclosure-acquarius- 3d model for interior 3d visualization.
archive3d
free

Enclosure 3D Model
...enclosure 3d model
archive3d
shower enclosure-omega- 3d model for interior 3d visualization.
archive3d
free

Enclosure 3D Model
...enclosure 3d model
archive3d
shower enclosure-vega - 3d model for interior 3d visualization.
archive3d
free

Enclosure 3D Model
...enclosure 3d model
archive3d
shower enclosure-zenith - 3d model for interior 3d visualization.
turbosquid
$20

shower enclosure
... available on turbo squid, the world's leading provider of digital 3d models for visualization, films, television, and games.
turbosquid
$14

Dumpster Enclosure
... available on turbo squid, the world's leading provider of digital 3d models for visualization, films, television, and games.
turbosquid
$25

3d printer enclosure
... model 3d printer enclosure for download as ipt, skp, and fbx on turbosquid: 3d models for games, architecture, videos. (1634310)
Electronics
turbosquid
$1

electron
...urbosquid
royalty free 3d model electron for download as max on turbosquid: 3d models for games, architecture, videos. (1157488)
turbosquid
$50

electronic
...
royalty free 3d model electronic for download as max and obj on turbosquid: 3d models for games, architecture, videos. (1289427)
turbosquid
$40

Electron
... available on turbo squid, the world's leading provider of digital 3d models for visualization, films, television, and games.
3d_ocean
$8
Electronic game
...electronic game
3docean
electronic games nu pogody wait a minute well
electronic game “well, wait a minute”, “nu pogody”
3ddd
$1
Brilux Electronic
...brilux electronic
3ddd
подвес. brilux electronic. польша. материалы настроены.
3d_export
free

electronic shop
...lectronic shop with high quality interior and exterior. it has tvs smartphone play station printer and many more electronic item.
3ddd
$1

Термостаты OJ Electronics
...ермостаты oj electronics
3ddd
oj electronics , термостат
термостаты фирмы oj electronics
3d_export
$8

electron 714
...electron 714
3dexport
game ready model for export to unreal engine soviet tv electron 714 pbr 4k
3ddd
$1

Термостат OJ Electronics
... oj electronics
3ddd
oj electronics , термостат
термостат occ2-1991 фирмы oj electronics
turbosquid
$60
Electronics Stuff
...
royalty free 3d model electronics stuff for download as max on turbosquid: 3d models for games, architecture, videos. (1624680)
Printer
archibase_planet
free

Printer
...inter
archibase planet
printer laser printer pc equipment
printer n120614 - 3d model (*.gsm+*.3ds) for interior 3d visualization.
archibase_planet
free

Printer
...rchibase planet
laser printer office equipment computer equipment
printer - 3d model (*.gsm+*.3ds) for interior 3d visualization.
turbosquid
$100

Printer
...er
turbosquid
royalty free 3d model printer for download as on turbosquid: 3d models for games, architecture, videos. (1487819)
turbosquid
$3

Printer
...turbosquid
royalty free 3d model printer for download as max on turbosquid: 3d models for games, architecture, videos. (1670230)
turbosquid
$1

printer
...turbosquid
royalty free 3d model printer for download as max on turbosquid: 3d models for games, architecture, videos. (1595546)
turbosquid
$1

printer
...turbosquid
royalty free 3d model printer for download as max on turbosquid: 3d models for games, architecture, videos. (1595105)
turbosquid
$10

Printer
...id
royalty free 3d model printer for download as max and 3dm on turbosquid: 3d models for games, architecture, videos. (1607146)
turbosquid
$7

Printer
...royalty free 3d model printer for download as ma, ma, and obj on turbosquid: 3d models for games, architecture, videos. (1644580)
turbosquid
$30

Printer
... available on turbo squid, the world's leading provider of digital 3d models for visualization, films, television, and games.
turbosquid
$20

Printer
... available on turbo squid, the world's leading provider of digital 3d models for visualization, films, television, and games.