GrabCAD

3d Printed Hand Fan
by GrabCAD
Last crawled date: 1 year, 11 months ago
This is my submission for the 3D Printing Event Challenge. I hope you enjoy my piece and hope that it fulfills your requirements.
The idea for this item came to me while I was waiting for power to come back to my house. There was a power cut on that day for my region in my city (Male') and well... thank you Stelco. Hehehe...
I wanted it to be a functional, simple and reliable design/build. I think I was able to do that. As to the aesthetics, I like it... and I hope the majority public does too.
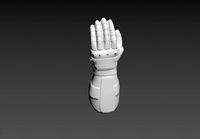
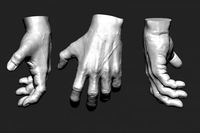
The 3d Printed Hand Fan consists of 10 parts to be assembled. Out of these there are 4 unique parts:
1. Core Flap X 1: This is the main assembling flap.
2. Arranged Flap X 7: This is the flaps that are arranged in the middle.
3. End Flap X 1: This is the last flap that is placed.
4. End Screw Cap X 1: This is the cap that gets screwed into the Core Flap to hold the assembly together.
The material to be used is a relatively sturdy plastic. I am not a materials person (nor an actual engineer for that matter) so I am not able to give precise material specifications.
The largest part has a length not more than 250mm. The rules did not state that the different parts couldn't be assembled together to create a larger assembly. But even still... the assembled fan does fit the 10" by 10" by 10" rule.
That is all I can say about this item. Aah... don't forget the feedback! Hehehe
UPDATES:
These are changes made based on user feedback. These changes have been made before the deadline of the 3D Printing Event Challenge.
Mod A (1st Sept 2012): As suggested by Luke (http://grabcad.com/luke-7) I have changed the end screw cap. Instead of a little tab a rectangular though cut allows a flat head screw driver to be used to tighten the cap. This improves the ergonomics.
Mod B (1st Sept 2012): As suggested by Azrael (http://grabcad.com/azrael-1) I have implemented a locking mechanism as shown in the last image in the gallery. I have also added a small extrusion in the cap head to allow the flaps to slight move for this feature to work. Again, though I have given a value to this extrusion I think this might need to be adjusted after the first test print. I have never used a 3D printer before nor seen a printout and I cannot know the imperfections involved. Based on this and the material used the extrusion might need to be increased (or reduced) slightly to just allow the locking mechanism to work but prevent too much shaking of the flaps.
The idea for this item came to me while I was waiting for power to come back to my house. There was a power cut on that day for my region in my city (Male') and well... thank you Stelco. Hehehe...
I wanted it to be a functional, simple and reliable design/build. I think I was able to do that. As to the aesthetics, I like it... and I hope the majority public does too.
The 3d Printed Hand Fan consists of 10 parts to be assembled. Out of these there are 4 unique parts:
1. Core Flap X 1: This is the main assembling flap.
2. Arranged Flap X 7: This is the flaps that are arranged in the middle.
3. End Flap X 1: This is the last flap that is placed.
4. End Screw Cap X 1: This is the cap that gets screwed into the Core Flap to hold the assembly together.
The material to be used is a relatively sturdy plastic. I am not a materials person (nor an actual engineer for that matter) so I am not able to give precise material specifications.
The largest part has a length not more than 250mm. The rules did not state that the different parts couldn't be assembled together to create a larger assembly. But even still... the assembled fan does fit the 10" by 10" by 10" rule.
That is all I can say about this item. Aah... don't forget the feedback! Hehehe
UPDATES:
These are changes made based on user feedback. These changes have been made before the deadline of the 3D Printing Event Challenge.
Mod A (1st Sept 2012): As suggested by Luke (http://grabcad.com/luke-7) I have changed the end screw cap. Instead of a little tab a rectangular though cut allows a flat head screw driver to be used to tighten the cap. This improves the ergonomics.
Mod B (1st Sept 2012): As suggested by Azrael (http://grabcad.com/azrael-1) I have implemented a locking mechanism as shown in the last image in the gallery. I have also added a small extrusion in the cap head to allow the flaps to slight move for this feature to work. Again, though I have given a value to this extrusion I think this might need to be adjusted after the first test print. I have never used a 3D printer before nor seen a printout and I cannot know the imperfections involved. Based on this and the material used the extrusion might need to be increased (or reduced) slightly to just allow the locking mechanism to work but prevent too much shaking of the flaps.
Similar models
thingiverse
free

Aluminum extrusion end cap for 8020 by gallonoffuel
...a bit but left the cap end the same. i scale this to 25.4mm in x and y and 10mm in z to fit onto a 10-series extrusion from 8020.
thingiverse
free

Alternate to Openbuilds V-Slot End Caps by Sotm
...ded my g-code if you want to use it. added a 20-60 2 screw end cap with a fancy "s" in the middle as a custom end cap.
thingiverse
free

80mm x 25mm fan holder for MendelMax by yesac
...xt to the print bed and pivots and slides allowing you to aim the air flow. my print fit so well i didn't need to add screws.
thingiverse
free

1.5" x 1.5" Aluminum extrusion end cap by PianoPrint
...1.5" x 1.5" aluminum extrusion end cap. i printed this in simplify3d 0.14 layer resolution. the fit is snug and secure
thingiverse
free

Rule Stop by Mtbowers21
... and handy device for woodworking and craft projects.
non-printed parts:
1 x ~80mm m5 socket head cap screw
1 x m5 thermal insert
thingiverse
free

40mm Snap On Fan Guard for Prusa i3 MK3s - Screw Access
...i remove the fan duct for easier nozzle changes. this remix allows the screw to be removed without removing the fan guard. enjoy!
thingiverse
free

BondTech BMG E3d v6 Extruder Assembly
...pter allows you to connect a 40mm fan to the stock fan connector that comes with the e3d allowing for the ultra quiet noctua fans
thingiverse
free

AM8 - 2040 extrusion end cap by Keepars
...n end cap by keepars
thingiverse
a simple cap to cover the end of the 2040 extrusion (from 8020.com) that i used on my am8 build
thingiverse
free

Aluminium Extrusion Caps 2020 / 4020 / 4040 by to0kan
...k in place and stay put. hence, this design.
i printed and tested only the 2020 version, but both 4020 and 4040 should work fine.
thingiverse
free

End cap for 2" Square T-Slot Extrusion by WillLyon
...to slide t-nuts through the cap. cap is 2mm thick.
designed to cover sharp edges on cut extrusion while allowing t-nut insertion.
Fan
3d_export
$5

fan
...fan
3dexport
fan 3d model, table fan, fan, electric fan, ventilator
archibase_planet
free

Fan
...fan
archibase planet
fan large fan
fan out n260707 - 3d model for interior 3d visualization.
archibase_planet
free

Fan
...fan
archibase planet
fan ceiling fan ventilator
fan stealth n300615 - 3d model (*.gsm+*.3ds) for interior 3d visualization.
3d_export
$15

fan
...fan
3dexport
is an ancient fan
3ddd
$1

Fan-C-Fan by marco gallegos
...n-c-fan by marco gallegos
3ddd
вентилятор , marco gallegos
fan-c-fan by marco gallegos
3d_export
$10

fan
...fan
3dexport
a detailed fan designed for home or space blowing is now available for only 19.99!
turbosquid
$1

Fan
...fan
turbosquid
free 3d model fan for download as on turbosquid: 3d models for games, architecture, videos. (1427865)
turbosquid
$14

Fan
...fan
turbosquid
royalty free 3d model fan for download as on turbosquid: 3d models for games, architecture, videos. (1415642)
3ddd
$1

Светильник Fan
...светильник fan
3ddd
fan , italamp
светильник fan, производитель italamp
turbosquid
$25

Fan
...fan
turbosquid
royalty free 3d model fan for download as c4d on turbosquid: 3d models for games, architecture, videos. (1483246)
Hand
3d_export
$8
hand
...hand
3dexport
fantasy hand
3d_export
$5
hand
...hand
3dexport
male hand
3d_export
$5
hand
...hand
3dexport
realistic male hand
3d_export
$5

hand
...hand
3dexport
hand with nails and structure
archibase_planet
free
Hand
...hand
archibase planet
hand
hand n190111 - 3d model (*.gsm+*.3ds) for interior 3d visualization.
3ddd
$1

Hand
...hand
3ddd
hand
модель руки будды
3d_export
$5

hand
...hand
3dexport
it is my wrist of hand and this is on 3d sculpt
3d_export
$5
hand
...hand
3dexport
realistic male hand obj file
3d_export
$7

hand-006 rigged hand
...hand-006 rigged hand
3dexport
rigged right hand 3d model additional textures for pbr rendering included
3d_ocean
$6
Hand
...
this 3d models of the hands, made in 3ds max, has textures(.jpg), materials(.mat), rigged, the models in .max, fbx, obj format.
Printed
design_connected
$27

...print
designconnected
moroso print computer generated 3d model. designed by wanders, marcel.
3ddd
free

Eichholtz Prints
...- eichholtz print central station i
13 - eichholtz print central station ii
14 - eichholtz print marisa
15 - eichholtz print tish
3ddd
$1

Eichholtz Prints
...print abstract - set of 2
10 - eichholtz print orange abstract
11 - eichholtz print buddha right
12 - eichholtz print buddha left
turbosquid
$1

... available on turbo squid, the world's leading provider of digital 3d models for visualization, films, television, and games.
3ddd
free

Eichholtz Prints
...of 4
2 - print dunbar 2 set of 4
3 - print guadeloupe 1 set of 4
4 - print guadeloupe 2 set of 4
5 - print giles
6 - print trett
3ddd
$1

Eichholtz Prints
...nt tutti frutti
3 - eichholtz prints watson - set of 2
4 - eichholtz prints antique nautilus - set of 2
5 - eichholtz print tiara
3d_export
$5

Monster for printing
...monster for printing
3dexport
monster 3d model printing
3ddd
free

printed rug
...printed rug
3ddd
ковер
very creative printed rug
3ddd
free

Eichholtz Prints
...иал: бумага
габариты (вхш): 72 x 62 см
описание: print sweetmeat - постер в деревянной раме.
3 - prints varsity set of 2
арти
3ddd
free

Art Print Posters
...art print posters
3ddd
прованс
art print posters by patrician prints