Thingiverse
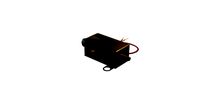
3-wheeled or Linear Railed Modular X-carriage (D-Bot Core_XY 3D Printer) by printingSome
by Thingiverse
Last crawled date: 3 years ago
Edit 12-01-19) ATTENTION: A new version which is much simpler and offers the same features: X-Carriage, Linear, Modular, 20x20 V-Slot by printingSome, www.thingiverse.com/thing:3350550
Edit 09-10-18 Cooling is replaced, see below. Now V2 (01/11/18.
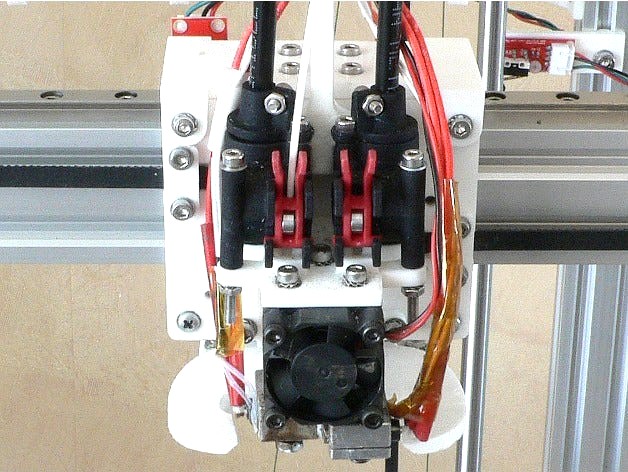
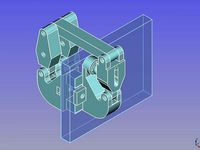
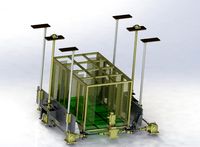
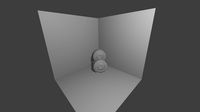
A print-carriage on 3 wheels or on a Linear Rail, to use with 3D-printers which use V Slot Extrusion rails, like D-Bot, J-Bot, etc.
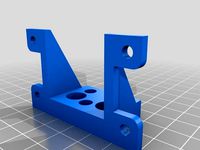
3-Wheeled: The usual lower 2 wheels are replaced with 1 wheel, which also has an easy way of adjustment of the pressure with which the 3 wheels are in contact with the rail, to prevent unwanted movements of the carriage. Works nicely, but:
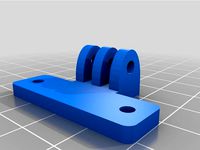
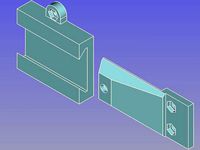
Linear Rail: Now the 2 upper wheels are replaced with a 400mm MGN9 rail + MGN9H block, just to know whether that gives just that bit improvement.
Just replacing the wheels etc. with it and the "Linear Rail MGN9 Mount" should do the trick, without any other changes.
I think it is a good idea to keep the Lower Bridge with the original "3rd Wheel" in place, to check eventual sideways movement (Y-direction) of the lower parts. But I provide a "Lower Bridge without Wheel" for those who think that's too much. ;-)
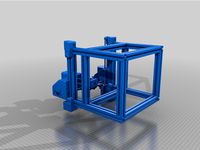
The whole thing was inspired by and remixed from the famous and incredibly documented D-Bot of spauda01.
But check: the plates are still 12mm wider and 7mm higher than the original of spauda01, because that gives somewhat easier access for (mounts of) accessories.
State of affairs on october 13th, 2017:
The basic components haven't changed since march/april, most mounts have.(that has changed as of 12-02-18, see below.
I could not get the Direct Drives Mount to perform as I wished. I thought it looked nice
and I felt sorry etc., but when I saw the Zesty Nimbles I decided to chuck it.
I felt that I never could get a bit of speed with enough accuracy with all that mass on
top, even with lighter steppers (which again didn't have enough power to drive the filament
securely without some gear box, adding more mass).
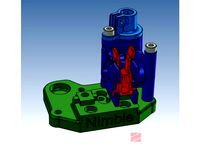
I prefer printing parts above buying them, but this time I decided to go for this concept which combines the best of 2 worlds: stepper on the frame and a light gearbox on the X-carriage, hopefully tightly enough connected in both directions with that cable.
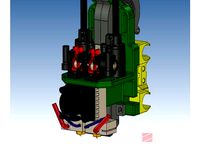
So you'll find modules for 2 ways of using the E3Dv6, the Cyclops, the Chimera: with bowden tubes and with Nimbles. The diamond mount for bowden tubes only.
There is a different fanduct for each setup, mounted on a common vertically adjustable slider. I chose for this solution to get as close as possible to the various hot ends. (When too close: easy to clip them a bit). These ducts are leaner then a previous version.
At the moment I don't use the cable chain any more. It looks nice perhaps, but I still doubt whether it gives real advantage above other ways of conducting cables etc.
With the nimbles there are 8 less wires to bring to the carriage, that convinced me to skip it, but I could easily imagine it still being of use in other configurations.
For mounting the E3Dv6 with a nimble I used the "Adapter for Single Nimble and V6 on a D-Bot" by ZestyTech, published Sep 13, 2017,https://www.thingiverse.com/thing:2531767.
For mounting the Chimera/Cyclops with 2 single nimbles I made the "Cyclops-Chimera Mount for 2 Nimbles on an original D-Bot and the 3-Wheeled X-Carriage" by printingSome, published Oct 8, 2017, https://www.thingiverse.com/thing:2574741.
I preferred to buy 2 single nimbles in stead of the Dual Nimble in order to be more flexible for future endeavors.
But of course you can use the "D-Bot Chimera/Cyclops adapter for the Dual Nimble using the printingSome carriage" by ZestyTech, published Jul 30, 2017, https://www.thingiverse.com/thing:2459458 too.
The corresponding fan ducts fit here also.
N.B. The above sounds like I have commercial links with Zesty, but I don't. I am experimenting with those nimbles, have not even got really satisfactory results at the moment, without knowing what I do wrong, but I think they form a good proposition.
For the pictures of the various setups I used "mockups" from "Diamond Hotend parts" by kharar, published Mar 24, 2015, https://www.thingiverse.com/thing:720520,
"E3D V6 HotEnd CAD Models (Includes all 3 versions)" by lXGaimMasterXl, published May 24, 2014, https://www.thingiverse.com/thing:341689, "Mockup of the Zesty Nimble: Lightweight direct drive extruder" by ZestyTech, published Oct 22, 2016, https://www.thingiverse.com/thing:1843195 and a mockup of a 20x40mm V-slot of Openbuilds which I can't find at the moment. Thanks.
I replaced all history from this page with this overview, it was too much, and also somewhat rewrote the "Notes" (where you can find tips about the assembly etc.)
Edit (10/21/17): added some parts for a Linear Rail, changed this text and the Notes accordingly.
Edit (10/29/17: V2 of Linear Rail Mount (V1 did agree with the nimbles) and added a M3-Nut_mount, to adapt to the new situation. Notes V6a explain it all.
Edit (11/10/17): V6c even better ;-) Added a Nimble_Stepper_Mount, to create more mounting possibilities for the stepper motor without losing any printing space. Tweaked the M3-Nut_mount a bit for easier placing ->v1
Edit (11/27/17): I saw I forgot to remove a warning in the Notes about the linear guide I did build in -> V6d. I works nice and I am going for the same in the Y-direction. ;-)
Edit (12/13/17): I replaced M3-nut_mount-v1.stl with M3-nut_mount-v3.stl, because it was too big, i.e. too little tolerance towards the rail. I flattened it at the side. See to it that you keep that flattened place down, parallel to the 20x40 rail, when fastening. When you have already printed the things I advise you to file 1-1.5mm from the side, when you experience some resistance here and there, whilst riding the X-carriage
Edit (13/02/18) I added a new Rear Plate: "CarriageRear(Belt_Tensioner_Version)", inspired on "D-Bot Carriage Rear Plate with Adjustable Belt Tensioner" by 1sPiRe, https://www.thingiverse.com/thing:2376442 and Separate GT2 belt tensioner" by MrArrow1961, https://www.thingiverse.com/thing:910725. The most important feature would be that one can adjust the angle between the X-axis and the Y-axis by adjusting the belt-tensions with bolts. While the effect on that angle in practice is less then I expected it makes it also easier to (un)mount and adjust the tension on the belts. With it come the "Belt_Tensioner" and a new Part 2 of the fan mounts the "Fan_Mount_Pt2-Belt_Tensioner_Version" because the other one didn't fit any more. That has become better to mount in the process. All fan mounts Pt1 fit on this, with only a 4mm bigger distance from the hot end.
I suppose that in time I will remove the older rear plate, because I consider this one far better, despite the fact that it needs a bit of t.l.c. after printing without support to get a nice and easy fit of the tensioner into its house. See also the Notes.
Edit (02/04/18) moved fan reduction files from the complete printer here. To use, together with a moulded fan housing guard, for the E3D V6 HotEnd.
Edit (07/04/18) updated some pictures.
Edit (20/06/18) added a Berd-Air-pipe_Mount, to use with my nimbles mount, see Notes.
Edit (09-10-18) replaced the fan at the rear with a blower fan underneath: more compact and stronger air jets. Made mounts for this for the usual suspects (E3Dv6 and Chimera/Cyclops with/without Nimbles, Diamond). See the renewed Notes_on_Assembly_and_such_v7.pdf
Edit (01/11/18) Directed the air flow from the blower fans downward -> V2 of Pt1 and stiffened Pt2 a bit ->V2. Adapted the Notes ->V8.
Edit (23/12/18) Lengthened mounting legs at the back of Blower_Mnt_Pt2-(E3Dv6,chimera,cyclops)w.Nimble for easier positioning -> V3
Edit (30/12/18) Little improvements -> Blower_Mnt_Pt2-(E3Dv6,chimera,cyclops)w.Nimble-V4.stl and Blower_Mnt_Pt2-(diamond)-V3.stl
Edit 09-10-18 Cooling is replaced, see below. Now V2 (01/11/18.
A print-carriage on 3 wheels or on a Linear Rail, to use with 3D-printers which use V Slot Extrusion rails, like D-Bot, J-Bot, etc.
3-Wheeled: The usual lower 2 wheels are replaced with 1 wheel, which also has an easy way of adjustment of the pressure with which the 3 wheels are in contact with the rail, to prevent unwanted movements of the carriage. Works nicely, but:
Linear Rail: Now the 2 upper wheels are replaced with a 400mm MGN9 rail + MGN9H block, just to know whether that gives just that bit improvement.
Just replacing the wheels etc. with it and the "Linear Rail MGN9 Mount" should do the trick, without any other changes.
I think it is a good idea to keep the Lower Bridge with the original "3rd Wheel" in place, to check eventual sideways movement (Y-direction) of the lower parts. But I provide a "Lower Bridge without Wheel" for those who think that's too much. ;-)
The whole thing was inspired by and remixed from the famous and incredibly documented D-Bot of spauda01.
But check: the plates are still 12mm wider and 7mm higher than the original of spauda01, because that gives somewhat easier access for (mounts of) accessories.
State of affairs on october 13th, 2017:
The basic components haven't changed since march/april, most mounts have.(that has changed as of 12-02-18, see below.
I could not get the Direct Drives Mount to perform as I wished. I thought it looked nice
and I felt sorry etc., but when I saw the Zesty Nimbles I decided to chuck it.
I felt that I never could get a bit of speed with enough accuracy with all that mass on
top, even with lighter steppers (which again didn't have enough power to drive the filament
securely without some gear box, adding more mass).
I prefer printing parts above buying them, but this time I decided to go for this concept which combines the best of 2 worlds: stepper on the frame and a light gearbox on the X-carriage, hopefully tightly enough connected in both directions with that cable.
So you'll find modules for 2 ways of using the E3Dv6, the Cyclops, the Chimera: with bowden tubes and with Nimbles. The diamond mount for bowden tubes only.
There is a different fanduct for each setup, mounted on a common vertically adjustable slider. I chose for this solution to get as close as possible to the various hot ends. (When too close: easy to clip them a bit). These ducts are leaner then a previous version.
At the moment I don't use the cable chain any more. It looks nice perhaps, but I still doubt whether it gives real advantage above other ways of conducting cables etc.
With the nimbles there are 8 less wires to bring to the carriage, that convinced me to skip it, but I could easily imagine it still being of use in other configurations.
For mounting the E3Dv6 with a nimble I used the "Adapter for Single Nimble and V6 on a D-Bot" by ZestyTech, published Sep 13, 2017,https://www.thingiverse.com/thing:2531767.
For mounting the Chimera/Cyclops with 2 single nimbles I made the "Cyclops-Chimera Mount for 2 Nimbles on an original D-Bot and the 3-Wheeled X-Carriage" by printingSome, published Oct 8, 2017, https://www.thingiverse.com/thing:2574741.
I preferred to buy 2 single nimbles in stead of the Dual Nimble in order to be more flexible for future endeavors.
But of course you can use the "D-Bot Chimera/Cyclops adapter for the Dual Nimble using the printingSome carriage" by ZestyTech, published Jul 30, 2017, https://www.thingiverse.com/thing:2459458 too.
The corresponding fan ducts fit here also.
N.B. The above sounds like I have commercial links with Zesty, but I don't. I am experimenting with those nimbles, have not even got really satisfactory results at the moment, without knowing what I do wrong, but I think they form a good proposition.
For the pictures of the various setups I used "mockups" from "Diamond Hotend parts" by kharar, published Mar 24, 2015, https://www.thingiverse.com/thing:720520,
"E3D V6 HotEnd CAD Models (Includes all 3 versions)" by lXGaimMasterXl, published May 24, 2014, https://www.thingiverse.com/thing:341689, "Mockup of the Zesty Nimble: Lightweight direct drive extruder" by ZestyTech, published Oct 22, 2016, https://www.thingiverse.com/thing:1843195 and a mockup of a 20x40mm V-slot of Openbuilds which I can't find at the moment. Thanks.
I replaced all history from this page with this overview, it was too much, and also somewhat rewrote the "Notes" (where you can find tips about the assembly etc.)
Edit (10/21/17): added some parts for a Linear Rail, changed this text and the Notes accordingly.
Edit (10/29/17: V2 of Linear Rail Mount (V1 did agree with the nimbles) and added a M3-Nut_mount, to adapt to the new situation. Notes V6a explain it all.
Edit (11/10/17): V6c even better ;-) Added a Nimble_Stepper_Mount, to create more mounting possibilities for the stepper motor without losing any printing space. Tweaked the M3-Nut_mount a bit for easier placing ->v1
Edit (11/27/17): I saw I forgot to remove a warning in the Notes about the linear guide I did build in -> V6d. I works nice and I am going for the same in the Y-direction. ;-)
Edit (12/13/17): I replaced M3-nut_mount-v1.stl with M3-nut_mount-v3.stl, because it was too big, i.e. too little tolerance towards the rail. I flattened it at the side. See to it that you keep that flattened place down, parallel to the 20x40 rail, when fastening. When you have already printed the things I advise you to file 1-1.5mm from the side, when you experience some resistance here and there, whilst riding the X-carriage
Edit (13/02/18) I added a new Rear Plate: "CarriageRear(Belt_Tensioner_Version)", inspired on "D-Bot Carriage Rear Plate with Adjustable Belt Tensioner" by 1sPiRe, https://www.thingiverse.com/thing:2376442 and Separate GT2 belt tensioner" by MrArrow1961, https://www.thingiverse.com/thing:910725. The most important feature would be that one can adjust the angle between the X-axis and the Y-axis by adjusting the belt-tensions with bolts. While the effect on that angle in practice is less then I expected it makes it also easier to (un)mount and adjust the tension on the belts. With it come the "Belt_Tensioner" and a new Part 2 of the fan mounts the "Fan_Mount_Pt2-Belt_Tensioner_Version" because the other one didn't fit any more. That has become better to mount in the process. All fan mounts Pt1 fit on this, with only a 4mm bigger distance from the hot end.
I suppose that in time I will remove the older rear plate, because I consider this one far better, despite the fact that it needs a bit of t.l.c. after printing without support to get a nice and easy fit of the tensioner into its house. See also the Notes.
Edit (02/04/18) moved fan reduction files from the complete printer here. To use, together with a moulded fan housing guard, for the E3D V6 HotEnd.
Edit (07/04/18) updated some pictures.
Edit (20/06/18) added a Berd-Air-pipe_Mount, to use with my nimbles mount, see Notes.
Edit (09-10-18) replaced the fan at the rear with a blower fan underneath: more compact and stronger air jets. Made mounts for this for the usual suspects (E3Dv6 and Chimera/Cyclops with/without Nimbles, Diamond). See the renewed Notes_on_Assembly_and_such_v7.pdf
Edit (01/11/18) Directed the air flow from the blower fans downward -> V2 of Pt1 and stiffened Pt2 a bit ->V2. Adapted the Notes ->V8.
Edit (23/12/18) Lengthened mounting legs at the back of Blower_Mnt_Pt2-(E3Dv6,chimera,cyclops)w.Nimble for easier positioning -> V3
Edit (30/12/18) Little improvements -> Blower_Mnt_Pt2-(E3Dv6,chimera,cyclops)w.Nimble-V4.stl and Blower_Mnt_Pt2-(diamond)-V3.stl
Similar models
thingiverse
free

Cyclops-Chimera Mount for 2 Nimbles on an original D-Bot and the 3-Wheeled X-Carriage by printingSome
...ngsome, https://www.thingiverse.com/thing:2206664
edit (20-06-18) for a berd-air-pipe_mount to go with this thing look there too.
thingiverse
free

D-Bot Chimera/Cyclops adapter for the Dual Nimble V1 using the printingSome carriage by ZestyTech
...uder you can buy, it has ample torque and can be mounted in multiple orientations.
the nimble is available from zesty technology.
thingiverse
free
Chimera Mount and X-carriage by Davidspek
... designed for the chimera. i did this as i really like this simple and effective design.
http://www.thingiverse.com/thing:2209349
thingiverse
free
Nimble V1 Direct drive solution for Chimera/Hypercube Evo by ZestyTech
...uder you can buy, it has ample torque and can be mounted in multiple orientations.
the nimble is available from zesty technology.
thingiverse
free
Mount to put 2 Nimbles V1 on a Chimera by ZestyTech
...uder you can buy, it has ample torque and can be mounted in multiple orientations.
the nimble is available from zesty technology.
thingiverse
free

Adapter for Single Nimble and V6 on a D-Bot by ZestyTech
...uder you can buy, it has ample torque and can be mounted in multiple orientations.
the nimble is available from zesty technology.
thingiverse
free
E3D Chimera Mount by alyis
...; for use with "modular carriages for 4020 v-slot (for d3m-bot, d-bot, c-bot)"https://www.thingiverse.com/thing:2155251
thingiverse
free
D-Bot modified fan mount for E3D Cyclops/Chimera by timere969
... for e3d cyclops/chimera by timere969
thingiverse
a mount that moves the fan up for the shorter e3d cyclops or chimera hot ends.
thingiverse
free

Chimera/Cyclops Hot End Mount for FLSun Cube carriage modification by nigel42
... sensor here: https://www.thingiverse.com/thing:2995894
and a compatible fan duct here: https://www.thingiverse.com/thing:2995919
thingiverse
free

Single V6 and Nimble V1 mount for original D-Bot carriage by ZestyTech
...uder you can buy, it has ample torque and can be mounted in multiple orientations.
the nimble is available from zesty technology.
Printingsome
thingiverse
free

Back_Leadscrew_Bracket by printingSome
... another look at the earlier version and decided that is was way to difficult to print and these things are also easier to mount.
thingiverse
free

camera hot shoe to keep on by printingSome
..., before i could get to the battery or the sd-card.
not any more. with this gadget i can get to both without disturbing anything.
thingiverse
free

Ball_Foot for D-Bot by printingSome
...tennis balls, good damping, little swaying. i attached them after gluing the harder part of pieces of velcro (the hooks) inside.
thingiverse
free

ATX PSU mount by printingSome
...hings under the bottom are supports for some tie-wraps or such.
the thin stiles in the bottom-holes should afterwards be removed.
thingiverse
free

y-axis min/max endstop for Prusa i3 Hesine by printingSome
...i have.
it can serve as well as a min. endstop mount.
warning: check whether you want to miss a couple of mm in the y direction.
thingiverse
free
x-axis endstop for Prusa i3 Hesine by printingSome
...ning this, but i now prefer and use "x-axis min/max endstop for microswitch", https://www.thingiverse.com/thing:1683535
thingiverse
free
y-axis belt tensioner (Prusa i3 Hesine) by printingSome
...ed it all in one go, but for the little round thing, which i reprinted with a layer height of 0.1mm. it looked a lot better then.
thingiverse
free

Open Cable Chain Reversed by printingSome
...hole bunch wrapped up could also use a little support (perhaps the same rubber band ;-) ).
please give me your thoughts. thanks.
thingiverse
free

3-extruder base with LCD controller stand by printingSome
...ings get straight on to the extruder-house.
the lcd controller-box is from http://www.thingiverse.com/thing:1116163, with thanks.
thingiverse
free

Glass bed XY corner clamp variation by printingSome
...quot; i put between the glass and the aluminium.)
i fits nicely on my prusa i3 hesine bed and i enjoy the absence of the clamps.
Xy
3ddd
$1

Вешалка напольная XY-027
...а штанги: 171 см
диаметр основания: 38 смhttp://mebelshopos.ru/aksessuary-ofisnye/veshalka-napolnaya-xy-027-detail.html
turbosquid
$9
XY Rectangular Dining Table
... available on turbo squid, the world's leading provider of digital 3d models for visualization, films, television, and games.
3ddd
$1
holly hunt xy bench
...eight: 17.75 in
width: 45 in, 26 in
depth: 18 in
больше превьюhttps://www.behance.net/gallery/24983999/bench-3d-model?
turbosquid
$8
Xy fine tuning handle adjusts the module
...odule for download as 3ds, max, ige, obj, fbx, stl, and sldas on turbosquid: 3d models for games, architecture, videos. (1331394)
3ddd
$1

pillows bed 2
...pillows bed 2 3ddd подушка , круглая dimensions: xy ...
3ddd
$1
Honeycomb Floor
...паркет parquet with metalic honeycomb floor demensions 500x500 cm xy multitexture +...
3d_export
$7

positioning screw mechanism
...and lead screw, constitute a double displacement adjustable mechanism, xy axis double position adjustable positioning.<br>**************************************<br>files format contains<br>-solidworks 2017<br>-step<br>-iges<br>- and...
3d_export
$9
positioning mechanism of heavy-duty platform
...activity -- ball mechanism activity ---- drive heavy load xy axis movement -- positioning completed<br>**************************************<br>files format contains<br>-solidworks 2017<br>-step<br>-iges<br>- and...
3d_export
$180
optical fiber laser marking machines assembly
...fiber laser marking machine<br>automatic loading and unloading laser marking machine<br>xy platform adjustable laser marking machine<br>laser marking machine used with...
thingiverse
free
XY ROBOT by ymtlab
...xy robot by ymtlab
thingiverse
xy robot
Bot
turbosquid
$19

Bot
... available on turbo squid, the world's leading provider of digital 3d models for visualization, films, television, and games.
turbosquid
free

Bot
... available on turbo squid, the world's leading provider of digital 3d models for visualization, films, television, and games.
3d_export
$10
scanner bot
...scanner bot
3dexport
cool scanner bot who scans for fixing things...
3d_ocean
$9

Apc Bot
...n bot games toys
an all-purpose-constructo-bot. for cartoon purposes. the model is not rigged. please use vray adv for rendering.
3d_export
$75
Bot 3D Model
...bot 3d model
3dexport
robot bot man kiborg character
bot 3d model evgen 19504 3dexport
turbosquid
free

Eye Bot
...eye bot
turbosquid
free 3d model eye bot for download as fbx on turbosquid: 3d models for games, architecture, videos. (1514059)
turbosquid
$29
Gorill-bot
...bosquid
royalty free 3d model gorill-bot for download as fbx on turbosquid: 3d models for games, architecture, videos. (1239456)
turbosquid
$25

Lamp Bot
...bosquid
royalty free 3d model lamp bot for download as blend on turbosquid: 3d models for games, architecture, videos. (1230121)
turbosquid
$10
Spectre Bot
...osquid
royalty free 3d model spectre bot for download as fbx on turbosquid: 3d models for games, architecture, videos. (1616378)
turbosquid
$8
Ultra Bot
...urbosquid
royalty free 3d model ultra bot for download as ma on turbosquid: 3d models for games, architecture, videos. (1330752)
Carriage
archibase_planet
free

Carriage
...arriage
archibase planet
perambulator baby carriage pram
carriage n250908 - 3d model (*.gsm+*.3ds) for interior 3d visualization.
3d_export
free

carriage
...carriage
3dexport
old fashion carriage model, more files here:
turbosquid
$140

Carriage
...urbosquid
royalty free 3d model carriage for download as max on turbosquid: 3d models for games, architecture, videos. (1482052)
turbosquid
$25

Carriage
...urbosquid
royalty free 3d model carriage for download as max on turbosquid: 3d models for games, architecture, videos. (1285944)
3d_export
free

carriage
...carriage
3dexport
game cart
3d_ocean
$15

Barrel Carriage
...ieval oak old transport wheels wine wood
this model contains a barrel and a carriage. it is a medieval type of wood oak carriage.
turbosquid
$40

Carriage
...ty free 3d model carriage for download as obj, fbx, and blend on turbosquid: 3d models for games, architecture, videos. (1290094)
turbosquid
free

Carriage
...yalty free 3d model carriage for download as ma, obj, and fbx on turbosquid: 3d models for games, architecture, videos. (1239157)
3d_export
$5

Medieval carriage
...medieval carriage
3dexport
medieval carriage in fairy style
turbosquid
$58

Carriage
...d model carriage with scene for download as max, obj, and fbx on turbosquid: 3d models for games, architecture, videos. (1276262)
Linear
3ddd
$1
Linear Diffusers
...linear diffusers
3ddd
диффузор
set of linear diffusers for ceiling.
design_connected
$27
Linear Sofa
...linear sofa
designconnected
scp linear sofa computer generated 3d model.
design_connected
$18
Atlantis linear
...atlantis linear
designconnected
terzani atlantis linear pendant lights computer generated 3d model. designed by barlas baylar.
3d_export
$5
light linear unit
...light linear unit
3dexport
light linear unit
turbosquid
$5
Linear Actuator
...
royalty free 3d model linear actuator for download as blend on turbosquid: 3d models for games, architecture, videos. (1589061)
turbosquid
$29
Linear panel
...oyalty free 3d model linear panel for download as max and obj on turbosquid: 3d models for games, architecture, videos. (1391254)
turbosquid
$12
Linear Chandelier
...y free 3d model linear chandelier for download as max and obj on turbosquid: 3d models for games, architecture, videos. (1574289)
turbosquid
$10

Grohe Lineare
... available on turbo squid, the world's leading provider of digital 3d models for visualization, films, television, and games.
turbosquid
$10

Linear Axis
... available on turbo squid, the world's leading provider of digital 3d models for visualization, films, television, and games.
3d_export
$5
Linear Unit 3D Model
...linear unit 3d model
3dexport
linear unit force torque velocity
linear unit 3d model fau 71218 3dexport
Core
turbosquid
$143
In the core
... available on turbo squid, the world's leading provider of digital 3d models for visualization, films, television, and games.
3ddd
$1
Skandiform Core
...skandiform core
3ddd
skandiform
кресло фирмы skandiform, модель core.
габаритные размеры (шхвхг): 530х700х510 мм
turbosquid
$8

Chandelier CORE
...id
royalty free 3d model chandelier core for download as max on turbosquid: 3d models for games, architecture, videos. (1673910)
turbosquid
free

Planet Core
... available on turbo squid, the world's leading provider of digital 3d models for visualization, films, television, and games.
3ddd
$1

Samsung Galaxy Core 2
...samsung galaxy core 2
3ddd
телефон
samsung galaxy core 2
turbosquid
$10

cable 2 core
... available on turbo squid, the world's leading provider of digital 3d models for visualization, films, television, and games.
turbosquid
$10

cable 1 core
... available on turbo squid, the world's leading provider of digital 3d models for visualization, films, television, and games.
3ddd
$1
Кондиционер ICE CORE
...кондиционер ice core
3ddd
кондиционер
37 000 полигонов
turbosquid
$65

Insulated Multi Core Cable
... available on turbo squid, the world's leading provider of digital 3d models for visualization, films, television, and games.
turbosquid
$29

Samsung Galaxy Core Advance
... available on turbo squid, the world's leading provider of digital 3d models for visualization, films, television, and games.
Modular
3ddd
$1
MODULAR
...modular
3ddd
modular , врезной свет
modular потолочные светильники
3ddd
$1
Modular Spock
...modular spock
3ddd
modular
modular spock
3ddd
$1
MODULAR / Spock
...modular / spock
3ddd
modular
modular/spock
design_connected
$7
Modular
...modular
designconnected
emmemobili modular shelves and storage computer generated 3d model. designed by ferruccio laviani.
3ddd
$1
Modular spock
...modular spock
3ddd
modular
spock wall led
turbosquid
$25
Modular sofa Angelo Cappellini Modular
...a angelo cappellini modular for download as max, fbx, and obj on turbosquid: 3d models for games, architecture, videos. (1570923)
turbosquid
$15

Modular sofa Angelo Cappellini Modular
...a angelo cappellini modular for download as max, fbx, and obj on turbosquid: 3d models for games, architecture, videos. (1570304)
3ddd
$1
Modular 2FLAT2C
...modular 2flat2c
3ddd
modular
modularhttp://www.supermodular.com/
3d_export
free
Modular walls
...modular walls
3dexport
modular walls for playing without materials and textures
3ddd
$1

Modular / Lighting Juliette
...modular / lighting juliette
3ddd
modular
modular lighting juliette
Railed
3d_ocean
$5
rails
...rails
3docean
old rails rails sleepers
old rails
archibase_planet
free
Rail
...chibase planet
rail railing handrail guard-rail
rail forged fence n310814 - 3d model (*.gsm+*.3ds) for exterior 3d visualization.
archibase_planet
free
Rail
...rail
archibase planet
handrail railing guard-rail
rail n220914 - 3d model (*.gsm+*.3ds) for interior 3d visualization.
archibase_planet
free
Rail
...rail
archibase planet
railing hand-rail banisters
rail n130309 - 3d model (*.gsm+*.3ds) for interior 3d visualization.
archibase_planet
free
Rail
...rail
archibase planet
railing hand-rail banisters
rail n270510 - 3d model (*.gsm+*.3ds) for interior 3d visualization.
archibase_planet
free
Railing
...
archibase planet
railing handrail fence guard-rail
railing n140314 - 3d model (*.gsm+*.3ds+*.max) for exterior 3d visualization.
archibase_planet
free

Railing
...railing
archibase planet
railing
railing- 3d model (*.gsm+*.3ds) for interior 3d visualization.
archibase_planet
free
Railing
...railing
archibase planet
railing enclosure barrier
light railing - 3d model for interior 3d visualization.
archibase_planet
free
Rail
...rail
archibase planet
metal railing
rail n280608 - 3d model (*.gsm+*.3ds) for interior 3d visualization.
archibase_planet
free
Railing
...railing
archibase planet
railing kitchen ware
railing 1 - 3d model (*.gsm+*.3ds) for interior 3d visualization.
Wheeled
archibase_planet
free
Wheel
...l steering control steering wheel
wheel ship steering wheel n060215 - 3d model (*.gsm+*.3ds+*.max) for exterior 3d visualization.
3d_ocean
$14
Wheel
...wheel
3docean
car rim car wheel rim wheel
high poly car wheel design. 16,840 polys
3d_export
free
wheel
...wheel
3dexport
wheel
3d_export
free
wheel
...wheel
3dexport
wheel
3d_export
free
Wheel
...wheel
3dexport
wheel
3d_export
$5

wheel
...wheel
3dexport
wheel for car.
3d_export
$5
wheel
...wheel
3dexport
car wheel
3d_export
$5
wheel
...wheel
3dexport
car wheel
3d_export
$5
wheel
...wheel
3dexport
car wheel
3d_export
$5
wheel
...wheel
3dexport
car wheel
Printer
archibase_planet
free

Printer
...inter
archibase planet
printer laser printer pc equipment
printer n120614 - 3d model (*.gsm+*.3ds) for interior 3d visualization.
archibase_planet
free

Printer
...rchibase planet
laser printer office equipment computer equipment
printer - 3d model (*.gsm+*.3ds) for interior 3d visualization.
turbosquid
$100

Printer
...er
turbosquid
royalty free 3d model printer for download as on turbosquid: 3d models for games, architecture, videos. (1487819)
turbosquid
$3

Printer
...turbosquid
royalty free 3d model printer for download as max on turbosquid: 3d models for games, architecture, videos. (1670230)
turbosquid
$1

printer
...turbosquid
royalty free 3d model printer for download as max on turbosquid: 3d models for games, architecture, videos. (1595546)
turbosquid
$1

printer
...turbosquid
royalty free 3d model printer for download as max on turbosquid: 3d models for games, architecture, videos. (1595105)
turbosquid
$10

Printer
...id
royalty free 3d model printer for download as max and 3dm on turbosquid: 3d models for games, architecture, videos. (1607146)
turbosquid
$7

Printer
...royalty free 3d model printer for download as ma, ma, and obj on turbosquid: 3d models for games, architecture, videos. (1644580)
turbosquid
$30

Printer
... available on turbo squid, the world's leading provider of digital 3d models for visualization, films, television, and games.
turbosquid
$20

Printer
... available on turbo squid, the world's leading provider of digital 3d models for visualization, films, television, and games.
3
turbosquid
$10

Mountain Bike 3 -3 of 3
...model mountain bike 3 (#3 of 3) for download as fbx and blend on turbosquid: 3d models for games, architecture, videos. (1438752)
turbosquid
$6

Rock 3-3
...urbosquid
royalty free 3d model rock 3-3 for download as obj on turbosquid: 3d models for games, architecture, videos. (1628065)
turbosquid
$29

Books 150 pieces 3-3-3
...books 150 pieces 3-3-3 for download as max, obj, fbx, and stl on turbosquid: 3d models for games, architecture, videos. (1384033)
turbosquid
$3

Genesis 3 Clothing 3
... available on turbo squid, the world's leading provider of digital 3d models for visualization, films, television, and games.
3d_export
$5

hinge 3
...hinge 3
3dexport
hinge 3
3ddd
$1

Розетка 3
...розетка 3
3ddd
розетка
розетка 3
turbosquid
$50

is-3
... available on turbo squid, the world's leading provider of digital 3d models for visualization, films, television, and games.
turbosquid
$10

Mountain Bike 3 -2 of 3
...model mountain bike 3 (#2 of 3) for download as fbx and blend on turbosquid: 3d models for games, architecture, videos. (1438750)
turbosquid
$10

Mountain Bike 1 -3 of 3
...model mountain bike 1 (#3 of 3) for download as fbx and blend on turbosquid: 3d models for games, architecture, videos. (1438743)
3d_export
$5

3 CATS
...3 cats
3dexport
3 cats pen holder