Thingiverse
#3 Empty Capsule Filler - filling medical gelcap
by Thingiverse
Last crawled date: 4 years, 2 months ago
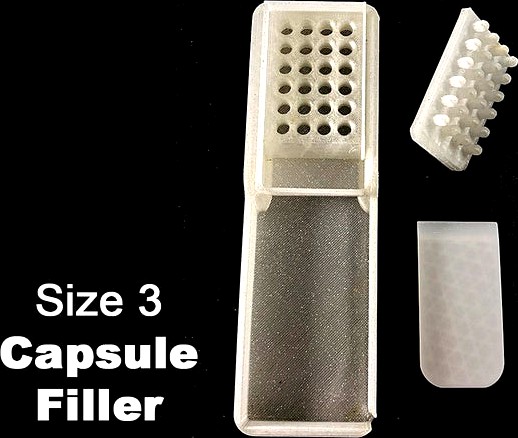
Size 3 Capsule Filler - filling medical gelcap
WHAT IS IT?
It's a device to speed up the filling of empty gelcaps with powdered supplements that you want to be able to swallow. (making your own capsules) I created this because my body typically needs less medicine than is sold in health food store capsules, so I needed to find my own dosage then find the capsule size that will store the amount of powder I need for my dose.
I use these most frequently to make capsules (for Targeted Amino Acid Therapy) so I've honed it a lot to get it where I want it.
I've learned to get the dosage fairly precise +/- .010g and can tweak the dosage by choosing to either: lightly fill the capsules just till full, or filling then tapping the whole rig 1 or more times (to get the powder to compact slightly) then fill again, or not caring and just packing the capsules all the way using the packer (compactor) to press the powder in tight and keep adding more till absolutely full.
I've created identical units for these four capsule sizes:
size 1- https://www.thingiverse.com/thing:4078171
size 3- https://www.thingiverse.com/thing:4079394
size 4- https://www.thingiverse.com/thing:4079607
size 5- https://www.thingiverse.com/thing:4079997
This is a remix of:https://www.thingiverse.com/thing:2349276
PARTS:
There are 6 parts:
1- Hole test (optional)
This is a test part to see what % you need to print the part at to match the variability in your filament's shrinkage rate and in the capsule sizes for the batch you have.
I bring this into my slicer at 100%, then duplicate it... and make one at 96%, 98%, 102% and 105%... then I line them all up so they just slightly overlap and create 1 part from this test file small to large. I print, then test with my empty capsules. I ideally want the capsule to slightly grab in the hole, not fall through and not get wedged.
(there is variability in most printing diameters so not all the holes will be identical, find a good balance.)
2- Capsule Filler
This is the main part where you insert the bottom half of the capsules to be filled. Print this at whatever % you found best when you printed the hole test part.
Depending on your slicer settings or filament there may be more or less variability in your hole sizes on the final print (some perfect, some to small) Another option is to find a drill bit that is the perfect size for the capsule and clean up the holes that seem too snug. You can also use this and skip the size test... just print at 100% and drill the holes to the exact size.
3- Extended base BEST!
4- Short base (optional)
The capsule filler slides into the base to hold it in place so the capsules are the correct distance from the base and that you can't accidentally lift the capsule filler up and dump your capsules. It also allows you to pick up the whole unit and tap it on a counter to compact the material slightly to control dosing.
[note: the bases for size 3 & 4 are the same. If you use both sizes, print the base only once, both fillers will work with this base]
Whatever % you used to print the capsule filler above, use the same % to print this part.
There are two versions of the base:
a- Extended Base (suggested) with attached receiver tray - where you set the capsule filler to put the cap lids on so it keeps the powder contained.
b-Base (short), open with no receiver tray -you slide out the capsule filler onto a counter surface to apply the cap lids... and may spill some powder on counter.
5- Packer (optional)
Once you fill the capsules with powder, if you want them to have the maximum amount in them, press the packer into the full capsules to compact the powder, then refill powder. Repeat until powder no longer packs down. (The part works best when orientated with the rounded corners facing the open tray).
The packer will need supports. The best print I've gotten is from laying the part on edge, with pins sticking out sideways.
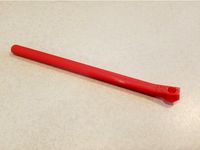
6- Paddle
This is the scraper you use to move the powder over the holes to make sure all the capsules are evenly filled.
FILAMENT/FLOW:
Select a filament that gives you a nice flow with smooth surfaces (or tweak your temp & flow rates) to get the surfaces as smooth as you can. The smoother your top surfaces are, the less chance of whatever powder you're using to stick in the tiny spaces between lines.
Some filaments will naturally do a better job... some can be a bitch to calibrate and get the holes nice. Use your most cooperative filament :)
SLICER SETTINGS: (Cura)
Speed: use whatever speed you can get accurate parts from, slow down if needed. I used 60 (first layers 20)
Layer Height: .28 (or finer if you like)
Rafts: No! (we want a smooth surface on bottom)
Supports: (only for packer)
Infill: 15-20% (I like cubic)
IRONING: Yes!
For the base ironing is OPTIMAL - useful to get a nice smooth surface (so powder doesn't stick in the ridges of the plastic) I'm using:
enable ironing [ON]
Iron only highest layer [OFF]
ironing pattern: zig zag
ironing line spacing: 0.1mm
ironing flow: 1% (this will vary based on your filament... this may be closer to 10% for you)
ironing inset: 0.2mm
ironing speed: 23.33
Adaptive Layers: (optional)
To smooth out some of the curves you can use adaptive layers in Cura. But it doesn't really add to the functionality, so you can skip if you want.
Use adaptive layers [ON]
Adaptive Layers Maximum Variation: 0.04mm
Adaptive Layers Variation Step Size: 0.04mm
Adaptive Layers Threshold: 100.0
SOURCE FILES:https://www.tinkercad.com/things/6CclH1blfVb-3-filler-assembly-final
WHAT IS IT?
It's a device to speed up the filling of empty gelcaps with powdered supplements that you want to be able to swallow. (making your own capsules) I created this because my body typically needs less medicine than is sold in health food store capsules, so I needed to find my own dosage then find the capsule size that will store the amount of powder I need for my dose.
I use these most frequently to make capsules (for Targeted Amino Acid Therapy) so I've honed it a lot to get it where I want it.
I've learned to get the dosage fairly precise +/- .010g and can tweak the dosage by choosing to either: lightly fill the capsules just till full, or filling then tapping the whole rig 1 or more times (to get the powder to compact slightly) then fill again, or not caring and just packing the capsules all the way using the packer (compactor) to press the powder in tight and keep adding more till absolutely full.
I've created identical units for these four capsule sizes:
size 1- https://www.thingiverse.com/thing:4078171
size 3- https://www.thingiverse.com/thing:4079394
size 4- https://www.thingiverse.com/thing:4079607
size 5- https://www.thingiverse.com/thing:4079997
This is a remix of:https://www.thingiverse.com/thing:2349276
PARTS:
There are 6 parts:
1- Hole test (optional)
This is a test part to see what % you need to print the part at to match the variability in your filament's shrinkage rate and in the capsule sizes for the batch you have.
I bring this into my slicer at 100%, then duplicate it... and make one at 96%, 98%, 102% and 105%... then I line them all up so they just slightly overlap and create 1 part from this test file small to large. I print, then test with my empty capsules. I ideally want the capsule to slightly grab in the hole, not fall through and not get wedged.
(there is variability in most printing diameters so not all the holes will be identical, find a good balance.)
2- Capsule Filler
This is the main part where you insert the bottom half of the capsules to be filled. Print this at whatever % you found best when you printed the hole test part.
Depending on your slicer settings or filament there may be more or less variability in your hole sizes on the final print (some perfect, some to small) Another option is to find a drill bit that is the perfect size for the capsule and clean up the holes that seem too snug. You can also use this and skip the size test... just print at 100% and drill the holes to the exact size.
3- Extended base BEST!
4- Short base (optional)
The capsule filler slides into the base to hold it in place so the capsules are the correct distance from the base and that you can't accidentally lift the capsule filler up and dump your capsules. It also allows you to pick up the whole unit and tap it on a counter to compact the material slightly to control dosing.
[note: the bases for size 3 & 4 are the same. If you use both sizes, print the base only once, both fillers will work with this base]
Whatever % you used to print the capsule filler above, use the same % to print this part.
There are two versions of the base:
a- Extended Base (suggested) with attached receiver tray - where you set the capsule filler to put the cap lids on so it keeps the powder contained.
b-Base (short), open with no receiver tray -you slide out the capsule filler onto a counter surface to apply the cap lids... and may spill some powder on counter.
5- Packer (optional)
Once you fill the capsules with powder, if you want them to have the maximum amount in them, press the packer into the full capsules to compact the powder, then refill powder. Repeat until powder no longer packs down. (The part works best when orientated with the rounded corners facing the open tray).
The packer will need supports. The best print I've gotten is from laying the part on edge, with pins sticking out sideways.
6- Paddle
This is the scraper you use to move the powder over the holes to make sure all the capsules are evenly filled.
FILAMENT/FLOW:
Select a filament that gives you a nice flow with smooth surfaces (or tweak your temp & flow rates) to get the surfaces as smooth as you can. The smoother your top surfaces are, the less chance of whatever powder you're using to stick in the tiny spaces between lines.
Some filaments will naturally do a better job... some can be a bitch to calibrate and get the holes nice. Use your most cooperative filament :)
SLICER SETTINGS: (Cura)
Speed: use whatever speed you can get accurate parts from, slow down if needed. I used 60 (first layers 20)
Layer Height: .28 (or finer if you like)
Rafts: No! (we want a smooth surface on bottom)
Supports: (only for packer)
Infill: 15-20% (I like cubic)
IRONING: Yes!
For the base ironing is OPTIMAL - useful to get a nice smooth surface (so powder doesn't stick in the ridges of the plastic) I'm using:
enable ironing [ON]
Iron only highest layer [OFF]
ironing pattern: zig zag
ironing line spacing: 0.1mm
ironing flow: 1% (this will vary based on your filament... this may be closer to 10% for you)
ironing inset: 0.2mm
ironing speed: 23.33
Adaptive Layers: (optional)
To smooth out some of the curves you can use adaptive layers in Cura. But it doesn't really add to the functionality, so you can skip if you want.
Use adaptive layers [ON]
Adaptive Layers Maximum Variation: 0.04mm
Adaptive Layers Variation Step Size: 0.04mm
Adaptive Layers Threshold: 100.0
SOURCE FILES:https://www.tinkercad.com/things/6CclH1blfVb-3-filler-assembly-final
Similar models
thingiverse
free

#5 Empty Capsule Filler - filling medical gelcap
...p size: 0.04mm
adaptive layers threshold: 100.0
source files:https://www.tinkercad.com/things/4qdmmhcviwn-5-filler-assembly-final
thingiverse
free

#1 Empty Capsule Filler - filling medical gelcap
...e: 0.04mm
adaptive layers threshold: 100.0
source files:https://www.tinkercad.com/things/enau1pjm5qx-1-capsule-filler-assembly/
thingiverse
free

#4 Empty Capsule Filler - filling medical gelcap
...p size: 0.04mm
adaptive layers threshold: 100.0
source files:https://www.tinkercad.com/things/9vhun2jknre-4-filler-assembly-final
thingiverse
free

Single Capsule Filler - Size 0 by meatportal
...nal filling.
in case you want to modify the dimensions for other capsule sizes, i've included a fusion360 f3a and stp export.
thingiverse
free

Single Capsule Maker Filler Thing! With Tamp and Weighing Funnel Pan - Multiple Sizes by SimonSplat
...ng off as required.
update: this is an awesome remix/version that is more compact. kudos! https://www.thingiverse.com/make:669018
thingiverse
free

"00" Gelcap Capsule Filler and tamper by Bruce177
... printer as i know it will be 100x better made on that. i just wanted to put the files out there for you all to have a play with.
thingiverse
free

Pill capsule filling tool #3 size by futile
... be great to see a medical category added here on thingaverse.
this might be useful to anyone else that needs to fill capsules.
thingiverse
free

Pill Packer 100x by adolist
... blocked off however these are not on the actual model when printed and this is only a program error within stl viewing programs.
thingiverse
free
Capsule Holder by PrimalR0de0
... has that portion omitted, and can be printed with no supports by being printed on its side.
hope this can make your life easier!
thingiverse
free

100 "00" Capsule Filler Machine
...ed, and then you are done. (you will normally hear a click when a capsule is closed.)
*note: top half is the small capsule plate.
Gelcap
thingiverse
free
"00" Gelcap Capsule Filler and tamper by Bruce177
... printer as i know it will be 100x better made on that. i just wanted to put the files out there for you all to have a play with.
thingiverse
free
#5 Empty Capsule Filler - filling medical gelcap
...p size: 0.04mm
adaptive layers threshold: 100.0
source files:https://www.tinkercad.com/things/4qdmmhcviwn-5-filler-assembly-final
thingiverse
free
#1 Empty Capsule Filler - filling medical gelcap
...e: 0.04mm
adaptive layers threshold: 100.0
source files:https://www.tinkercad.com/things/enau1pjm5qx-1-capsule-filler-assembly/
thingiverse
free
#4 Empty Capsule Filler - filling medical gelcap
...p size: 0.04mm
adaptive layers threshold: 100.0
source files:https://www.tinkercad.com/things/9vhun2jknre-4-filler-assembly-final
Capsule
3d_ocean
$5
Capsules
...capsules
3docean
blister blistered capsules doc doctor medicine pills plastic tablets
some blistered capsules
3d_export
$10

energy capsule
...energy capsule
3dexport
energy capsule
3ddd
free

Capsule Lamp
...capsule lamp
3ddd
capsule lamp
turbosquid
$380

Capsule
... available on turbo squid, the world's leading provider of digital 3d models for visualization, films, television, and games.
turbosquid
$75

capsule
... available on turbo squid, the world's leading provider of digital 3d models for visualization, films, television, and games.
turbosquid
$29

Capsule
... available on turbo squid, the world's leading provider of digital 3d models for visualization, films, television, and games.
turbosquid
$19

capsule
... available on turbo squid, the world's leading provider of digital 3d models for visualization, films, television, and games.
turbosquid
$15

capsules
... available on turbo squid, the world's leading provider of digital 3d models for visualization, films, television, and games.
turbosquid
free

Capsule
... available on turbo squid, the world's leading provider of digital 3d models for visualization, films, television, and games.
3d_ocean
$8
Capsul Man
...l man
3docean
3ds arman3dg capsul games low man max people poly
capsul man, 7 texture 1024-1024 (3ds max files- 2012, 2011, 2010)
Filler
turbosquid
$26

Filler
... available on turbo squid, the world's leading provider of digital 3d models for visualization, films, television, and games.
3ddd
$1
Concealed Tub Filler
...concealed tub filler
3ddd
waterworks , смеситель
concealed tub filler
3d_export
$8
faucet pot filler
...faucet pot filler
3dexport
3ddd
$1
Vola BK7 Bath Filler
...vola bk7 bath filler
3ddd
vola , faucet
vola bk7 bath filler
turbosquid
$15

Metal Filler Breather.ipt
... available on turbo squid, the world's leading provider of digital 3d models for visualization, films, television, and games.
turbosquid
free
Risco301Continuous Vacuum Filler
... available on turbo squid, the world's leading provider of digital 3d models for visualization, films, television, and games.
3ddd
$1
Vola FS1 Floormount Bath Filler
...vola fs1 floormount bath filler
3ddd
vola , faucet
vola bk7 floormount tub filler
turbosquid
$20

Pot filler K431029(1)
... available on turbo squid, the world's leading provider of digital 3d models for visualization, films, television, and games.
turbosquid
$14

Bath Filler/Sink Taps
... available on turbo squid, the world's leading provider of digital 3d models for visualization, films, television, and games.
turbosquid
$9

Home and condo filler objects
... available on turbo squid, the world's leading provider of digital 3d models for visualization, films, television, and games.
Empty
turbosquid
$1

Empty box
...osquid
royalty free 3d model empty box for download as blend on turbosquid: 3d models for games, architecture, videos. (1660136)
turbosquid
$15

Empty jar
...
royalty free 3d model empty jar for download as max and fbx on turbosquid: 3d models for games, architecture, videos. (1143032)
3d_export
$5

empty glass
...empty glass
3dexport
3d modeling of a glass.
turbosquid
$29

Trailer Empty
... available on turbo squid, the world's leading provider of digital 3d models for visualization, films, television, and games.
turbosquid
$29

Soccerball empty
... available on turbo squid, the world's leading provider of digital 3d models for visualization, films, television, and games.
turbosquid
$19

Empty Jar
... available on turbo squid, the world's leading provider of digital 3d models for visualization, films, television, and games.
turbosquid
$1

Empty Fountain
... available on turbo squid, the world's leading provider of digital 3d models for visualization, films, television, and games.
turbosquid
$1

Bookshelf Empty
... available on turbo squid, the world's leading provider of digital 3d models for visualization, films, television, and games.
turbosquid
free

Empty Hourglass
... available on turbo squid, the world's leading provider of digital 3d models for visualization, films, television, and games.
turbosquid
free

Empty Hourglass
... available on turbo squid, the world's leading provider of digital 3d models for visualization, films, television, and games.
Medical
3d_ocean
$4
Medical Front
...medical front
3docean
horror low medical
medical front
turbosquid
$100

MEDICAL EQUIPMENT, Equipement Medical
... available on turbo squid, the world's leading provider of digital 3d models for visualization, films, television, and games.
turbosquid
$30
Medical Pallet , Paillasse Medical
... available on turbo squid, the world's leading provider of digital 3d models for visualization, films, television, and games.
3d_export
$18

medical mask
...medical mask
3dexport
medical mask
3d_export
$5

Medical
...medical
3dexport
3d_ocean
$12
Medical Scissors
...medical scissors
3docean
cut cutter scissors tool. metal medical
realistic high poly model of medical scissors.
3d_export
$6

medics chest
...medics chest
3dexport
medic's chest
turbosquid
$30
Medic
... available on turbo squid, the world's leading provider of digital 3d models for visualization, films, television, and games.
turbosquid
$15
Medic
... available on turbo squid, the world's leading provider of digital 3d models for visualization, films, television, and games.
3d_export
$7

medical mask
...medical mask
3dexport
medical mask against corona virus
Filling
3d_export
$14

8 Filling Head Filling Machine
...8 filling head filling machine
3dexport
8 filling head filling machine
3d_export
$7

filling machine
...ng position; there are many details, which are suitable for learning and viewing, and can be downloaded by your favorite friends.
turbosquid
$11

Cabinet Filling
...id
royalty free 3d model cabinet filling for download as max on turbosquid: 3d models for games, architecture, videos. (1395069)
turbosquid
$10

ladle filling
...quid
royalty free 3d model ladle filling for download as max on turbosquid: 3d models for games, architecture, videos. (1298994)
turbosquid
$5

Filling machine
...lty free 3d model filling machine for download as max and fbx on turbosquid: 3d models for games, architecture, videos. (1382952)
3d_ocean
$19

Croissant with filling
...d model of two croissants with chocolate filling – one is half eaten. 3d scanned from real product. placed on square white plate.
3d_ocean
$20
Cupcakes with filling
...f three cupcakes with cherry and vanilla filling. one is half cutted. 3d scanned from real product. placed on square white plate.
3d_ocean
$20

Waffles with filling
...3d model of three waffles with chocolate filling – one is half eaten. 3d scanned from real product. placed on square white plate.
3d_export
$10
ring for enamel filling
...ring for enamel filling
3dexport
ring for enamel filling. formats: max 20, stl.
3d_export
$6

filling wallpaper
..., hp printer, epson scanner,<br>logitech keyboard and mouse, diary,<br>magazine, smartphone, clock, calendar, poster.
3
turbosquid
$10

Mountain Bike 3 -3 of 3
...model mountain bike 3 (#3 of 3) for download as fbx and blend on turbosquid: 3d models for games, architecture, videos. (1438752)
turbosquid
$6

Rock 3-3
...urbosquid
royalty free 3d model rock 3-3 for download as obj on turbosquid: 3d models for games, architecture, videos. (1628065)
turbosquid
$3

Genesis 3 Clothing 3
... available on turbo squid, the world's leading provider of digital 3d models for visualization, films, television, and games.
3d_export
$5

hinge 3
...hinge 3
3dexport
hinge 3
3ddd
$1

Розетка 3
...розетка 3
3ddd
розетка
розетка 3
turbosquid
$50

is-3
... available on turbo squid, the world's leading provider of digital 3d models for visualization, films, television, and games.
turbosquid
$10

Mountain Bike 3 -2 of 3
...model mountain bike 3 (#2 of 3) for download as fbx and blend on turbosquid: 3d models for games, architecture, videos. (1438750)
turbosquid
$10

Mountain Bike 1 -3 of 3
...model mountain bike 1 (#3 of 3) for download as fbx and blend on turbosquid: 3d models for games, architecture, videos. (1438743)
3d_export
$5

3 CATS
...3 cats
3dexport
3 cats pen holder
3ddd
free
3 Буфета
...3 буфета
3ddd
буфет , кантри
3 буфета