Thingiverse

27mm Piezo mount for Re-X Carriage by rkrammes
by Thingiverse
Last crawled date: 3 years, 1 month ago
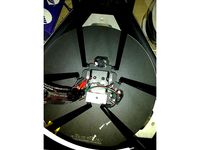
I would rotate it -90 degrees and print with supports under the "wings" that you use to mount it to the carriage. The way this requires the plastic to flex I think it would be best printed in something like PETG, ABS, or some kind of Nylon. I would not recommend PLA. The relevant features are a .5mm slot for the 27mm drilled piezo with a 1.5mm x 5mm slot for the wires and solder points. I put a tiny .1mm rim around the innermost hole to concentrate pressure on the ceramic disc. There is a 2.25mm space for the raised portion of the stepper to fit into. Again this is totally untested and I will update things if/when I am able to get it functioning. I am also planning to modify the top cover to contain the V2 Universal PCB but first things first. In the picture, I highlighted the piezo in blue.
*update 4/25. I updated the .stl to give more clearance for the wires and solder points since I had to put on new leads. I also covered the back of the piezo with electrical tape and put some shrink rap on the stepper shaft to insulate everything. The shaft fit through the hole without modification but with the shrink wrap I had to expand it a little. I havn't gotten to firmware yet but I've got it triggering by tapping the hotend. I made a video but I'm not going to upload it to youtube just for this. Allow video uploads thingiverse!
*update 4/26. It works!
*update 4/27. I added a mount to the top cover to hold the Universal PCB v2.x. It has cutouts for the LEDs and adjustment screws. Wiring can be a bit tight in there so make sure you clean it up to avoid interference issues. Requires 2 M3x8mm bolts with nuts. There can be a clearance problem if the bolts you used for the wire harness mount are too long. You can either use shorter bolts or back out the one to the right a bit.
Similar models
thingiverse
free

Trinus E3Dv6 (Bowden) Precision Piezo by ukflyer
... pcb from becoming dislodged.
06/12/17 uploaded 20mm piezo mount - note that this is untested as i only have 27mm piezo elements.
thingiverse
free

Hypercube Evolution - HEVO Fusion RC - Piezo 27mm Mount by otaku521
...ps://www.tinkercad.com/things/kc8tdyrguhe-hevo-sml-27mm-piezo-plate/editv2?sharecode=_77z-n0nrz_aszmqffpru-tr07xbymg-yhdvkch_oqq=
thingiverse
free

Mount for Precision Piezo Univeral PCB v2 by hayseedbyte
...e 10 times before i realized to could bang out a quick adaptor in fusion360. i'm a little slow but i get there eventually. :d
thingiverse
free

Stepper universal axis mount by Jmulalley
...o a stepper. will use threaded rod for movement.
will add
top mount
belt version mounted at 90 degrees to rods
carriage mounts
thingiverse
free

Y axis stepper motor (48mm) mount for Malyan M180 by chrisclw
...ting bolts, however, cannot be used due to clearance issue. i used 4x m3 countersunk bolt to replace the original mounting bolts.
thingiverse
free

UPDATED! universal Gopro Hero 9 protective case TBS ND filter by iroNLionX
...ent and remix.
universal gopro hero 9 protective case.
v2 with main screen covered.
if you need a custom mount for fpv contact me
thingiverse
free

fischertechnik stepper coupler
...ting, please bold the mounting hub with the adapter together. you can now push the adapter onto the shaft. lock it with the hole.
thingiverse
free

VORON Precision Piezo Carriage by aMpeX_fhm
... (6mm and 5mm, respectively)
make sure to remove the bowden coupling in your hotend if you're using a plastic bowden coupling
thingiverse
free

Electrical Bolt Cover for Solderless Stepper Motor Mount by GeoDave
...i used 3/8" screws for my build.
i would print one to test fit before printing the other three or four that you will need.
thingiverse
free

2020 V-slot wire cover by Rcfiddy1
... in ninjaflex. i needed it to sit flush and not above vslot so my carriages would not hit it. i also used these to mount leds on.
Rkrammes
thingiverse
free

Positive nipple for Microfusion Cell. by rkrammes
... the reference images i was looking at had this nipple that was missing from the original model. should just snap into the hole.
thingiverse
free

Stronger Wires Guide by rkrammes
...our top cover or print the one i included. the photo is of the version i made for a piezo but it shows the stronger wires guide.
thingiverse
free

Dampening Feet for 2020 Extruded Aluminum by rkrammes
...e design and the footprint of appjaws' anti vibration and noise feet stands for ormerod, but i wanted to attach them to 2020.
thingiverse
free

Wire Harness Support for 2040 and D-Bot by rkrammes
...ut is just as applicable to any printer with 2040 extruded aluminum. i suggest using supports similar to what is pictured above.
thingiverse
free

Wavy Football by rkrammes
...getting to turn off the parts cooling fan when i printed it but otherwise it's surprisingly solid for having just .4mm walls.
thingiverse
free

Easy print relaxed grip for the pipe revolver by 3dprintforhellofit by rkrammes
...t supports. they are in the original scale of his design which seems to be oversized. i found 75% scale to be a reasonable size.
thingiverse
free

Re-X Carriage Belt Tensioner for Twisted Belts by rkrammes
...e belts to come into the re-x carriage without a second twist. i also included one with larger tolerances if it's too tight.
thingiverse
free

Re-X Carriage Adjustable Mount for Mini Differential IR Height Sensor by rkrammes
...ll fit. the bolt should move freely in the hole at the top of the bracket but should be tight where it screws into the carriage.
thingiverse
free

Dampening Feet for 2020 Extruded Aluminum by rennwaffen
...two to print them individually. big thank you to rkrammes for the...
thingiverse
free

Re-D-Bot Fan Duct With DC42 IR Sensor Mount by Maxbo123
...maxbo123 thingiverse re-d-bot fan duct by nickrimmer configured with rkrammes rybot dc42 ir sensor mount. built for the e3dv6...
Piezo
turbosquid
$5

Buzzer Piezo
...odel buzzer piezo for download as max, max, 3ds, fbx, and obj on turbosquid: 3d models for games, architecture, videos. (1607700)
3d_export
$7

buzzer piezo
...;all materials are logically named<br>the main format is in 3ds max 2013.<br>satisfaction guarranteed<br>thanks
3d_export
$15

Buzzer 3D Model
...audio electronic component signalling piezoelectric disk alarm timer electric piezo industrial part electrical bell doorbell buzzer 3d model download...
thingiverse
free

Hypercube_evolution E3D_Titan_Aero with piezo
...ercube_evolution e3d_titan_aero with piezo
thingiverse
hypercube_evolution a piezo z-axis sensor was attached to e3d_titan_aero.
thingiverse
free

Precision-Piezo Probe with 3 Piezo 15mm by Tech-Raton
...if bigger, you'll lose the piezo marks)
you just have to slide the part between the heatsink and the effector (or your mount)
thingiverse
free
Piezo Chimera mount by RKS7204
...piezo chimera mount by rks7204
thingiverse
mount for e3d chimera hotend and piezo sensor
thingiverse
free

Piezo v1.22 Mount by Suggy
...piezo v1.22 mount by suggy
thingiverse
mount for under bed piezo censor pcb
thingiverse
free

Precision Piezo - 27mm and 20mm Piezo Disc drill guide. by DjDemonD
... djdemond
thingiverse
drilling guide for piezo discs to centre your drill.
see youtube video here: https://youtu.be/ms1fd0v5z68
thingiverse
free

Underbed Piezo Mounts by fcollingwood
...the piezos are smooth. two of the arms a required and two of the mirror arms are required
everything else can be printed at 0.2mm
thingiverse
free

(Beta) Piezo UnderBed Mounts by Precision Piezo by DjDemonD
...sulation to the mounts to keep heat from the bed away from the piezos.
future release might include some clamps on the top parts.
27Mm
3ddd
$1

iPod shuffle
...ipod shuffle - music mp3 1gb dim 42mm x 27mm x 10mm 2657 polys all...
3d_export
$10

baroque style classic carving
...(w * h * d): 455 x 120 x 27mmlt;br>* polys: 124 144<br>* .stl file included<br>exchange...
3d_export
$19

Modern Design Large Wall Clock 07
...more than 5 edges: 0<br>object:<br>- dimension mm: 353mm x 27mm x 345mm<br>- dimension cm: 35.3cm x 2.7cm x 34.5cm<br>-...
3d_export
$19

Modern Design Large Wall Clock 08
...more than 5 edges: 0<br>object:<br>- dimension mm: 292mm x 27mm x 297mm<br>- dimension cm: 29.2cm x 2.7cm x 29.7cm<br>-...
3d_export
$12

Modern Design Large Wall Clock 09
...more than 5 edges: 0<br>object:<br>- dimension mm: 121mm x 27mm x 121mm<br>- dimension cm: 12.1cm x 2.7cm x 12.1cm<br>-...
thingiverse
free

27mm Coin Display Stand by slepp
...der for a coin in a case (27mm coin, 31mm case). specifically made for the case supplied by the canadian mint for 27mm $20 coins.
thingiverse
free

Hook, 27mm long
...hook, 27mm long
thingiverse
this hook is designed to be mounted by a screw.
hole diameter: 4 mm
thingiverse
free

riveter collection tube 27mm thread by AnyPoint3DPrint
...riveter collection tube 27mm thread by anypoint3dprint
thingiverse
riveter collection tube 27mm thread
thingiverse
free

Adapter Festool LS130 (27mm to 35mm) by lukkoz
...adapter festool ls130 (27mm to 35mm) by lukkoz
thingiverse
adapter festool ls130 (27mm to 35mm)
thingiverse
free

MFT router jig for 27mm copying sleeve by motion2k
...for 27mm copying sleeve by motion2k
thingiverse
100mm mft router jig with 27mm holes for the original 27mm bosch copying sleeve.
Carriage
archibase_planet
free

Carriage
...arriage
archibase planet
perambulator baby carriage pram
carriage n250908 - 3d model (*.gsm+*.3ds) for interior 3d visualization.
3d_export
free

carriage
...carriage
3dexport
old fashion carriage model, more files here:
turbosquid
$140

Carriage
...urbosquid
royalty free 3d model carriage for download as max on turbosquid: 3d models for games, architecture, videos. (1482052)
turbosquid
$25

Carriage
...urbosquid
royalty free 3d model carriage for download as max on turbosquid: 3d models for games, architecture, videos. (1285944)
3d_export
free

carriage
...carriage
3dexport
game cart
3d_ocean
$15

Barrel Carriage
...ieval oak old transport wheels wine wood
this model contains a barrel and a carriage. it is a medieval type of wood oak carriage.
turbosquid
$40

Carriage
...ty free 3d model carriage for download as obj, fbx, and blend on turbosquid: 3d models for games, architecture, videos. (1290094)
turbosquid
free

Carriage
...yalty free 3d model carriage for download as ma, obj, and fbx on turbosquid: 3d models for games, architecture, videos. (1239157)
3d_export
$5

Medieval carriage
...medieval carriage
3dexport
medieval carriage in fairy style
turbosquid
$58

Carriage
...d model carriage with scene for download as max, obj, and fbx on turbosquid: 3d models for games, architecture, videos. (1276262)
Re
3ddd
$1
RES 10_8
...res 10_8
3ddd
res , дверь
производитель res модель 10.8
turbosquid
$7

Re
... available on turbo squid, the world's leading provider of digital 3d models for visualization, films, television, and games.
design_connected
$18

Re-trouvé
...re-trouvé
designconnected
emu group re-trouvé chairs computer generated 3d model. designed by patricia urquiola.
design_connected
$16

Re-turned
...
photo-realistic 3d models of the re-turned table accessories from beller for 3d architectural and interior design presentations.
3ddd
free
дверь RES WAVE
... дверь , карим рашид
производитель res италия модель wave
turbosquid
$1

Table Re
...ree 3d model table re for download as ma, obj, fbx, and blend on turbosquid: 3d models for games, architecture, videos. (1233574)
3ddd
$1

Do-lo-Res
... угловой
диван фабрика do-lo-res компонуется из отдельных боксов, разнообразных размеров и тканей.
design_connected
$16

Re-trouvé Tables
...re-trouvé tables
designconnected
emu group re-trouvé tables computer generated 3d model. designed by urquiola, patricia.
design_connected
$11

Re-flect pendant
...re-flect pendant
designconnected
steng licht re-flect pendant computer generated 3d model. designed by e27 berlin.
design_connected
$11

Re-flect wall
...re-flect wall
designconnected
steng licht re-flect wall computer generated 3d model. designed by e27 berlin.
Mount
3d_export
free

mounting bracket
...mounting plate is the portion of a hinge that attaches to the wood. mounting plates can be used indoors, cabinetry and furniture.
turbosquid
$2

MOUNTING
... available on turbo squid, the world's leading provider of digital 3d models for visualization, films, television, and games.
turbosquid
free

Mounts
... available on turbo squid, the world's leading provider of digital 3d models for visualization, films, television, and games.
turbosquid
free

Mount Fuji
...fuji
turbosquid
free 3d model mount fuji for download as obj on turbosquid: 3d models for games, architecture, videos. (1579977)
3d_export
$5

Headphone mount LR
...headphone mount lr
3dexport
headphone mount l+r
turbosquid
$39

Mount rainier
...quid
royalty free 3d model mount rainier for download as fbx on turbosquid: 3d models for games, architecture, videos. (1492586)
turbosquid
$5

pipe mounting
...quid
royalty free 3d model pipe mounting for download as obj on turbosquid: 3d models for games, architecture, videos. (1293744)
turbosquid
$3

Mounting Tires
...uid
royalty free 3d model mounting tires for download as fbx on turbosquid: 3d models for games, architecture, videos. (1708511)
3d_export
$5

Magnetic GoPro Mount
...pro mount
3dexport
cool magnetic mount for gopro. allows you to mount the camera on flat metal surfaces and get exclusive shots.
turbosquid
$5

Stone Mount
...ty free 3d model stone mount for download as ma, obj, and fbx on turbosquid: 3d models for games, architecture, videos. (1370306)