Thingiverse
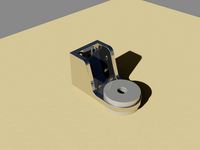
2020 Dial Indicator Mount by techyg
by Thingiverse
Last crawled date: 4 years ago
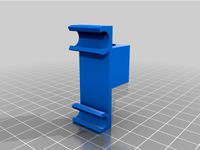
There are a lot of dial indicator mounts out there, but I wanted to make one that would be able to be mounted to a 2020 extrusion, as opposed to your hot end, as there are so many different types out there. I am no longer using the stock CR-10 hot end, and rather than design one for my current one, I wanted something that will work independently.
Note: this is not designed to be used with the hot end/gantry moving. It is all done manually- see instructions below.
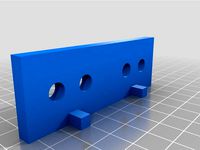
UPDATE 2/17: Thanks to user MikePek for providing feedback that the mount prints out better at 96.5 scaling. I created an updated version that should have the same effect, but does not change the size of the nut hole on the holder. I also have provided the Open SCAD source code if you would like to experiment with another tolerance. Note: you will need to download the original mount this was remixed from to make changes. It is very simple code and you only need to change one line to update the tolerance of the bracket.
UPDATE/NOTE: if you find that mount is a little loose when it is sitting on the 2020, put some electrical tape on the inside back. You don't want it to wiggle around, otherwise you won't get a good consistent reading.
Here is a video showing it in action: https://www.youtube.com/watch?v=bqSuxbQ5n0I
I remixed this one from the CR-10 Dial Indicator mount found here:https://www.thingiverse.com/thing:2412647
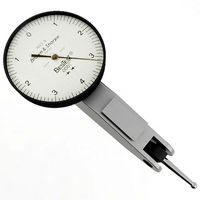
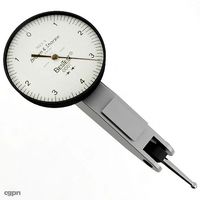
You can get the dial indicator gauge from Amazon, here:http://amzn.to/2ttaAGr
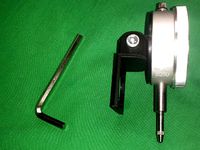
You will also need 20mm screw and nut. Use an m6 screw and nut for best results.
This can be used on any 3d printer that has a 2020 extrusion for the gantry/hot end. There is a small bit of play in the mount (for tolerance), but I've found it to be consistent/accurate.
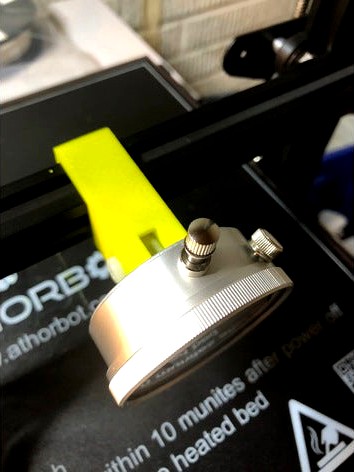
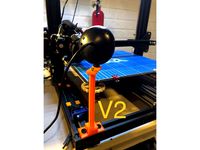
Print it as shown in the image (flat on the bed). I recommend using supports as well. It won't need to print much supports.
Instructions on how I use it (for my CR-10S) - updated for clarity and how I am using it.
First, get everything preheated and into position.
1) Preheat your bed to 60C. No need to preheat your nozzle, but scrape off any gunk on the tip.
2) Autohome your printer so the extruder goes to the front left corner. Put a piece of paper in between it where there is a slight drag.This will be your reference point, and you don't want to adjust the bed level for this corner after you do this.
3) Raise your z axis around 40mm or so using the prepare -> move axis -> z axis menu.
4) Disable your stepper motors (under the "Prepare" menu).
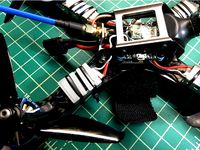
5) Move your hot end all the way to the right side so it is mostly out of the way. I am using a Titan Aero mount on my printer, and it slides far enough to the right where I have access to the full bed.
Now you are ready to use the Dial Indicator to check the level.
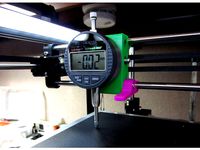
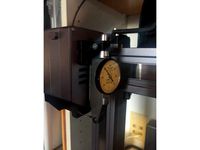
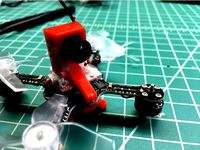
1) Snap on the Dial Indicator to the 2020 extrusion on the left side of the bed near the auto home position.
2) Manually move the bed forward, to check the back corner. Adjust the bed leveling knob so the number on the dial indicator is about the same.
3) Now, slide the dial indicator to the back right and adjust the back right nob. Then manually move the bed backwards and adjust the front right corner.
4) Repeat this a few times until you are seeing everything reading the same number. Remember DO NOT adjust the front left corner knob, because that is your reference point.
Once you get the hang of this method, it is only going to take you a few minutes to check level. I've found that my bed stays level for at least 10 prints. After that it's a good idea to run through the check again.
Tips:
1) It's a good idea to check to make sure that your x gantry is the same height on both sides before using the dial indicator. You can easily check with a ruler. I find that the left side usually sags by a few mm (it's heavier on the left side, and when you turn off the printer, the steppers do not hold the position as well). If it is not even, use your hand to manually turn the lead screw to get it even.
2) If you are using the original glass bed, it's possible it may be warped from the factory, and you'll not be able to get it perfectly level. A lot of people have had success with mirror tile, or going to a hardware store and having glass cut to size.
Note: this is not designed to be used with the hot end/gantry moving. It is all done manually- see instructions below.
UPDATE 2/17: Thanks to user MikePek for providing feedback that the mount prints out better at 96.5 scaling. I created an updated version that should have the same effect, but does not change the size of the nut hole on the holder. I also have provided the Open SCAD source code if you would like to experiment with another tolerance. Note: you will need to download the original mount this was remixed from to make changes. It is very simple code and you only need to change one line to update the tolerance of the bracket.
UPDATE/NOTE: if you find that mount is a little loose when it is sitting on the 2020, put some electrical tape on the inside back. You don't want it to wiggle around, otherwise you won't get a good consistent reading.
Here is a video showing it in action: https://www.youtube.com/watch?v=bqSuxbQ5n0I
I remixed this one from the CR-10 Dial Indicator mount found here:https://www.thingiverse.com/thing:2412647
You can get the dial indicator gauge from Amazon, here:http://amzn.to/2ttaAGr
You will also need 20mm screw and nut. Use an m6 screw and nut for best results.
This can be used on any 3d printer that has a 2020 extrusion for the gantry/hot end. There is a small bit of play in the mount (for tolerance), but I've found it to be consistent/accurate.
Print it as shown in the image (flat on the bed). I recommend using supports as well. It won't need to print much supports.
Instructions on how I use it (for my CR-10S) - updated for clarity and how I am using it.
First, get everything preheated and into position.
1) Preheat your bed to 60C. No need to preheat your nozzle, but scrape off any gunk on the tip.
2) Autohome your printer so the extruder goes to the front left corner. Put a piece of paper in between it where there is a slight drag.This will be your reference point, and you don't want to adjust the bed level for this corner after you do this.
3) Raise your z axis around 40mm or so using the prepare -> move axis -> z axis menu.
4) Disable your stepper motors (under the "Prepare" menu).
5) Move your hot end all the way to the right side so it is mostly out of the way. I am using a Titan Aero mount on my printer, and it slides far enough to the right where I have access to the full bed.
Now you are ready to use the Dial Indicator to check the level.
1) Snap on the Dial Indicator to the 2020 extrusion on the left side of the bed near the auto home position.
2) Manually move the bed forward, to check the back corner. Adjust the bed leveling knob so the number on the dial indicator is about the same.
3) Now, slide the dial indicator to the back right and adjust the back right nob. Then manually move the bed backwards and adjust the front right corner.
4) Repeat this a few times until you are seeing everything reading the same number. Remember DO NOT adjust the front left corner knob, because that is your reference point.
Once you get the hang of this method, it is only going to take you a few minutes to check level. I've found that my bed stays level for at least 10 prints. After that it's a good idea to run through the check again.
Tips:
1) It's a good idea to check to make sure that your x gantry is the same height on both sides before using the dial indicator. You can easily check with a ruler. I find that the left side usually sags by a few mm (it's heavier on the left side, and when you turn off the printer, the steppers do not hold the position as well). If it is not even, use your hand to manually turn the lead screw to get it even.
2) If you are using the original glass bed, it's possible it may be warped from the factory, and you'll not be able to get it perfectly level. A lot of people have had success with mirror tile, or going to a hardware store and having glass cut to size.
Similar models
thingiverse
free

Prusa i3 Dial Indicator Mount by henryarnold
...d and do you normal z height adjustment. all four corners are level so no check should be needed other than the middle of the bed
thingiverse
free
HyperCube Dial Indicator Mount by henryarnold
...dial indicator i used although you can buy a similar unit from harbor freight.https://www.amazon.com and then search for "b01g9k8u5g"...
thingiverse
free
Indicator Mount
...r the side of the snapmaker 2 print head.
it can be used to check your bed level. a link to the dial indicator i got is included.
thingiverse
free

Bed Adjust tool by centerridge
...ust threaded rod to level bed. use z home to verify. move to back, should only need slight adjust to level, use z home to verify.
thingiverse
free

Tevo Michelangelo Dial Indicator Mount by Sp4wN
...m/watch?v=0adjcdecoxy
disclaimer: if you damage your printer while drilling or using this mount, i won’t take any responsibility.
thingiverse
free
Dial indicator clip for 30mm fan hot end (E3D V6, Chimera etc) by chrishornby
...al the dial indicator is fixed firmly. if it moves at all you will not have accuracy. remember you are measuring tiny tolerances.
thingiverse
free
Dial Indicator mount for Adventurer 3
...ing bed level on the mpv or ffa3.
included is the original file from autodesk inventor if you need to adjust it to fit your unit
thingiverse
free

Creality CR-10 Dial Indicator Holder for Bed Leveling by bebryan
...ew extra holes for other dial indicators that i have, and made some stress-relief corners (a bit asymmetrical) for a springy fit.
thingiverse
free

Dial Indicator for Bed Leveling Flashforge Creator Max by tbrinlee
...your knobs to adjust the height if you are off. i am assuming you know how to zero the dial indicator. if not, look it up online.
thingiverse
free

Dial Indicator Bracket for Ender 3 Pro w/3DMoe E3D V6 Mount by Flyboyron
...oesn't matter enough to worry about, and moving things by hand is a lot quicker and less "fiddly" as the brits say.
Techyg
thingiverse
free

A basic coaster by techyg
...to customize it, but you may have to edit the code- it probably isn't super customizable. but if you do, please post a remix!
thingiverse
free

QX70 LED Diffuser by techyg
...r height (recommended)
after printing, dab a bit of hot glue on the top and bottom to hold it in place. zip ties could also work.
thingiverse
free
Eachine X73S Prop Riser by techyg
...are not using a flex filament, i am not sure how well this would work, because it might not grip the shaft quite as well and rub.
thingiverse
free
ESC Cover (Diatone Inspired) by techyg
...put the cover on top of that.
i recommend printing this with something strong, like abs or petg. it may also work well with tpu.
thingiverse
free
Configurable Banana Post Terminal Block by techyg
.../products/radioshack-multipurpose-nylon-binding-posts-2-pack
you can easily change the diameter of the holes using the scad file.
thingiverse
free
Emax Babyhawk Antenna Holder by techyg
...lace like that, otherwise they will pop off.
5) run the antennas through the holder. i put some small heatshrink on mine as well.
thingiverse
free

Runcam Micro Swift / Swift 2 Camera Mount by techyg
... it would fit right with a more rigid filament. this is a very quick print. hope it works for you, please post a pic if it does!
thingiverse
free

Tiny Whoop Arrow Frame by techyg
...ientation for this frame. refer to the picture. the board will also only fit one way, due to how the motor connectors are set up.
thingiverse
free

Bracket for Titan Aero, Reach3D Printer by techyg
...en't done that and it seems to be fine (my bed is fairly level). if i end up changing settings i'll come back and update.
thingiverse
free
CR-10 Camera Mount by techyg
...w in. after that, screw the mount down using the m3 10mm bolt. use the zip tie to keep the wire out of the way.
hope you enjoy!
Dial
3ddd
$1

Hidra Dial
...a dial , биде , унитаз
hidra dial унитаз + биде
3d_ocean
$12

Old Rotary Dial Telephone
...ial phone telephone
this is a model of a rotary dial telephone made in cinema4d file contains the following files: .obj .c4d .3ds
3ddd
$1

Dialing kitchen
...зон , базилик , лук
polys: 48 893
verts: 54 349
3d_export
$45
Dial Indicator 3D Model
...tion metalworking hurco indicating geometric dimensioning tolerancing bridgeport
dial indicator 3d model plutonius 63521 3dexport
cg_studio
$45
Dial Indicator Vray3d model
...el
cgstudio
.3ds .max .obj .wrl - dial indicator vray 3d model, royalty free license available, instant download after purchase.
3ddd
free
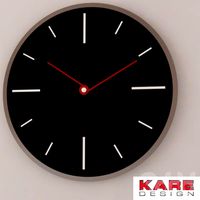
KARE DESIGN / Red Dial
... часы
часы "wall clock red dial", производитель kare design, размеры: 0,335 x 0,335 m
3d_export
$9
Dynamite with an electronic dial 3D Model
...ronics tnt
dynamite with an electronic dial 3d model download .c4d .max .obj .fbx .ma .lwo .3ds .3dm .stl dweller 107503 3dexport
3d_export
$26

Vintage Rotary Dial Phone 3D Model
...sic old style communication cord corded desk table land line receiver
vintage rotary dial phone 3d model trinity23 28701 3dexport
cg_studio
$50
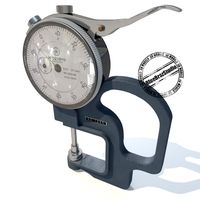
Dial Thickness Gauges3d model
...
.obj .max .fbx .dxf .c4d .3ds - dial thickness gauges 3d model, royalty free license available, instant download after purchase.
3ddd
$1

CIRCA 1900 FRENCH DUAL-DIAL CLOCK CLOCHE
...storation hardware , настольные
14¼"w x 9¾"d x 19"h
cm 35,6 x 24,3 x 47,5
Indicator
3ddd
$1

Indice Sofa
...indice sofa
3ddd
indice sofa , roche bobois
indice sofa roche bobois
archive3d
free
Indicator 3D Model
...sor indicator pointer
indicator n130508 - 3d model (*.gsm+*.3ds) for interior 3d visualization.
archive3d
free

Indicator panel 3D Model
...ard score-board
indicator panel n180511 - 3d model (*.gsm+*.3ds) for interior 3d visualization.
3d_ocean
$12

Vintage digital indicator
...amp numeric radio retro vintage
retro digital indicator could use for vintage clocks/calendar/counter models. animated materials.
3d_export
$45
Dial Indicator 3D Model
...tion metalworking hurco indicating geometric dimensioning tolerancing bridgeport
dial indicator 3d model plutonius 63521 3dexport
3ddd
$1
Wash Basin with light indicator
...wash basin with light indicator
3ddd
wash basin with light indicator according to temperature.
cg_studio
$45
Dial Indicator Vray3d model
...el
cgstudio
.3ds .max .obj .wrl - dial indicator vray 3d model, royalty free license available, instant download after purchase.
3ddd
$1

Ламповые часы "Past indicator"
...ast indicator".
ламы (советские газоразрядные индикаторы ин-14).
ссылка на производителя:http://past-indicator.com
3d_export
$8

heart pendant
...port
weight and all parameters in the photo the eyelet is not included in the set and the weight is indicated without the eyelet
3ddd
free

Gruppo Treesse
...ppotres , ванна
http://www.gruppotres.it/ru/indice-grandi-vasche.html#bis.html
2020
3d_export
$5

cyberpunk 2020
...cyberpunk 2020
3dexport
cyberpunk 2020
3d_export
$5

monster01 2020
...monster01 2020
3dexport
monster01 2020 dxf file rigged in mixamo.
3d_export
$15

3 rims 2020
...3 rims 2020
3dexport
new rims 2020 from inventor
3d_export
$25

tesla roadster 2020
...tesla roadster 2020
3dexport
3d_export
$5

Tesla Rodster 2020
...tesla rodster 2020
3dexport
3d_export
$40

a 2020 honda accord
...a 2020 honda accord
3dexport
a low poly car
3d_export
$5

CAR 2020 3D Model
...car 2020 3d model
3dexport
sport car inventor autodesk
car 2020 3d model darko100 58089 3dexport
3d_export
$80

BMW 2020 3D 3D Model
...bmw 2020 3d 3d model
3dexport
bmw car cars sport 2020 speed voiture
bmw 2020 3d 3d model crazyyassin 66964 3dexport
3d_export
free
bank developed in solidworks 2020
...bank developed in solidworks 2020
3dexport
cg_studio
$149

Nissan 2020 + garage3d model
...
.max .obj .fbx .dae .c4d .3ds - nissan 2020 + garage 3d model, royalty free license available, instant download after purchase.
Mount
3d_export
free

mounting bracket
...mounting plate is the portion of a hinge that attaches to the wood. mounting plates can be used indoors, cabinetry and furniture.
3ddd
$1
Wall Mounted Basin
...wall mounted basin
3ddd
high detailed wall mounted basin
material included
3d_export
$10

Mount White 3D Model
...mount white 3d model
3dexport
mount white the alps map land snow
mount white italy
3d_export
$5
Engine mounting 3D Model
...engine mounting 3d model
3dexport
engine mounting
engine mounting 3d model pushkarnath79 71661 3dexport
3ddd
$1
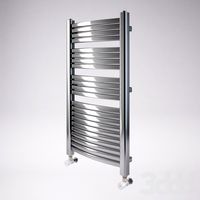
Wall mounted radiator
...wall mounted radiator
3ddd
полотенцесушитель
wall mounted radiator
dimensions h 135cm w 77cm d 13cm
3d_ocean
$15

Dragon Mount
...be awakend by a dragonrider.the dragonrider can speak to the dragon trough the magic sphere infront of the seat.” details: cre...
3ddd
$1

RSS BIDET WALL MOUNTED
...rss bidet wall mounted
3ddd
duravit
rss bidet wall mounted
3d_export
$10

Mount Blanc 3D Model
...mount blanc 3d model
3dexport
mount blanc 3d model bu1266 76684 3dexport
cg_studio
$79

Mount Qomolangma3d model
...model
cgstudio
.obj .max .fbx .3ds - mount qomolangma 3d model, royalty free license available, instant download after purchase.
3ddd
$1
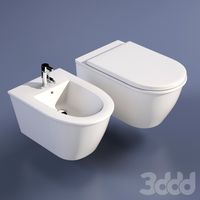
TOILET & BIDET WALL MOUNTED
...toilet & bidet wall mounted
3ddd
duravit
toilets wall mounted #254409
bidet wall mounted #224915