Thingiverse

2 Element 2m / 3 Element 70cm Yagi by ZS6TVB
by Thingiverse
Last crawled date: 3 years, 1 month ago
Printing time for this project is quite extensive but you will not regret either the filament used or the time spent printing for one moment. Parts are easy to print without issues.
The end project is a professional looking antenna that looks and works well. Well worth your time spent.
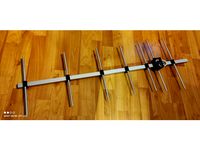
I have seen many antenna designs here but none met my needs. I required a reasonably strong and light weight. The complete antenna weighs out at around 650 gram (~23 ounce) with good strength. My drawing skills are limited, hence mostly parametric parts readily available on Thingiverse were used.
This is an attempt to create an easily constructable 3D printed version of the excellent 2m/70cm 2+2/3 El antenna design by DK7ZB.
Web Page:http://www.qsl.net/dk7zb/Duoband/duoband_2-70_2-3.htm
Should you require more bandwidth/better SWR on 70cm, you can build the antenna without the third 70cm element with a bit less gain. I suggest you read Martin, DK7ZBs page on the link above before deciding to build the antenna.
This antenna is seriously easy to build, sturdy and works as expected. It has a single feed point/driven element for both the 2m and 70cm bands. In my opinion it is worth the 3D printing time for an end product that just works and should provide many hours of pleasure afterwards.
Individual parametric parts are here:http://www.thingiverse.com/thing:2252745http://www.thingiverse.com/thing:2255051http://www.thingiverse.com/thing:2252291
Tools Required:
2.5mm Drill (Drill 2 x 2.5mm holes one in each of the two driven elements for the feed point - holes can be drilled 5mm from the edge of the element)
M3 Tap (Tap the 2 x 2.5 drilled holes in the driven elements)
M5 Tap (Tap 5mm holes in the Element Holder)
M5 Die (Clean up thread on printed M5 Bolts)
Metric Allen Keys (Tighten M5 3D printed bolts (not too tight) and Stainless steel Bolts)
Soldering Iron (Solder your coax to eyelid connectors or connect directly to the driven element)
3D Printed Parts required:
1 x Yagi_El_Holder_16-55-WideWindow
4 x Yagi_El_Holder_16-55-NoWindow
10 x M5x10_Hex_Bolt
Optional 3D Pinted:
2 x Yagi end Cap 140-170-8
Other Parts Required:
15.88-16mm (1/4") x 520mm Aluminium tubing for the boom (Add 170 - 200 mm for a handle on the rear)
6mm Solid aluminium Rod (2 x 2.5m lengths were more than enough for me)
10 x M4 x 30mm Button head allen key bolts (To clamp the Boom to element brackets to the boom)
10 x M4 Nuts
2 x M3x6 Button head allen key bolts (Used to connect the coax to the driven element)
Build is quite simple. I followed the instructions as per the DK7ZB page.
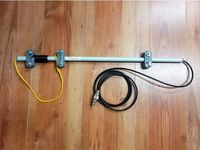
The driven element of my antenna was assembled using LMR195 Coax. I drilled a 2.5mm hole 5mm from the edge of each driven element and tapped the holes to 3mm using the M3x5mm button head bolts in the tapped holes.
Should any of the info not be accurate or clear, please do not hesitate to contact me either here or by looking me up on QRZ. I will do my best at keeping this page as complete as possible and add all input received. My intention is to ensure a complete and easy to build antenna with full design instructions supplied. Please help me by contacting me should you feel that there are an additions or changes required in order to further clarify build instructions.
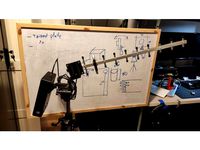
A simple PDF drawing of the complete Yagi has been added in the thing files for clarification purposes. Element lengths and placement positions on the boom are clearly indicated in order to assist with the build of the antenna.
73
The end project is a professional looking antenna that looks and works well. Well worth your time spent.
I have seen many antenna designs here but none met my needs. I required a reasonably strong and light weight. The complete antenna weighs out at around 650 gram (~23 ounce) with good strength. My drawing skills are limited, hence mostly parametric parts readily available on Thingiverse were used.
This is an attempt to create an easily constructable 3D printed version of the excellent 2m/70cm 2+2/3 El antenna design by DK7ZB.
Web Page:http://www.qsl.net/dk7zb/Duoband/duoband_2-70_2-3.htm
Should you require more bandwidth/better SWR on 70cm, you can build the antenna without the third 70cm element with a bit less gain. I suggest you read Martin, DK7ZBs page on the link above before deciding to build the antenna.
This antenna is seriously easy to build, sturdy and works as expected. It has a single feed point/driven element for both the 2m and 70cm bands. In my opinion it is worth the 3D printing time for an end product that just works and should provide many hours of pleasure afterwards.
Individual parametric parts are here:http://www.thingiverse.com/thing:2252745http://www.thingiverse.com/thing:2255051http://www.thingiverse.com/thing:2252291
Tools Required:
2.5mm Drill (Drill 2 x 2.5mm holes one in each of the two driven elements for the feed point - holes can be drilled 5mm from the edge of the element)
M3 Tap (Tap the 2 x 2.5 drilled holes in the driven elements)
M5 Tap (Tap 5mm holes in the Element Holder)
M5 Die (Clean up thread on printed M5 Bolts)
Metric Allen Keys (Tighten M5 3D printed bolts (not too tight) and Stainless steel Bolts)
Soldering Iron (Solder your coax to eyelid connectors or connect directly to the driven element)
3D Printed Parts required:
1 x Yagi_El_Holder_16-55-WideWindow
4 x Yagi_El_Holder_16-55-NoWindow
10 x M5x10_Hex_Bolt
Optional 3D Pinted:
2 x Yagi end Cap 140-170-8
Other Parts Required:
15.88-16mm (1/4") x 520mm Aluminium tubing for the boom (Add 170 - 200 mm for a handle on the rear)
6mm Solid aluminium Rod (2 x 2.5m lengths were more than enough for me)
10 x M4 x 30mm Button head allen key bolts (To clamp the Boom to element brackets to the boom)
10 x M4 Nuts
2 x M3x6 Button head allen key bolts (Used to connect the coax to the driven element)
Build is quite simple. I followed the instructions as per the DK7ZB page.
The driven element of my antenna was assembled using LMR195 Coax. I drilled a 2.5mm hole 5mm from the edge of each driven element and tapped the holes to 3mm using the M3x5mm button head bolts in the tapped holes.
Should any of the info not be accurate or clear, please do not hesitate to contact me either here or by looking me up on QRZ. I will do my best at keeping this page as complete as possible and add all input received. My intention is to ensure a complete and easy to build antenna with full design instructions supplied. Please help me by contacting me should you feel that there are an additions or changes required in order to further clarify build instructions.
A simple PDF drawing of the complete Yagi has been added in the thing files for clarification purposes. Element lengths and placement positions on the boom are clearly indicated in order to assist with the build of the antenna.
73
Similar models
thingiverse
free
YAGI Antenna 70cm or 2m by SP9MX
...ingiverse
a set of 3d printing parts to build a yagi antenna for 70cm or 2m.
boom: 20x20 mm,
antenna elements: fi 8 mm.
73 sp9mx
3dwarehouse
free

Antena krzyżowa DK7ZB 2m/70cm 6/10el
.../10.htm #2m #70cm #antena #antenna #antennas #dk7zb #grzesiczak #grzesiczakmpl #jo90rx #kross #krzyżowa #michał #satelita #sq7jzi
thingiverse
free

Portable YAGI antenna components by ok1cdj
...s/pvc-details.htm
you can buy 3d printed components here:http://hamshop.cz/antennas-c9/portable-yagi-antenna-components-kit-i301/
thingiverse
free
Ultra Portable 2m/70cm Yagi-Uda / Dipole Antenna Parts
...alcony. for i dipole, i do not bend the radiating elements but cut them separately for easy length adjustment inside the bracket.
thingiverse
free

Yagi antenna kit by LEXX
...ed to 2 parts. is longer than 1m and is connected with screw terminal.
for example i assembled yagi 8 + 6 elements 2 / 70cm bands
grabcad
free

Allen standard bolt with chart of its drill,tap and free hole size
...allen standard bolt with chart of its drill,tap and free hole size
grabcad
allen standard bolt
m3
m4
m5
m6
m8
m10
thingiverse
free

Tape Measure Yagi by preseli
... the pvc pipe into the dowel and it won't move again, and is still easy to remove if you want to make the antenna light again
thingiverse
free

Yagi Element Clamp Holder by j03m4r13
...ed the model arranged in such as way the side is set as the bottom. i used petg for this so it can withstand the heat of the sun.
thingiverse
free

Antenna Yagi boom mount 20mm fi8 by norbert740
...antenna yagi boom mount 20mm fi8 by norbert740
thingiverse
yagi elements mounted boom
thingiverse
free

Yagi antenna parametric element clamp by plataformacero
...define the diameter of the antenna element, the diameter of the screw used to attach the element to the boom, and the boom width.
Zs6Tvb
thingiverse
free

ZS6TVB Antenna Offset for Canopy by broodforce
...zs6tvb antenna offset for canopy by broodforce
thingiverse
luv canopy hf antenna bracket to limit antenna movement.
thingiverse
free

Hy-Gain CD-45 Antenna rotator motor gear by ZS6TVB
...hy-gain cd-45 antenna rotator motor gear by zs6tvb
thingiverse
a gear for a hy-gain cd-45 amateur radio antenna rotator motor.
Yagi
turbosquid
$50

yagi
... available on turbo squid, the world's leading provider of digital 3d models for visualization, films, television, and games.
3d_export
$12

TV Aerial 1 3D Model
...uhf vhf band outdoor radio mast log periodic yagi-uda yagi array telecommunication digital tv aerial 1 3d model firdz3d...
3d_export
$10
Antenna 3D Model
...parabolic parabolle dish radio dishes telecom reception air wave yagi zx shortwave antenna 3d model mkms 35034...
thingiverse
free

Text by yagi
...text by yagi
thingiverse
just text
thingiverse
free
Yagi Support by GesehenFPV
...gesehenfpv
thingiverse
this is a simple yagi antenna support.
gopro standard connectors to connect with the main tripod support.
thingiverse
free

YAGI 15mm fi6 by norbert740
...yagi 15mm fi6 by norbert740
thingiverse
yagi boom elements mount 15 mm and fi6
thingiverse
free
Yagi Tripod mount
... quick tripod adapter for my yagi, might update it later to house a nut for the screw to go in. but works for a quick fix for now
thingiverse
free

yagi antenna by lellelel
...ng one of the many online calculators. this one is designed to use with the smaller diameter brazing rods, 2.3-2.5mm in thickness
thingiverse
free

Yagi Element Crib by gilifon
...yagi element crib by gilifon
thingiverse
a crib for 11 mm diameter yagi antenna elements.
the bottom surface is 25x20 mm.
thingiverse
free

Yagi Hanger by dlsspy
... hanging from a nail with a millitie and rubber band. decided to make something real quick to store it more easily and securely.
70Cm
turbosquid
$7
Bathroom Furniture Indiana 70cm
... 3d model bathroom furniture indiana 70cm for download as max on turbosquid: 3d models for games, architecture, videos. (1511881)
3d_export
$5

deco object trapez star 54cm 70cm
...deco object trapez star 54cm 70cm
3dexport
deco object trapez star 54cm & 70cm kare design + stl file
3d_export
$5

deco object trapez star 54cm 70cm
...deco object trapez star 54cm 70cm
3dexport
deco object trapez star 54cm & 70cm kare design + stl file
3ddd
$1

Caspani Tino / Diamond Cinque
.../ diamond cinque 3ddd caspani tino , журнальный l 70cm w 70cm h...
3d_export
$8

Ch71 lounge chair
...ch71 lounge chair 3dexport -ch71 lounge chair -single sofa -dimensions:(h)84cm×(w)70cm(d)70cm ...
3d_export
$18

Two-seater sofa lounge chair
...two-seater sofa lounge chair 3dexport -lounge chair dimensions:(h)84cm×(w)70cm(d)70cm -two-seater sofa...
3ddd
$1

Bold and Noble / Love
...bold and noble / love 3ddd размер 50cm x 70cm ...
3d_export
$5

armchair
...armchair 3dexport armchair size 70cm * 80cm * 75cm 4 model and 4...
3ddd
$1

Regina Ceramic Table Lamp
...regina ceramic table lamp 3ddd regina dimension: h-70cm ...
3ddd
$1

Possoni Art.236/8+2
...possoni art.236/8+2 3ddd possoni d 70cm h...
2M
turbosquid
$15
Camera Chaika 2M
...d
royalty free 3d model camera chaika 2m for download as max on turbosquid: 3d models for games, architecture, videos. (1328666)
turbosquid
$17

Swing 2m Hardwood
... 3d model swing 2m hardwood for download as max, fbx, and obj on turbosquid: 3d models for games, architecture, videos. (1630788)
turbosquid
$79

Creative Booth Design Template 4m * 4m - 3m * 3m - 2m * 2m
... available on turbo squid, the world's leading provider of digital 3d models for visualization, films, television, and games.
turbosquid
$10

Helmet ZSH 1-2M
...ee 3d model helmet zsh 1-2m for download as obj, fbx, and dae on turbosquid: 3d models for games, architecture, videos. (1330777)
humster3d
$75
3D model of SR-2M Veresk
...
buy a detailed 3d model of sr-2m veresk in various file formats. all our 3d models were created maximally close to the original.
turbosquid
$29

Concrete Fence Panel PO-2M
...po-2m for download as blend, unitypackage, fbx, obj, and gltf on turbosquid: 3d models for games, architecture, videos. (1712966)
turbosquid
$20

Norway Maple (Acer platanoides) 2m
...er platanoides) 2m for download as ma, max, obj, c4d, and fbx on turbosquid: 3d models for games, architecture, videos. (1175968)
turbosquid
$49

Kiosk Exhibition Stand Project 3m x 2m
...ition stand project 3m x 2m for download as obj, c4d, and fbx on turbosquid: 3d models for games, architecture, videos. (1322108)
turbosquid
$39

Kiosk Expo Stand Display 2m x 3m
... expo stand display 2m x 3m for download as obj, c4d, and fbx on turbosquid: 3d models for games, architecture, videos. (1322389)
turbosquid
$29

Kiosk Exhibition Counter Stand 2m x 3m
...ition counter stand 2m x 3m for download as obj, c4d, and fbx on turbosquid: 3d models for games, architecture, videos. (1323971)
Element
archibase_planet
free

Element
...element
archibase planet
decorative picturesque element
element b_403 - 3d model for interior 3d visualization.
archibase_planet
free
Element
...element
archibase planet
decorative picturesque element
element b_411 - 3d model for interior 3d visualization.
archibase_planet
free
Element
...element
archibase planet
decor ornamental element
element n230708 - 3d model (*.gsm+*.3ds) for interior 3d visualization.
archibase_planet
free

Element
...lement
archibase planet
element moulding friezes cornices
element n201207 - 3d model (*.gsm+*.3ds) for interior 3d visualization.
design_connected
$13

Elements
...elements
designconnected
moooi elements computer generated 3d model. designed by hayon, jaime.
archibase_planet
free

Element
...element
archibase planet
moulding friezes moldings border pilaster
element - 3d model for interior 3d visualization.
archibase_planet
free
Element
...element
archibase planet
railing hand-rail banisters
element n140808 - 3d model (*.gsm+*.3ds) for interior 3d visualization.
3ddd
$1

Decorative element
...corative , element , plaster
decorative element
3d_export
$5
element studio
...element studio
3dexport
element studio kare design
3ddd
$2
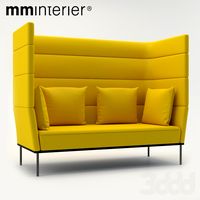
ELEMENT | Диван
... element
производитель: mminterier
дизайн: boris klimek
коллекция: element
полигоны: 45124
вертексы: 45124
3
turbosquid
$10

Mountain Bike 3 -3 of 3
...model mountain bike 3 (#3 of 3) for download as fbx and blend on turbosquid: 3d models for games, architecture, videos. (1438752)
turbosquid
$6

Rock 3-3
...urbosquid
royalty free 3d model rock 3-3 for download as obj on turbosquid: 3d models for games, architecture, videos. (1628065)
turbosquid
$29

Books 150 pieces 3-3-3
...books 150 pieces 3-3-3 for download as max, obj, fbx, and stl on turbosquid: 3d models for games, architecture, videos. (1384033)
turbosquid
$3

Genesis 3 Clothing 3
... available on turbo squid, the world's leading provider of digital 3d models for visualization, films, television, and games.
3d_export
$5

hinge 3
...hinge 3
3dexport
hinge 3
3ddd
$1

Розетка 3
...розетка 3
3ddd
розетка
розетка 3
turbosquid
$50

is-3
... available on turbo squid, the world's leading provider of digital 3d models for visualization, films, television, and games.
turbosquid
$10

Mountain Bike 3 -2 of 3
...model mountain bike 3 (#2 of 3) for download as fbx and blend on turbosquid: 3d models for games, architecture, videos. (1438750)
turbosquid
$10

Mountain Bike 1 -3 of 3
...model mountain bike 1 (#3 of 3) for download as fbx and blend on turbosquid: 3d models for games, architecture, videos. (1438743)
3d_export
$5

3 CATS
...3 cats
3dexport
3 cats pen holder
2
design_connected
$11

No 2
...no 2
designconnected
sibast no 2 computer generated 3d model. designed by sibast, helge.
turbosquid
$6

Cliff Rock 2-2
...uid
royalty free 3d model cliff rock 2-2 for download as obj on turbosquid: 3d models for games, architecture, videos. (1619161)
turbosquid
$29

Book variation 2 2
...3d model book variation 2 2 for download as max, obj, and fbx on turbosquid: 3d models for games, architecture, videos. (1366868)
turbosquid
$22

Classic baluster (2) (2)
...assic baluster (2) (2) for download as max, obj, fbx, and stl on turbosquid: 3d models for games, architecture, videos. (1483789)
turbosquid
$99

Smilodon 2 Pose 2
... available on turbo squid, the world's leading provider of digital 3d models for visualization, films, television, and games.
turbosquid
$20

Barrel Barricade 2-2
... available on turbo squid, the world's leading provider of digital 3d models for visualization, films, television, and games.
turbosquid
$6

Wall Trophy (2) (2)
... available on turbo squid, the world's leading provider of digital 3d models for visualization, films, television, and games.
turbosquid
free

Tire label 2 of 2
... available on turbo squid, the world's leading provider of digital 3d models for visualization, films, television, and games.
3ddd
$1

Кровать, 2 тумбочки, 2 светильника
...кровать, 2 тумбочки, 2 светильника
3ddd
кровать, 2 тумбочки, 2 светильника
нормальное качество
формат 3ds max
без текстур
3ddd
free

Кровать, 2 тумбочки, 2 светильника
...кровать, 2 тумбочки, 2 светильника
3ddd
кровать, 2 тумбочки, 2 светильника
нормальное качество
формат 3ds max
без текстур