GrabCAD

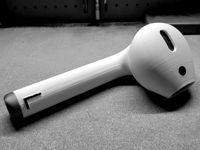
10" tall Bluetooth AirPod - 3D Printed
by GrabCAD
Last crawled date: 1 year, 12 months ago
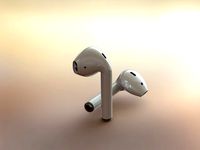
This model is provided for entertainment purposes only. It is not my intention-nor do I have authorization to-copy Apple's original design for their wireless earbuds.
As seen online! https://www.businessinsider.com/airpod-apple-bluetooth-speaker-photos-minnesota-high-school-student-2019-11
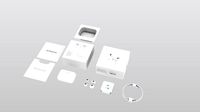
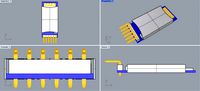
This is a larger-than-usual left ear AirPod "clone". It's... large, not very portable. Included are STEP and STL files for both the large Bluetooth version, as well as a blank model of 1:1 scale AirPods too. Credit me if you make one online! You can also print 1:1 fakes with the provided solid model.
If you want to build the large Bluetooth one, you'll need:
- Access to a 3D printer (20x20cm build size)
- 22-30ga wire (for extending the wires to the speaker, buttons, and battery)
- 3 push buttons - https://www.adafruit.com/product/367
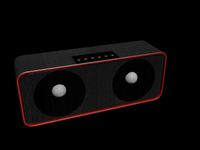
- This Bluetooth speaker - https://www.amazon.com/gp/product/B07JFK95ZD/ref=ppx_yo_dt_b_asin_title_o00_s00?ie=UTF8&psc=1
- Window screen for the speaker + mic meshes
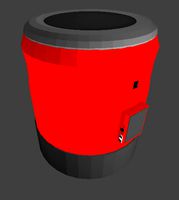
After printing all three parts, the screen for the meshes can be glued in from the inside of the AirPod for two of the holes. For the main speaker hole as well as the bottom hole (mic on an actual AirPod), the screen should be cut precisely to that size and then glued in. It's not an easy process, but if you are careful to glue only the edges, it doesn't look too bad.
Disassemble the Bluetooth speaker by undoing the visible bolts (with a 2.5mm allen key). The inner screws are phillips head, and after the case is open, all components can be removed pretty easily. To remove the speaker, cut around the plastic, basically cutting it out of the case. This requires a good pair of some cutting tool (a dremel would work too).
Carefully cut or desolder the buttons from the PCB, and solder 9-12" wires to three new (or reused) buttons, but KEEP ONE SIDE DISCONNECTED until the wires are threaded through the "base" piece of the AirPod. The battery needs similar length wire, and the speaker needs ~4" wires.
The speaker should be glued into the "head" piece, and the PCB screws into the "base" piece with the MicroUSB port upside down, lined up with the charging hole on the side of the AirPod. The battery is put in from the bottom. The buttons get glued in place on the silver piece/print, and their wires should go all the way through the AirPod. This is a bit difficult to fit in beside the battery cables, but with some time it's possible.
For the black spots on the outside of the AirPod, I painted them on and put epoxy over it to make it glossy, but that's not necessary if the paint doesn't rub off on its own. The "head" piece will slot into the "base", but be careful when doing so, since the tabs are tiny and break off quite easily.
Inspiration for this project came from u/DangDan12's AirPod post a while ago. AirPod surface model credit goes to the creator of this model (although it is heavily modified to look like the original AirPods, and not like a fake Chinese clone): https://grabcad.com/library/apple-airpod-earphone-case-1
As seen online! https://www.businessinsider.com/airpod-apple-bluetooth-speaker-photos-minnesota-high-school-student-2019-11
This is a larger-than-usual left ear AirPod "clone". It's... large, not very portable. Included are STEP and STL files for both the large Bluetooth version, as well as a blank model of 1:1 scale AirPods too. Credit me if you make one online! You can also print 1:1 fakes with the provided solid model.
If you want to build the large Bluetooth one, you'll need:
- Access to a 3D printer (20x20cm build size)
- 22-30ga wire (for extending the wires to the speaker, buttons, and battery)
- 3 push buttons - https://www.adafruit.com/product/367
- This Bluetooth speaker - https://www.amazon.com/gp/product/B07JFK95ZD/ref=ppx_yo_dt_b_asin_title_o00_s00?ie=UTF8&psc=1
- Window screen for the speaker + mic meshes
After printing all three parts, the screen for the meshes can be glued in from the inside of the AirPod for two of the holes. For the main speaker hole as well as the bottom hole (mic on an actual AirPod), the screen should be cut precisely to that size and then glued in. It's not an easy process, but if you are careful to glue only the edges, it doesn't look too bad.
Disassemble the Bluetooth speaker by undoing the visible bolts (with a 2.5mm allen key). The inner screws are phillips head, and after the case is open, all components can be removed pretty easily. To remove the speaker, cut around the plastic, basically cutting it out of the case. This requires a good pair of some cutting tool (a dremel would work too).
Carefully cut or desolder the buttons from the PCB, and solder 9-12" wires to three new (or reused) buttons, but KEEP ONE SIDE DISCONNECTED until the wires are threaded through the "base" piece of the AirPod. The battery needs similar length wire, and the speaker needs ~4" wires.
The speaker should be glued into the "head" piece, and the PCB screws into the "base" piece with the MicroUSB port upside down, lined up with the charging hole on the side of the AirPod. The battery is put in from the bottom. The buttons get glued in place on the silver piece/print, and their wires should go all the way through the AirPod. This is a bit difficult to fit in beside the battery cables, but with some time it's possible.
For the black spots on the outside of the AirPod, I painted them on and put epoxy over it to make it glossy, but that's not necessary if the paint doesn't rub off on its own. The "head" piece will slot into the "base", but be careful when doing so, since the tabs are tiny and break off quite easily.
Inspiration for this project came from u/DangDan12's AirPod post a while ago. AirPod surface model credit goes to the creator of this model (although it is heavily modified to look like the original AirPods, and not like a fake Chinese clone): https://grabcad.com/library/apple-airpod-earphone-case-1
Similar models
grabcad
free

10" tall AirPod - 3D Printed (with base model)
...the "base" piece of the airpod. the battery needs similar length wire, and the speaker needs ~4" wires. the...
thingiverse
free
GIANT AirPod (Bluetooth Speaker!)
...the "base" piece of the airpod. the battery needs similar length wire, and the speaker needs ~4" wires. the...
thingiverse
free

Rockler Bluetooth Speaker Shim by Karivian
...at size of hole saw. this shim fits snugly around the speaker and control unit to allow you to install them into a 2" hole.
grabcad
free

Subkick Bass Drum
...like a microphone (a microphone and speaker are very similar and each will work as the other, if wired...
thingiverse
free

Laser Cut 4" Speaker Case by Bartimaeus
... that are 3/8" long and the matching nuts.
speakers used: http://www.digikey.com/product-detail/en/gf1004/gf1004-nd/304447
thingiverse
free
Gameboy Zero LCD Mounting Bracket by kapakahi
...work with most button pcb's.
screw posts should be glued down to the case.
no hot glue gun required. use original gb screws.
thingiverse
free

Fallout "BOOM" Box by C0d3Man87
...ch at the top. i did print a "wafer" to hold the internal hardware. hot glued it to the magnet on the bottom speaker.
thingiverse
free

Marine Speaker Filler Panel by PlaneMaker1968
...ot;, a perfect fit for the speakers.
i will come back and edit this "thing" with the exact speakers that i'm using.
thingiverse
free
Arduino Leonardo Pro Micro case with 2 tactile push buttons by szezol
... pull_up resistors.
they can be turned on this way:
...
pinmode(button1pin, input_pullup);
pinmode(button2pin, input_pullup);
...
grabcad
free

Bluetooth Speakers
...luetooth speakers
grabcad
bluetooth speakers features-
- chargable battery
- easy power button
- control by mobile
- extra bass
Airpod
3d_export
$25
airpod
...airpod
3dexport
here is the .sldprt file of airpod.
turbosquid
$35

Airpods
... free 3d model airpods for download as 3ds, max, obj, and fbx on turbosquid: 3d models for games, architecture, videos. (1479140)
3d_export
$5

airpods
...ce. after purchasing this product, this model can be used wherever and however you want. the model is very simple and lightweight
3d_export
free

Airpods model
...airpods model
3dexport
turbosquid
$20

Airpods pro
...free 3d model airpods pro for download as blend, fbx, and obj on turbosquid: 3d models for games, architecture, videos. (1659836)
3d_export
$30

Airpod 3D Model
...airpod 3d model
3dexport
futuristic car
airpod 3d model dtcx94 67347 3dexport
turbosquid
$26

Apple Airpods
... model apple airpods for download as obj, fbx, blend, and dae on turbosquid: 3d models for games, architecture, videos. (1434677)
turbosquid
$1

Apple Airpods 2
...id
royalty free 3d model apple airpods 2 for download as c4d on turbosquid: 3d models for games, architecture, videos. (1671793)
turbosquid
$28

AirPods 3d model
...e 3d model airpods 3d model for download as max, fbx, and obj on turbosquid: 3d models for games, architecture, videos. (1664355)
3d_export
$41
3d airpods pro box and unboxing
... airpod pro, include cable type c, ear tips, airpod pro case, decals. file inculde model 3dm and all decals no include headphones
Bluetooth
3d_ocean
$16
Bluetooth handset
...ooth handset
3docean
bluetooth bluetooth handset concept handset headphone high poly modern music new
high poly bluetooth handset
turbosquid
$35
Bluetooth
... available on turbo squid, the world's leading provider of digital 3d models for visualization, films, television, and games.
3ddd
free
USB-Bluetooth
...luetooth
3ddd
bluetooth
usb-bluetooth с прозрачным корпусом. камера и освещение выставлены. камера проанимирована на презентацию.
3d_export
$5
bluetooth card
...bluetooth card
3dexport
this is a simplified bluetooth card with which you can create cases
turbosquid
$2
Bluetooth Speaker
...royalty free 3d model bluetooth speaker for download as blend on turbosquid: 3d models for games, architecture, videos. (1281743)
turbosquid
$5

Bluetooth Speaker
...y free 3d model bluetooth speaker for download as max and fbx on turbosquid: 3d models for games, architecture, videos. (1336601)
turbosquid
$5
Bluetooth Speaker
...y free 3d model bluetooth speaker for download as max and fbx on turbosquid: 3d models for games, architecture, videos. (1336600)
turbosquid
$5

Bluetooth Speaker
...y free 3d model bluetooth speaker for download as max and fbx on turbosquid: 3d models for games, architecture, videos. (1336599)
turbosquid
$3
Bluetooth speaker
...y free 3d model bluetooth speaker for download as obj and fbx on turbosquid: 3d models for games, architecture, videos. (1165662)
turbosquid
$19

Bluetooth Speaker
...odel bluetooth speaker for download as max, obj, c4d, and fbx on turbosquid: 3d models for games, architecture, videos. (1286177)
Tall
turbosquid
$4

Tall Lamp
...urbosquid
royalty free 3d model tall lamp for download as ma on turbosquid: 3d models for games, architecture, videos. (1618176)
turbosquid
$6

tall can
...d
royalty free 3d model tall can for download as 3dm and max on turbosquid: 3d models for games, architecture, videos. (1671940)
turbosquid
free

Tall Building
...free 3d model tall building for download as obj, fbx, and stl on turbosquid: 3d models for games, architecture, videos. (1392736)
turbosquid
$69

Tall Rock
...y free 3d model tall rock for download as blend, fbx, and obj on turbosquid: 3d models for games, architecture, videos. (1607151)
turbosquid
$15

Nadda tall
...ty free 3d model nadda tall for download as max, obj, and fbx on turbosquid: 3d models for games, architecture, videos. (1394578)
turbosquid
$12
Tall Stand
...ty free 3d model tall stand for download as max, fbx, and obj on turbosquid: 3d models for games, architecture, videos. (1652955)
turbosquid
$10
dieffenbachia tall
...3d model dieffenbachia tall for download as max, max, and max on turbosquid: 3d models for games, architecture, videos. (1557648)
turbosquid
$5

Tall table
...ee 3d model tall table for download as 3ds, obj, c4d, and fbx on turbosquid: 3d models for games, architecture, videos. (1455143)
turbosquid
$35

Pumpkin, tall
... available on turbo squid, the world's leading provider of digital 3d models for visualization, films, television, and games.
turbosquid
$18

Glass_martini-tall
... available on turbo squid, the world's leading provider of digital 3d models for visualization, films, television, and games.
10
turbosquid
$25

10
... available on turbo squid, the world's leading provider of digital 3d models for visualization, films, television, and games.
turbosquid
$10

a-10
... available on turbo squid, the world's leading provider of digital 3d models for visualization, films, television, and games.
3ddd
$1

EX 10
...ex 10
3ddd
samsung , фотоаппарат
ex 10
3ddd
$1

Bed 10
...bed 10
3ddd
постельное белье
bed 10
evermotion
$25

Scene 10 Archinteriors vol. 10
...dering design interior
take a look at textured and shadered visualization scene ready to be rendered.. evermotion 3d models shop.
3ddd
$1

Curtains 10
...curtains 10
3ddd
curtains 10
3ds max 2011,fbx + textures
polys: 100355
3ddd
free

PLANTS 10
...plants 10
3ddd
цветок , горшок
plants 10,, with 3 different color planter boxes
turbosquid
$24

Chandelier MD 89310-10+10 Osgona
... chandelier md 89310-10+10 osgona for download as max and fbx on turbosquid: 3d models for games, architecture, videos. (1218762)
design_connected
$29

Nuvola 10
...nuvola 10
designconnected
gervasoni nuvola 10 computer generated 3d model. designed by navone, paola.
design_connected
$22

Kilt 10
...kilt 10
designconnected
zanotta kilt 10 computer generated 3d model. designed by progetti, emaf.
Printed
design_connected
$27

...print
designconnected
moroso print computer generated 3d model. designed by wanders, marcel.
3ddd
free

Eichholtz Prints
...- eichholtz print central station i
13 - eichholtz print central station ii
14 - eichholtz print marisa
15 - eichholtz print tish
3ddd
$1

Eichholtz Prints
...print abstract - set of 2
10 - eichholtz print orange abstract
11 - eichholtz print buddha right
12 - eichholtz print buddha left
turbosquid
$1

... available on turbo squid, the world's leading provider of digital 3d models for visualization, films, television, and games.
3ddd
free

Eichholtz Prints
...of 4
2 - print dunbar 2 set of 4
3 - print guadeloupe 1 set of 4
4 - print guadeloupe 2 set of 4
5 - print giles
6 - print trett
3ddd
$1

Eichholtz Prints
...nt tutti frutti
3 - eichholtz prints watson - set of 2
4 - eichholtz prints antique nautilus - set of 2
5 - eichholtz print tiara
3d_export
$5

Monster for printing
...monster for printing
3dexport
monster 3d model printing
3ddd
free

printed rug
...printed rug
3ddd
ковер
very creative printed rug
3ddd
free

Eichholtz Prints
...иал: бумага
габариты (вхш): 72 x 62 см
описание: print sweetmeat - постер в деревянной раме.
3 - prints varsity set of 2
арти
3ddd
free

Art Print Posters
...art print posters
3ddd
прованс
art print posters by patrician prints