Cults
FlashForge Creator Pro 2016 - Dual extrusion fan duct
by Cults
Last crawled date: 6 years ago
"You are suggested to use the left extruder to print with PLA, while the right extruder to print with ABS"
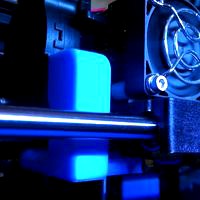
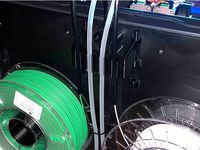
This is a direct quote from the FlashForge Creator Pro 2016 manual, and the only qualm that I have with this printer. After some tests, I confirmed that this printer has the potential to use the right extruder to print in PLA and make excellent dualstrusion prints. The only thing you need is an improved fan duct.
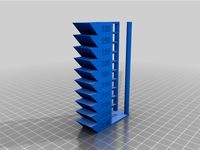
As you can see in the attached photos, this fan duct allows for a visible improvement in print quality and accuracy.
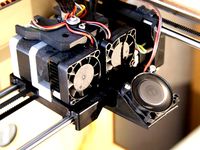
You can replace the stock fan duct with this model easily, without the need to relocate the fan or make any drastic changes to your machine.
Instructions:
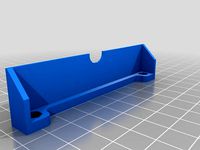
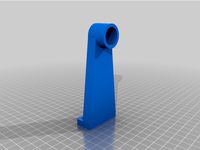
Download and print the STL file in ABS using the recommended print settings.
Make sure that your printer has cooled down before attempting to install this piece
Remove the three bolts that secure the fan to the extruders
Separate the fan from the included duct
Move the fan away from the extruders and check if the new duct fits. Don't force it too much. If you have trouble inserting the new duct, carefully sand it a little.
When you are sure that both parts fit without applying too much force, align the fan in its place (but don't put the bolts yet!)
Install the new fan duct from below, so that it doesn't collide with the bands
Re-install the three bolts to secure the fan to the extruders
I have included the SolidWorks file, so if you have any ideas on how to improve this design, go for it!
This is a direct quote from the FlashForge Creator Pro 2016 manual, and the only qualm that I have with this printer. After some tests, I confirmed that this printer has the potential to use the right extruder to print in PLA and make excellent dualstrusion prints. The only thing you need is an improved fan duct.
As you can see in the attached photos, this fan duct allows for a visible improvement in print quality and accuracy.
You can replace the stock fan duct with this model easily, without the need to relocate the fan or make any drastic changes to your machine.
Instructions:
Download and print the STL file in ABS using the recommended print settings.
Make sure that your printer has cooled down before attempting to install this piece
Remove the three bolts that secure the fan to the extruders
Separate the fan from the included duct
Move the fan away from the extruders and check if the new duct fits. Don't force it too much. If you have trouble inserting the new duct, carefully sand it a little.
When you are sure that both parts fit without applying too much force, align the fan in its place (but don't put the bolts yet!)
Install the new fan duct from below, so that it doesn't collide with the bands
Re-install the three bolts to secure the fan to the extruders
I have included the SolidWorks file, so if you have any ideas on how to improve this design, go for it!
Similar models
thingiverse
free

FlashForge Creator Pro 2016 - Dual extrusion fan duct by Vexelius
... the fan to the extruders
i have included the solidworks file, so if you have any ideas on how to improve this design, go for it!
thingiverse
free

FLASHFORGE CREATOR PRO COOLING FAN DUCT by JOSEBLY
... x 20mm screws needed to mount the turbofan.
-optional copper tape to prevent too much heat on the plastic part.
-printed in abs.
thingiverse
free

FlashForge Dreamer Right Extruder Cooling duct by Willg77
...inal mounting.
v2 is the improved version with better internal air flow, but a bit more complicated to print.
no support required
thingiverse
free
Flashforge/Makerbot Dual 40mm Fan Duct (left or right extruder) by MasterFX
...just a simple fan duct for the flashforge/makerbot dual right extruder to cool the model while printing to improve print quality
thingiverse
free

120 mm fan mount for FlashForge Creator by mikemccand
...nient because you can just lift it off whenever you need full access (e.g. to remove the print), yet it's still quite secure.
thingiverse
free

Fan Duct For Axial Part Cooling Fan - Geeetech A10
...mended. you can find a printable mold for a silicone sock on my thingiverse.
you might need slightly longer screws for the duct.
thingiverse
free
Simplified bracket for Active Cooling Fan Duct - CTC / FlashForge by thruit00
... the inner holes inside of the air way. this adapted version of the duct activeductd4_v1_nohole.stl you can download in my thing.
thingiverse
free

Dual to Single Extruder for Flashforge Creator Pro by schoepsi
...fan, so the new one can be controlled over printer software.
besides some short m3 screws and the fan, u don´t need anything else
thingiverse
free

PowerSpec 3D Pro/FlashForge Creator Pro Screwless (ABS and Acetone) 40mm Fan Duct by eckerj
...print using other materials, but will require superglue or similar adhesive to attach the parts together. it attaches to...
thingiverse
free

Fan Duct (8cm fan) for Geeetech i3 and similar (MK8 extruder) by demonetized
...ecide to print abs (no fan) you need to dismount it. also make sure the fan is always on. i may post some variations to fix this.
Flashforge
thingiverse
free

Flashforge Filiment Guide by russellscanlan
...flashforge filiment guide by russellscanlan
thingiverse
my design to feed filament through the door on a flashforge adventure 3
thingiverse
free

Spool Holder for Creator Pro by ItsDeCia
...a simple re-design of the spool holder for the flashforge creator pro. the barrel is longer and smaller in...
thingiverse
free

Terminator 2 LAPD Badge by trekdolph76
...also know some printers will struggle with this my flashforge creator pro managed it...
thingiverse
free
Flashforge Dreamer V2+ Large Spool Holder - Internal by Kinetic69
...s a stepper motor at the back and using a large diameter spool with this spool holder may mean your spool hits the stepper motor.
thingiverse
free
Quad Filament Feed Tube Holder for Creator Pro by ItsDeCia
...this is a filament feed tube holder for the flashforge creator pro. with this particular model, it has 4...
thingiverse
free

Makita BDF452 Forward/Reverse Replacement Switch by Simcorp69
...for some extra strength. printed in abs on a flashforge good...
thingiverse
free
New Temptower PLA 230-185 Flashforge Adventurer 3 by Frazingo
...rcentage: 15%
print speed: 60 mm/s
first layer speed: 33% / 20mm/s
outline speed: 50% / 30 mm/s
solid infill speed: 50% / 30 mm/s
thingiverse
free

FlashForge Finder Dial indicator mount by Flamingpumpkin
... laying around, remove the 4 screws at the back and use them to mount it to the holder. the hole spacing is 46mm dia x4 hole pcd.
thingiverse
free
FlashForge Finder tool holder by Flamingpumpkin
... 1st 2 layers to 230c to get better adhesion.
there is a radius on everything so there shouldn't he any elephants foot issue.
thingiverse
free

FlashForge Finder filament tube support by Flamingpumpkin
...e this onto your filament cartridge and press in the tube.
honestly the best improvement that i have made to this printer so far.
Duct
3d_export
$25

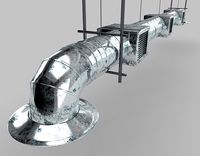
Ventilation pipes 3D Model
...ventilation pipes 3d model 3dexport ventilation pipes duct piping tubes tubing вентиляционные трубы трубопровод вентиляция ventilation pipes...
3d_ocean
$7
Air-duct
... ventilation
high quality industrial air duct ventilation model. created in cinema 4d but comes in various other formats as well.
cg_studio
$20
Aquaduct3d model
... plumbing rome roman ancient aqua duct
.max - aquaduct 3d model, royalty free license available, instant download after purchase.
3d_export
$15
Concrete Drainage Tube 3D Model
...conveyance circular site gases liquid flow water sewerage sewer duct concrete drainage tube 3d model download .c4d .max .obj...
3d_ocean
$3
Duct tape
...polys. includes: cinema 4d project. model in 3 formats (obj, fbx, 3ds). 6 .tga texture maps (albedo, ambient occlusion, diffus...
3d_export
$5
Air bypass valve 3D Model
...air bypass valve 3d model 3dexport valve; pipe; tube; duct flap;vent; piston; valvula air bypass valve 3d model swan...
3d_export
$7

Lian Li AD06Bb 3D Model
...3dexport lian li aluminum 120mm fan cooler with air duct black ad-06b-b lian li ad06bb 3d model mackandco 37935...
3d_export
$40
Lian Li parts pack vol1 3D Model
...mounting kit vent filter thumb screws fan cooler air duct 120mm spider guard anti-vibration lian li parts pack vol1...
3d_export
$23

Blood Cells Sickle Anemia also 3D Model
...ray micro virus bacterium bacteria medical science sick vein duct blood cells sickle anemia also 3d model duchampmodels 7867...
3d_export
$25
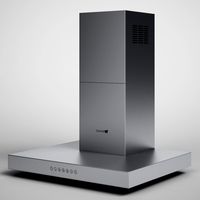
CGAxis Cooker Exhaust Fan Hood 18 3D Model
...detailed textures materials stainless steel exhaust fan hood extractor duct ventilator cgaxis cooker exhaust fan hood 18 3d model...
Extrusion
3d_export
$300
melt-blown fabric extrusion molding machine
...an email to me.<br>designed with solidworks 2017, render with photoview 360<br>**************************************
3d_export
$10
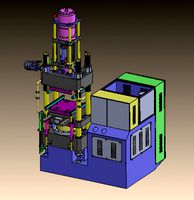
glue injection machine
...injection technology. the ordinary glue injection machine is screw extrusion type, and its instantaneous pressure can reach more than...
3d_export
$7

wireline
...from the ceiling, the cable holds a ribbed glass extrusion containing an led light source. the lamp plays on...
3d_export
$5

one-eyed scary virus
...cinema, the body relief is formed by the standard extrusion noise. the eye texture is...
3d_export
$5

Spaceship - Galaxy Crusher
...with a more ominous twist. it has lots of extrusion and cubes and comes with a whopping 4k texture,...
3d_export
free

30 x 30 extrusion
... x 30 x 40.sldprt<br>30 x 30 x 50.sldprt<br>30 x 30 x 606.sldprt<br>the sketch.sldprt<br>30 x 30 x 40.stl
3d_export
$1000
bead triangle adhesive laminating machine
...a triangular rubber head with the shape required for extrusion the rear end of the extruder is also provided...
3d_export
$20
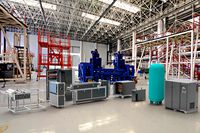
1600 Meltblown cloth production line set drawing CAD
...width of 1600mm. the steel structure frame, feeding host, extrusion screw, heating system, screen changer, metering pump, melting it...
3d_export
$20

GE TF34 Fan Blade and Nose Cone
...and appropriately sized fillet features are provided.<br>also, a threaded extrusion profile is provided on the fan blade component and...
turbosquid
$5

Cable Cover Extrusion
... available on turbo squid, the world's leading provider of digital 3d models for visualization, films, television, and games.
Creator
3ddd
$1

J.L. Lobmeyr Illuminated Mirror
...j.l. lobmeyr illuminated mirror 3ddd lobmeyr creator j.l. lobmeyr (designer) materials and techniques: mirror, crystal, brass...
3ddd
$1
Grand 1800s Wheeler Mirrored Lamp
...wheeler , grand https://www.1stdibs.com/furniture/lighting/chandeliers-pendant-lights/grand-1800s-wheeler-mirrored-lamp/id-f_3456232/ grand 1800s wheeler mirrored lamp creator wheeler reflector company (manufacturer) of the period: industrial place...
3ddd
$1

A Pair of Unique Blue Glass and Nickel Lamps
...unique blue glass and nickel lamps price upon request creator roberto giulio rida (artist) of the period: modern country:...
3ddd
$1

Large Palwa Gilded Brass and Crystal Mirror
...gilded brass and crystal mirror 3ddd palwa , круглое creator palwa (manufacturer) in the style of: hollywood regency materials...
3d_ocean
$12

Low Poly Wild West Sheriff Office
...sheriff wild west another low poly for wild west creator. this set is designed for games which are developed...
3d_ocean
$50
3D Dungeon Pack
...and companies who dont have acess to 3d model creator or have the skill to create their own 3d...
3d_ocean
$19

Lego house
...lego house 3docean brick construction creator house lego set toy building block this is a...
3d_ocean
$39

Train Track Creator Pro
...n tracks, for video game or rendering in a matter of minutes. all the models in this pack are low poly with high resolution te...
3ddd
free
2 Dining Table + Trus Coffee Table
...dining table in black nickel by charles hollis jones creator charles hollis jones (designer) in the style of: mid-century...
3ddd
free

Venini Two Tier Textured Glass Fixture
...textured glass fixture 3ddd venini price: price upon request creator venini (manufacturer) place of origin: italy date of manufacture:...
Dual
3d_export
$49

LG L70 Dual Black 3D Model
... cellular 2g 3g ips lcd
lg l70 dual black 3d model download .c4d .max .obj .fbx .ma .lwo .3ds .3dm .stl humster3d 103896 3dexport
3d_export
$49

Nokia 225 Red 3D Model
...3dexport nokia 225 cell phone mobile cellular 2g keyboard dual tft lcd red nokia 225 red 3d model download...
3d_export
$49

LG L65 Dual White 3D Model
...ouchscreen touch screen
lg l65 dual white 3d model download .c4d .max .obj .fbx .ma .lwo .3ds .3dm .stl humster3d 103755 3dexport
3ddd
$1

Мобильный телефон Nokia Asha 210 dual-sim
...ual-sim
3ddd
nokia , телефон
profi 3д модель мобильного телефона nokia asha 210 dual-sim
3d_ocean
$15

Microsoft Lumia 535 Orange
...microsoft lumia 535 orange 3docean android cell dual lumia microsoft nokia phone sim smart windows - realistic,...
3d_ocean
$17

SMA's Dual Material Packs-Porcelain for Cinema 4D
...tion: this is my dual material series based on custom made hi-res 4k porcelain textures. the library contains 20 material. 10 ...
3d_ocean
$15

Element 3D - Microsoft Lumia 535 Green
...3d - microsoft lumia 535 green 3docean android cell dual lumia microsoft nokia phone sim windows - realistic, detailed...
3d_ocean
$15

Microsoft Lumia 535 White
...microsoft lumia 535 white 3docean android cell dual lumia microsoft nokia phone sim windows - realistic, detailed...
3d_ocean
$25

SMA's Dual Material Pack - Wood-S02 - Parquet C4D
...arquet description: here i present you with wood series 02 – parquet dual materials library for cinema 4d. all textures used a...
3d_ocean
$10
Modular Dungeon Set|Dual Teeth Wall Pack (8 of 20)
...ngeon set. (also has an all-in-one pack if you plan on buying them all) this dual teeth wall pack comes with a high quality lo...
Fan
3d_export
$5

Ceiling fan 3D Model
...ort
ceiling room fan extractor extract interior 3d model light bulb blade rotor lamp
ceiling fan 3d model mimicmwb 24939 3dexport
3ddd
$1

STEALTH FAN
...stealth fan
3ddd
вентилятор
model included with texture
3d_ocean
$15

Westinghouse fan
...tinghouse fan, a great vintage interior set piece. all file formats are tested and work as they should and are subdivision ready.
3d_ocean
$39

Low Poly urban pack
...low poly urban pack 3docean bank buildings city dumpster fan fence flat furniture garbage generator high voltage hotel low...
3d_ocean
$7

Plane Low Poly (rigged)
...low poly low poly plane rigged vehicles wings plane fan and plane wheel door (open – close) rigged materials...
3d_ocean
$85

Scion FR S Cabrio 2015
...made at direction of the author and created for fan . so if you...
3d_ocean
$4

Facebook Like Thumb Up Hand Icon
...hand icon 3docean business button click clicked clicking facebook fan follow friendship internet like liked mouse social media thumbs...
cg_studio
$50

Baseball Stadium arena3d model
...sport arena game field city athletics sports audience crowd fan olympic dugout .obj .3ds .fbx .max - baseball stadium...
cg_studio
$35

Baseball stadium pitch diamond low poly3d model
...sport arena game field city athletics sports audience crowd fan olympic dugout .max .fbx .3ds .obj - baseball stadium...
3ddd
$1
TEFCOLD Минибар BA10H
...мини бар , бар product features: interior led light fan assisted cooling double glazed reversible door 2 adjustable shelves...
2016
3d_export
$99

Mercedes Benz A180 Eco 2015 3D Model
...a180 eco 2015 3d model 3dexport 2014 car 2015 2016 compact mercedes-benz germany eco hatchback 2017 a180 mercedes benz...
3d_export
$99

Suzuki Jimny 2013 3D Model
...model 3dexport suzuki jimny wide sierra 2013 2014 2015 2016 2-door suv crossover off-road 4x4 mini compact small japan...
3d_export
$99

MercedesBenz Axor Tractor Truck 2011 3D Model
...tractor mercedes benz 3-axis 2011 2012 2013 2014 2015 2016 truck heavy duty trucks industrial mercedesbenz axor tractor truck...
3d_export
$99

Jeep Grand Cherokee SRT 2014 3D Model
...3d model 3dexport 2013 2014 american v8 usa 2015 2016 suv crossover allterrain offroad 4x4 grand 2017 jeep cherokee...
3d_export
$99

Toyota Yaris 2012 5door 3D Model
...yaris 2012 5-door 5d 3d 3-door 2013 2014 2015 2016 hatchback japan small city car toyota yaris 2012 5door...
3d_export
$99

Volkswagen Santana 2014 3D Model
...santana 2014 3d model 3dexport 2012 2013 2014 2015 2016 sedan saloon volkswagen vw 2017 asia china santana asian...
3d_export
$119

Lexus NX 2015 3D Model
...lexus nx 2015 3d model 3dexport 2014 japan 2016 luxury suv allterrain offroad 4x4 hybrid lexus 2017 nx...
3d_export
$99

Volkswagen Golf VII R 5door 2015 3D Model
...vii r 5door 2015 3d model 3dexport 2014 2015 2016 sport germany hatchback 5-door volkswagen vw detailed interior golf...
3d_export
$129

Scania R1000 2014 AeroTrailer 3D Model
...2014 aerotrailer 3d model 3dexport aero 2013 2014 2015 2016 truck concept prototype tractor 2017 semi transport scania r1000...
3d_export
$99

MercedesBenz Sprinter Passenger Van 2014 3D Model
...van 2014 3d model 3dexport 2013 2014 car 2015 2016 mercedes mb mercedes-benz germany benz van minivan minibus passenger...
Pro
3d_export
$59

Microsoft Surface with Touch Cover 3D Model
...surface with touch cover 3d model 3dexport microsoft surface pro type touch windows windows wifi tablet computer pc mobile...
3d_export
$99

Kia Pro Ceed 3door hatchback 2011 3D Model
...y hatchback hatch estate europe hyundai i30 south korea forte
kia pro ceed 3door hatchback 2011 3d model humster3d 50040 3dexport
3d_export
$99

Kia Pro Ceed 2014 3D Model
...rt
kia pro ceed 2014 2015 2016 2013 3-door hatchback compact city south korea
kia pro ceed 2014 3d model humster3d 64388 3dexport
3ddd
$1
Aviation PRO
... aviation
http://www.oligo.de/en/products/system-luminaires/prod/st-aviation-pro-1.html
3d_ocean
$15

Low Poly iPad Pro
...an
apple display flat gold golden icons ios ipad ipad pro mac macintosh osx screen style tablet touch
ipad pro with only 86 faces
3d_ocean
$17

Apple Mac Pack
...iphone 6s iphone 7 mac macbook model photo-realistic pink pro silver smart phone smartphone touchscreen in this pack you...
3d_export
$26

5Zigen Pro Racen GN 3D Model
...l brembo brakes
5zigen pro racen gn 3d model download .c4d .max .obj .fbx .ma .lwo .3ds .3dm .stl rajanbharti1991 113385 3dexport
3d_export
$129

Kia PRO Ceed GT 2016 3D Model
...thatch 3door 3d 2018 pro
kia pro ceed gt 2016 3d model download .c4d .max .obj .fbx .ma .lwo .3ds .3dm .stl squir 106728 3dexport
3d_ocean
$5

LowPoly Trees .Pack10
...cartoon day game low lowpoly materials nature pack poly pro tree trees *originally created in blender 3d. exported to...
3ddd
$1

TMK-Pro Garden Swings Polycarbonate
... модификаторов открыт. геометрию можно легко модифицировать, увеличить количество полигонов для близких планов при необходимости.